Atmos Terraform Drift Detection
The "Atmos Terraform Drift Detection" and "Atmos Terraform Drift Remediation" GitHub Actions provide a scalable pattern for detecting and remediating Terraform drift from within GitHub by utilizing a combination of scheduled GitHub Workflows and GitHub Issues.
The "Atmos Terraform Drift Detection" will determine drifted Terraform state by running Atmos Terraform Plan and creating GitHub Issues for any drifted component and stack. Furthermore, "Atmos Terraform Drift Remediation" will run Atmos Terraform Apply for any open Issue if called and close the given Issue. With these two actions, we can fully support drift detection for Terraform directly within the GitHub UI.
These actions are intended to be used together with Atmos Terraform Plan and Atmos Terraform Apply.
Features
This GitHub Action incorporates superior GitOps support for Terraform by utilizing the capabilities of Atmos, enabling efficient management of large enterprise-scale environments.
- Implements Native GitOps with Atmos and Terraform.
- No hardcoded credentials. Use GitHub OIDC to assume roles.
- Compatible with GitHub Cloud & Self-hosted Runners for maximum flexibility.
- Beautiful Job Summaries don't clutter up pull requests with noisy GitHub comments.
- Automated Drift Detection Regularly check and track all resources for drift.
- Free Tier GitHub Use GitHub Issues to track drifted resources.
- 100% Open Source with Permissive APACHE2 License means you have no expensive subscriptions or long-term commitments.
Usage Example
Drift Detection with Atmos requires two separate workflows.
Atmos Terraform Drift Detection
First, we trigger the "Atmos Terraform Drift Detection" workflow on a schedule. This workflow will gather every single component and stack in the repository. Then using that list of components and stacks, run atmos terraform plan <component> --stack <stack> for the given component and stack. If there are any changes, the workflow will create a GitHub Issue.
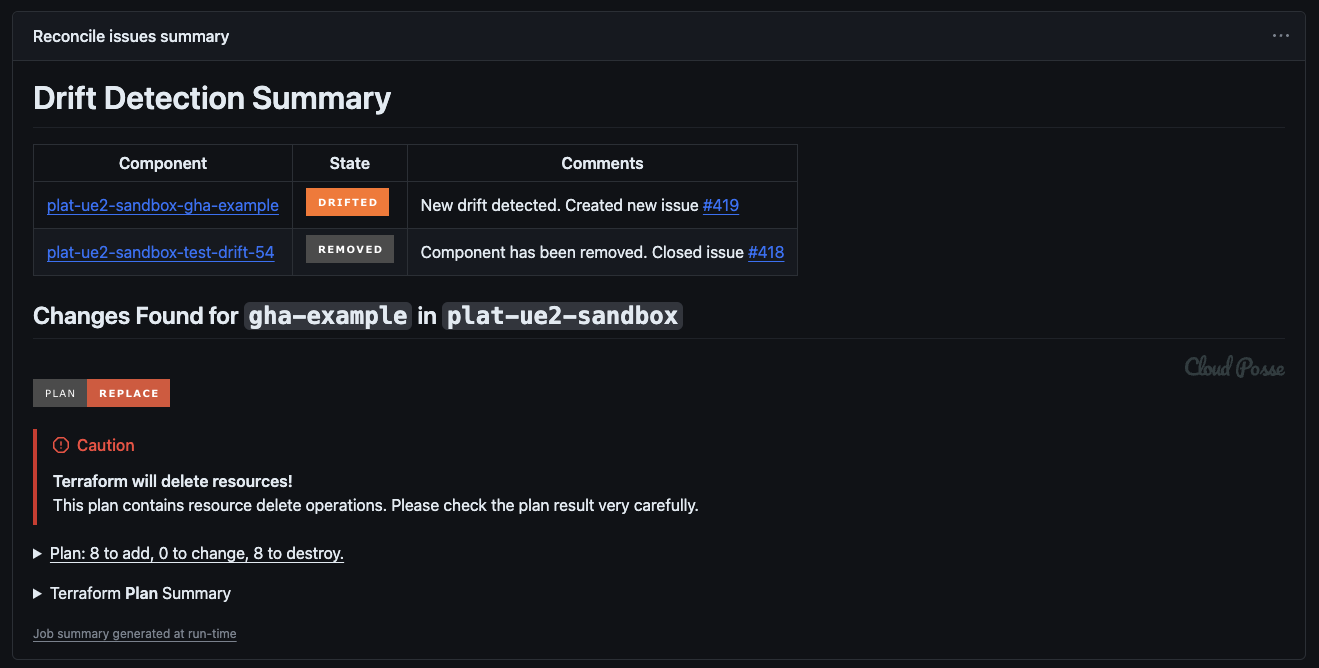
For example in this screenshot, the workflow has gathered two components. Only one has drift, and therefore one new Issue has been created.

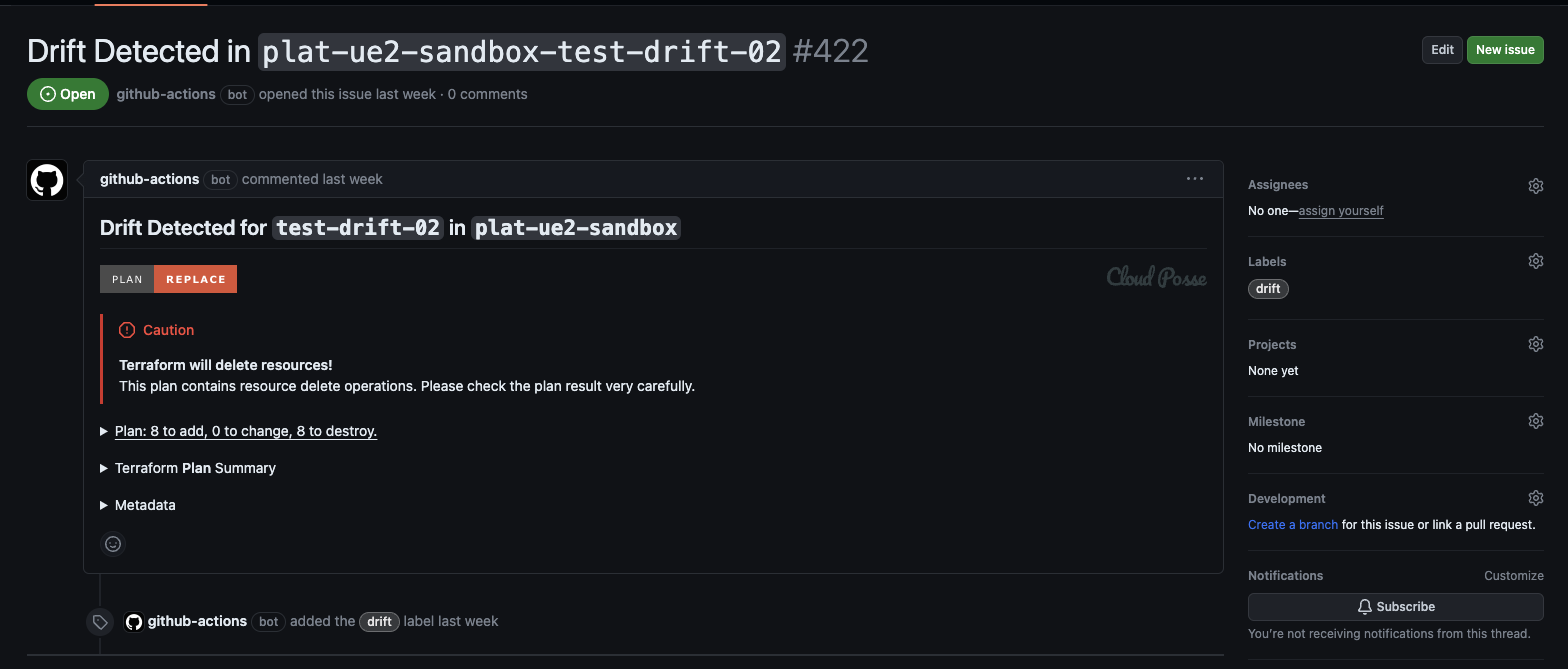
Now we can see the new Issue, including a Terraform Plan summary and metadata for applying.

Without a limit, the number of Issues for drifted components can quickly get out-of-hand. In order to create a more manageable developer experience, set a limit for the maximum number of Issues created by the "Atmos Terraform Drift Detection" action with max-opened-issues.
The default value is 10.
See cloudposse/github-action-atmos-terraform-drift-detection for details.
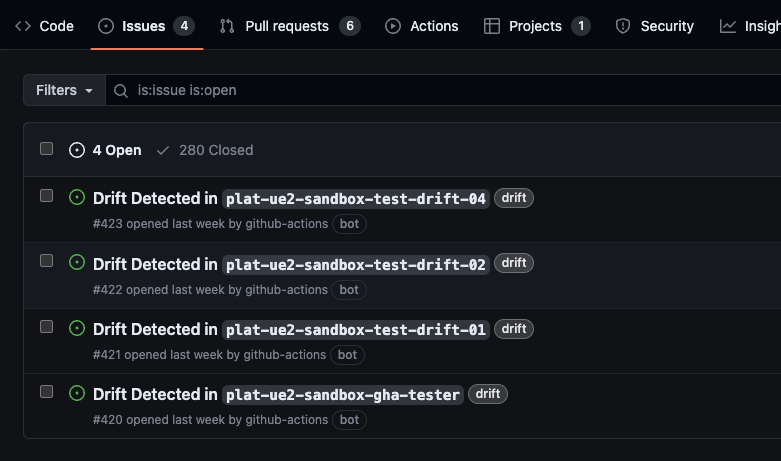
We can quickly see a complete list of all drift components in the "Issues" tab in the GitHub UI.

Usage Example
atmos-terraform-drift-detection.yaml
256 Matrix Limitation
GitHub Actions support 256 matrix jobs in a single workflow at most, ref.
When planning all stacks in an Atmos environment, we frequently plan more than 256 component in the stacks at a time. In order to work around this limitation by GitHub, we can add an additional layer of abstraction using reusable workflows.
For example, the "Atmos Terraform Plan" workflow can call "Atmos Terraform Plan Matrix" workflow which then calls the "Atmos Terraform Plan" Composite Action.
Atmos Terraform Drift Remediation
Once we have an open Issue for a drifted component, we can trigger another workflow to remediate the drifted Terraform resources. When an Issue is labeled with apply, the "Atmos Terraform Drift Remediation" workflow will take the component and stack in the given Issue and run atmos terraform apply <component> --stack <stack> using the latest Terraform Planfile. If the apply is successful, the workflow will close the given Issue as resolved.
Usage Example
atmos-terraform-drift-remediation.yaml
Requirements
This action has the requirements as Github Actions. Use the same S3 Bucket, DynamoDB table, IAM Roles and config described there.

