Your First Environment on AWS
Intro
Up until now, our tutorial content has been been primarily using contrived examples to enable folks to get up to speed with some of the more fundamental SweetOps concepts and tools. This tutorial will be a bit different in that we'll actually get something deployed to your AWS account so you can see how SweetOps works in a more concrete way.
Prerequisites
System Requirements
To accomplish this tutorial, you'll need the following:
- Git
- Docker
- An AWS test account and credentials for that account added to Leapp using the "default" profile so they're ready to be used in Geodesic.
- We recommend Administrator privileges to make everything easy, but you can likely get away with credentials that only allow S3, CloudFront, and DynamoDB access.
- If you haven't set this up before, check out the Geodesic how-to on authenticating with Leapp.
Understanding
Prior to starting this tutorial, you should be sure that you understand our various concepts and terminology and have gone through our Getting started with Geodesic and Getting started with Atmos tutorial because we'll be building upon the knowledge in both of those tutorials.
Tutorial
1. Clone the Tutorials Repository + Run the tutorials Image
As part of this tutorial (and others following in our tutorial series), we will utilize our tutorials repository. This repository includes code and relevant materials for you to use alongside this tutorial walkthrough.
Let's clone it to your local machine and cd into it:
git clone git@github.com:cloudposse/tutorials.git

cd tutorials
Now that we've got our code, we'll want to interact with it using our standard set of tools. Following the SweetOps methodology, we will use a docker toolbox, a Docker image built on top of Geodesic. This entire tutorials repository is actually Dockerized to make that part easy, so let's run our cloudposse/tutorials image:
# Run our docker image
docker run -it \
          --rm \
          --volume "$HOME":/localhost \
          --volume "$PWD":/tutorials \
          --name sweetops-tutorials \
          cloudposse/tutorials:latest;
This will pull the tutorials image to your local machine, run a new container from that image, and mount the various tutorial folders so you can edit them on your host machine or in the container and the changes will propagate either direction.
Now that we're running inside of our container, let's start a new shell as your AWS profile and get into our specific tutorial directory:
cd /tutorials/03-first-aws-environment
Troubleshooting tip: If you are logged in with Leapp using profile "default", you should already be authenticated in Geodesic and see a green "√" at the beginning of the command line prompt. If you are logged in with a different profile name, configure Geodesic to use it by running
export AWS_PROFILE=profile-namewhere "profile-name" is the Named Profile in your Leapp session. If you have the profile names in sync but you see a red "✗" instead of the green "√", review the How-To on authenticating with Leapp and get that working before proceeding further.
This 03-first-aws-environment/ directory that you're now in should be looking a little bit familiar from our atmos tutorial:
- We've got a
components/directory which holds terraform components that we're looking toapplyto our AWS Account. - We've got a
stacks/directory which holds the declarative descriptions of 3 environments:uw2-dev.yaml: Our dev environment hosted in us-west-2.uw2-prod.yaml: Our prod environment hosted in the same region.ue2-root.yaml: Our global resources hosted in us-east-2.
- We've also got a
bin/random-pet.shfile that we'll discuss shortly.
Cool, let's jump into our next step and actually do something with this small project.
2. Build and generate our tfstate-backend for this project
In our last tutorial, we showed atmos being used to apply some fairly simple terraform projects that didn't actually create any resources in the cloud. For this tutorial however, we're going to be making a simple static site in AWS and as part of that we should be sure to follow one of the most important best practices in terraform: Use remote state. Luckily, atmos and stacks make that easy on us by providing a simple abstraction layer to configure all our terraform components with a single backend config. In this example, we'll be using the S3 backend and the tfstate-backend component to automate the resources we need for that backend, so let's dive into that:
- To start off, we need to do something funky to generate unique resource names. This is due to this tutorial being used by many people, so it's not something a normal project setting would need. The reasoning is that this tutorial is creating S3 buckets and their names need to be globally unique across all AWS accounts. To make that easy on you, we've included a little helper script (
bin/random-pet.sh) which was mentioned previously. This small script generates some random pet names and utilizesyqto update some of our stack files to include those random names. Let's run that now:
bin/random-pet.sh
This should update most of our stack and catalog files to now include uniquely generated names.
- Next, we need to get our
tfstate-backendcomponent deployed using local state before we can actually utilize any backend. This is a good example of the chicken or the egg problem, so it's a bit funky but luckily we only need to do this initial set of steps once for all components. To get started let's plan and apply ourtfstate-backendcomponent:
atmos terraform plan tfstate-backend --stack ue2-root

# Check the plan looks good and doesn't have 'TODO' anywhere if so, be sure to run `bin/random-pet.sh`)
atmos terraform apply tfstate-backend --stack ue2-root
This will provision our S3 bucket + Dynamo DB table for usage as our backend.
- Next, let's generate the configuration for that backend:
atmos terraform generate backend tfstate-backend --stack ue2-root
This will look at our stack, find the imported terraform.backend.s3 configuration and build a valid backend.tf.json file and put it in our component directory. Then going forward, whenever we plan or apply against that component it will be properly configured to use that S3 backend.
- Now that we have our
backend.tf.jsonfile, we can change over ourtfstate-backendcomponent from using local state to its S3 backend:
atmos terraform plan tfstate-backend --stack ue2-root
This will prompt you with the following:
Do you want to migrate all workspaces to "s3"?
Both the existing "local" backend and the newly configured "s3" backend
support workspaces. When migrating between backends, Terraform will copy
all workspaces (with the same names). THIS WILL OVERWRITE any conflicting
states in the destination.

Terraform initialization doesn't currently migrate only select workspaces.
If you want to migrate a select number of workspaces, you must manually
pull and push those states.

If you answer "yes", Terraform will migrate all states. If you answer
"no", Terraform will abort.

Enter a value:
Enter "yes" and this will migrate our local state to our S3 backend. Success!
- Now that we've migrated our single "chicken or the egg" component, we'll want to generate the
backend.tf.jsonfile for our other components as well considering we'll want them to use the S3 backend too. Luckily for us, there is only one, simple component as part of this tutorial:components/terraform/static-site. Let's go ahead and generate the backend config for that component:
atmos terraform generate backend static-site --stack uw2-dev
Exactly the same as for our tfstate-backend component, our atmos backend generate command will put a backend.tf.json file in our components/terraform/static-site/ directory so that component will always utilize the correct backend. If this were a real project that we were working on and practicing proper GitOps, then we'd actually check those files into git so that our backend configuration would persist going forward, but since this is a tutorial we'll skip that step.
3. Apply our Static Site
Next, let's move onto applying our static-site component to actually build something real on AWS. Well that's pretty simple actually:
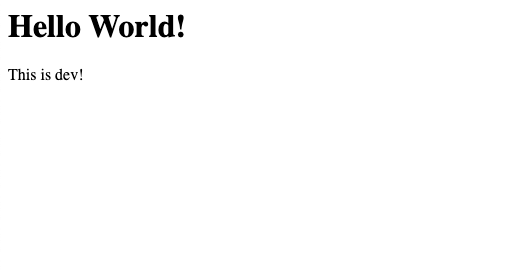
atmos terraform deploy static-site --stack uw2-dev
This command will plan and apply our static-site component with our configuration specified in our stacks/uw2-dev.yaml stack. This should output something similar to the following at the end:
Apply complete! Resources: 7 added, 0 changed, 0 destroyed.

Outputs:

domain_name = "CLOUDFRONT_ID.cloudfront.net"
s3_bucket_name = "acme-uw2-dev-static-site-RANDOM_PET-origin"
If you copy the domain_name value and paste it into your browser then you should see our simple static site!
As you can see, this deploys our static site for our dev environment, but not our prod environment. This tutorial won't cover deploying the prod environment, but feel free to play around with the variables if you would like to mess around with it!
Conclusion
In this tutorial, we've given you a bit more of taste of what it looks like to work on a real project while following the SweetOps methodology:
- We've seen real world components:
tfstate-backendandstatic-site. These are sharable root modules that you didn't need write yourself or touch to get up and running, you just need to supply the configuration. We have a whole library of components (whichtfstate-backendis one of) over atcloudposse/terraform-aws-components. - We utilized
atmosto deploy our terraform state backend for our various components and then also generate thebackend.tf.jsonfiles to ensure our components are properly being built from a central configuration in ourstacks/directory. - You now have an example of what it looks like to organize stack configurations for different environments and regions. This is immensely important and is why SweetOps is so powerful: Our stacks centrally define our environments, where they're deployed, and how they're configured; the components are completely agnostic to their environment and only responsible for business logic. This separation is critical to building reusable, composable infrastructure. Not to mention, we ensure that critical configurations are declared as code and not just committed to the memory of a few senior engineers.
With this knowledge, you're now ready to actually build projects on AWS using the SweetOps methodology!

