# atmos
> Universal tool for DevOps and Cloud Automation
This file contains all documentation content in a single document following the llmstxt.org standard.
## Best Practices
import DocCardList from '@theme/DocCardList'
> Physics is the law, everything else is a recommendation.
> Anyone can break laws created by people, but I have yet to see anyone break the laws of physics.
> — **Elon Musk**
Learn how to best leverage Stacks and Components together with Atmos.
---
## Component Best Practices
import Intro from '@site/src/components/Intro'
Here are some essential best practices to follow when designing architectures using infrastructure as code (IaC), focusing on optimizing
component design, reusability, and lifecycle management. These guidelines are designed to help developers and operators build efficient,
scalable, and reliable systems, ensuring a smooth and effective infrastructure management process.
Also, be sure to review the [Terraform Best Practices](/best-practices/terraform) for additional guidance on using Terraform with Atmos.
> Physics is the law, everything else is a recommendation.
> Anyone can break laws created by people, but I have yet to see anyone break the laws of physics.
> — **Elon Musk**
## Keep Your Components Small to Reduce the Blast Radius of Changes
Focus on creating single purpose components that small, reusable components that adhere to the UNIX philosophy by doing one thing well.
This strategy leads to simpler updates, more straightforward troubleshooting, quicker plan/apply cycles, and a
clearer separation of responsibilities. Best of all, your state remains small and complexity remains manageable.
Anti-patterns to avoid include:
- Combining VPCs with databases in the same component
- Defining every dependency needed by an application in a single component (provided there's no shared lifecycle)
## Split Components By Lifecycle
To keep your component small, consider breaking them apart by their Software Development Lifecycle (SDLC).
Things that always change together, go together. Things that seldom change together, should be managed separately.
Keep the coupling loose, and use remote state for cohesion.
For instance, a VPC, which is rarely destroyed, should be managed separately from more dynamic resources like clusters
or databases that may frequently scale or undergo updates.
## Make Them Opinionated, But Not Too Opinionated
Ensure components are generalized to prevent the proliferation of similar components, thereby promoting easier testing,
reuse, and maintenance.
:::important Don't Treat Components like Child Modules
Don't force users to use generic components if that will radically complicate the configuration.
The goal is to make 80% of your infrastructure highly reusable with generic single purpose components.
The remaining 20% might need to be specialized for your use case, and that's okay.
:::
## Avoid Single Resource Components
If you find yourself writing a component that is so small, it manages only a single resource e.g. (an IAM Policy),
consider if it should be part of a larger component.
:::tip Stack Configurations are Not a Replacement for Terraform
The biggest risk for newcomers to Atmos is to over architect components into extremely DRY single-purpose components.
Stack configurations in YAML should not just be a proxy for terraform resources.
Use terraform for its strengths, compliment it with YAML when it makes sense for very straight forward configuration.
:::
## Use Parameterization, But Avoid Over-Parameterization
Good parameterization ensures components are reusable, but components become difficult to test and document with too many parameters.
Often time, child modules might accept more parameters than the root module. You can always add more parameters to the root module
as needed, but it's hard to remove them once they are there.
## Avoid Creating Factories Inside of Components
[Factories are common software design patterns](https://en.wikipedia.org/wiki/Factory_(object-oriented_programming)) that allow you
to create multiple instances of a component.
To minimize the blast radius of changes and maintain fast plan/apply cycles, do not embed factories within components that
provision lists of resources.
Examples of anti-patterns include:
- Reading a configuration file inside of Terraform to create multiple Buckets
- Using a `for_each` loop to create multiple DNS records from a variable input
(you may hit rate limits when you zones get large enough; it's happened to us)
Instead, leverage [Stack configurations to serve as factories](/core-concepts/stacks) for provisioning multiple component instances.
This approach keeps the state isolated and scales efficiently with the increasing number of component instances.
Please note, it's perfectly fine to use `for_each` loops sometimes to provision groups of resources, just use them with moderation
and be aware of the potential downsides, such as creating massive states with a wide blast radius. For example, maybe you can safely manage a collection of resources this way.
:::note Do as we say, not as we do
It is with humility that we state this best practice. Even many of our own Cloud Posse components, do not follow this because
they were written before we realized the overwhelming benefits of this approach.
:::
## Use Components Inside of Factories
Google discusses the "factories" approach in the post [Resource Factories: A descriptive approach to Terraform](https://medium.com/google-cloud/resource-factories-a-descriptive-approach-to-terraform-581b3ebb59c). This concept is familiar to every major programming framework, and you can apply it to Terraform too.
However, unlike Google's approach of creating the factory inside the component ([which we don't recommend](#avoid-creating-factories-inside-of-components)), we suggest using the stack configuration as the factory and the component as the product.
By following this method, you create a single component for a specific purpose, such as a VPC, database, or Kubernetes cluster. Then, you can instantiate multiple instances of that component in your stack configuration.
In the factory pattern, the component acts like the "factory class," and when defined in the stack configuration, it is used to create and configure multiple component instances.
A component provides specific functionality but is not responsible for its own instantiation or configuration; this responsibility is delegated to the factory.
This approach decouples your architecture from the configuration, resulting in smaller state files and independent lifecycle management for each instance. Most importantly, it maximizes the reusability of your components.
## Use Component Libraries & Vendoring
Utilize a centralized [component library](/core-concepts/components/library) to distribute and share components across the
organization efficiently. This approach enhances discoverability by centralizing where components are stored, preventing
sprawl, and ensuring components are easily accessible to everyone. Employ vendoring to retrieve remote dependencies, like
components, ensuring the practice of immutable infrastructure.
## Organize Related Components with Folders
Organize multiple related components in a common folder. Use nested folders as necessary, to logically group components.
For example, by grouping components by cloud provider and layer (e.g. `components/terraform/aws/network/`)
## Document Component Interfaces and Usage
Utilize tools such as [terraform-docs](https://terraform-docs.io) to thoroughly document the input variables and outputs
of your component. Include snippets of stack configuration to simplify understanding for developers on integrating the component
into their stack configurations. Providing examples that cover common use-cases of the component is particularly effective.
## Version Components for Breaking Changes
Use versioned folders within the component to delineate major versions (e.g. `/components/terraform//v1/`)
## Use a Monorepo for Your Components
For streamlined development and simplified dependency management, smaller companies should consolidate stacks and components
in a single monorepo, facilitating easier updates and unified versioning. Larger companies and enterprises with multiple monorepos
can benefit from a central repository for upstream components, and then use vendoring to easily pull in these shared components to
team-specific monorepos.
## Maintain Loose Coupling Between Components
Avoid directly invoking one component from within another to ensure components remain loosely coupled. Specifically for Terraform
components (root modules), this practice is unsupported due to the inability to define a backend in a child module, potentially
leading to unexpected outcomes. It's crucial to steer clear of this approach to maintain system integrity.
## Reserve Code Generation as an Escape Hatch for Emergencies
We generally advise against using code generation for application logic (components), because it's challenging to ensure good test
coverage (e.g. with `terratest`) and no one likes to code review machine-generated boilerplate in Pull Requests.
If you find yourself in a situation that seems to require code generation, take a step back and consider if that's the right approach.
- Do not code generate providers to [overcome "limitations" in Terraform](https://github.com/hashicorp/terraform/issues/19932#issuecomment-1817043906),
for example, to iterate over providers. This is a red flag. Instead, architect your components to work with a single provider
- If you are programmatically combining several child modules, consider if they should instead be separated by lifecycle.
When you follow these rules, root modules become highly reusable, and you reduce the amount of state managed by a single component,
and therefore, the blast radius of changes.
## Separate Your State by Region
For Disaster Recovery purposes, always strive to keep the state of your components separate by region.
You don't want a regional outage to affect your ability to manage infrastructure in other regions.
## Limit Providers to One or Two Per Component
Avoid using multiple providers in a single component, as it reduces the reusability of the component and increases
the complexity and blast radius of what it manages.
Consider instead "hub" and "spoke" models, where each spoke is its own component with its own lifecycle.
In this model, the "spoke" will usually have two providers, one for the current context and one for the "hub."
---
## Stacks Best Practices
import Intro from '@site/src/components/Intro'
Here are some essential best practices to follow when designing the Stack configurations that describe your architectures. These guidelines are intended to help developers and operators think about how they model the configuration of their infrastructure in Atmos, for maximum clarity and long-term maintainability.
> Physics is the law, everything else is a recommendation.
> Anyone can break laws created by people, but I have yet to see anyone break the laws of physics.
> — **Elon Musk**
## Define Factories in Stack Configurations
Avoid creating factories inside of components, which make them overly complicate and succumb to their massive state.
Instead, use stack configurations to serve as factories for provisioning multiple component instances.
This approach keeps the state isolated and scales efficiently with the increasing number of component instances.
## Treat Stack Templates like an Escape Hatch
Apply them carefully and only when necessary. Using templates instead of inheritance can make stack configurations complex
and hard to manage. Be careful using stack templates together with the [factory pattern](#define-factories-in-stack-configurations).
The simplest templates are the best templates. Using variable interpolation is perfectly fine, but avoid using complex logic,
conditionals, and loops in templates. If you find yourself needing to do this, consider if you are solving the problem in the right way.
## Avoid Too Many Levels of Imports
It's very difficult for others to follow relationships when there are too many nested levels and overrides.
:::warning Complexity rashes
**If you have more than (3) levels of imports, you're probably developing a complexity rash.**
Overly DRY configurations can lead to complexity rashes that are difficult to debug and maintain,
and impossible for newcomers to understand.
:::
## Balance DRY Principles with Configuration Clarity
Avoid overly DRY configuration as it leads to complexity rashes. Sometimes repeating configuration is beneficial
for maintenance and clarity.
In recent years, the DevOps industry has often embraced the DRY (Don’t Repeat Yourself) principle to an extreme.
(And Atmos delivers!) While DRY aims to reduce redundancy and improve maintainability by eliminating duplicate code,
overzealous application of this principle leads to complications and rigidity.
DRY is not a panacea. In fact, sometimes a bit of repetition is **beneficial**, particularly when anticipating future
divergence in configurations or functionality. A balance between DRY and WET (Write Everything Twice) can offer more
flexibility, and make it easier to see the entire context in one place without needing to trace through multiple abstractions
or indirections
Here’s why:
1. **Cognitive Load:** The more you strive for DRYness, the more indirection and abstraction layers you introduce.
This makes it harder for developers because they need to navigate through multiple layers of imports and abstractions
to grasp the complete picture.
2. **Plan for Future Divergence:** When initially similar configurations are likely diverge over time,
keeping them separate will make future changes easier.
3. **Premature Optimization:** Over-optimizing for DRYness may be a form of premature optimization. It’s important to recognize
when to prioritize flexibility and clarity over minimal repetition.
## Reserve Code Generation for Stack Configuration
While we generally advise against using code generation for application logic (components), it's beneficial for
creating configurations where appropriate, such as developer environments and SaaS tenants.
These configurations ought to be committed.
Also, consider if you can [use templates](/core-concepts/stacks/templates) instead.
## Use Mixin Pattern for Snippets of Stack Configuration
Employ the [mixin pattern](/core-concepts/stacks/inheritance/mixins) for clarity when there there is brief configuration snippets that are reusable. Steer clear
of minimal stack configurations simply for the sake of DRYness as it frequently leads to too many levels of imports.
## Use YAML Anchors to DRY Configuration
YAML anchors are pretty sweet and you don’t get those with tfvars.
:::important YAML Anchors Gotchas
When you define [YAML anchors](https://yaml.org/spec/1.2.2/#3222-anchors-and-aliases), they can only be used within the scope of the
same file. This is not an Atmos limitation, but how YAML works. For example, do not work together with [imports](/core-concepts/stacks/imports),
where you define an anchor in one stack configuration and try to use it in another.
:::
## Enforce Standards using OPA Policies
Apply OPA or JSON Schema validation within stacks to establish policies governing component usage. These policies can be tailored
as needed, allowing the same component to be validated differently depending on its context of use.
---
## Terraform Best Practices with Atmos
import Intro from '@site/src/components/Intro'
These are some of the best practices we recommend when using Terraform with Atmos. They are opinionated and based on our experience working with Terraform and Atmos. When followed, they lead to more reusable and maintainable infrastructure as code.
> Physics is the law, everything else is a recommendation.
> Anyone can break laws created by people, but I have yet to see anyone break the laws of physics.
> — **Elon Musk**
Also, since [Terraform "root modules" are components](/core-concepts/components/terraform), be sure to review the [Component Best Practices](/best-practices/components) for additional guidance on using components with Atmos.
:::tip
[Cloud Posse](https://github.com/cloudposse) publishes their general [Terraform Best Practices](https://docs.cloudposse.com/reference/best-practices/terraform-best-practices/), which are more general and not specific to Atmos.
:::
## Never Include Components Inside of Other Components
We do not recommend consuming one terraform component inside of another as that would defeat the purpose; each component is intended to be a loosely coupled unit of IaC with its own lifecycle.
Furthermore, since components define a state backend and providers, it's not advisable to call one root module from another root module. As only the stack backend of the first root module will be used, leading to unpredictable results.
## Use Terraform Overrides to Extend ("Monkey Patch") Vendored Components
When you need to extend a component, we recommend using [Terraform Overrides](https://developer.hashicorp.com/terraform/language/files/override).
It's essentially a Terraform-native way of [Monkey Patching](https://en.wikipedia.org/wiki/Monkey_patch).
This way, you can maintain the original component as a dependency and only override the parts you need to change.
:::warning Pitfall!
Use this technique cautiously because your overrides may break if the upstream interfaces change. There’s no contract that an upstream component will remain the same.
:::
To gain a deeper understanding of how this works, you have to understand how [Terraform overrides work](https://developer.hashicorp.com/terraform/language/files/override), and then it will make sense how [vendoring with Atmos](/core-concepts/vendor) can be used to extend components.
Comparison to Other Languages or Frameworks
#### Swizzling
In [Objective-C](https://spin.atomicobject.com/method-swizzling-objective-c/) and [Swift-UI](https://medium.com/@pallavidipke07/method-swizzling-in-swift-5c9d9ab008e4), swizzling is the method of changing the implementation of an existing selector.
In Docusaurus, [swizzling a component](https://docusaurus.io/docs/swizzling) means providing an alternative implementation that takes precedence over the component provided by the theme.
#### Monkey Patching
You can think of it also like [Monkey Patching](https://en.wikipedia.org/wiki/Monkey_patch) in [Ruby](http://blog.headius.com/2012/11/refining-ruby.html) or [React components](https://medium.com/@singhalaryan06/monkey-patching-mocking-hooks-and-methods-in-react-f6afef73e423), enabling you to override the default implementation. Gatsby has a similar concept called theme [shadowing](https://www.gatsbyjs.com/docs/how-to/plugins-and-themes/shadowing/).
---
## CLI Commands Cheat Sheet
import Link from '@docusaurus/Link'
import Card from '@site/src/components/Card'
import CardGroup from '@site/src/components/CardGroup'
```
atmos
```
Start an interactive UI to select an Atmos command, component and stack. Press "Enter" to execute the command.
```
atmos help
```
Show help for all Atmos CLI commands
```
atmos docs
```
Open the Atmos documentation in a web browser
```
atmos version
```
Get the Atmos CLI version
```
atmos completion
```
Generate completion scripts for `Bash`, `Zsh`, `Fish` and `PowerShell`
```
atmos describe affected
```
Generate a list of the affected Atmos components and stacks given two Git commits
```
atmos describe component
```
Describe the complete configuration for an Atmos component in an Atmos stack
```
atmos describe config
```
Show the final (deep-merged) CLI configuration of all `atmos.yaml` file(s)
```
atmos describe dependents
```
Show a list of Atmos components in Atmos stacks that depend on the provided Atmos component
```
atmos describe stacks
```
Show the fully deep-merged configuration for all Atmos stacks and the components in the stacks
```
atmos describe workflows
```
Show the configured Atmos workflows
```
atmos terraform
```
Execute `terraform` commands
```
atmos terraform clean
```
Delete the `.terraform` folder, the folder that `TF_DATA_DIR` ENV var points to, `.terraform.lock.hcl` file, `varfile` and `planfile` for a component in a stack
```
atmos terraform deploy
```
Execute `terraform apply -auto-approve` on an Atmos component in an Atmos stack
```
atmos terraform generate backend
```
Generate a Terraform backend config file for an Atmos terraform component in an Atmos stack
```
atmos terraform generate backends
```
Generate the Terraform backend config files for all Atmos terraform components in all stacks
```
atmos terraform generate varfile
```
Generate a varfile (`.tfvar` ) for an Atmos terraform component in an Atmos stack
```
atmos terraform generate varfiles
```
Generate the terraform varfiles (`.tfvar`) for all Atmos terraform components in all stacks
```
atmos terraform shell
```
Start a new `SHELL` configured with the environment for an Atmos component in a stack to allow executing all native terraform commands inside the shell without using any atmos-specific arguments and flags
```
atmos terraform workspace
```
Calculate the Terraform workspace for an Atmos component (from the context variables and stack config), then run `terraform init -reconfigure`, then select the workspace by executing the `terraform workspace select` command
```
atmos helmfile
```
Execute `helmfile` commands
```
atmos helmfile generate varfile
```
Generate a varfile for a helmfile component in an Atmos stack
```
atmos validate component
```
Validate an Atmos component in a stack using JSON Schema and OPA policies
```
atmos validate stacks
```
Validate all Atmos stack configurations
```
atmos vendor pull
```
Pull sources and mixins from remote repositories for Terraform and Helmfile components and other artifacts
```
atmos workflow
```
Perform sequential execution of `atmos` and `shell` commands defined as workflow steps
```
atmos aws eks update-kubeconfig
```
Download `kubeconfig` from an EKS cluster and save it to a file
```
atmos atlantis generate repo-config
```
Generates repository configuration for Atlantis
---
## Atmos Cheatsheet
import Link from '@docusaurus/Link'
import Card from '@site/src/components/Card'
import CardGroup from '@site/src/components/CardGroup'
```shell
atmos list stacks
```
```
├── atmos.yaml
├── components
│ └── myapp
│ ├── main.tf
│ ├── outputs.tf
│ └── variables.tf
└── stacks
├── catalog
│ └── myapp.yaml
└── deploy
├── dev.yaml
├── prod.yaml
└── staging.yaml
```
```
import:
- catalog/something
vars:
key: value
components:
terraform:
$component:
vars:
foo: "bar"
```
```
import:
- catalog/something
- path: "catalog/something/else"
context:
key: value
skip_templates_processing: false
ignore_missing_template_values: false
skip_if_missing: false
```
```shell
atmos validate stacks
```
```shell
atmos list components
```
```shell
atmos validate component $component -s $stack
atmos validate component $component -s $stack --schema-type jsonschema --schema-path $component.json
atmos validate component $component -s $stack --schema-type opa --schema-path $component.rego
atmos validate component $component -s $stack --schema-type opa --schema-path $component.rego --module-paths catalog
atmos validate component $component -s $stack --timeout 15
```
```shell
atmos list workflows
```
```shell
atmos terraform plan
```
```shell
atmos terraform apply $component --stack $stack
atmos terraform apply $component --stack $stack -auto-approve
atmos terraform apply $component --stack $stack $planfile
```
```shell
atmos terraform apply
atmos terraform apply $component --stack $stack -out $planfile
atmos terraform apply $component --stack $stack -var "key=value"
```
```shell
atmos describe affected
atmos describe affected --verbose=true
atmos describe affected --ref refs/heads/main
atmos describe affected --ref refs/heads/my-new-branch --verbose=true
atmos describe affected --ref refs/heads/main --format json
atmos describe affected --ref refs/tags/v1.16.0 --file affected.yaml --format yaml
atmos describe affected --sha 3a5eafeab90426bd82bf5899896b28cc0bab3073 --file affected.json
atmos describe affected --sha 3a5eafeab90426bd82bf5899896b28cc0bab3073
atmos describe affected --ssh-key
atmos describe affected --ssh-key --ssh-key-password
atmos describe affected --repo-path
atmos describe affected --include-spacelift-admin-stacks=true
```
---
## Components Cheatsheet
import Link from '@docusaurus/Link'
import Card from '@site/src/components/Card'
import CardGroup from '@site/src/components/CardGroup'
```
├── atmos.yaml
├── components
│ └── myapp
│ ├── main.tf
│ ├── outputs.tf
│ └── variables.tf
└── stacks
├── catalog
│ └── myapp.yaml
└── deploy
├── dev.yaml
├── prod.yaml
└── staging.yaml
```
```shell
atmos list components
```
```shell
atmos validate component $component -s $stack
atmos validate component $component -s $stack --schema-type jsonschema --schema-path $component.json
atmos validate component $component -s $stack --schema-type opa --schema-path $component.rego
atmos validate component $component -s $stack --schema-type opa --schema-path $component.rego --module-paths catalog
atmos validate component $component -s $stack --timeout 15
```
```shell
atmos terraform plan $component --stack $stack
atmos terraform plan $component --stack $stack -out $planfile
```
```shell
atmos terraform apply $component --stack $stack
atmos terraform apply $component --stack $stack -auto-approve
atmos terraform apply $component --stack $stack $planfile
```
```shell
atmos terraform deploy
atmos terraform deploy $component --stack $stack -out $planfile
atmos terraform deploy $component --stack $stack -var "key=value"
```
---
## Stacks Cheatsheet
import Link from '@docusaurus/Link'
import Card from '@site/src/components/Card'
import CardGroup from '@site/src/components/CardGroup'
```
├── atmos.yaml
├── components
│ └── myapp
│ ├── main.tf
│ ├── outputs.tf
│ └── variables.tf
└── stacks
├── catalog
│ └── myapp.yaml
└── deploy
├── dev.yaml
├── prod.yaml
└── staging.yaml
```
```yaml
import:
- catalog/something
vars:
key: value
components:
terraform:
$component:
vars:
foo: "bar"
```
```yaml
terraform:
overrides:
env: {}
settings: {}
vars: {}
command: "opentofu"
```
```yaml
terraform:
components:
$component:
settings:
spacelift:
# The `autodeploy` setting was overridden with the value
# from `terraform.overrides.settings.spacelift.autodeploy`
autodeploy: true
workspace_enabled: true
```
```shell
atmos list components
```
```shell
atmos validate component $component -s $stack
atmos validate component $component -s $stack --schema-type jsonschema --schema-path $component.json
atmos validate component $component -s $stack --schema-type opa --schema-path $component.rego
atmos validate component $component -s $stack --schema-type opa --schema-path $component.rego --module-paths catalog
atmos validate component $component -s $stack --timeout 15
```
---
## Vendoring Cheatsheet
import Card from '@site/src/components/Card'
import CardGroup from '@site/src/components/CardGroup'
```
├── atmos.yaml
├── vendor.yaml
└── components
└── myapp
├── main.tf
├── outputs.tf
└── variables.tf
```
```yaml title="vendor.yaml"
apiVersion: atmos/v1
kind: AtmosVendorConfig
metadata:
name: example-vendor-config
description: Atmos vendoring manifest
spec:
imports:
- "vendor/something"
sources:
- component: "vpc"
source: "oci://public.ecr.aws/cloudposse/components/terraform/stable/aws/vpc:{{.Version}}"
version: "latest"
targets: ["components/terraform/infra/vpc/{{.Version}}"]
included_paths: ["**/*.tf"]
tags:
- test
- networking
```
```yaml title="components/$component/component.yaml"
apiVersion: atmos/v1
kind: ComponentVendorConfig
metadata:
name: vpc-flow-logs-bucket-vendor-config
description: Source and mixins config for vendoring of 'vpc-flow-logs-bucket' component
spec:
source:
uri: github.com/cloudposse/terraform-aws-components.git//modules/vpc-flow-logs-bucket?ref={{.Version}}
version: 1.398.0
included_paths: ["**/*.tf"]
excluded_paths: ["**/context.tf"]
mixins:
- uri: https://raw.githubusercontent.com/cloudposse/terraform-null-label/0.25.0/exports/context.tf
filename: context.tf
```
```shell
atmos vendor pull
atmos vendor pull --everything
atmos vendor pull --component vpc-mixin-1
atmos vendor pull -c vpc-mixin-2
atmos vendor pull -c vpc-mixin-3
atmos vendor pull -c vpc-mixin-4
atmos vendor pull --tags test
atmos vendor pull --tags networking,storage
```
---
## Atmos CLI
import Screengrab from '@site/src/components/Screengrab'
import Terminal from '@site/src/components/Terminal'
import Intro from '@site/src/components/Intro'
Use this command to start an interactive UI to run Atmos commands against any component or stack. Press `Enter` to execute the command for the selected
stack and component
## Usage
Just run the `atmos` command in your terminal to start the interactive UI. Use the arrow keys to select stacks and components to deploy.
```shell
atmos
```
- Use the `right/left` arrow keys to navigate between the "Commands", "Stacks" and "Components" views
- Use the `up/down` arrow keys (or the mouse wheel) to select a command to execute, component and stack
- Use the `/` key to filter/search for the commands, components, and stacks in the corresponding views
- Use the `Tab` key to flip the "Stacks" and "Components" views. This is useful to be able to use the UI in two different modes:
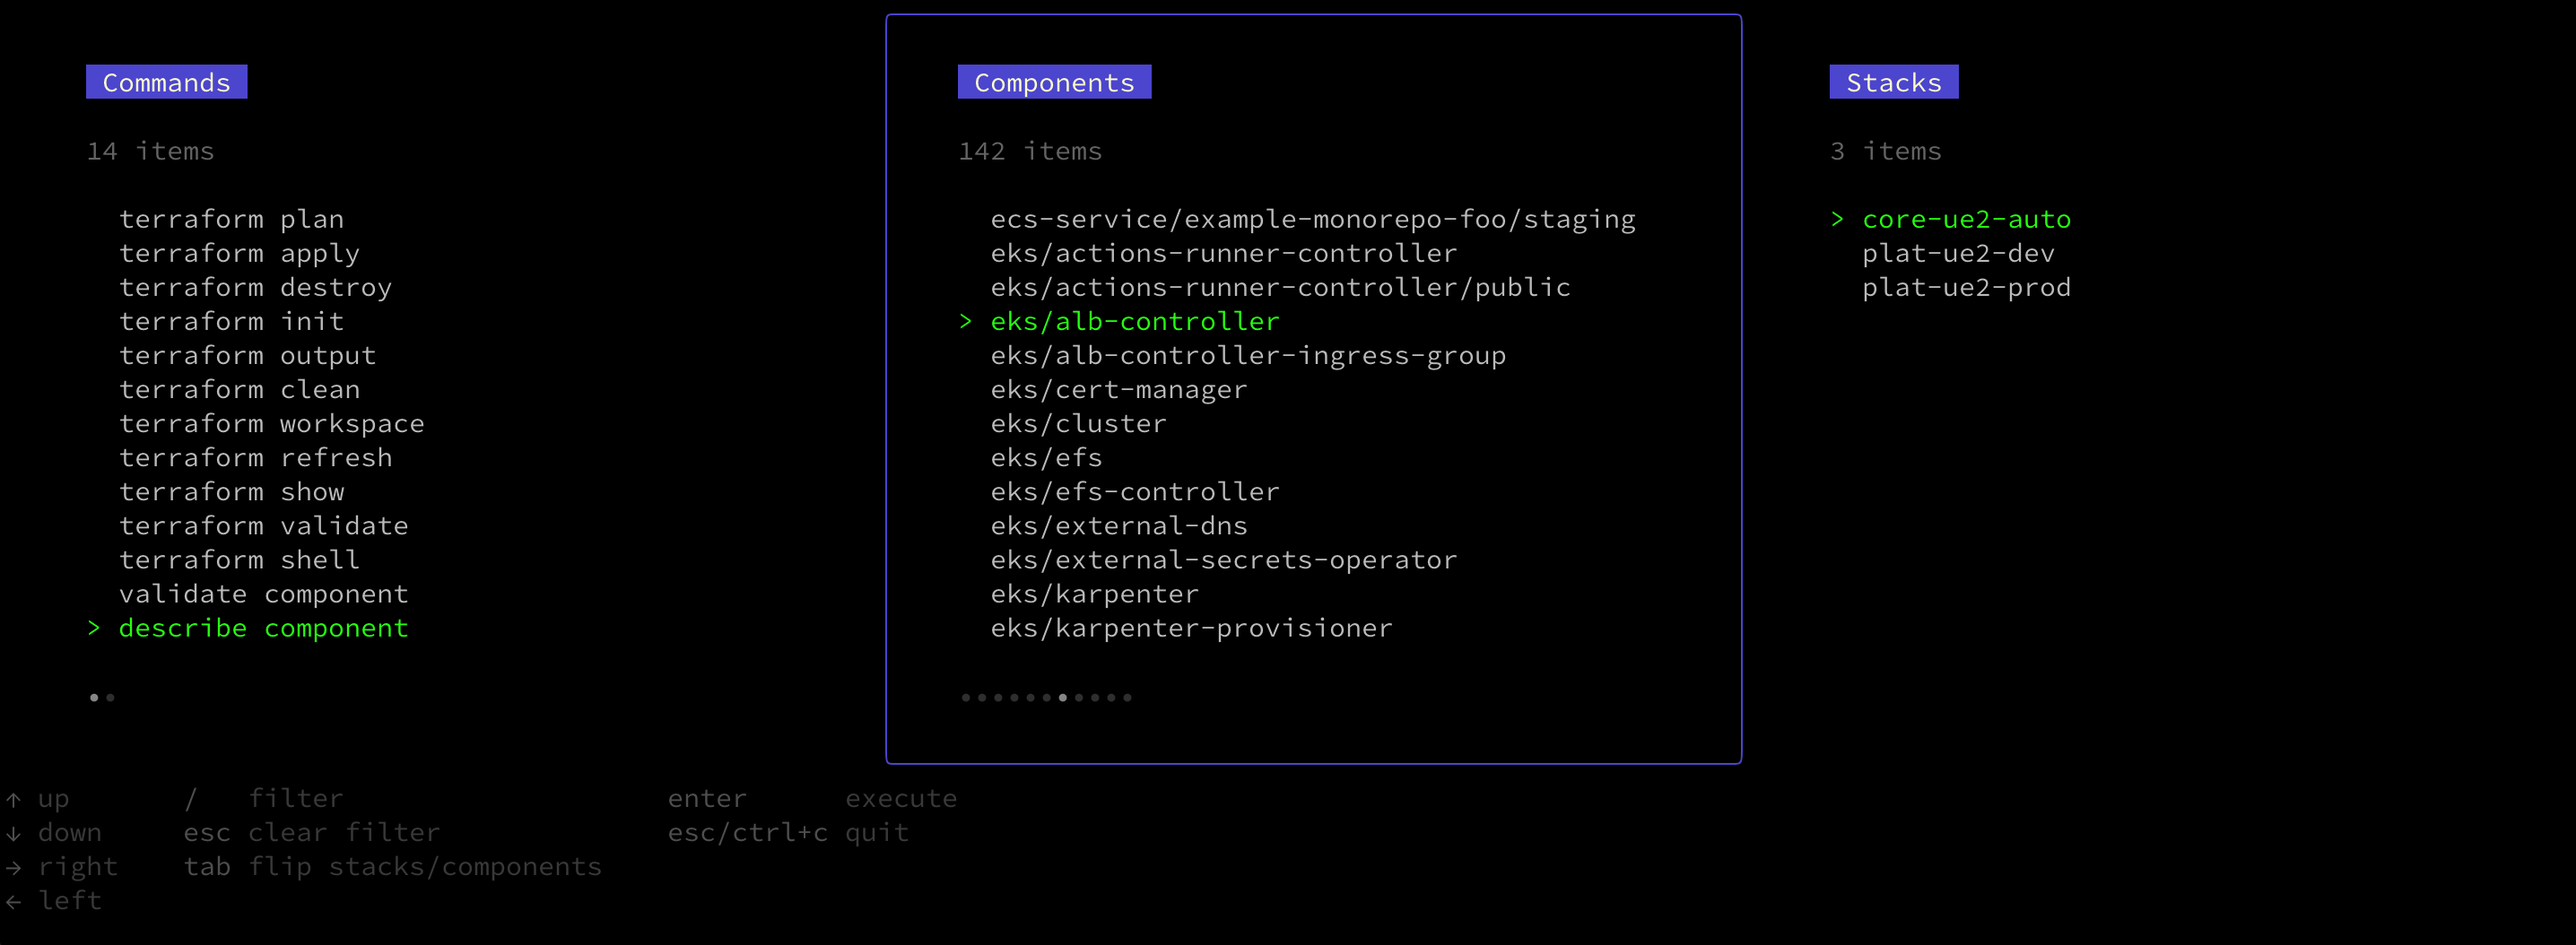
* `Mode 1: Components in Stacks`. Display all available stacks, select a stack, then show all the components that are defined in the selected stack
* `Mode 2: Stacks for Components`. Display all available components, select a component, then show all the stacks where the selected component is
configured
- Press `Enter` to execute the selected command for the selected stack and component
## Screenshots
To get an idea of what it looks like using `atmos` on the command line, just [try our quickstart](/quick-start/) and run the [`atmos`](/cli) command to start
an interactive UI in the terminal. Use the arrow keys to select stacks and components to deploy.

### Components in Stacks (Mode 1)
In Atmos, you can easily search and navigate your configuration from the built-in UI.
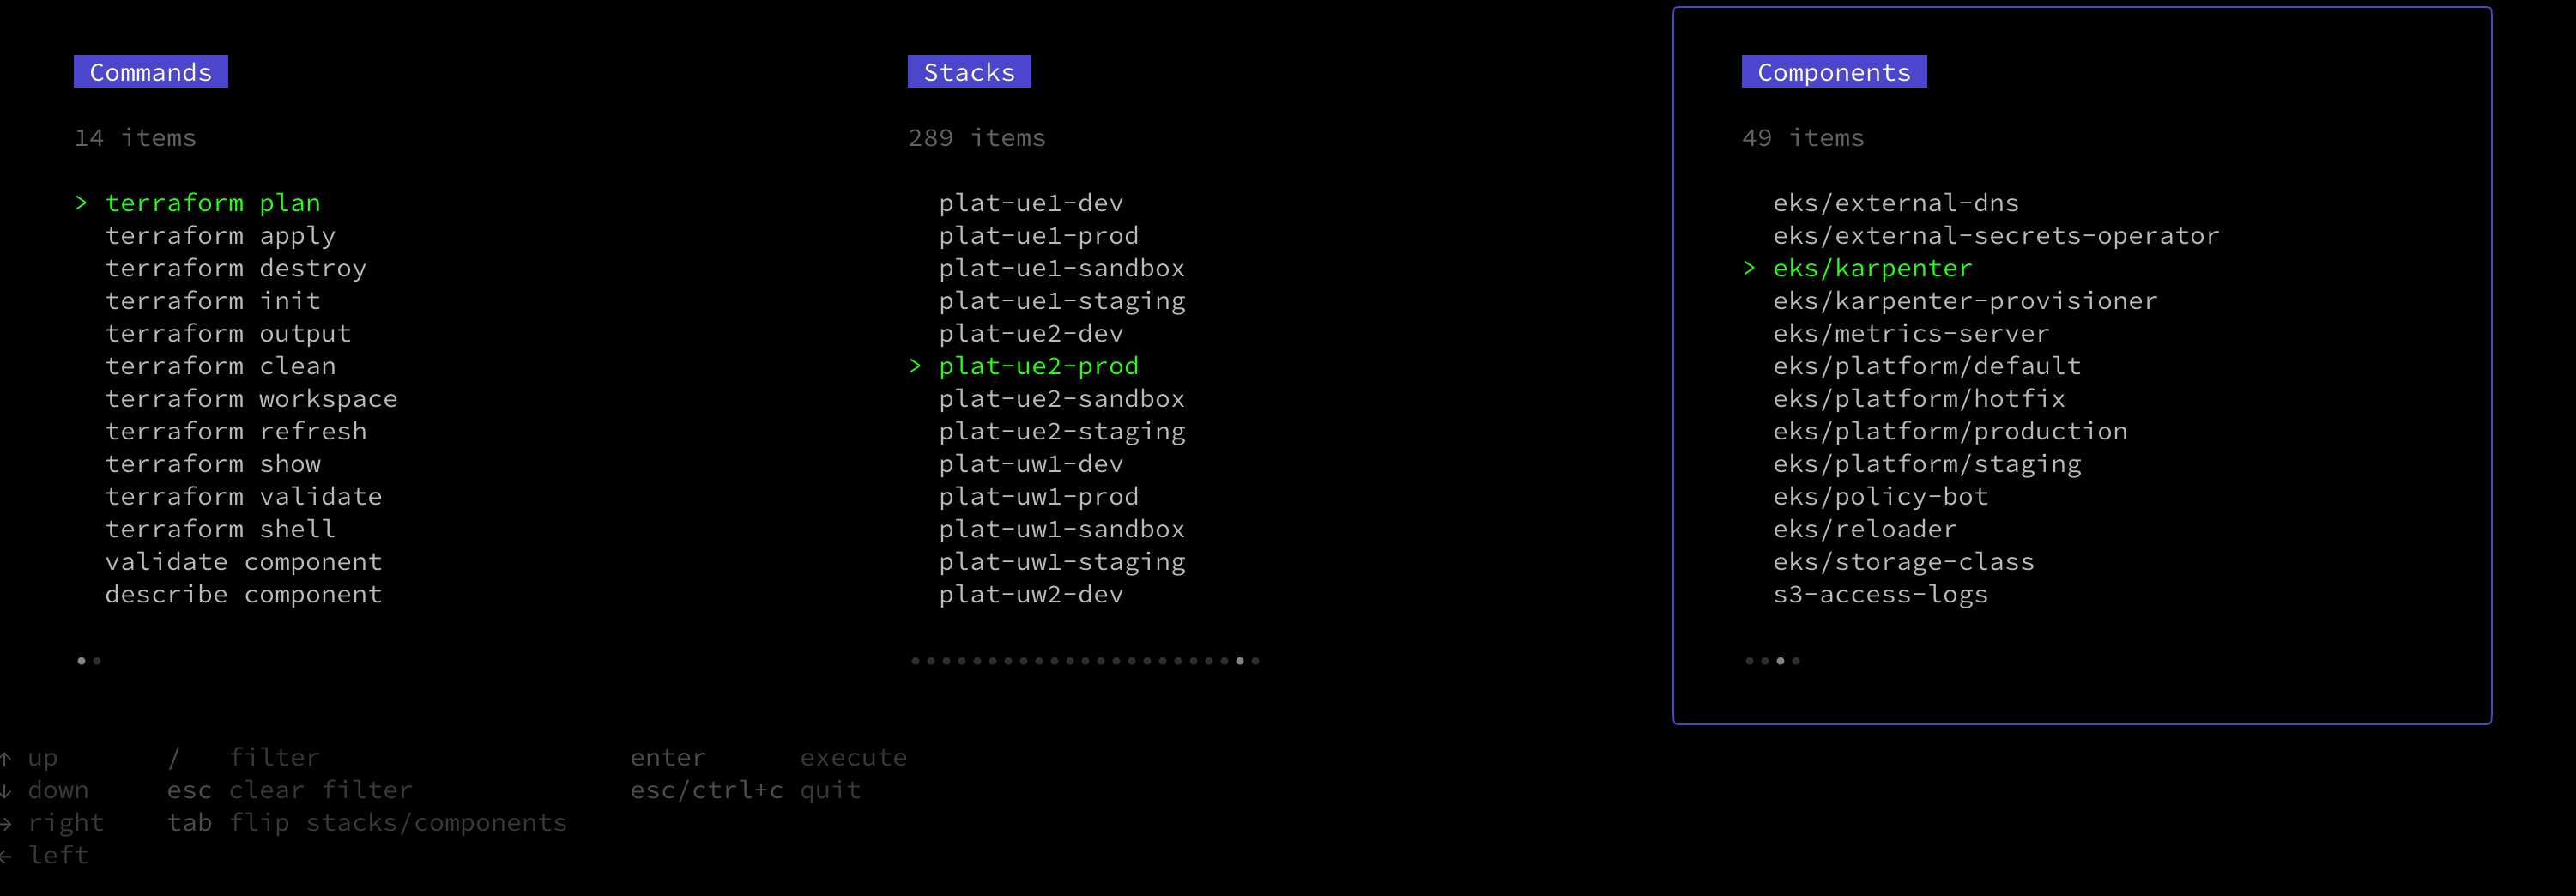
### Stacks for Components (Mode 2)
You can also search for the stacks where a component is configured.
---
## atmos atlantis generate repo-config
import Screengrab from '@site/src/components/Screengrab'
import Intro from '@site/src/components/Intro'
Use this command to generate a repository configuration (`atlantis.yaml`) for Atlantis.
```shell
atmos atlantis generate repo-config [options]
```
:::tip
Run `atmos atlantis generate repo-config --help` to see all the available options
:::
## Examples
```shell
atmos atlantis generate repo-config
atmos atlantis generate repo-config --output-path /dev/stdout
atmos atlantis generate repo-config --config-template config-1 --project-template project-1
atmos atlantis generate repo-config --config-template config-1 --project-template project-1 --stacks
atmos atlantis generate repo-config --config-template config-1 --project-template project-1 --components
atmos atlantis generate repo-config --config-template config-1 --project-template project-1 --stacks --components
atmos atlantis generate repo-config --affected-only=true
atmos atlantis generate repo-config --affected-only=true --output-path /dev/stdout
atmos atlantis generate repo-config --affected-only=true --verbose=true
atmos atlantis generate repo-config --affected-only=true --output-path /dev/stdout --verbose=true
atmos atlantis generate repo-config --affected-only=true --repo-path
atmos atlantis generate repo-config --affected-only=true --ref refs/heads/main
atmos atlantis generate repo-config --affected-only=true --ref refs/tags/v1.1.0
atmos atlantis generate repo-config --affected-only=true --sha 3a5eafeab90426bd82bf5899896b28cc0bab3073
atmos atlantis generate repo-config --affected-only=true --ref refs/tags/v1.2.0 --sha 3a5eafeab90426bd82bf5899896b28cc0bab3073
atmos atlantis generate repo-config --affected-only=true --ssh-key
atmos atlantis generate repo-config --affected-only=true --ssh-key --ssh-key-password
atmos atlantis generate repo-config --affected-only=true --clone-target-ref=true
```
## Flags
- `--config-template` (optional)
- Atlantis config template name.
- `--project-template` (optional)
- Atlantis project template name.
- `--output-path` (optional)
- Output path to write `atlantis.yaml` file.
- `--stacks` (optional)
- Generate Atlantis projects for the specified stacks only (comma-separated values).
- `--components` (optional)
- Generate Atlantis projects for the specified components only (comma-separated values).
- `--affected-only` (optional)
- Generate Atlantis projects only for the Atmos components changedbetween two Git commits.
- `--ref` (optional)
- [Git Reference](https://git-scm.com/book/en/v2/Git-Internals-Git-References) with which to compare the current working branch.
- `--sha` (optional)
- Git commit SHA with which to compare the current working branch.
- `--ssh-key` (optional)
- Path to PEM-encoded private key to clone private repos using SSH.
- `--ssh-key-password` (optional)
- Encryption password for the PEM-encoded private key if the key containsa password-encrypted PEM block.
- `--repo-path` (optional)
- Path to the already cloned target repository with which to compare the current branch.Conflicts with `--ref`, `--sha`, `--ssh-key` and `--ssh-key-password`.
- `--verbose` (optional)
- Print more detailed output when cloning and checking out the targetGit repository and processing the result.
- `--clone-target-ref` (optional)
- Clone the target reference with which to compare the current branch.`atmos atlantis generate repo-config --affected-only=true --clone-target-ref=true`The flag is only used when `--affected-only=true`If set to `false` (default), the target reference will be checked out insteadThis requires that the target reference is already cloned by Git,and the information about it exists in the `.git` directory.
:::info
Refer to [Atlantis Integration](/integrations/atlantis) for more details on the Atlantis integration in Atmos
:::
---
## atmos atlantis
import DocCardList from '@theme/DocCardList';
import Screengrab from '@site/src/components/Screengrab'
import Intro from '@site/src/components/Intro'
Use these subcommands to execute commands that generate Atlantis configurations.
## Usage
## Subcommands
---
## atmos aws eks update-kubeconfig
import Screengrab from '@site/src/components/Screengrab'
import Intro from '@site/src/components/Intro'
Use this command to download `kubeconfig` from an EKS cluster and save it to a file.
```shell
atmos aws eks update-kubeconfig [options]
```
This command executes `aws eks update-kubeconfig` command to download `kubeconfig` from an EKS cluster and saves it to a file.
The command can execute `aws eks update-kubeconfig` in three different ways:
1. If all the required parameters (cluster name and AWS profile/role) are provided on the command-line, then Atmos executes the command without
requiring the `atmos.yaml` CLI config and context.
For example:
```shell
atmos aws eks update-kubeconfig --profile= --name=
```
1. If `component` and `stack` are provided on the command-line, then Atmos executes the command using the `atmos.yaml` CLI config and stack's context
by searching for the following settings:
- `components.helmfile.cluster_name_pattern` in the `atmos.yaml` CLI config (and calculates the `--name` parameter using the pattern)
- `components.helmfile.helm_aws_profile_pattern` in the `atmos.yaml` CLI config (and calculates the `--profile` parameter using the pattern)
- `components.helmfile.kubeconfig_path` in the `atmos.yaml` CLI config the variables for the component in the provided stack
- `region` from the variables for the component in the stack
For example:
```shell
atmos aws eks update-kubeconfig -s
```
1. Combination of the above. Provide a component and a stack, and override other parameters on the command line.
For example:
```shell
atmos aws eks update-kubeconfig -s --kubeconfig= --region=us-east-1
```
:::info
Refer to [Update kubeconfig](https://docs.aws.amazon.com/cli/latest/reference/eks/update-kubeconfig.html) for more information
:::
:::tip
Run `atmos aws eks update-kubeconfig --help` to see all the available options
:::
## Examples
```shell
atmos aws eks update-kubeconfig -s
atmos aws eks update-kubeconfig --profile= --name=
atmos aws eks update-kubeconfig -s --kubeconfig= --region=
atmos aws eks update-kubeconfig --role-arn
atmos aws eks update-kubeconfig --alias
atmos aws eks update-kubeconfig --dry-run=true
atmos aws eks update-kubeconfig --verbose=true
```
## Arguments
- `component` (optional)
- Atmos component.
## Flags
- `--stack` / `-s` (optional)
- Atmos stack.
- `--profile` (optional)
- AWS profile to use to authenticate to the EKS cluster.
- `--role-arn` (optional)
- AWS IAM role ARN to use to authenticate to the EKS cluster.
- `--name` (optional)
- EKS cluster name.
- `--region` (optional)
- AWS region.
- `--kubeconfig` (optional)
- `kubeconfig` filename to append with the configuration.
- `--alias` (optional)
- Alias for the cluster context name. Defaults to match cluster ARN.
- `--dry-run` (optional)
- Print the merged kubeconfig to stdout instead of writing it to the specified file.
- `--verbose` (optional)
- Print more detailed output when writing the kubeconfig file, including the appended entries.
---
## atmos aws
import Screengrab from '@site/src/components/Screengrab'
import DocCardList from '@theme/DocCardList';
import Intro from '@site/src/components/Intro'
## Subcommands
Use these subcommands to interact with AWS.
---
## Atmos CLI Commands
import Screengrab from '@site/src/components/Screengrab'
import DocCardList from '@theme/DocCardList'
import Intro from '@site/src/components/Intro'
Use these commands to perform operations.
# Commands
---
## atmos completion
import Screengrab from '@site/src/components/Screengrab'
import Tabs from '@theme/Tabs';
import TabItem from '@theme/TabItem';
import Intro from '@site/src/components/Intro'
Use this command to generate completion scripts for `Bash`, `Zsh`, `Fish` and `PowerShell`.
## Usage
Execute the `completion` command like this:
```shell
atmos completion [bash|zsh|fish|powershell]
```
This command generates completion scripts for `Bash`, `Zsh`, `Fish` and `powershell`.
When the generated completion script is loaded into the shell, pressing the tab key twice displays the available commands and the help.
:::tip
Run `atmos completion --help` to see all the available options
:::
## Configuring Your Shell
To enable command completion, you need to configure your shell. The setup process depends on which shell you’re using (e.g., `zsh` or `bash`).
Select your shell below for detailed setup instructions.
## Bash Completion Setup
To enable tab completion for Atmos in Bash, add the following to your `~/.bashrc` or `~/.bash_profile`:
```bash
# Enable Atmos CLI completion
source <(atmos completion bash)
```
After saving the file, apply the changes by running:
```zsh
source ~/.bashrc
```
Now, you can run any `atmos` command, and pressing `` after typing `atmos` will show the available subcommands. The same applies to `--stack` arguments and commands requiring a component (e.g., `atmos terraform plan`).
## Zsh Completion Setup
To enable tab completion for Atmos in `Zsh`, add the following to your `~/.zshrc`:
```zsh
# Initialize Zsh completion system
autoload -Uz compinit && compinit
# Enable Atmos CLI completion
source <(atmos completion zsh)
# Improve completion behavior
zstyle ':completion:*' menu select # Enable menu selection
zstyle ':completion:*' force-list always # Force vertical menu listing
# Ensure the Tab key triggers autocompletion
bindkey '\t' expand-or-complete
```
After saving the file, apply the changes by running:
```zsh
source ~/.zshrc
```
Now, you can run any `atmos` command, and pressing `` after typing `atmos` will show the available subcommands. The same applies to `--stack` arguments and commands requiring a component (e.g., `atmos terraform plan`).
If completions do not work, try regenerating the completion cache:
```zsh
rm -f ~/.zcompdump && compinit
```
:::warning
The Atmos completion script statically completes [custom commands](/core-concepts/custom-commands) based on the Atmos configuration. If completions are generated without this configuration (e.g., outside a project directory), custom commands won’t be included. To ensure accuracy, generate or regenerate the script from the correct working directory. This only affects custom commands. Components, stacks, and built-in commands remain fully dynamic.
:::
### Examples
```shell
atmos completion bash
atmos completion zsh
atmos completion fish
atmos completion powershell
```
You can generate and load the shell completion script for `Bash` by executing the following commands:
```shell
atmos completion bash > /tmp/completion
source /tmp/completion
```
or
```shell
source <(atmos completion bash)
```
## Arguments
- `shell_name` (required)
- Shell name. Valid values are `bash`, `zsh`, `fish` and `powershell`.
:::info
Refer to [Command-line completion](https://en.wikipedia.org/wiki/Command-line_completion) for more details
:::
---
## atmos describe affected
import Terminal from '@site/src/components/Terminal'
import File from '@site/src/components/File'
import Screengrab from '@site/src/components/Screengrab'
import Intro from '@site/src/components/Intro'
Use this command to show a list of the affected Atmos components and stacks given two Git commits.
## Description
The command uses two different Git commits to produce a list of affected Atmos components and stacks.
For the first commit, the command assumes that the current repo root is a Git checkout. An error will be thrown if the
current repo is not a Git repository (the `.git/` folder does not exist or is configured incorrectly).
The second commit can be specified on the command line by using
the `--ref` ([Git References](https://git-scm.com/book/en/v2/Git-Internals-Git-References)) or `--sha` (commit SHA) flags.
The `--sha` takes precedence over the `--ref` flag.
:::tip
If the flags are not provided, the `ref` will be set automatically to the reference to the default branch
(`refs/remotes/origin/HEAD` Git ref, usually the `main` branch).
:::
## How does it work?
The command performs the following:
- If the `--repo-path` flag is passed, the command uses it as the path to the already cloned target repo with which to
compare the current working branch. I this case, the command will not clone and checkout the
target reference, but instead will use the already cloned one to compare the current branch with. In this case, the
`--ref`, `--sha`, `--ssh-key` and `--ssh-key-password` flags are not used, and an error will be thrown if the `--repo-path`
flag and any of the `--ref`, `--sha`, `--ssh-key` or `--ssh-key-password` flags are provided at the same time
- Otherwise, if the `--clone-target-ref=true` flag is specified, the command clones (into a temp directory) the remote
target with which to compare the current working branch. If the `--ref` flag or the commit SHA flag `--sha` are provided,
the command uses them to clone and checkout the remote target. Otherwise, the `HEAD` of the remote origin is
used (`refs/remotes/origin/HEAD` Git ref, usually the `main` branch)
- Otherwise, (if the `--repo-path` and `--clone-target-ref=true` flags are not passed), the command does not clone anything
from the remote origin, but instead just copies the current repo into a temp directory and checks out the target
reference with which to compare the current working branch.
If the `--ref` flag or the commit SHA flag `--sha` are
provided, the command uses them to check out. Otherwise, the `HEAD` of the remote origin is used
(`refs/remotes/origin/HEAD` Git ref, usually the `main` branch).
This requires that the target reference is already cloned by Git, and the information about it exists in
the `.git` directory (in case of using a non-default branch as the target, Git deep clone needs to be executed instead
of a shallow clone).
This is the recommended way to execute the `atmos describe affected` command since it allows
[working with private repositories](#working-with-private-repositories) without providing the SSH credentials
(`--ssh-key` and `--ssh-key-password` flags), since in this case Atmos does not access the remote origin and instead
just checks out the target reference (which is already on the local file system)
- The command deep-merges all stack configurations from both sources: the current working branch and the target reference
- The command searches for changes in the component directories
- The command compares each stack manifest section of the stack configurations from both sources looking for differences
- And finally, the command outputs a JSON or YAML document consisting of a list of the affected components and stacks
and what caused it to be affected
Since Atmos first checks the component folders for changes, if it finds any affected files, it will mark all related
components and stacks as affected. Atmos will then skip evaluating the stacks for differences since it already
knows that they are affected.
:::tip Use our GitHub Action
Our [affected stacks](/integrations/github-actions/affected-stacks) GitHub Action provides a ready-to-go way to run
`describe affected` and produce a GitHub matrix.
:::
## Usage
```shell
atmos describe affected [options]
```
:::tip
Run `atmos describe affected --help` to see all the available options
:::
## Examples
```shell
atmos describe affected
atmos describe affected --verbose=true
atmos describe affected --ref refs/heads/main
atmos describe affected --ref refs/heads/my-new-branch --verbose=true
atmos describe affected --ref refs/heads/main --format json
atmos describe affected --ref refs/tags/v1.16.0 --file affected.yaml --format yaml
atmos describe affected --sha 3a5eafeab90426bd82bf5899896b28cc0bab3073 --file affected.json
atmos describe affected --sha 3a5eafeab90426bd82bf5899896b28cc0bab3073
atmos describe affected --ssh-key
atmos describe affected --ssh-key --ssh-key-password
atmos describe affected --repo-path
atmos describe affected --include-spacelift-admin-stacks=true
atmos describe affected --clone-target-ref=true
atmos describe affected --include-dependents=true
atmos describe affected --include-settings=true
atmos describe affected --stack=plat-ue2-prod
atmos describe affected --upload=true
atmos describe affected --query
atmos describe affected --process-templates=false
atmos describe affected --process-functions=false
atmos describe affected --skip=terraform.output
atmos describe affected --skip=terraform.output --skip=include
atmos describe affected --skip=include,eval
atmos describe affected --exclude-locked
```
# Example Output
```shell
> atmos describe affected --verbose=true
Cloning repo 'https://github.com/cloudposse/atmos' into the temp dir '/var/folders/g5/lbvzy_ld2hx4mgrgyp19bvb00000gn/T/16710736261366892599'
Checking out the HEAD of the default branch ...
Enumerating objects: 4215, done.
Counting objects: 100% (1157/1157), done.
Compressing objects: 100% (576/576), done.
Total 4215 (delta 658), reused 911 (delta 511), pack-reused 3058
Checked out Git ref 'refs/heads/main'
Current HEAD: 7d37c1e890514479fae404d13841a2754be70cbf refs/heads/describe-affected
BASE: 40210e8d365d3d88ac13c0778c0867b679bbba69 refs/heads/main
Changed files:
tests/fixtures/scenarios/complete/components/terraform/infra/vpc/main.tf
internal/exec/describe_affected.go
website/docs/cli/commands/describe/describe-affected.md
Affected components and stacks:
[
{
"component": "infra/vpc",
"component_type": "terraform",
"component_path": "components/terraform/infra/vpc",
"stack": "tenant1-ue2-dev",
"stack_slug": "tenant1-ue2-dev-infra-vpc",
"spacelift_stack": "tenant1-ue2-dev-infra-vpc",
"atlantis_project": "tenant1-ue2-dev-infra-vpc",
"affected": "component"
},
{
"component": "infra/vpc",
"component_type": "terraform",
"component_path": "components/terraform/infra/vpc",
"stack": "tenant1-ue2-prod",
"stack_slug": "tenant1-ue2-prod-infra-vpc",
"spacelift_stack": "tenant1-ue2-prod-infra-vpc",
"atlantis_project": "tenant1-ue2-prod-infra-vpc",
"affected": "component"
},
{
"component": "infra/vpc",
"component_type": "terraform",
"component_path": "components/terraform/infra/vpc",
"stack": "tenant1-ue2-staging",
"stack_slug": "tenant1-ue2-staging-infra-vpc",
"spacelift_stack": "tenant1-ue2-staging-infra-vpc",
"atlantis_project": "tenant1-ue2-staging-infra-vpc",
"affected": "component"
},
{
"component": "top-level-component3",
"component_type": "terraform",
"component_path": "components/terraform/top-level-component1",
"stack": "tenant1-ue2-test-1",
"stack_slug": "tenant1-ue2-test-1-top-level-component3",
"atlantis_project": "tenant1-ue2-test-1-top-level-component3",
"affected": "file",
"file": "tests/fixtures/scenarios/complete/components/terraform/mixins/introspection.mixin.tf"
},
{
"component": "top-level-component3",
"component_type": "terraform",
"component_path": "components/terraform/top-level-component1",
"stack": "tenant1-ue2-test-1",
"stack_slug": "tenant1-ue2-test-1-top-level-component3",
"atlantis_project": "tenant1-ue2-test-1-top-level-component3",
"affected": "folder",
"folder": "tests/fixtures/scenarios/complete/components/helmfile/infra/infra-server"
}
]
```
## Flags
- `--ref` (optional)
-
[Git Reference](https://git-scm.com/book/en/v2/Git-Internals-Git-References) with which to compare the current working branch
- `--sha` (optional)
-
Git commit SHA with which to compare the current working branch
- `--file` (optional)
-
If specified, write the result to the file
- `--format` (optional)
-
Specify the output format: `json` or `yaml` (`json` is default)
- `--ssh-key` (optional)
-
Path to PEM-encoded private key to clone private repos using SSH
- `--ssh-key-password` (optional)
-
Encryption password for the PEM-encoded private key if the key contains a password-encrypted PEM block
- `--repo-path` (optional)
-
Path to the already cloned target repository with which to compare the current branch. Conflicts with `--ref`, `--sha`, `--ssh-key` and `--ssh-key-password`
- `--verbose` (optional)
-
Print more detailed output when cloning and checking out the target Git repository and processing the result
- `--include-spacelift-admin-stacks` (optional)
-
Include the Spacelift admin stack of any stack that is affected by config changes
- `--clone-target-ref` (optional)
-
Clone the target reference with which to compare the current branch.
`atmos describe affected --clone-target-ref=true`
If set to `false` (default), the target reference will be checked out instead.
This requires that the target reference is already cloned by Git, and the information about it exists in the `.git` directory
- `--stack` (optional)
-
Only show results for the specific stack.
`atmos describe affected --stack=plat-ue2-prod`
- `--include-dependents` (optional)
-
Include the dependent components and stacks.
`atmos describe affected --include-dependents=true`
- `--include-settings` (optional)
-
Include the `settings` section for each affected component.
`atmos describe affected --include-settings=true`
- `--query` (optional)
-
Query the results of the command using YQ expressions.
`atmos describe affected --query=`
For more details, refer to [YQ - a lightweight and portable command-line YAML processor](https://mikefarah.gitbook.io/yq)
- `--process-templates` (optional)
-
Enable/disable processing of `Go` templates in Atmos stacks manifests when executing the command.
If the flag is not provided, it's set to `true` by default.
`atmos describe affected --process-templates=false`
- `--process-functions` (optional)
-
Enable/disable processing of Atmos YAML functions in Atmos stacks manifests when executing the command.
If the flag is not provided, it's set to `true` by default.
`atmos describe affected --process-functions=false`
- `--skip` (optional)
-
Skip processing a specific Atmos YAML function in Atmos stacks manifests when executing the command.
To specify more than one function, use multiple `--skip` flags, or separate the functions with a comma:
`atmos describe affected --skip=terraform.output --skip=include`
`atmos describe affected --skip=terraform.output,include`
- `--exclude-locked` (optional)
-
Exclude the locked components (`metadata.locked: true`) from the output.
Refer to [Locking Components with `metadata.locked`](/core-concepts/stacks/define-components/#locking-components-with-metadatalocked)
`atmos describe affected --exclude-locked`
- `--upload` (optional)
-
Upload the affected components and stacks to a specified HTTP endpoint.
`atmos describe affected --upload=true`
Atmos will perform an HTTP POST request to the URL `${ATMOS_PRO_BASE_URL}/${ATMOS_PRO_ENDPOINT}`,
where the base URL is defined by the `ATMOS_PRO_BASE_URL` environment variable,
and the URL path is defined by the `ATMOS_PRO_ENDPOINT`environment variable
## Output
The command outputs a list of objects (in JSON or YAML format).
Each object has the following schema:
```json
{
"component": "....",
"component_type": "....",
"component_path": "....",
"stack": "....",
"stack_slug": "....",
"spacelift_stack": ".....",
"atlantis_project": ".....",
"affected": ".....",
"affected_all": [],
"file": ".....",
"folder": ".....",
"dependents": [],
"included_in_dependents": "true | false",
"settings": {}
}
```
where:
- `component`
-
The affected Atmos component.
- `component_type`
-
The type of the component (`terraform` or `helmfile`).
- `component_path`
-
The filesystem path to the `terraform` or `helmfile` component.
- `stack`
-
The affected Atmos stack.
- `stack_slug`
-
The Atmos stack slug (concatenation of the Atmos stack and Atmos component).
- `spacelift_stack`
-
The affected Spacelift stack. It will be included only if the Spacelift workspace is enabled for the Atmos component in the
Atmos stack in the `settings.spacelift.workspace_enabled` section (either directly in the component's `settings.spacelift.workspace_enabled` section
or via inheritance).
- `atlantis_project`
-
The affected Atlantis project name. It will be included only if the Atlantis integration is configured in
the `settings.atlantis` section in the stack config. Refer to [Atlantis Integration](/integrations/atlantis) for more details.
- `file`
-
If the Atmos component depends on an external file, and the file was changed,
the `file` attributes shows the modified file.
- `folder`
-
If the Atmos component depends on an external folder, and any file in the folder was changed,
the `folder` attributes shows the modified folder.
- `dependents`
-
A list of components that depend on the current affected component. It will be populated only if the
command-line flag `--include-dependents=true` is passed (to take dependencies into account) and there are other components
that depend on the affected component in the stack.
Refer to [`atmos describe dependents`](/cli/commands/describe/dependents) for more details. The `dependents` property is
hierarchical - each component in the list will also contain a `dependents` property if that component has dependent
components as well.
- `settings`
-
The `settings` section of the component in the stack. It will be included only if the
command-line flag `--include-settings=true` is passed. The `settings` sections is a free-form map used to pass
configuration information to [integrations](/integrations).
- `included_in_dependents`
-
A boolean flag indicating if the affected component in the stack is also present in any of the `dependents`
properties of the other affected components. It will be included only if the command-line flag `--include-dependents=true`
is passed. If `included_in_dependents` is set to `true`, it indicates that the affected component in the stack is also
present in any of the `dependents` lists in the dependency hierarchy of the other affected components.
This flag can be used to decide whether to plan/apply the affected component - you might skip planning/applying the component
since it's also a dependency of another affected component and will be triggered in the dependency order of the other
affected component.
- `affected`
-
Shows the first (in the processing order) section that was changed. The possible values are:
- `stack.vars`
-
The `vars` component section in the stack config has been modified.
- `stack.env`
-
The `env` component section in the stack config has been modified.
- `stack.settings`
-
The `settings` component section in the stack config has been modified.
- `stack.metadata`
-
The `metadata` component section in the stack config has been modified.
- `component`
-
The Terraform or Helmfile component that the Atmos component provisions has been changed.
- `component.module`
-
The Terraform component is affected because it uses a local Terraform module (not from the Terraform registry, but from the
local filesystem), and that local module has been changed.
For example, let's suppose that we have a catalog of reusable Terraform modules in the `modules` folder (outside the `components` folder), and
we have defined the following `label` Terraform module in `modules/label`:
```hcl title="modules/label"
module "label" {
source = "cloudposse/label/null"
version = "0.25.0"
context = module.this.context
}
output "label" {
value = module.label
description = "Label outputs"
}
```
We then use the Terraform module in the `components/terraform/top-level-component1` component:
```hcl title="components/terraform/top-level-component1"
module "service_2_label" {
source = "../../../modules/label"
context = module.this.context
}
output "service_2_id" {
value = module.service_2_label.label.id
description = "Service 2 ID"
}
```
The `label` module is not in the stack config of the `top-level-component1` component (not in the YAML stack config files), but Atmos
understands Terraform dependencies (using a Terraform parser from HashiCorp), and can automatically detect any changes to the module.
For example, if you make changes to any files in the folder `modules/label`, Atmos will detect the module changes, and since the module is a
Terraform dependency of the `top-level-component1` component, Atmos will mark the component as affected with the `affected` attribute
set to `component.module`:
```json
[
{
"component": "top-level-component1",
"component_type": "terraform",
"component_path": "tests/fixtures/scenarios/complete/components/terraform/top-level-component1",
"stack": "tenant1-ue2-staging",
"stack_slug": "tenant1-ue2-staging-top-level-component1",
"spacelift_stack": "tenant1-ue2-staging-top-level-component1",
"atlantis_project": "tenant1-ue2-staging-top-level-component1",
"affected": "component.module",
"affected_all": [
"component.module"
]
},
{
"component": "top-level-component1",
"component_type": "terraform",
"component_path": "tests/fixtures/scenarios/complete/components/terraform/top-level-component1",
"stack": "tenant2-ue2-staging",
"stack_slug": "tenant2-ue2-staging-top-level-component1",
"spacelift_stack": "tenant2-ue2-staging-top-level-component1",
"atlantis_project": "tenant2-ue2-staging-top-level-component1",
"affected": "component.module",
"affected_all": [
"component.module"
]
}
]
```
- `stack.settings.spacelift.admin_stack_selector`
-
The Atmos component for the Spacelift admin stack.
This will be included only if all of the following is true:
- The `atmos describe affected` is executed with the `--include-spacelift-admin-stacks=true` flag
- Any of the affected Atmos components has configured the section `settings.spacelift.admin_stack_selector` pointing to the Spacelift admin
stack that manages the components.
For example:
```yaml title="stacks/orgs/cp/tenant1/_defaults.yaml"
settings:
spacelift:
# All Spacelift child stacks for the `tenant1` tenant are managed by the
# `tenant1-ue2-prod-infrastructure-tenant1` Spacelift admin stack.
# The `admin_stack_selector` attribute is used to find the affected Spacelift
# admin stack for each affected Atmos stack
# when executing the command
# `atmos describe affected --include-spacelift-admin-stacks=true`
admin_stack_selector:
component: infrastructure-tenant1
tenant: tenant1
environment: ue2
stage: prod
```
- The Spacelift admin stack is enabled by `settings.spacelift.workspace_enabled` set to `true`.
For example:
```yaml title="stacks/catalog/terraform/spacelift/infrastructure-tenant1.yaml"
components:
terraform:
infrastructure-tenant1:
metadata:
component: spacelift
inherits:
- spacelift-defaults
settings:
spacelift:
workspace_enabled: true
```
- `file`
-
An external file on the local filesystem that the Atmos component depends on was changed.
Dependencies on external files (not in the component's folder) are defined using the `file` attribute in the `settings.depends_on` map.
For example:
```yaml title="stacks/catalog/terraform/top-level-component3.yaml"
components:
terraform:
top-level-component3:
metadata:
component: "top-level-component1"
settings:
depends_on:
1:
file: "tests/fixtures/scenarios/complete/components/terraform/mixins/introspection.mixin.tf"
```
In the configuration above, we specify that the Atmos component `top-level-component3` depends on the file
`tests/fixtures/scenarios/complete/components/terraform/mixins/introspection.mixin.tf` (which is not in the component's folder). If the file gets modified,
the component `top-level-component3` will be included in the `atmos describe affected` command output.
For example:
```json
[
{
"component": "top-level-component3",
"component_type": "terraform",
"component_path": "components/terraform/top-level-component1",
"stack": "tenant1-ue2-test-1",
"stack_slug": "tenant1-ue2-test-1-top-level-component3",
"atlantis_project": "tenant1-ue2-test-1-top-level-component3",
"affected": "file",
"affected_all": [
"file"
],
"file": "tests/fixtures/scenarios/complete/components/terraform/mixins/introspection.mixin.tf"
}
]
```
- `folder`
-
Any file in an external folder that the Atmos component depends on was changed.
Dependencies on external folders are defined using the `folder` attribute in the `settings.depends_on` map.
For example:
```yaml title="stacks/catalog/terraform/top-level-component3.yaml"
components:
terraform:
top-level-component3:
metadata:
component: "top-level-component1"
settings:
depends_on:
1:
file: "tests/fixtures/scenarios/complete/components/terraform/mixins/introspection.mixin.tf"
2:
folder: "tests/fixtures/scenarios/complete/components/helmfile/infra/infra-server"
```
In the configuration above, we specify that the Atmos component `top-level-component3` depends on the folder
`tests/fixtures/scenarios/complete/components/helmfile/infra/infra-server`. If any file in the folder gets modified,
the component `top-level-component3` will be included in the `atmos describe affected` command output.
For example:
```json
[
{
"component": "top-level-component3",
"component_type": "terraform",
"component_path": "components/terraform/top-level-component1",
"stack": "tenant1-ue2-test-1",
"stack_slug": "tenant1-ue2-test-1-top-level-component3",
"atlantis_project": "tenant1-ue2-test-1-top-level-component3",
"affected": "folder",
"affected_all": [
"folder"
],
"folder": "tests/fixtures/scenarios/complete/components/helmfile/infra/infra-server"
}
]
```
- `affected_all`
-
Shows all component sections and attributes that were changed.
For example, if you make changes to the `vars` and `settings` sections of the component `component-1` in the
`nonprod` stack, and execute `atmos describe affected`, you will get the following result:
```json
[
{
"component": "component-1",
"component_type": "terraform",
"stack": "nonprod",
"stack_slug": "nonprod-component-1",
"affected": "stack.vars",
"affected_all": [
"stack.vars",
"stack.settings"
]
}
]
```
If you create a new Terraform/Tofu component, configure a new Atmos component `component-1` in the
`nonprod` stack, and execute `atmos describe affected`, you will get the following result:
```json
[
{
"component": "component-1",
"component_type": "terraform",
"stack": "nonprod",
"stack_slug": "nonprod-component-1",
"affected": "stack.metadata",
"affected_all": [
"component",
"stack.metadata",
"stack.vars",
"stack.env",
"stack.settings"
]
}
]
```
where:
- `affected`
-
Shows that the Atmos component's `metadata` section was changed
(since the component is new and the `metadata` section is the first section that Atmos processes).
- `affected_all`
-
Shows all the affected sections and attributes:
- `component`
-
The Terraform component (Terraform configuration) was affected (since it was just added).
- `stack.metadata`
-
The Atmos component's `metadata` section was changed.
- `stack.vars`
-
The Atmos component's `vars` section was changed.
- `stack.env`
-
The Atmos component's `env` section was changed.
- `stack.settings`
-
The Atmos component's `settings` section was changed.
:::note
[Abstract Atmos components](/design-patterns/abstract-component) (`metadata.type` is set to `abstract`)
are not included in the output since they serve as blueprints for other Atmos components and are not meant to be provisioned.
[Disabled Atmos components](/core-concepts/stacks/define-components/#disabling-components-with-metadataenabled) (`metadata.enabled` is set to `false`)
are also not included in the output since they are explicitly disabled.
:::
## Output Example
```json
[
{
"component": "infrastructure-tenant1",
"component_type": "terraform",
"component_path": "tests/fixtures/scenarios/complete/components/terraform/spacelift",
"stack": "tenant1-ue2-prod",
"stack_slug": "tenant1-ue2-prod-infrastructure-tenant1",
"spacelift_stack": "tenant1-ue2-prod-infrastructure-tenant1",
"atlantis_project": "tenant1-ue2-prod-infrastructure-tenant1",
"affected": "stack.settings.spacelift.admin_stack_selector",
"affected_all": [
"stack.settings.spacelift.admin_stack_selector"
]
},
{
"component": "infrastructure-tenant2",
"component_type": "terraform",
"component_path": "tests/fixtures/scenarios/complete/components/terraform/spacelift",
"stack": "tenant2-ue2-prod",
"stack_slug": "tenant2-ue2-prod-infrastructure-tenant2",
"spacelift_stack": "tenant2-ue2-prod-infrastructure-tenant2",
"atlantis_project": "tenant2-ue2-prod-infrastructure-tenant2",
"affected": "stack.settings.spacelift.admin_stack_selector",
"affected_all": [
"stack.settings.spacelift.admin_stack_selector"
]
},
{
"component": "test/test-component-override-2",
"component_type": "terraform",
"component_path": "components/terraform/test/test-component",
"stack": "tenant1-ue2-dev",
"stack_slug": "tenant1-ue2-dev-test-test-component-override-2",
"spacelift_stack": "tenant1-ue2-dev-new-component",
"atlantis_project": "tenant1-ue2-dev-new-component",
"affected": "stack.vars",
"affected_all": [
"stack.vars"
]
},
{
"component": "infra/vpc",
"component_type": "terraform",
"component_path": "components/terraform/infra/vpc",
"stack": "tenant2-ue2-staging",
"stack_slug": "tenant1-ue2-staging-infra-vpc",
"spacelift_stack": "tenant1-ue2-staging-infra-vpc",
"atlantis_project": "tenant1-ue2-staging-infra-vpc",
"affected": "component",
"affected_all": [
"component"
]
},
{
"component": "test/test-component-override-3",
"component_type": "terraform",
"component_path": "components/terraform/test/test-component",
"stack": "tenant1-ue2-prod",
"stack_slug": "tenant1-ue2-prod-test-test-component-override-3",
"atlantis_project": "tenant1-ue2-prod-test-test-component-override-3",
"affected": "stack.env",
"affected_all": [
"stack.env"
]
},
{
"component": "top-level-component3",
"component_type": "terraform",
"component_path": "components/terraform/top-level-component1",
"stack": "tenant1-ue2-test-1",
"stack_slug": "tenant1-ue2-test-1-top-level-component3",
"atlantis_project": "tenant1-ue2-test-1-top-level-component3",
"affected": "file",
"affected_all": [
"file",
"folder"
]
"file": "tests/fixtures/scenarios/complete/components/terraform/mixins/introspection.mixin.tf"
},
{
"component": "top-level-component3",
"component_type": "terraform",
"component_path": "components/terraform/top-level-component1",
"stack": "tenant1-ue2-test-1",
"stack_slug": "tenant1-ue2-test-1-top-level-component3",
"atlantis_project": "tenant1-ue2-test-1-top-level-component3",
"affected": "folder",
"affected_all": [
"file",
"folder"
]
"folder": "tests/fixtures/scenarios/complete/components/helmfile/infra/infra-server"
}
]
```
## Affected Components with Dependencies
The output of the `atmos describe affected` command can include dependencies for the affected components.
If the command-line flag `--include-dependents=true` is passed to the `atmos describe affected` command, and there are
other components that depend on the affected components in the stack, the command will include a `dependents`
property (list) for each affected component. The `dependents` property is hierarchical - each component in the list will
also contain a `dependents` property if that component has dependent components as well.
For example, suppose that we have the following configuration for the Atmos components `component-1`, `component-2` and
`component-3` in the stack `plat-ue2-dev`:
```yaml
components:
terraform:
component-1:
metadata:
component: "terraform-component-1"
vars: {}
component-2:
metadata:
component: "terraform-component-2"
vars: {}
settings:
depends_on:
1:
component: "component-1"
component-3:
metadata:
component: "terraform-component-3"
vars: {}
settings:
depends_on:
1:
component: "component-2"
```
:::tip
For more details on how to configure component dependencies, refer to [`atmos describe dependents`](/cli/commands/describe/dependents)
:::
In the above configuration, `component-3` depends on `component-2`, whereas `component-2` depends on `component-1`.
If all the components are affected (modified) in the current working branch,
the `atmos describe affected --include-dependents=true` command will produce the following result:
```json
[
{
"component": "component-1",
"stack": "plat-ue2-dev",
"stack_slug": "plat-ue2-dev-component-1",
"included_in_dependents": false,
"dependents": [
{
"component": "component-2",
"stack": "plat-ue2-dev",
"stack_slug": "plat-ue2-dev-component-2",
"dependents": [
{
"component": "component-3",
"stack": "plat-ue2-dev",
"stack_slug": "plat-ue2-dev-component-3"
}
]
}
]
},
{
"component": "component-2",
"stack": "plat-ue2-dev",
"stack_slug": "plat-ue2-dev-component-2",
"included_in_dependents": true,
"dependents": [
{
"component": "component-3",
"stack": "plat-ue2-dev",
"stack_slug": "plat-ue2-dev-component-3"
}
]
},
{
"component": "component-3",
"stack": "plat-ue2-dev",
"stack_slug": "plat-ue2-dev-component-3",
"included_in_dependents": true
}
]
```
The `component-1` component does not depend on any other component, and therefore it has the `included_in_dependents`
attribute set to `false`. The `component-2` and `component-3` components depend on other components and are included in
the `dependents` property of the other components, and hence the `included_in_dependents` attribute is set to `true`.
When processing the above output, you might decide to not plan/apply the `component-2` and `component-3` components
since they are in the `dependents` property of the `component-1` component. Instead, you might just
trigger `component-1` and then `component-2` and `component-3` in the order of dependencies.
## Working with Private Repositories
There are a few ways to work with private repositories with which the current local branch is compared to detect the changed files and affected Atmos
stacks and components:
- Using the `--ssh-key` flag to specify the filesystem path to a PEM-encoded private key to clone private repos using SSH, and
the `--ssh-key-password` flag to provide the encryption password for the PEM-encoded private key if the key contains a password-encrypted PEM block
- Execute the `atmos describe affected --repo-path ` command in a [GitHub Action](https://docs.github.com/en/actions).
For this to work, clone the remote private repository using the [checkout](https://github.com/actions/checkout) GitHub action. Then use
the `--repo-path` flag to specify the path to the already cloned target repository with which to compare the current branch
- It should just also work with whatever SSH config/context has been already set up, for example, when
using [SSH agents](https://www.ssh.com/academy/ssh/agent). In this case, you don't need to use the `--ssh-key`, `--ssh-key-password`
and `--repo-path` flags to clone private repositories
## Using with GitHub Actions
If the `atmos describe affected` command is executed in a [GitHub Action](https://docs.github.com/en/actions), and you don't want to store or
generate a long-lived SSH private key on the server, you can do the following (__NOTE:__ This is only required if the action is attempting to clone a
private repo which is not itself):
- Create a GitHub
[Personal Access Token (PAT)](https://docs.github.com/en/authentication/keeping-your-account-and-data-secure/creating-a-personal-access-token)
with scope permissions to clone private repos
- Add the created PAT as a repository or GitHub organization [secret](https://docs.github.com/en/actions/security-guides/encrypted-secrets)
- In your GitHub action, clone the remote repository using the [checkout](https://github.com/actions/checkout) GitHub action
- Execute `atmos describe affected` command with the `--repo-path` flag set to the cloned repository path using
the [`GITHUB_WORKSPACE`](https://docs.github.com/en/actions/learn-github-actions/variables) ENV variable (which points to the default working
directory on the GitHub runner for steps, and the default location of the repository when using the [checkout](https://github.com/actions/checkout)
action). For example:
```shell
atmos describe affected --repo-path $GITHUB_WORKSPACE
```
## Upload the affected components and stacks to an HTTP endpoint
If the `--upload=true` command-line flag is passed, Atmos will upload the affected components and stacks to a
specified HTTP endpoint.
The endpoint can process the affected components and their dependencies in a CI/CD pipeline (e.g. execute
`terraform apply` on all the affected components in the stacks and all the dependencies).
Atmos will perform an HTTP POST request to the URL `${ATMOS_PRO_BASE_URL}/${ATMOS_PRO_ENDPOINT}`, where the base URL
is defined by the `ATMOS_PRO_BASE_URL` environment variable, and the URL path is defined by the `ATMOS_PRO_ENDPOINT`
environment variable.
An [Authorization](https://developer.mozilla.org/en-US/docs/Web/HTTP/Headers/Authorization) header
`Authorization: Bearer $ATMOS_PRO_TOKEN` will be added to the HTTP request (if the `ATMOS_PRO_TOKEN` environment
variable is set) to provide credentials to authenticate with the server.
:::note
If the `--upload=true` command-line flag is passed, the `--include-dependencies` and `--include-settings` flags are
automatically set to `true`, so the affected components will be uploaded with their dependencies and settings
(if they are configured in Atmos stack manifests).
:::
The payload of the HTTP POST request will be a JSON object with the following schema:
```json
{
"base_sha": "6746ba4df9e87690c33297fe740011e5ccefc1f9",
"head_sha": "5360d911d9bac669095eee1ca1888c3ef5291084",
"repo_url": "https://github.com/cloudposse/atmos",
"repo_host": "github.com",
"repo_name": "atmos",
"repo_owner": "cloudposse",
"stacks": [
{
"component": "vpc",
"component_type": "terraform",
"component_path": "examples/quick-start-advanced/components/terraform/vpc",
"stack": "plat-ue2-dev",
"stack_slug": "plat-ue2-dev-vpc",
"affected": "stack.vars",
"included_in_dependents": false,
"dependents": [],
"settings": {}
}
]
}
```
where:
- `base_sha`
-
the Git commit SHA of the base branch against which the changes in the current commit are compared
- `head_sha`
-
the SHA of the current Git commit
- `repo_url`
-
the URL of the current repository
- `repo_name`
-
the name of the current repository
- `repo_owner`
-
the owner of the current repository
- `repo_host`
-
the host of the current repository
- `stacks`
-
a list of affected components and stacks with their dependencies and settings
---
## atmos describe component
import Terminal from '@site/src/components/Terminal'
import Screengrab from '@site/src/components/Screengrab'
import Intro from '@site/src/components/Intro'
Use this command to describe the complete configuration for an [Atmos component](/core-concepts/components) in
an [Atmos stack](/core-concepts/stacks).
## Usage
Execute the `atmos describe component` command like this:
```shell
atmos describe component -s
```
:::tip
Run `atmos describe component --help` to see all the available options
:::
## Examples
```shell
atmos describe component infra/vpc -s tenant1-ue2-dev
atmos describe component infra/vpc -s tenant1-ue2-dev --format json
atmos describe component infra/vpc -s tenant1-ue2-dev -f yaml
atmos describe component infra/vpc -s tenant1-ue2-dev --file component.yaml
atmos describe component echo-server -s tenant1-ue2-staging
atmos describe component test/test-component-override -s tenant2-ue2-prod
atmos describe component vpc -s tenant1-ue2-dev --process-templates=false
atmos describe component vpc -s tenant1-ue2-dev --process-functions=false
atmos describe component vpc -s tenant1-ue2-dev --skip=terraform.output
atmos describe component vpc -s tenant1-ue2-dev --skip=terraform.output --skip=include
atmos describe component vpc -s tenant1-ue2-dev --skip=include,eval
atmos describe component vpc -s plat-ue2-prod --query .vars.tags
atmos describe component vpc -s plat-ue2-prod -q .settings
atmos describe component vpc -s plat-ue2-prod --pager=more
```
## Arguments
- `component` (required)
- Atmos component.
## Flags
- `--stack` / `-s` (required)
- Atmos stack.
- `--format` / `-f` (optional)
- Output format: `yaml` or `json` (`yaml` is default).
- `--file` (optional)
- If specified, write the result to the file.
- `--process-templates` (optional)
- Enable/disable processing of all `Go` templatesin Atmos stacks manifests when executing the command.Use the flag to see the component configurationbefore and after the templates are processed.If the flag is not provided, it's set to `true` by default.`atmos describe component -s --process-templates=false`.
- `--process-functions` (optional)
- Enable/disable processing of all Atmos YAML functionsin Atmos stacks manifests when executing the command.Use the flag to see the component configurationbefore and after the functions are processed.If the flag is not provided, it's set to `true` by default.`atmos describe component -s --process-functions=false`.
- `--skip` (optional)
- Skip processing a specific Atmos YAML functionin Atmos stacks manifests when executing the command.To specify more than one function,use multiple `--skip` flags, or separate the functions with a comma:`atmos describe component -s --skip=terraform.output --skip=include``atmos describe component -s --skip=terraform.output,include`.
- `--query` / `-q` (optional)
- Query the results of the command using `yq` expressions.`atmos describe component -s --query .vars.tags`For more details, refer to https://mikefarah.gitbook.io/yq.
- `--pager` (optional)
- Disable/Enable the paging user experience.
## Output
The command outputs the final deep-merged component configuration.
The output contains the following sections:
- `atlantis_project` - Atlantis project name (if [Atlantis Integration](/integrations/atlantis) is configured for the component in the stack)
- `atmos_cli_config` - information about Atmos CLI configuration from `atmos.yaml`
- `atmos_component` - [Atmos component](/core-concepts/components) name
- `atmos_stack` - [Atmos stack](/core-concepts/stacks) name
- `stack` - same as `atmos_stack`
- `atmos_stack_file` - the stack manifest where the Atmos stack is defined
- `atmos_manifest` - same as `atmos_stack_file`
- `backend` - Terraform/OpenTofu backend configuration
- `backend_type` - Terraform/OpenTofu backend type
- `command` - the binary to execute when provisioning the component (e.g. `terraform`, `terraform-1`, `tofu`, `helmfile`)
- `component` - the Terraform/OpenTofu component for which the Atmos component provides configuration
- `component_type` - the type of the component (`terraform` or `helmfile`)
- `component_info` - a block describing the Terraform or Helmfile components that the Atmos component manages. The `component_info` block has the
following sections:
- `component_path` - the filesystem path to the Terraform/OpenTofu or Helmfile component
- `component_type` - the type of the component (`terraform` or `helmfile`)
- `terraform_config` - if the component type is `terraform`, this sections describes the high-level metadata about the Terraform component from its
source code, including variables, outputs and child Terraform modules (using a Terraform parser from HashiCorp). The file names and line numbers
where the variables, outputs and child modules are defined are also included. Invalid Terraform configurations are also detected, and in case of
any issues, the warnings and errors are shows in the `terraform_config.diagnostics` section
- `env` - a map of ENV variables defined for the Atmos component
- `inheritance` - component's [inheritance chain](/core-concepts/stacks/inheritance)
- `metadata` - component's metadata config
- `remote_state_backend` - Terraform/OpenTofu backend config for remote state
- `remote_state_backend_type` - Terraform/OpenTofu backend type for remote state
- `settings` - component settings (free-form map)
- `sources` - sources of the values from the component's sections (`vars`, `env`, `settings`)
- `spacelift_stack` - Spacelift stack name (if [Spacelift Integration](/integrations/spacelift) is configured for the component in the stack
and `settings.spacelift.workspace_enabled` is set to `true`)
- `vars` - the final deep-merged component variables that are provided to Terraform/OpenTofu and Helmfile when executing
`atmos terraform` and `atmos helmfile` commands
- `workspace` - Terraform/OpenTofu workspace for the Atmos component
- `imports` - a list of all imports in the Atmos stack (this shows all imports in the stack, related to the component and not)
- `deps_all` - a list of all component stack dependencies (stack manifests where the component settings are defined, either inline or via imports)
- `deps` - a list of component stack dependencies where the _final_ values of all component configurations are defined
(after the deep-merging and processing all the inheritance chains and all the base components)
- `overrides` - a map of overrides for the component. Refer to [Component Overrides](/core-concepts/stacks/overrides) for more details
- `providers` - a map of provider configurations for the component
## Difference between `imports`, `deps_all` and `deps` outputs
The difference between the `imports`, `deps_all` and `deps` outputs is as follows:
- `imports` shows all imports in the stack for all components. This can be useful in GitHub actions and
in [OPA validation policies](/core-concepts/validate/opa) to check whether an import is allowed in the stack or not
- `deps_all` shows all component stack dependencies (imports and root-level stacks) where any configuration for the component is present.
This also can be useful in GitHub Actions and [OPA validation policies](/core-concepts/validate/opa) to check whether a user or a team
is allowed to import a particular config file for the component in the stack
- `deps` shows all the component stack dependencies where the __FINAL__ values from all the component sections are defined
(after the deep-merging and processing all the inheritance chains and all the base components). This is useful in CI/CD systems (e.g. Spacelift)
to detect only the affected files that the component depends on. `deps` is usually a much smaller list than `deps_all` and can
differ from it in the following ways:
- An Atmos component can inherit configurations from many base components, see [Component Inheritance](/core-concepts/stacks/inheritance), and
import those base component configurations
- The component can override all the default variables from the base components, and the final values are not dependent on the base component
configs anymore. For example, `derived-component-3` import the base component `base-component-4`, inherits from it, and overrides all
the variables:
```yaml
# Import the base component config
import:
- catalog/terraform/base-component-4
components:
terraform:
derived-component-3:
metadata:
component: "test/test-component" # Point to the Terraform/OpenTofu component
inherits:
# Inherit all the values from the base component
- base-component-4
vars:
# Override all the variables from the base component
```
- Atmos detects that and does not include the base component `base-component-4` config file into the `deps` output since the `derived-component-3`
does not directly depend on `base-component-4` (all values are coming from the `derived-component-3`). This will help, for example,
prevent unrelated Spacelift stack triggering
- In the above case, the `deps_all` output will include both `derived-component-3` and `base-component-4`, but the `deps` output will not include
`base-component-4`
## Command example
```yaml
atlantis_project: tenant1-ue2-dev-test-test-component-override-3
atmos_cli_config:
base_path: ./tests/fixtures/scenarios/complete
components:
terraform:
base_path: components/terraform
apply_auto_approve: false
deploy_run_init: true
init_run_reconfigure: true
auto_generate_backend_file: false
stacks:
base_path: stacks
included_paths:
- orgs/**/*
excluded_paths:
- '**/_defaults.yaml'
name_pattern: '{tenant}-{environment}-{stage}'
workflows:
base_path: stacks/workflows
atmos_component: test/test-component-override-3
atmos_stack: tenant1-ue2-dev
atmos_stack_file: orgs/cp/tenant1/dev/us-east-2
backend:
bucket: cp-ue2-root-tfstate
dynamodb_table: cp-ue2-root-tfstate-lock
key: terraform.tfstate
region: us-east-2
workspace_key_prefix: test-test-component
backend_type: s3
command: terraform
component: test/test-component
component_info:
component_path: tests/fixtures/scenarios/complete/components/terraform/test/test-component
component_type: terraform
terraform_config:
path: tests/fixtures/scenarios/complete/components/terraform/test/test-component
variables:
enabled:
name: enabled
type: bool
description: Set to false to prevent the module from creating any resources
default: null
required: false
sensitive: false
pos:
filename: tests/fixtures/scenarios/complete/components/terraform/test/test-component/context.tf
line: 97
name:
name: name
type: string
description: |
ID element. Usually the component or solution name, e.g. 'app' or 'jenkins'.
This is the only ID element not also included as a `tag`.
The "name" tag is set to the full `id` string. There is no tag with the value of the `name` input.
default: null
required: false
sensitive: false
pos:
filename: tests/fixtures/scenarios/complete/components/terraform/test/test-component/context.tf
line: 127
service_1_name:
name: service_1_name
type: string
description: Service 1 name
default: null
required: true
sensitive: false
pos:
filename: tests/fixtures/scenarios/complete/components/terraform/test/test-component/variables.tf
line: 6
outputs:
service_1_id:
name: service_1_id
description: Service 1 ID
sensitive: false
pos:
filename: tests/fixtures/scenarios/complete/components/terraform/test/test-component/outputs.tf
line: 1
service_2_id:
name: service_2_id
description: Service 2 ID
sensitive: false
pos:
filename: tests/fixtures/scenarios/complete/components/terraform/test/test-component/outputs.tf
line: 6
modulecalls:
service_1_label:
name: service_1_label
source: cloudposse/label/null
version: 0.25.0
pos:
filename: tests/fixtures/scenarios/complete/components/terraform/test/test-component/main.tf
line: 1
diagnostics: []
deps:
- catalog/terraform/mixins/test-2
- catalog/terraform/services/service-1-override-2
- catalog/terraform/services/service-2-override-2
- catalog/terraform/spacelift-and-backend-override-1
- catalog/terraform/test-component
- catalog/terraform/test-component-override-3
- mixins/region/us-east-2
- mixins/stage/dev
- orgs/cp/_defaults
- orgs/cp/tenant1/_defaults
- orgs/cp/tenant1/dev/us-east-2
deps_all:
- catalog/terraform/mixins/test-1
- catalog/terraform/mixins/test-2
- catalog/terraform/services/service-1
- catalog/terraform/services/service-1-override
- catalog/terraform/services/service-1-override-2
- catalog/terraform/services/service-2
- catalog/terraform/services/service-2-override
- catalog/terraform/services/service-2-override-2
- catalog/terraform/spacelift-and-backend-override-1
- catalog/terraform/tenant1-ue2-dev
- catalog/terraform/test-component
- catalog/terraform/test-component-override
- catalog/terraform/test-component-override-2
- catalog/terraform/test-component-override-3
- mixins/region/us-east-2
- mixins/stage/dev
- orgs/cp/_defaults
- orgs/cp/tenant1/_defaults
- orgs/cp/tenant1/dev/us-east-2
env:
TEST_ENV_VAR1: val1-override-3
TEST_ENV_VAR2: val2-override-3
TEST_ENV_VAR3: val3-override-3
TEST_ENV_VAR4: null
imports:
- catalog/terraform/mixins/test-1
- catalog/terraform/mixins/test-2
- catalog/terraform/services/service-1
- catalog/terraform/services/service-1-override
- catalog/terraform/services/service-1-override-2
- catalog/terraform/services/service-2
- catalog/terraform/services/service-2-override
- catalog/terraform/services/service-2-override-2
- catalog/terraform/services/top-level-service-1
- catalog/terraform/services/top-level-service-2
- catalog/terraform/spacelift-and-backend-override-1
- catalog/terraform/tenant1-ue2-dev
- catalog/terraform/test-component
- catalog/terraform/test-component-override
- catalog/terraform/test-component-override-2
- catalog/terraform/test-component-override-3
- catalog/terraform/top-level-component1
- catalog/terraform/vpc
- mixins/region/us-east-2
- mixins/stage/dev
- orgs/cp/_defaults
- orgs/cp/tenant1/_defaults
- orgs/cp/tenant1/dev/_defaults
inheritance:
- mixin/test-2
- mixin/test-1
- test/test-component-override-2
- test/test-component-override
- test/test-component
metadata:
component: test/test-component
inherits:
- test/test-component-override
- test/test-component-override-2
- mixin/test-1
- mixin/test-2
terraform_workspace: test-component-override-3-workspace
remote_state_backend:
bucket: cp-ue2-root-tfstate
dynamodb_table: cp-ue2-root-tfstate-lock
region: us-east-2
workspace_key_prefix: test-test-component
remote_state_backend_type: s3
settings:
config:
is_prod: false
spacelift:
protect_from_deletion: true
stack_destructor_enabled: false
stack_name_pattern: '{tenant}-{environment}-{stage}-new-component'
workspace_enabled: false
sources:
backend:
bucket:
final_value: cp-ue2-root-tfstate
name: bucket
stack_dependencies:
- stack_file: catalog/terraform/spacelift-and-backend-override-1
stack_file_section: terraform.backend.s3
dependency_type: import
variable_value: cp-ue2-root-tfstate
- stack_file: orgs/cp/_defaults
stack_file_section: terraform.backend.s3
dependency_type: import
variable_value: cp-ue2-root-tfstate
dynamodb_table:
final_value: cp-ue2-root-tfstate-lock
name: dynamodb_table
stack_dependencies:
- stack_file: catalog/terraform/spacelift-and-backend-override-1
stack_file_section: terraform.backend.s3
dependency_type: import
variable_value: cp-ue2-root-tfstate-lock
- stack_file: orgs/cp/_defaults
stack_file_section: terraform.backend.s3
dependency_type: import
variable_value: cp-ue2-root-tfstate-lock
env:
TEST_ENV_VAR1:
final_value: val1-override-3
name: TEST_ENV_VAR1
stack_dependencies:
- dependency_type: import
stack_file: catalog/terraform/test-component-override-3
stack_file_section: components.terraform.env
variable_value: val1-override-3
- dependency_type: import
stack_file: catalog/terraform/test-component-override-2
stack_file_section: components.terraform.env
variable_value: val1-override-2
- dependency_type: import
stack_file: catalog/terraform/test-component-override
stack_file_section: components.terraform.env
variable_value: val1-override
- dependency_type: import
stack_file: catalog/terraform/test-component
stack_file_section: components.terraform.env
variable_value: val1
settings:
spacelift:
final_value:
protect_from_deletion: true
stack_destructor_enabled: false
stack_name_pattern: '{tenant}-{environment}-{stage}-new-component'
workspace_enabled: false
name: spacelift
stack_dependencies:
- dependency_type: import
stack_file: catalog/terraform/test-component-override-3
stack_file_section: components.terraform.settings
variable_value:
workspace_enabled: false
- dependency_type: import
stack_file: catalog/terraform/test-component-override-2
stack_file_section: components.terraform.settings
variable_value:
stack_name_pattern: '{tenant}-{environment}-{stage}-new-component'
workspace_enabled: true
- dependency_type: import
stack_file: catalog/terraform/test-component
stack_file_section: components.terraform.settings
variable_value:
workspace_enabled: true
- dependency_type: import
stack_file: catalog/terraform/spacelift-and-backend-override-1
stack_file_section: settings
variable_value:
protect_from_deletion: true
stack_destructor_enabled: false
workspace_enabled: true
vars:
enabled:
final_value: true
name: enabled
stack_dependencies:
- dependency_type: import
stack_file: catalog/terraform/test-component
stack_file_section: components.terraform.vars
variable_value: true
- dependency_type: inline
stack_file: orgs/cp/tenant1/dev/us-east-2
stack_file_section: terraform.vars
variable_value: false
# Other variables are omitted for clarity
vars:
enabled: true
environment: ue2
namespace: cp
region: us-east-2
service_1_map:
a: 1
b: 6
c: 7
d: 8
service_1_name: mixin-2
stage: dev
tenant: tenant1
workspace: test-component-override-3-workspace
```
## Sources of Component Variables
The `sources.vars` section of the output shows the final deep-merged component's variables and their inheritance chain.
Each variable descriptor has the following schema:
- `final_value` - the final value of the variable after Atmos processes and deep-merges all values from all stack manifests
- `name` - the variable name
- `stack_dependencies` - the variable's inheritance chain (stack manifests where the values for the variable were provided). It has the following
schema:
- `stack_file` - the stack manifest where the value for the variable was provided
- `stack_file_section` - the section of the stack manifest where the value for the variable was provided
- `variable_value` - the variable's value
- `dependency_type` - how the variable was defined (`inline` or `import`). `inline` means the variable was defined in one of the sections
in the stack manifest. `import` means the stack manifest where the variable is defined was imported into the parent Atmos stack
For example:
```yaml
sources:
vars:
enabled:
final_value: true
name: enabled
stack_dependencies:
- dependency_type: import
stack_file: catalog/terraform/test-component
stack_file_section: components.terraform.vars
variable_value: true
- dependency_type: inline
stack_file: orgs/cp/tenant1/dev/us-east-2
stack_file_section: terraform.vars
variable_value: false
- dependency_type: inline
stack_file: orgs/cp/tenant1/dev/us-east-2
stack_file_section: vars
variable_value: true
environment:
final_value: ue2
name: environment
stack_dependencies:
- dependency_type: import
stack_file: mixins/region/us-east-2
stack_file_section: vars
variable_value: ue2
namespace:
final_value: cp
name: namespace
stack_dependencies:
- dependency_type: import
stack_file: orgs/cp/_defaults
stack_file_section: vars
variable_value: cp
region:
final_value: us-east-2
name: region
stack_dependencies:
- dependency_type: import
stack_file: mixins/region/us-east-2
stack_file_section: vars
variable_value: us-east-2
service_1_map:
final_value:
a: 1
b: 6
c: 7
d: 8
name: service_1_map
stack_dependencies:
- dependency_type: import
stack_file: catalog/terraform/services/service-1-override-2
stack_file_section: components.terraform.vars
variable_value:
b: 6
c: 7
d: 8
- dependency_type: import
stack_file: catalog/terraform/services/service-1-override
stack_file_section: components.terraform.vars
variable_value:
a: 1
b: 2
c: 3
service_1_name:
final_value: mixin-2
name: service_1_name
stack_dependencies:
- dependency_type: import
stack_file: catalog/terraform/mixins/test-2
stack_file_section: components.terraform.vars
variable_value: mixin-2
- dependency_type: import
stack_file: catalog/terraform/mixins/test-1
stack_file_section: components.terraform.vars
variable_value: mixin-1
- dependency_type: import
stack_file: catalog/terraform/services/service-1-override-2
stack_file_section: components.terraform.vars
variable_value: service-1-override-2
- dependency_type: import
stack_file: catalog/terraform/tenant1-ue2-dev
stack_file_section: components.terraform.vars
variable_value: service-1-override-2
- dependency_type: import
stack_file: catalog/terraform/services/service-1-override
stack_file_section: components.terraform.vars
variable_value: service-1-override
- dependency_type: import
stack_file: catalog/terraform/services/service-1
stack_file_section: components.terraform.vars
variable_value: service-1
stage:
final_value: dev
name: stage
stack_dependencies:
- dependency_type: import
stack_file: mixins/stage/dev
stack_file_section: vars
variable_value: dev
```
:::info
The `stack_dependencies` inheritance chain shows the variable sources in the reverse order the sources were processed.
The first item in the list was processed the last and its `variable_value` overrode all the previous values of the variable.
:::
For example, the component's `enabled` variable has the following inheritance chain:
```yaml
sources:
vars:
enabled:
final_value: true
name: enabled
stack_dependencies:
- dependency_type: import
stack_file: catalog/terraform/test-component
stack_file_section: components.terraform.vars
variable_value: true
- dependency_type: inline
stack_file: orgs/cp/tenant1/dev/us-east-2
stack_file_section: terraform.vars
variable_value: false
- dependency_type: inline
stack_file: orgs/cp/tenant1/dev/us-east-2
stack_file_section: vars
variable_value: true
```
Which we can interpret as follows (reading from the last to the first item in the `stack_dependencies` list):
- In the `orgs/cp/tenant1/dev/us-east-2` stack manifest (the last item in the list), the value for `enabled` was set to `true` in the global `vars`
section (inline)
- Then in the same `orgs/cp/tenant1/dev/us-east-2` stack manifest, the value for `enabled` was set to `false` in the `terraform.vars`
section (inline). This value overrode the value set in the global `vars` section
- Finally, in the `catalog/terraform/test-component` stack manifest (which was imported into the parent Atmos stack
via [`import`](/core-concepts/stacks/imports)), the value for `enabled` was set to `true` in the `components.terraform.vars` section of
the `test/test-component-override-3` Atmos component. This value overrode all the previous values arriving at the `final_value: true` for the
variable. This final value is then set for the `enabled` variable of the Terraform component `test/test-component` when Atmos
executes `atmos terraform apply test/test-component-override-3 -s ` command
## Sources of Component ENV Variables
The `sources.env` section of the output shows the final deep-merged component's environment variables and their inheritance chain.
Each variable descriptor has the following schema:
- `final_value` - the final value of the variable after Atmos processes and deep-merges all values from all stack manifests
- `name` - the variable name
- `stack_dependencies` - the variable's inheritance chain (stack manifests where the values for the variable were provided). It has the following
schema:
- `stack_file` - the stack manifest where the value for the variable was provided
- `stack_file_section` - the section of the stack manifest where the value for the variable was provided
- `variable_value` - the variable's value
- `dependency_type` - how the variable was defined (`inline` or `import`). `inline` means the variable was defined in one of the sections
in the stack manifest. `import` means the stack manifest where the variable is defined was imported into the parent Atmos stack
For example:
```yaml
sources:
env:
TEST_ENV_VAR1:
final_value: val1-override-3
name: TEST_ENV_VAR1
stack_dependencies:
- dependency_type: import
stack_file: catalog/terraform/test-component-override-3
stack_file_section: components.terraform.env
variable_value: val1-override-3
- dependency_type: import
stack_file: catalog/terraform/test-component-override-2
stack_file_section: components.terraform.env
variable_value: val1-override-2
- dependency_type: import
stack_file: catalog/terraform/test-component-override
stack_file_section: components.terraform.env
variable_value: val1-override
- dependency_type: import
stack_file: catalog/terraform/test-component
stack_file_section: components.terraform.env
variable_value: val1
TEST_ENV_VAR2:
final_value: val2-override-3
name: TEST_ENV_VAR2
stack_dependencies:
- dependency_type: import
stack_file: catalog/terraform/test-component-override-3
stack_file_section: components.terraform.env
variable_value: val2-override-3
- dependency_type: import
stack_file: catalog/terraform/test-component-override-2
stack_file_section: components.terraform.env
variable_value: val2-override-2
- dependency_type: import
stack_file: catalog/terraform/test-component
stack_file_section: components.terraform.env
variable_value: val2
TEST_ENV_VAR3:
final_value: val3-override-3
name: TEST_ENV_VAR3
stack_dependencies:
- dependency_type: import
stack_file: catalog/terraform/test-component-override-3
stack_file_section: components.terraform.env
variable_value: val3-override-3
- dependency_type: import
stack_file: catalog/terraform/test-component-override
stack_file_section: components.terraform.env
variable_value: val3-override
- dependency_type: import
stack_file: catalog/terraform/test-component
stack_file_section: components.terraform.env
variable_value: val3
```
:::info
The `stack_dependencies` inheritance chain shows the ENV variable sources in the reverse order the sources were processed.
The first item in the list was processed the last and its `variable_value` overrode all the previous values of the variable.
:::
For example, the component's `TEST_ENV_VAR1` ENV variable has the following inheritance chain:
```yaml
sources:
env:
TEST_ENV_VAR1:
final_value: val1-override-3
name: TEST_ENV_VAR1
stack_dependencies:
- dependency_type: import
stack_file: catalog/terraform/test-component-override-3
stack_file_section: components.terraform.env
variable_value: val1-override-3
- dependency_type: import
stack_file: catalog/terraform/test-component-override-2
stack_file_section: components.terraform.env
variable_value: val1-override-2
- dependency_type: import
stack_file: catalog/terraform/test-component-override
stack_file_section: components.terraform.env
variable_value: val1-override
- dependency_type: import
stack_file: catalog/terraform/test-component
stack_file_section: components.terraform.env
variable_value: val1
```
Which we can interpret as follows (reading from the last to the first item in the `stack_dependencies` list):
- In the `catalog/terraform/test-component` stack manifest (the last item in the list), the value for the `TEST_ENV_VAR1` ENV variable was set
to `val1` in the `components.terraform.env` section
- Then the value was set to `val1-override` in the `catalog/terraform/test-component-override` stack manifest. This value overrides the value set
in the `catalog/terraform/test-component` stack manifest
- Then the value was set to `val1-override-2` in the `catalog/terraform/test-component-override-2` stack manifest. This value overrides the values
set in the `catalog/terraform/test-component` and `catalog/terraform/test-component-override` stack manifests
- Finally, in the `catalog/terraform/test-component-override-3` stack manifest (which was imported into the parent Atmos stack
via [`import`](/core-concepts/stacks/imports)), the value was set to `val1-override-3` in the `components.terraform.env` section of
the `test/test-component-override-3` Atmos component. This value overrode all the previous values arriving at the `final_value: val1-override-3` for
the ENV variable
## Sources of Component Settings
The `sources.settings` section of the output shows the final deep-merged component's settings and their inheritance chain.
Each setting descriptor has the following schema:
- `final_value` - the final value of the setting after Atmos processes and deep-merges all values from all stack manifests
- `name` - the setting name
- `stack_dependencies` - the setting's inheritance chain (stack manifests where the values for the variable were provided). It has the following
schema:
- `stack_file` - the stack manifest where the value for the setting was provided
- `stack_file_section` - the section of the stack manifest where the value for the setting was provided
- `variable_value` - the setting's value
- `dependency_type` - how the setting was defined (`inline` or `import`). `inline` means the setting was defined in one of the sections
in the stack manifest. `import` means the stack config file where the setting is defined was imported into the parent Atmos stack
For example:
```yaml
sources:
settings:
spacelift:
final_value:
protect_from_deletion: true
stack_destructor_enabled: false
stack_name_pattern: '{tenant}-{environment}-{stage}-new-component'
workspace_enabled: false
name: spacelift
stack_dependencies:
- dependency_type: import
stack_file: catalog/terraform/test-component-override-3
stack_file_section: components.terraform.settings
variable_value:
workspace_enabled: false
- dependency_type: import
stack_file: catalog/terraform/test-component-override-2
stack_file_section: components.terraform.settings
variable_value:
stack_name_pattern: '{tenant}-{environment}-{stage}-new-component'
workspace_enabled: true
- dependency_type: import
stack_file: catalog/terraform/test-component
stack_file_section: components.terraform.settings
variable_value:
workspace_enabled: true
- dependency_type: import
stack_file: catalog/terraform/spacelift-and-backend-override-1
stack_file_section: settings
variable_value:
protect_from_deletion: true
stack_destructor_enabled: false
workspace_enabled: true
```
:::info
The `stack_dependencies` inheritance chain shows the sources of the setting in the reverse order the sources were processed.
The first item in the list was processed the last and its `variable_value` overrode all the previous values of the setting.
:::
---
## atmos describe config
import Terminal from '@site/src/components/Terminal'
import Screengrab from '@site/src/components/Screengrab'
import Intro from '@site/src/components/Intro'
Use this command to show the final (deep-merged) [CLI configuration](/cli/configuration) of all `atmos.yaml` file(s).
## Usage
Execute the `describe config` command like this:
```shell
atmos describe config [options]
```
This command shows the final (deep-merged) [CLI configuration](/cli/configuration) (from `atmos.yaml` file(s)).
:::tip
Run `atmos describe config --help` to see all the available options
:::
## Examples
```shell
atmos describe config
atmos describe config -f yaml
atmos describe config --format yaml
atmos describe config -f json
atmos describe config --query
```
## Flags
- `--format` / `-f` (optional)
- Output format: `json` or `yaml` (`json` is default).
- `--query` / `-q` (optional)
- Query the results of the command using `yq` expressions.`atmos describe config --query `.For more details, refer to https://mikefarah.gitbook.io/yq.
---
## atmos describe dependents
import Terminal from '@site/src/components/Terminal'
import Screengrab from '@site/src/components/Screengrab'
import Intro from '@site/src/components/Intro'
Use this command to show a list of Atmos components in Atmos stacks that depend on the provided Atmos component.
## Description
In Atmos, you can define component dependencies by using the `settings.depends_on` section. The section used to define
all the Atmos components (in the same or different stacks) that the current component depends on.
The `settings.depends_on` section is a map of objects. The map keys are just the descriptions of dependencies and can be strings or numbers.
Provide meaningful descriptions so that people can understand what the dependencies are about.
Each object in the `settings.depends_on` section has the following schema:
- file (optional)
- A file on the local filesystem that the current component depends on
- folder (optional)
- A folder on the local filesystem that the current component depends on
- component (required if `file` or `folder` is not specified)
- an Atmos component that the current component depends on
- stack (optional)
- Atmos stack where the `component` is provisioned
- namespace (optional)
- The `namespace` where the `component` is provisioned
- tenant (optional)
- The `tenant` where the `component` is provisioned
- environment (optional)
- The `environment` where the `component` is provisioned
- stage (optional)
- The `stage` where the `component` is provisioned
One of `component`, `file` or `folder` is required.
Dependencies on external files (not in the component's folder) are defined using the `file` attribute. For example:
```yaml title="stacks/catalog/terraform/top-level-component3.yaml"
components:
terraform:
top-level-component3:
metadata:
component: "top-level-component1"
settings:
depends_on:
1:
file: "tests/fixtures/scenarios/complete/components/terraform/mixins/introspection.mixin.tf"
```
In the configuration above, we specify that the Atmos component `top-level-component3` depends on the file
`tests/fixtures/scenarios/complete/components/terraform/mixins/introspection.mixin.tf` (which is not in the component's folder).
Dependencies on external folders are defined using the `folder` attribute. For example:
```yaml title="stacks/catalog/terraform/top-level-component3.yaml"
components:
terraform:
top-level-component3:
metadata:
component: "top-level-component1"
settings:
depends_on:
1:
file: "tests/fixtures/scenarios/complete/components/terraform/mixins/introspection.mixin.tf"
2:
folder: "tests/fixtures/scenarios/complete/components/helmfile/infra/infra-server"
```
In the configuration above, we specify that the Atmos component `top-level-component3` depends on the folder
`tests/fixtures/scenarios/complete/components/helmfile/infra/infra-server`.
If `component` is specified, the rest of the attributes are the context variables and are used to define Atmos stacks other than the current stack.
For example, you can specify:
- `namespace` if the `component` is from a different Organization
- `tenant` if the `component` is from a different Organizational Unit
- `environment` if the `component` is from a different region
- `stage` if the `component` is from a different account
- `tenant`, `environment` and `stage` if the component is from a different Atmos stack (e.g. `tenant1-ue2-dev`)
In the following example, we define that the `top-level-component1` component depends on the following:
- The `test/test-component-override` component in the same Atmos stack
- The `test/test-component` component in Atmos stacks identified by the `dev` stage
- The `my-component` component from the `tenant1-ue2-staging` Atmos stack
```yaml title="tests/fixtures/scenarios/complete/stacks/catalog/terraform/top-level-component1.yaml"
components:
terraform:
top-level-component1:
settings:
depends_on:
1:
# If the `context` (namespace, tenant, environment, stage) is not provided,
# the `component` is from the same Atmos stack as this component
component: "test/test-component-override"
2:
# This component (in any stage) depends on `test/test-component`
# from the `dev` stage (in any `environment` and any `tenant`)
component: "test/test-component"
stage: "dev"
3:
# This component depends on `my-component`
# from the `tenant1-ue2-staging` Atmos stack
component: "my-component"
tenant: "tenant1"
environment: "ue2"
stage: "staging"
vars:
enabled: true
```
In the following example, we specify that the `top-level-component2` component depends on the following:
- The `test/test-component` component in the same Atmos stack
- The `test/test2/test-component-2` component in the same Atmos stack
```yaml title="tests/fixtures/scenarios/complete/stacks/catalog/terraform/top-level-component2.yaml"
components:
terraform:
top-level-component2:
metadata:
# Point to Terraform component
component: "top-level-component1"
settings:
depends_on:
1:
# If the `context` (namespace, tenant, environment, stage) is not provided,
# the `component` is from the same Atmos stack as this component
component: "test/test-component"
2:
# If the `context` (namespace, tenant, environment, stage) is not provided,
# the `component` is from the same Atmos stack as this component
component: "test/test2/test-component-2"
vars:
enabled: true
```
Having the `top-level-component` and `top-level-component2` components configured as shown above, we can now execute the following Atmos command
to show all the components that depend on the `test/test-component` component in the `tenant1-ue2-dev` stack:
```json
[
{
"component": "top-level-component1",
"component_type": "terraform",
"component_path": "tests/fixtures/scenarios/complete/components/terraform/top-level-component1",
"namespace": "cp",
"tenant": "tenant1",
"environment": "ue2",
"stage": "dev",
"stack": "tenant1-ue2-dev",
"stack_slug": "tenant1-ue2-dev-top-level-component1",
"spacelift_stack": "tenant1-ue2-dev-top-level-component1",
"atlantis_project": "tenant1-ue2-dev-top-level-component1"
}
]
```
Similarly, the following Atmos command shows all the components that depend on the `test/test-component` component in
the `tenant1-ue2-test-1` stack:
```json
[
{
"component": "top-level-component1",
"component_type": "terraform",
"component_path": "tests/fixtures/scenarios/complete/components/terraform/top-level-component1",
"namespace": "cp",
"tenant": "tenant1",
"environment": "ue2",
"stage": "test-1",
"stack": "tenant1-ue2-test-1",
"stack_slug": "tenant1-ue2-dev-top-level-component1",
"spacelift_stack": "tenant1-ue2-test-1-top-level-component1",
"atlantis_project": "tenant1-ue2-test-1-top-level-component1"
},
{
"component": "top-level-component2",
"component_type": "terraform",
"component_path": "tests/fixtures/scenarios/complete/components/terraform/top-level-component1",
"namespace": "cp",
"tenant": "tenant1",
"environment": "ue2",
"stage": "test-1",
"stack": "tenant1-ue2-test-1",
"stack_slug": "tenant1-ue2-test-1-top-level-component2",
"atlantis_project": "tenant1-ue2-test-1-top-level-component2"
}
]
```
After the `test/test-component` has been provisioned, you can use the outputs to perform the following actions:
- Provision the dependent components by executing the Atmos commands `atmos terraform apply top-level-component1 -s tenant1-ue2-test-1` and
`atmos terraform apply top-level-component2 -s tenant1-ue2-test-1` (on the command line or from a GitHub Action)
- Trigger the dependent Spacelift stack (from a GitHub Action by using the [spacectl](https://github.com/spacelift-io/spacectl) CLI, or by using an
OPA [Trigger](https://docs.spacelift.io/concepts/policy/trigger-policy)
policy, or by using
the [spacelift_stack_dependency](https://registry.terraform.io/providers/spacelift-io/spacelift/latest/docs/resources/stack_dependency) resource)
- Trigger the dependent Atlantis project
## Usage
```shell
atmos describe dependents [options]
```
:::tip
Run `atmos describe dependents --help` to see all the available options
:::
## Examples
```shell
atmos describe dependents test/test-component -s tenant1-ue2-test-1
atmos describe dependents test/test-component -s tenant1-ue2-dev --format yaml
atmos describe dependents test/test-component -s tenant1-ue2-test-1 -f yaml
atmos describe dependents test/test-component -s tenant1-ue2-test-1 --file dependents.json
atmos describe dependents test/test-component -s tenant1-ue2-test-1 --format yaml --file dependents.yaml
atmos describe dependents test/test-component -s tenant1-ue2-test-1 --query
```
## Arguments
- `component` (required)
-
Atmos component.
## Flags
- `--stack` (alias `-s`)(required)
-
Atmos stack.
- `--format` (alias `-f`)(optional)
-
Output format: `json` or `yaml` (`json` is default).
- `--file` (optional)
-
If specified, write the result to the file.
- `--query` (alias `-q`)(optional)
-
Query the results of the command using YQ expressions.
`atmos describe dependents -s --query `.
For more details, refer to https://mikefarah.gitbook.io/yq.
- `--process-templates` (optional)
-
Enable/disable processing of `Go` templates in Atmos stacks manifests when executing the command.
If the flag is not provided, it's set to `true` by default.
`atmos describe dependents -s --process-templates=false`
- `--process-functions` (optional)
-
Enable/disable processing of Atmos YAML functions in Atmos stacks manifests when executing the command.
If the flag is not provided, it's set to `true` by default.
`atmos describe dependents -s --process-functions=false`
- `--skip` (optional)
-
Skip processing a specific Atmos YAML function in Atmos stacks manifests when executing the command.
To specify more than one function, use multiple `--skip` flags, or separate the functions with a comma:
`atmos describe dependents -s --skip=terraform.output --skip=include`
`atmos describe dependents -s --skip=terraform.output,include`
## Output
The command outputs a list of objects (in JSON or YAML format).
Each object has the following schema:
```json
{
"component": "....",
"component_type": "....",
"component_path": "....",
"namespace": "....",
"tenant": "....",
"environment": "....",
"stage": "....",
"stack": "....",
"stack_slug": "",
"spacelift_stack": ".....",
"atlantis_project": "....."
}
```
where:
- `component` - the dependent Atmos component
- `component_type` - the type of the dependent component (`terraform` or `helmfile`)
- `component_path` - the filesystem path to the `terraform` or `helmfile` component
- `namespace` - the `namespace` where the dependent Atmos component is provisioned
- `tenant` - the `tenant` where the dependent Atmos component is provisioned
- `environment` - the `environment` where the dependent Atmos component is provisioned
- `stage` - the `stage` where the dependent Atmos component is provisioned
- `stack` - the Atmos stack where the dependent Atmos component is provisioned
- `stack_slug` - the Atmos stack slug (concatenation of the Atmos stack and Atmos component)
- `spacelift_stack` - the dependent Spacelift stack. It will be included only if the Spacelift workspace is enabled for the dependent Atmos component
in the Atmos stack in the `settings.spacelift.workspace_enabled` section (either directly in the component's `settings.spacelift.workspace_enabled`
section or via inheritance)
- `atlantis_project` - the dependent Atlantis project name. It will be included only if the Atlantis integration is configured in
the `settings.atlantis` section in the stack manifest. Refer to [Atlantis Integration](/integrations/atlantis) for more details
:::note
Abstract Atmos components (`metadata.type` is set to `abstract`) are not included in the output since they serve as blueprints for other
Atmos components and are not meant to be provisioned.
:::
## Output Example
```json
[
{
"component": "top-level-component2",
"component_type": "terraform",
"component_path": "tests/fixtures/scenarios/complete/components/terraform/top-level-component1",
"namespace": "cp",
"tenant": "tenant1",
"environment": "ue2",
"stage": "test-1",
"stack": "tenant1-ue2-test-1",
"stack_slug": "tenant1-ue2-dev-top-level-component2",
"atlantis_project": "tenant1-ue2-test-1-top-level-component2"
},
{
"component": "top-level-component1",
"component_type": "terraform",
"component_path": "tests/fixtures/scenarios/complete/components/terraform/top-level-component1",
"namespace": "cp",
"tenant": "tenant1",
"environment": "ue2",
"stage": "dev",
"stack": "tenant1-ue2-dev",
"stack_slug": "tenant1-ue2-test-1-top-level-component1",
"spacelift_stack": "tenant1-ue2-dev-top-level-component1",
"atlantis_project": "tenant1-ue2-dev-top-level-component1"
}
]
```
---
## atmos describe stacks
import Screengrab from '@site/src/components/Screengrab'
import Intro from '@site/src/components/Intro'
Use this command to show the fully deep-merged configuration for all stacks and the components in the stacks.
## Usage
Execute the `describe stacks` command like this:
```shell
atmos describe stacks [options]
```
This command shows configuration for stacks and components in the stacks.
:::tip
Run `atmos describe stacks --help` to see all the available options
:::
## Examples
```shell
atmos describe stacks
atmos describe stacks -s tenant1-ue2-dev
atmos describe stacks --file=stacks.yaml
atmos describe stacks --file=stacks.json --format=json
atmos describe stacks --components=infra/vpc
atmos describe stacks --components=echo-server,infra/vpc
atmos describe stacks --components=echo-server,infra/vpc --sections=none
atmos describe stacks --components=echo-server,infra/vpc --sections=none
atmos describe stacks --components=none --sections=metadata
atmos describe stacks --components=echo-server,infra/vpc --sections=vars,settings,metadata
atmos describe stacks --components=test/test-component-override-3 --sections=vars,settings,component,deps,inheritance --file=stacks.yaml
atmos describe stacks --components=test/test-component-override-3 --sections=vars,settings --format=json --file=stacks.json
atmos describe stacks --components=test/test-component-override-3 --sections=deps,vars -s=tenant2-ue2-staging
atmos describe stacks --process-templates=false
atmos describe stacks --process-functions=false
atmos describe stacks --skip=terraform.output
atmos describe stacks --skip=terraform.output --skip=include
atmos describe stacks --skip=include,eval
atmos describe stacks --query
```
:::tip
Use the `--query` flag (shorthand `-q`) to filter the output.
:::
## Flags
- `--stack` / `-s` (optional)
- Filter by a specific stack.Supports names of the top-level stack manifests(including subfolder paths),and Atmos stack names (derived from the context vars).
- `--file` (optional)
- If specified, write the result to the file.
- `--format` (optional)
- Specify the output format: `yaml` or `json` (`yaml` is default).
- `--components` (optional)
- Filter by specific Atmos components(comma-separated string of component names).
- `--component-types` (optional)
- Filter by specific component types: `terraform` or `helmfile`.
- `--sections` (optional)
- Output only the specified component sections.Available component sections: `backend`, `backend_type`, `component`, `deps`,`env`, `inheritance`, `metadata`, `remote_state_backend`,`remote_state_backend_type`, `settings`, `vars`.
- `--process-templates` (optional)
- Enable/disable processing of all `Go` templatesin Atmos stacks manifests when executing the command.Use the flag to see the stack configurationsbefore and after the templates are processed.If the flag is not provided, it's set to `true` by default.`atmos describe stacks --process-templates=false`.
- `--process-functions` (optional)
- Enable/disable processing of all Atmos YAML functionsin Atmos stacks manifests when executing the command.Use the flag to see the stack configurationsbefore and after the functions are processed.If the flag is not provided, it's set to `true` by default.`atmos describe stacks --process-functions=false`.
- `--skip` (optional)
- Skip processing a specific Atmos YAML functionin Atmos stacks manifests when executing the command.To specify more than one function,use multiple `--skip` flags, or separate the functions with a comma:`atmos describe stacks --skip=terraform.output --skip=include``atmos describe stacks --skip=terraform.output,include`.
- `--query` / `-q` (optional)
- Query the results of the command using `yq` expressions.`atmos describe stacks --query `.For more details, refer to https://mikefarah.gitbook.io/yq.
---
## atmos describe workflows
import Terminal from '@site/src/components/Terminal'
import Screengrab from '@site/src/components/Screengrab'
import Intro from '@site/src/components/Intro'
Use this command to show all configured Atmos workflows.
## Usage
Execute the `describe workflows` command like this:
```shell
atmos describe workflows [options]
```
:::tip
Run `atmos describe workflows --help` to see all the available options
:::
## Examples
```shell
atmos describe workflows
atmos describe workflows --output map
atmos describe workflows -o list
atmos describe workflows -o all
atmos describe workflows -o list --format json
atmos describe workflows -o all -f yaml
atmos describe workflows -f json
atmos describe workflows --query
```
## Flags
- `--format` / `-f` (optional)
- Specify the output format: `yaml` or `json` (`yaml` is default).
- `--output` / `-o` (optional)
- Specify the output type: `list`, `map` or `all` (`list` is default).
- `--query` / `-q` (optional)
- Query the results of the command using `yq` expressions.`atmos describe workflows --query `.For more details, refer to https://mikefarah.gitbook.io/yq.
When the `--output list` flag is passed (default), the output of the command is a list of objects. Each object has the
following schema:
- `file` - the workflow manifest file name
- `workflow` - the name of the workflow defined in the workflow manifest file
For example:
```shell
atmos describe workflows
atmos describe workflows -o list
```
```yaml
- file: compliance.yaml
workflow: deploy/aws-config/global-collector
- file: compliance.yaml
workflow: deploy/aws-config/superadmin
- file: compliance.yaml
workflow: destroy/aws-config/global-collector
- file: compliance.yaml
workflow: destroy/aws-config/superadmin
- file: datadog.yaml
workflow: deploy/datadog-integration
- file: helpers.yaml
workflow: save/docker-config-json
- file: networking.yaml
workflow: apply-all-components
- file: networking.yaml
workflow: plan-all-vpc
- file: networking.yaml
workflow: plan-all-vpc-flow-logs
```
When the `--output map` flag is passed, the output of the command is a map of workflow manifests to the lists of
workflows defined in each manifest.
For example:
```shell
atmos describe workflows -o map
```
```yaml
compliance.yaml:
- deploy/aws-config/global-collector
- deploy/aws-config/superadmin
- destroy/aws-config/global-collector
- destroy/aws-config/superadmin
datadog.yaml:
- deploy/datadog-integration
helpers.yaml:
- save/docker-config-json
networking.yaml:
- apply-all-components
- plan-all-vpc
- plan-all-vpc-flow-logs
```
When the `--output all` flag is passed, the output of the command is a map of workflow manifests to the maps of all
workflow definitions. For example:
```shell
atmos describe workflows -o all
```
```yaml
networking.yaml:
name: Networking & Logging
description: Atmos workflows for managing VPCs and VPC Flow Logs
workflows:
apply-all-components:
description: |
Run 'terraform apply' on all components in all stacks
steps:
- command: terraform apply vpc-flow-logs-bucket -s plat-ue2-dev -auto-approve
- command: terraform apply vpc -s plat-ue2-dev -auto-approve
- command: terraform apply vpc-flow-logs-bucket -s plat-uw2-dev -auto-approve
- command: terraform apply vpc -s plat-uw2-dev -auto-approve
- command: terraform apply vpc-flow-logs-bucket -s plat-ue2-staging -auto-approve
- command: terraform apply vpc -s plat-ue2-staging -auto-approve
- command: terraform apply vpc-flow-logs-bucket -s plat-uw2-staging -auto-approve
- command: terraform apply vpc -s plat-uw2-staging -auto-approve
- command: terraform apply vpc-flow-logs-bucket -s plat-ue2-prod -auto-approve
- command: terraform apply vpc -s plat-ue2-prod -auto-approve
- command: terraform apply vpc-flow-logs-bucket -s plat-uw2-prod -auto-approve
- command: terraform apply vpc -s plat-uw2-prod -auto-approve
plan-all-vpc:
description: |
Run 'terraform plan' on all 'vpc' components in all stacks
steps:
- command: terraform plan vpc -s plat-ue2-dev
- command: terraform plan vpc -s plat-uw2-dev
- command: terraform plan vpc -s plat-ue2-staging
- command: terraform plan vpc -s plat-uw2-staging
- command: terraform plan vpc -s plat-ue2-prod
- command: terraform plan vpc -s plat-uw2-prod
plan-all-vpc-flow-logs:
description: |
Run 'terraform plan' on all 'vpc-flow-logs-bucket' components in all stacks
steps:
- command: terraform plan vpc-flow-logs-bucket -s plat-ue2-dev
- command: terraform plan vpc-flow-logs-bucket -s plat-uw2-dev
- command: terraform plan vpc-flow-logs-bucket -s plat-ue2-staging
- command: terraform plan vpc-flow-logs-bucket -s plat-uw2-staging
- command: terraform plan vpc-flow-logs-bucket -s plat-ue2-prod
- command: terraform plan vpc-flow-logs-bucket -s plat-uw2-prod
validation.yaml:
name: Validation
description: Atmos workflows for VPCs and VPC Flow Logs validation
workflows:
validate-all-vpc:
description: Validate all VPC components in all stacks
steps:
- command: validate component vpc -s plat-ue2-dev
- command: validate component vpc -s plat-uw2-dev
- command: validate component vpc -s plat-ue2-staging
- command: validate component vpc -s plat-uw2-staging
- command: validate component vpc -s plat-ue2-prod
- command: validate component vpc -s plat-uw2-prod
validate-all-vpc-flow-logs:
description: Validate all VPC Flow Logs bucket components in all stacks
steps:
- command: validate component vpc-flow-logs-bucket -s plat-ue2-dev
- command: validate component vpc-flow-logs-bucket -s plat-uw2-dev
- command: validate component vpc-flow-logs-bucket -s plat-ue2-staging
- command: validate component vpc-flow-logs-bucket -s plat-uw2-staging
- command: validate component vpc-flow-logs-bucket -s plat-ue2-prod
- command: validate component vpc-flow-logs-bucket -s plat-uw2-prod
```
:::tip
Use the [atmos workflow](/cli/commands/workflow) CLI command to execute an Atmos workflow
:::
---
## atmos describe
import Screengrab from '@site/src/components/Screengrab'
import DocCardList from '@theme/DocCardList';
## Subcommands
---
## atmos docs generate
import Screengrab from '@site/src/components/Screengrab'
import Intro from '@site/src/components/Intro'
Use this command to generate one of your documentation artifacts (e.g. a README) as defined by the **named** section under `docs.generate.` in `atmos.yaml`.
Replace `` with the name of the section you want to run (for example, `readme`, `release-notes`, etc.).
In `atmos.yaml`, you can define **one or more** documentation‐generation blocks under `docs.generate`. Each top‐level key becomes a CLI argument:
```yaml
docs:
generate:
readme:
base-dir: .
input:
- "./README.yaml"
template: "https://.../README.md.gotmpl"
output: "./README.md"
terraform:
source: src/
enabled: false
format: "markdown"
show_providers: false
show_inputs: true
show_outputs: true
sort_by: "name"
hide_empty: false
indent_level: 2
release-notes:
base-dir: .
input:
- "./CHANGELOG.yaml"
template: "./release-notes.gotmpl"
output: "./RELEASE_NOTES.md"
```
For each CLI argument the command combines all local or remote YAML files specified at `input` and template file then generates the documentation artifact at the respective `output` folder. In case the template contains `terraform_docs` key, e.g.
```yaml
{{- $data := (ds "config") -}}
{{ $data.name | default "Project Title" }}
{{ $data.description | default "No description provided." }}
{{ if has $data "extra_info" }}
Extra info: {{ $data.extra_info }}
{{ end }}
{{ if has $data "terraform_docs" }}
## Terraform Docs
{{ $data.terraform_docs }}
{{ end }}
```
the resultant file will also have a corresponding section rendered. By default `terraform.format` is set to `markdown table`, and can also be `markdown`, `tfvars hcl`, and `tfvars json`.
## Dynamic Keys
If you add a new key under docs.generate—say readme2 or release-notes —you simply pass that key to the CLI:
```shell
atmos docs generate readme2
atmos docs generate release-notes
```
## Usage
```shell
atmos docs generate readme
```
## Supported Sources for README.yaml and template
### Local Sources
It supports the following local file sources:
- Absolute paths
```yaml
docs:
generate:
readme:
input:
- "/Users/me/Documents/README.yaml"
template: "/Users/me/Documents/README.md.gotmpl"
```
- Paths relative to the current working directory
```yaml
docs:
generate:
readme:
input:
- "./README.yaml"
template: "./README.md.gotmpl"
```
- Paths relative to the `base_dir` defined in `atmos.yaml` CLI config file (then resolved as relative to cwd)
```yaml
docs:
generate:
readme:
input:
- "terraform/README.yaml"
template: "terraform/README.md.gotmpl"
```
### Remote Sources
To download remote files, Atmos uses [`go-getter`](https://github.com/hashicorp/go-getter)
(used by [Terraform](https://www.terraform.io/) for downloading modules)
---
## atmos docs
import Screengrab from '@site/src/components/Screengrab'
import DocCardList from '@theme/DocCardList';
import Intro from '@site/src/components/Intro'
Use this command to open the [Atmos docs](https://atmos.tools/)
## Usage
When run on its own, the `atmos docs` command opens [Atmos docs](https://atmos.tools/), but it can also display documentation for specified components. For example:
```shell
atmos docs
atmos docs vpc
atmos docs eks/cluster
```
## Subcommands
---
## atmos helmfile generate varfile
import Screengrab from '@site/src/components/Screengrab'
import Terminal from '@site/src/components/Terminal'
import Intro from '@site/src/components/Intro'
Use this command to generate a varfile for a `helmfile` component in a stack.
## Usage
Execute the `helmfile generate varfile` command like this:
```shell
atmos helmfile generate varfile -s [options]
```
This command generates a varfile for a `helmfile` component in a stack.
:::tip
Run `atmos helmfile generate varfile --help` to see all the available options
:::
## Examples
```shell
atmos helmfile generate varfile echo-server -s tenant1-ue2-dev
atmos helmfile generate varfile echo-server -s tenant1-ue2-dev
atmos helmfile generate varfile echo-server -s tenant1-ue2-dev -f vars.yaml
atmos helmfile generate varfile echo-server --stack tenant1-ue2-dev --file=vars.yaml
```
## Arguments
- `component` (required)
- Atmos helmfile component.
## Flags
- `--stack` / `-s` (required)
- Atmos stack.
- `--file` / `-f` (optional)
- File name to write the varfile to.If not specified, the varfile name is generated automatically from the context.
- `--dry-run` (optional)
- Dry run.
---
## atmos helmfile
import Screengrab from '@site/src/components/Screengrab'
import Terminal from '@site/src/components/Terminal'
import DocCardList from '@theme/DocCardList';
import Intro from '@site/src/components/Intro'
Use these subcommands to run `helmfile` commands.
# Usage
The `helmfile` integration passes through all arguments to the `helmfile` command.
Executes `helmfile` commands.
```shell
atmos helmfile -s [options]
atmos helmfile --stack [options]
```
:::info
Atmos supports all `helmfile` commands and options described in [Helmfile CLI reference](https://github.com/helmfile/helmfile#cli-reference).
In addition, the `component` argument and `stack` flag are required to generate variables for the component in the stack.
:::
**Additions and differences from native Helmfile:**
- `atmos helmfile generate varfile` command generates a varfile for the component in the stack
- `atmos helmfile` commands support [GLOBAL OPTIONS](https://github.com/roboll/helmfile#cli-reference) using the command-line flag `--global-options`.
Usage: `atmos helmfile -s [command options] [arguments] --global-options="--no-color --namespace=test"`
- before executing the `helmfile` commands, Atmos runs `aws eks update-kubeconfig` to read kubeconfig from the EKS cluster and use it to
authenticate with the cluster. This can be disabled in `atmos.yaml` CLI config by setting `components.helmfile.use_eks` to `false`
- double-dash `--` can be used to signify the end of the options for Atmos and the start of the additional native arguments and flags for
the `helmfile` commands.
:::tip
Run `atmos helmfile --help` to see all the available options
:::
## Examples
```shell
atmos helmfile diff echo-server -s tenant1-ue2-dev
atmos helmfile diff echo-server -s tenant1-ue2-dev --redirect-stderr /dev/null
atmos helmfile apply echo-server -s tenant1-ue2-dev
atmos helmfile apply echo-server -s tenant1-ue2-dev --redirect-stderr /dev/stdout
atmos helmfile sync echo-server --stack tenant1-ue2-dev
atmos helmfile sync echo-server --stack tenant1-ue2-dev --redirect-stderr ./errors.txt
atmos helmfile destroy echo-server --stack=tenant1-ue2-dev
atmos helmfile destroy echo-server --stack=tenant1-ue2-dev --redirect-stderr /dev/stdout
```
## Arguments
- `component` (required)
- Atmos component.
## Flags
- `--stack` / `-s` (required)
- Atmos stack.
- `--dry-run` (optional)
- Dry run.
- `--redirect-stderr` (optional)
- File descriptor to redirect `stderr` to.Errors can be redirected to any file or any standard file descriptor(including `/dev/null`).
:::note
All native `helmfile` flags, command options, and arguments are supported
:::
## Subcommands
---
## atmos help
import Screengrab from '@site/src/components/Screengrab'
import Terminal from '@site/src/components/Terminal'
## Usage
The `atmos --help` and `atmos -h` commands show help for all Atmos CLI commands.
From time to time, Atmos will check for a newer release and let you know if one is available.
Please see the [`atmos version`](/cli/commands/version) documentation to configure this behavior.
```shell
atmos help
atmos --help
atmos -h
```
## Examples
```shell
atmos help # Starts an interactive help UI in the terminal
atmos --help # Shows help for all Atmos CLI commands
atmos -h # Shows help for all Atmos CLI commands
atmos atlantis --help # Executes 'atlantis' commands
atmos aws --help # Executes 'aws' commands
atmos completion --help # Executes 'completion' commands
atmos describe --help # Executes 'describe' commands
atmos terraform --help # Executes 'terraform' commands
atmos helmfile --help # Executes 'helmfile' commands
atmos packer --help # Executes 'packer' commands
atmos validate --help # Executes 'validate' commands
atmos vendor --help # Executes 'vendor' commands
atmos workflow --help # Executes 'workflow' commands
```
## Screenshots
The `atmos help` starts an interactive help UI in the terminal:
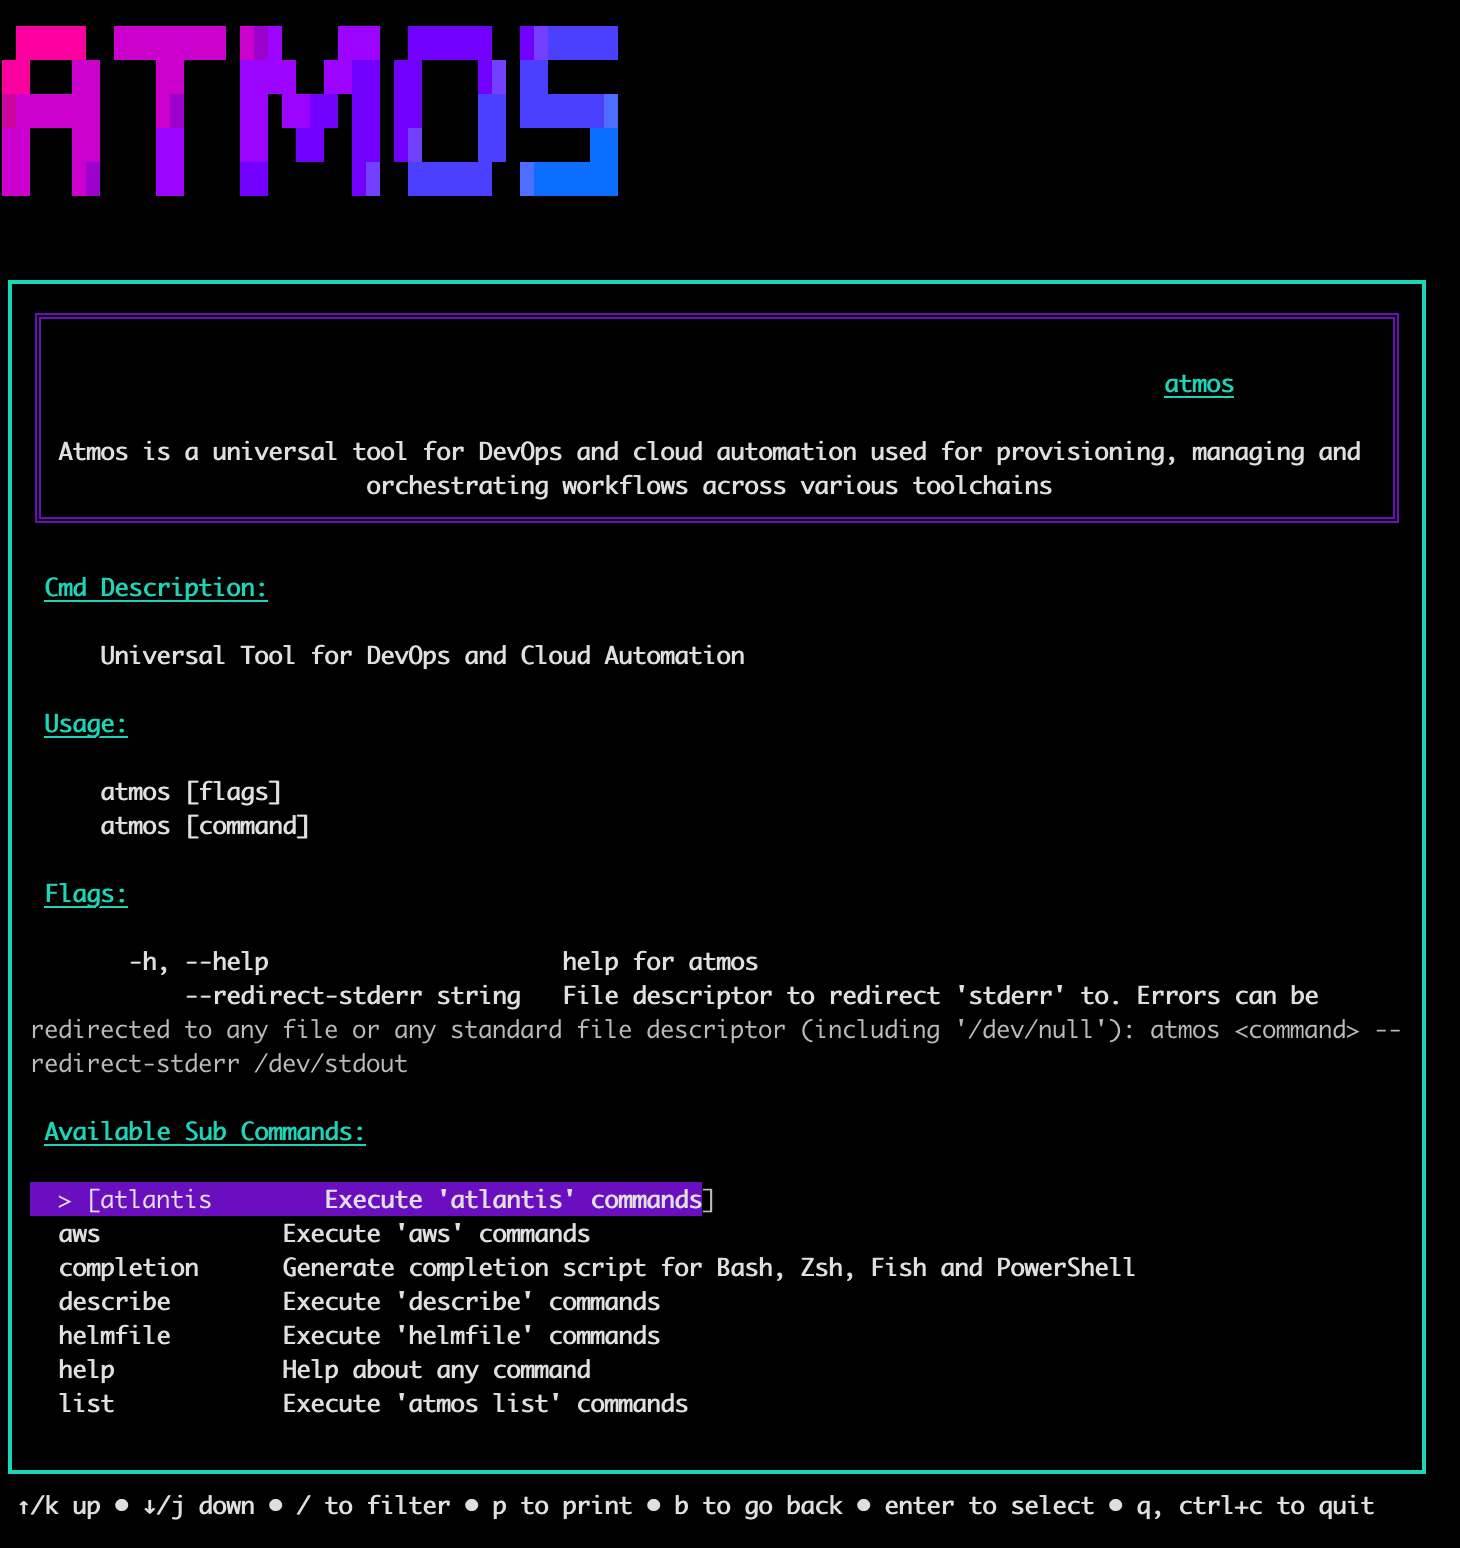
---
## atmos list components
import Screengrab from '@site/src/components/Screengrab'
:::note purpose
Use this command to list all Atmos components or Atmos components in a specified stack.
:::
## Usage
Execute the `list components` command like this:
```shell
atmos list components
```
This command lists Atmos components in a specified stack.
```shell
atmos list components -s
```
:::tip
Run `atmos list components --help` to see all the available options
:::
## Examples
```shell
atmos list components
atmos list components -s tenant1-ue2-dev
```
### Custom Columns for Components
This configuration customizes the output of `atmos list components`:
```yaml
# In atmos.yaml
components:
list:
columns:
- name: Component Name
value: "{{ .component_name }}"
- name: Component Type
value: "{{ .component_type }}"
- name: Component Path
value: "{{ .component_path }}"
```
Running `atmos list components` will produce a table with these custom columns.
## Flags
- `--stack` / `-s` (optional)
- Atmos stack.
---
## atmos list metadata
The `atmos list metadata` command displays component metadata across all stacks.
## Usage
```shell
atmos list metadata [flags]
```
## Description
The `atmos list metadata` command helps you inspect component metadata across different stacks. It provides a tabular view where:
- Each column represents a stack (e.g., dev-ue1, staging-ue1, prod-ue1)
- Each row represents a key in the component's metadata
- Cells contain the metadata values for each key in each stack
The command is particularly useful for:
- Comparing component metadata across different environments
- Verifying component types and versions across stacks
- Understanding component organization patterns across your infrastructure
## Flags
- `--query string`
- JMESPath query to filter metadata (default: `.metadata`)
- `--max-columns int`
- Maximum number of columns to display (default: `50`)
- `--format string`
- Output format: `table`, `json`, `yaml`, `csv`, `tsv` (default: `table`)
- `--delimiter string`
- Delimiter for csv/tsv output (default: `,` for csv, `\t` for tsv)
- `--stack string`
- Filter by stack pattern (e.g., `*-dev-*`, `prod-*`, `*-{dev,staging}-*`)
## Examples
List all metadata:
```shell
atmos list metadata
```
List metadata for specific stacks:
```shell
# List metadata for dev stacks
atmos list metadata --stack '*-dev-*'
# List metadata for production stacks
atmos list metadata --stack 'prod-*'
```
List specific metadata using JMESPath queries:
```shell
# Query component names
atmos list metadata --query '.metadata.component'
# Query component types
atmos list metadata --query '.metadata.type'
# Query component versions
atmos list metadata --query '.metadata.version'
```
Output in different formats:
```shell
# JSON format for machine processing
atmos list metadata --format json
# YAML format for configuration files
atmos list metadata --format yaml
# CSV format for spreadsheet compatibility
atmos list metadata --format csv
# TSV format with tab delimiters
atmos list metadata --format tsv
```
### Custom Column using Stack Name
You can use available variables like `.stack_name` in your column definitions:
```yaml
# In atmos.yaml, under the appropriate scope (values, vars, settings, or metadata)
list:
columns:
- name: "Stack"
value: "{{ .stack_name }}"
- name: "Metadata"
value: "{{ .key }}"
- name: "Value"
value: "{{ .value }}"
```
## Example Output
```shell
> atmos list metadata
┌──────────────┬──────────────┬──────────────┬──────────────┐
│ │ dev-ue1 │ staging-ue1 │ prod-ue1 │
├──────────────┼──────────────┼──────────────┼──────────────┤
│ component │ vpc │ vpc │ vpc │
│ type │ terraform │ terraform │ terraform │
│ version │ 1.0.0 │ 1.0.0 │ 1.0.0 │
└──────────────┴──────────────┴──────────────┴──────────────┘
```
:::tip
- For wide tables, try using more specific queries or reduce the number of stacks
- Stack patterns support glob matching (e.g., `*-dev-*`, `prod-*`, `*-{dev,staging}-*`)
- Metadata is typically found under component configurations
:::
---
## atmos list settings
The `atmos list settings` command displays component settings across all stacks.
## Usage
```shell
atmos list settings [flags]
```
## Description
The `atmos list settings` command helps you inspect component settings across different stacks. It provides a tabular view where:
- Each column represents a stack (e.g., dev-ue1, staging-ue1, prod-ue1)
- Each row represents a key in the component's settings
- Cells contain the settings values for each key in each stack (only scalars at this time)
The command is particularly useful for:
- Comparing component settings across different environments
- Verifying settings are configured correctly in each stack
- Understanding component configuration patterns across your infrastructure
## Flags
- `--query string`
- Dot-notation path query to filter settings (e.g., `.settings.templates`). Uses a simplified path syntax, not full JMESPath.
- `--max-columns int`
- Maximum number of columns to display (default: `50`)
- `--format string`
- Output format: `table`, `json`, `yaml`, `csv`, `tsv` (default: `table`)
- `--delimiter string`
- Delimiter for csv/tsv output (default: `,` for csv, `\t` for tsv)
- `--stack string`
- Filter by stack by wildcard pattern (e.g., `*-dev-*`, `prod-*`, `*-{dev,staging}-*`)
## Examples
List all settings:
```shell
atmos list settings
```
List settings for specific stacks:
```shell
# List settings for dev stacks
atmos list settings --stack '*-dev-*'
# List settings for production stacks
atmos list settings --stack 'prod-*'
```
List specific settings using path queries:
```shell
# Query template settings
atmos list settings --query '.settings.templates'
# Query validation settings
atmos list settings --query '.settings.validation'
# Query specific template configurations
atmos list settings --query '.settings.templates.gomplate'
```
Output in different formats:
```shell
# JSON format for machine processing
atmos list settings --format json
# YAML format for configuration files
atmos list settings --format yaml
# CSV format for spreadsheet compatibility
atmos list settings --format csv
# TSV format with tab delimiters
atmos list settings --format tsv
```
### Custom Column using Stack Name
You can use available variables like `.stack_name` in your column definitions:
```yaml
# In atmos.yaml, under the appropriate scope (values, vars, settings, or metadata)
list:
columns:
- name: "Stack"
value: "{{ .stack_name }}"
- name: "Setting"
value: "{{ .key }}"
- name: "Value"
value: "{{ .value }}"
```
## Example Output
```shell
> atmos list settings
┌──────────────┬──────────────┬──────────────┬──────────────┐
│ │ dev-ue1 │ staging-ue1 │ prod-ue1 │
├──────────────┼──────────────┼──────────────┼──────────────┤
│ templates │ {...} │ {...} │ {...} │
│ validation │ {...} │ {...} │ {...} │
└──────────────┴──────────────┴──────────────┴──────────────┘
```
:::tip
- For wide tables, try using more specific queries or reduce the number of stacks
- Stack patterns support glob matching (e.g., `*-dev-*`, `prod-*`, `*-{dev,staging}-*`)
- Settings are typically found under component configurations
:::
---
## atmos list stacks
import Screengrab from '@site/src/components/Screengrab'
import Terminal from '@site/src/components/Terminal'
import Intro from '@site/src/components/Intro'
Use this command to list Atmos stacks.
## Usage
Execute the `list stacks` command like this:
```shell
atmos list stacks
```
To view all stacks for a provided component, execute the `list stacks` command like this:
```shell
atmos list stacks -c
```
:::tip
Run `atmos list stacks --help` to see all the available options
:::
## Examples
```shell
atmos list stacks
atmos list stacks -c vpc
```
### Customizing Output Columns
This configuration customizes the output of `atmos list stacks`:
```yaml
# In atmos.yaml
stacks:
list:
format: table
columns:
- name: Stack Name
value: "{{ .stack_name }}"
- name: Configuration Path
value: "{{ .stack_path }}"
```
When you run `atmos list stacks`, the output table will have columns titled "Stack Name" and "Configuration Path".
## Flags
- `--component` / `-c` (optional)
- Atmos component.
---
## atmos list values
The `atmos list values` command displays component values across all stacks where the component is used.
## Usage
```shell
atmos list values [component] [flags]
```
## Description
The `atmos list values` command helps you inspect component values across different stacks. It provides a tabular view where:
- Each column represents a stack (e.g., dev-ue1, staging-ue1, prod-ue1)
- Each row represents a key in the component's configuration
- Cells contain the values for each key in each stack
The command is particularly useful for:
- Comparing component configurations across different environments
- Verifying values are set correctly in each stack
- Understanding how a component is configured across your infrastructure
## Flags
- `--query string`
- Dot-notation path query to filter values (e.g., `.vars.enabled`). Uses a simplified path syntax, not full JMESPath.
- `--abstract`
- Include abstract components in the output
- `--max-columns int`
- Maximum number of columns to display (default: `10`)
- `--format string`
- Output format: `table`, `json`, `csv`, `tsv` (default: `table`)
- `--delimiter string`
- Delimiter for csv/tsv output (default: `,` for csv, `\t` for tsv)
## Examples
List all values for a component:
```shell
atmos list values vpc
```
List only variables for a component (using the alias):
```shell
atmos list vars vpc
```
List values with a custom path query:
```shell
# Query specific variables
atmos list values vpc --query .vars.enabled
# Query environment settings
atmos list values vpc --query .vars.environment
# Query network configuration
atmos list values vpc --query .vars.ipv4_primary_cidr_block
```
Include abstract components:
```shell
atmos list values vpc --abstract
```
Limit the number of columns:
```shell
atmos list values vpc --max-columns 5
```
Output in different formats:
```shell
# JSON format for machine processing
atmos list values vpc --format json
# CSV format for spreadsheet compatibility
atmos list values vpc --format csv
# TSV format with tab delimiters
atmos list values vpc --format tsv
# Note: Use JSON or CSV formats when dealing with wide datasets
# The table format will show a width error if the data is too wide for your terminal
```
### Custom Column using Stack Name
You can use available variables like `.stack_name` in your column definitions:
```yaml
# In atmos.yaml, under the appropriate scope (values, vars, settings, or metadata)
list:
columns:
- name: "Stack"
value: "{{ .stack_name }}"
- name: "Key"
value: "{{ .key }}"
- name: "Value"
value: "{{ .value }}"
```
## Example Output
```shell
> atmos list vars vpc
┌──────────────┬──────────────┬──────────────┬──────────────┐
│ │ dev-ue1 │ staging-ue1 │ prod-ue1 │
├──────────────┼──────────────┼──────────────┼──────────────┤
│ enabled │ true │ true │ true │
│ name │ dev-vpc │ staging-vpc │ prod-vpc │
│ cidr_block │ 10.0.0.0/16 │ 10.1.0.0/16 │ 10.2.0.0/16 │
│ environment │ dev │ staging │ prod │
│ namespace │ example │ example │ example │
│ stage │ dev │ staging │ prod │
│ region │ us-east-1 │ us-east-1 │ us-east-1 │
└──────────────┴──────────────┴──────────────┴──────────────┘
```
### Nested Object Display
When listing values that contain nested objects:
1. In table format, nested objects appear as `{...}` placeholders
2. Use `--format json` or `--format yaml` to see the complete nested structure
3. You can query specific nested paths using the dot notation: `--query .vars.tags.Environment`
Example JSON output with nested objects:
```json
{
"dev-ue1": {
"cidr_block": "10.0.0.0/16",
"tags": {
"Environment": "dev",
"Team": "devops"
},
"subnets": [
"10.0.1.0/24",
"10.0.2.0/24"
]
}
}
```
## Related Commands
- [atmos list components](/cli/commands/list/components) - List available components
- [atmos describe component](/cli/commands/describe/component) - Show detailed information about a component
---
## atmos list vars
The `atmos list vars` command displays component variables across all stacks where the component is used.
## Usage
```shell
atmos list vars [flags]
```
## Description
The `atmos list vars` command helps you inspect component variables across different stacks. It provides a tabular view where:
- Each column represents a stack (e.g., dev-ue1, staging-ue1, prod-ue1)
- Each row represents a variable in the component's configuration
- Cells contain the variable values for each stack
This command is an alias for `atmos list values --query .vars` and is useful for:
- Comparing component variables across different environments
- Verifying configuration consistency across stacks
- Troubleshooting configuration issues
## Arguments
- `component`
- The component to list variables for
## Flags
- `--query string`
- Filter the results using YQ expressions (default: `.vars`)
- `--abstract`
- Include abstract components
- `--max-columns int`
- Maximum number of columns to display (default: `50`)
- `--format string`
- Output format: `table`, `json`, `yaml`, `csv`, `tsv` (default: `table`)
- `--delimiter string`
- Delimiter for csv/tsv output (default: `,` for csv, `\t` for tsv)
- `--stack string`
- Filter by stack pattern (e.g., `*-dev-*`, `prod-*`, `*-{dev,staging}-*`)
## Examples
List all variables for a component:
```shell
atmos list vars vpc
```
List specific variables using query:
```shell
# List specific variable
atmos list vars vpc --query .vars.tags
# List a nested variable
atmos list vars vpc --query .vars.settings.vpc
```
Filter by stack pattern:
```shell
# List variables for dev stacks
atmos list vars vpc --stack '*-dev-*'
# List variables for production stacks
atmos list vars vpc --stack 'prod-*'
```
Output in different formats:
```shell
# JSON format for machine processing
atmos list vars vpc --format json
# YAML format for configuration files
atmos list vars vpc --format yaml
# CSV format for spreadsheet compatibility
atmos list vars vpc --format csv
# TSV format with tab delimiters
atmos list vars vpc --format tsv
```
Include abstract components:
```shell
atmos list vars vpc --abstract
```
Filter by stack and specific variables:
```shell
atmos list vars vpc --stack '*-ue2-*' --query .vars.region
```
### Custom Column using Stack Name
You can use available variables like `.stack_name` in your column definitions:
```yaml
# In atmos.yaml, under the appropriate scope (values, vars, settings, or metadata)
list:
columns:
- name: "Stack"
value: "{{ .stack_name }}"
- name: "Variable"
value: "{{ .key }}"
- name: "Value"
value: "{{ .value }}"
```
## Example Output
```shell
> atmos list vars vpc
┌─────────────┬──────────────┬──────────────┬──────────────┐
│ │ dev-ue1 │ staging-ue1 │ prod-ue1 │
├─────────────┼──────────────┼──────────────┼──────────────┤
│ name │ platform-vpc │ platform-vpc │ platform-vpc │
│ region │ us-east-1 │ us-east-1 │ us-east-1 │
│ environment │ dev │ staging │ prod │
└─────────────┴──────────────┴──────────────┴──────────────┘
```
:::tip
- For wide tables, try using more specific queries or reduce the number of stacks
- Stack patterns support glob matching (e.g., `*-dev-*`, `prod-*`, `*-{dev,staging}-*`)
- Use `--abstract` to include abstract components in the results
:::
---
## atmos list workflows
The `atmos list workflows` command displays all Atmos workflows defined in your project.
## Usage
```shell
atmos list workflows [flags]
```
## Description
The `atmos list workflows` command helps you inspect all Atmos workflows defined in your project's workflow manifests. It provides a tabular view where:
- Each row represents a workflow
- Columns show the file, workflow name, and description
This command is useful for:
- Getting an overview of all available workflows
- Finding workflows for specific tasks
- Understanding workflow organization in your project
## Flags
- `--file, -f string`
- Filter workflows by file (e.g., `atmos list workflows -f workflow1`)
- `--format string`
- Output format: `table`, `json`, `yaml`, `csv`, `tsv` (default: `table`)
- `--delimiter string`
- Delimiter for csv/tsv output (default: `\t`)
## Examples
List all workflows:
```shell
atmos list workflows
```
Filter workflows by file:
```shell
atmos list workflows -f networking.yaml
```
Output in different formats:
```shell
# JSON format for machine processing
atmos list workflows --format json
# YAML format for configuration files
atmos list workflows --format yaml
# CSV format for spreadsheet compatibility
atmos list workflows --format csv
# TSV format with tab delimiters
atmos list workflows --format tsv
```
Specify delimiter for CSV output:
```shell
atmos list workflows --format csv --delimiter ','
```
## Example Output
```shell
> atmos list workflows
┌────────────────┬─────────────────────────────┬─────────────────────────────────────────┐
│ File │ Workflow │ Description │
├────────────────┼─────────────────────────────┼─────────────────────────────────────────┤
│ compliance.yaml│ deploy/aws-config/global │ Deploy AWS Config Global │
│ networking.yaml│ apply-all-components │ Apply all networking components │
│ networking.yaml│ plan-all-vpc │ Plan all VPC changes │
│ datadog.yaml │ deploy/datadog-integration │ Deploy Datadog integration │
└────────────────┴─────────────────────────────┴─────────────────────────────────────────┘
```
:::tip
- Use the `--file` flag to filter workflows from a specific manifest file
- The `describe workflows` command provides more detailed information about workflows
:::
## Examples
### Custom Columns for Workflows
This configuration customizes the output of `atmos list workflows`:
```yaml
# In atmos.yaml
workflows:
list:
columns:
- name: Workflow
value: "{{ .workflow_name }}"
- name: Definition File
value: "{{ .workflow_file }}"
- name: Description
value: "{{ .workflow_description }}"
```
Running `atmos list workflows` will display these columns.
---
## atmos list
import Screengrab from '@site/src/components/Screengrab';
import DocCardList from '@theme/DocCardList';
import Intro from '@site/src/components/Intro'
Use these subcommands to list sections of Atmos configurations.
Atmos provides a powerful feature to customize the columns displayed by various `atmos list` commands (e.g., `atmos list stacks`, `atmos list components`, `atmos list workflows`). This allows you to tailor the tabular output to show precisely the information you need for different contexts.
Column customization is configured within your `atmos.yaml` file using Go template expressions, enabling dynamic values based on stack, component, or workflow data. This guide explains how to configure and use this feature.
## Subcommands
## Supported List Commands
| Command | Description |
|---------------------------|-----------------------------------------------------------------------------------------------|
| `atmos list stacks` | Lists all defined **stacks** in your project. A *stack* is a named configuration representing a deployment environment (e.g., `dev/us-east-1`, `prod/eu-west-1`). |
| `atmos list components` | Lists all available **components** (Terraform, Helmfile, etc.) defined in the project. Components are reusable infrastructure building blocks. |
| `atmos list workflows` | Lists all defined **workflows**, which are custom command sequences defined in `atmos.yaml` to streamline repetitive tasks. |
| `atmos list values` | Displays the fully resolved **configuration values** for a specified component in a stack, after inheritance and imports are applied. |
| `atmos list vars` | Lists the **Terraform `vars`** (input variables) that will be passed to a component for a given stack. Useful for debugging variable resolution. |
| `atmos list settings` | Shows the **`settings` block**, typically used for configuring a component’s behavior (e.g., module version, backend type). |
| `atmos list metadata` | Displays the **`metadata` block** associated with a component in a stack, including attributes like `stage`, `tenant`, `environment`, and `namespace`. |
You can define custom columns for each of these commands individually in your `atmos.yaml`.
## How Column Customization Works
To customize columns for a specific `list` command, navigate to the relevant section (e.g., `stacks`, `components`, `workflows`) in your `atmos.yaml` configuration file. Within that section, define a `list` block.
Inside the `list` block:
1. Specify the output `format` (optional, defaults to `table`). Other options include `json`, `yaml`, `csv`, `tsv`.
2. Define a `columns` array. Each element in this array represents a column in the output table and must have:
* `name`: The string that will appear as the column header.
* `value`: A Go template string that dynamically determines the value for each row in that column.
**Example Structure:**
```yaml
# In atmos.yaml
stacks: # Or components, workflows, etc.
list:
format: table # Optional
columns:
- name: "Header 1"
value: "{{ .some_template_variable }}"
- name: "Header 2"
value: "Static Text or {{ .another_variable }}"
# ... more columns
```
## YAML Template Syntax
The `value` field in each column definition supports Go templates. The available variables within the template depend on the specific `atmos list` command being customized:
### For `atmos list stacks`:
```yaml
{{ .stack_name }} # Name of the stack
{{ .stack_path }} # Filesystem path to the stack configuration file
```
### For `atmos list components`:
```yaml
{{ .component_name }} # Name of the component
{{ .component_type }} # Type of the component (e.g., terraform, helmfile)
{{ .component_path }} # Filesystem path to the component directory
```
### For `atmos list workflows`:
```yaml
{{ .name }} # The name of the workflow
{{ .file }} # The manifest name
{{ .description }} # The description provided for the workflow
```
### For `atmos list values`, `atmos list vars`, `atmos list settings`, and `atmos list metadata`:
```yaml
{{ .stack_name }} # Name of the stack context
{{ .key }} # The key or property name being listed
{{ .value }} # The corresponding value for the key
```
## Full Reference: atmos.yaml Structure
Here's the general structure for defining custom list columns in `atmos.yaml`:
```yaml
: # e.g., stacks, components, workflows, values, vars, settings, metadata
list:
format: table|json|csv|yaml|tsv # Optional, default is 'table'
columns:
- name: ""
value: ""
# ... add more column definitions as needed
```
- Replace `` with the specific scope corresponding to the `atmos list` command you want to customize (e.g., `stacks` for `atmos list stacks`).
- The `columns` array is mandatory if you want to override the default columns. If `columns` is omitted, the command uses its default output columns.
### Custom Columns for Workflows
```yaml
# In atmos.yaml
workflows:
list:
columns:
- name: Workflow
value: "{{ .name }}" # Corresponds to the workflow key in the manifest
- name: Manifest Name
value: "{{ .file }}" # Corresponds to the 'name' field within the manifest file
- name: Description
value: "{{ .description }}" # Corresponds to the 'description' field for the workflow
```
:::info
Note that `{{ .file }}` in this context refers to the value of the top-level `name` attribute within the workflow manifest file itself, not the path to the file.
:::
## Display Behavior
### TTY vs Non-TTY Output
The appearance of the output table depends on whether `atmos` detects an interactive terminal (TTY) or not:
- **TTY Output (e.g., running in your terminal)**
- Displays a formatted table with borders and styling.
- Attempts to fit within the terminal width.
- Uses standard padding between columns (TableColumnPadding = 3).
- Defaults to `format: table` if not specified.
- **Non-TTY Output (e.g., redirecting to a file, piping to another command)**
- Produces a simpler, machine-readable format suitable for scripting or automation.
- Ensures consistent structure for programmatic parsing.
## Troubleshooting & Tips
- **Blank Columns:** If a column appears empty, double-check the template variable name (`{{ .variable }}`) against the [YAML Template Syntax](#yaml-template-syntax) section for the specific command. Ensure the data context actually contains that variable for the items being listed.
- **Inspecting Available Data:** Use the `describe` command with `--format json` or `--format yaml` (e.g., `atmos describe stacks --format json`) to see the raw data structure and available fields you can use in your templates.
- **Wide Tables:** If the table is too wide for your terminal or you encounter errors about content width:
- Reduce the number of columns defined in your `atmos.yaml`.
- Use a different output format like `json` or `yaml`.
- Some `list` commands might support a `--max-columns` flag (check command help).
- **Filtering:** Use command-specific flags like `--stacks 'pattern'` for `atmos list stacks` to filter the rows, which can indirectly simplify the output. Query flags (`--query`) might also help narrow down data.
---
## atmos packer build
import File from '@site/src/components/File'
import Terminal from '@site/src/components/Terminal'
import useBaseUrl from '@docusaurus/useBaseUrl';
:::note purpose
Use this command to process a Packer template configured for an Atmos component in a stack, and build it to generate a set of artifacts.
The builds specified within a template are executed in parallel, unless otherwise specified.
The artifacts that are created will be outputted at the end of the build, and a Packer manifest
(if configured in the Atmos component) will be updated with the results of the build.
:::
## Usage
Execute the `packer build` command like this:
```shell
atmos packer build --stack [flags] -- [packer-options]
```
:::tip
For more details on the `packer build` command and options, refer to [Packer build command reference](https://developer.hashicorp.com/packer/docs/commands/build).
:::
## Arguments
- `component` (required)
-
Atmos Packer component.
## Flags
- `--stack` (alias `-s`)(required)
-
Atmos stack.
- `--template` (alias `-t`)(optional)
-
Packer template.
It can be specified in the `settings.packer.template` section in the Atmos component manifest,
or on the command line via the flag `--template ` (shorthand `-t`).
The command line flag takes precedence over `settings.packer.template`.
## Examples
```shell
atmos packer build aws/bastion --stack nonprod
atmos packer build aws/bastion -s prod --template main.pkr.hcl
atmos packer build aws/bastion -s nonprod -t main.nonprod.pkr.hcl
```
```shell
> atmos packer build aws/bastion --stack nonprod
amazon-ebs.al2023:
==> amazon-ebs.al2023: Prevalidating any provided VPC information
==> amazon-ebs.al2023: Prevalidating AMI Name: bastion-al2023-1754025080
==> amazon-ebs.al2023: Found Image ID: ami-0013ceeff668b979b
==> amazon-ebs.al2023: Setting public IP address to true on instance without a subnet ID
==> amazon-ebs.al2023: No VPC ID provided, Packer will use the default VPC
==> amazon-ebs.al2023: Inferring subnet from the selected VPC "vpc-xxxxxxx"
==> amazon-ebs.al2023: Set subnet as "subnet-xxxxxxx"
==> amazon-ebs.al2023: Creating temporary keypair: packer_688c4c79-f14a-b77e-ca1e-b5b4c17b4581
==> amazon-ebs.al2023: Creating temporary security group for this instance: packer_688c4c7b-3f16-69f9-0c39-88a3fcbe94fd
==> amazon-ebs.al2023: Authorizing access to port 22 from [0.0.0.0/0] in the temporary security groups...
==> amazon-ebs.al2023: Launching a source AWS instance...
==> amazon-ebs.al2023: changing public IP address config to true for instance on subnet "subnet-xxxxxxx"
==> amazon-ebs.al2023: Instance ID: i-0b621ca091aa4c240
==> amazon-ebs.al2023: Waiting for instance (i-0b621ca091aa4c240) to become ready...
==> amazon-ebs.al2023: Using SSH communicator to connect: 18.222.63.67
==> amazon-ebs.al2023: Waiting for SSH to become available...
==> amazon-ebs.al2023: Connected to SSH!
==> amazon-ebs.al2023: Provisioning with shell script: /var/folders/rt/fqmt0tmx3fs1qfzbf3qxxq700000gn/T/packer-shell653292668
==> amazon-ebs.al2023: Waiting for process with pid 2085 to finish.
==> amazon-ebs.al2023: Amazon Linux 2023 Kernel Livepatch repository 154 kB/s | 16 kB 00:00
==> amazon-ebs.al2023: Package jq-1.7.1-49.amzn2023.0.2.aarch64 is already installed.
==> amazon-ebs.al2023: Dependencies resolved.
==> amazon-ebs.al2023: Nothing to do.
==> amazon-ebs.al2023: Complete!
==> amazon-ebs.al2023: 17 files removed
==> amazon-ebs.al2023: Stopping the source instance...
==> amazon-ebs.al2023: Stopping instance
==> amazon-ebs.al2023: Waiting for the instance to stop...
==> amazon-ebs.al2023: Creating AMI bastion-al2023-1754025080 from instance i-0b621ca091aa4c240
==> amazon-ebs.al2023: Attaching run tags to AMI...
==> amazon-ebs.al2023: AMI: ami-0b2b3b68aa3c5ada8
==> amazon-ebs.al2023: Waiting for AMI to become ready...
==> amazon-ebs.al2023: Skipping Enable AMI deprecation...
==> amazon-ebs.al2023: Skipping Enable AMI deregistration protection...
==> amazon-ebs.al2023: Modifying attributes on AMI (ami-0b2b3b68aa3c5ada8)...
==> amazon-ebs.al2023: Modifying: ami org arns
==> amazon-ebs.al2023: Modifying attributes on snapshot (snap-09ad35550e1438fb2)...
==> amazon-ebs.al2023: Adding tags to AMI (ami-0b2b3b68aa3c5ada8)...
==> amazon-ebs.al2023: Tagging snapshot: snap-09ad35550e1438fb2
==> amazon-ebs.al2023: Creating AMI tags
==> amazon-ebs.al2023: Adding tag: "Stage": "nonprod"
==> amazon-ebs.al2023: Adding tag: "ScanStatus": "pending"
==> amazon-ebs.al2023: Adding tag: "SourceAMI": "ami-0013ceeff668b979b"
==> amazon-ebs.al2023: Adding tag: "SourceAMIDescription": "Amazon Linux 2023 AMI 2023.7.20250527.1 arm64 HVM kernel-6.12"
==> amazon-ebs.al2023: Adding tag: "SourceAMIName": "al2023-ami-2023.7.20250527.1-kernel-6.12-arm64"
==> amazon-ebs.al2023: Adding tag: "SourceAMIOwnerAccountId": "137112412989"
==> amazon-ebs.al2023: Creating snapshot tags
==> amazon-ebs.al2023: Terminating the source AWS instance...
==> amazon-ebs.al2023: Cleaning up any extra volumes...
==> amazon-ebs.al2023: No volumes to clean up, skipping
==> amazon-ebs.al2023: Deleting temporary security group...
==> amazon-ebs.al2023: Deleting temporary keypair...
==> amazon-ebs.al2023: Running post-processor: (type manifest)
Build 'amazon-ebs.al2023' finished after 3 minutes 39 seconds.
==> Wait completed after 3 minutes 39 seconds
==> Builds finished. The artifacts of successful builds are:
--> amazon-ebs.al2023: AMIs were created:
us-east-2: ami-0b2b3b68aa3c5ada8
--> amazon-ebs.al2023: AMIs were created:
us-east-2: ami-0b2b3b68aa3c5ada8
```
---
## atmos packer init
import File from '@site/src/components/File'
import Terminal from '@site/src/components/Terminal'
import useBaseUrl from '@docusaurus/useBaseUrl';
:::note purpose
Use this command to initialize Packer and install plugins according to an HCL template configuration for an Atmos component in a stack.
:::
## Usage
Execute the `packer init` command like this:
```shell
atmos packer init --stack [flags] -- [packer-options]
```
:::tip
For more details on the `packer init` command and options, refer to [Packer init command reference](https://developer.hashicorp.com/packer/docs/commands/init).
:::
## Arguments
- `component` (required)
-
Atmos Packer component.
## Flags
- `--stack` (alias `-s`)(required)
-
Atmos stack.
- `--template` (alias `-t`)(optional)
-
Packer template.
It can be specified in the `settings.packer.template` section in the Atmos component manifest,
or on the command line via the flag `--template ` (shorthand `-t`).
The command line flag takes precedence over `settings.packer.template`.
## Examples
```shell
atmos packer init aws/bastion --stack nonprod
atmos packer init aws/bastion -s prod --template main.pkr.hcl
atmos packer init aws/bastion -s nonprod -t main.nonprod.pkr.hcl
```
```shell
> atmos packer init aws/bastion --stack nonprod
Installed plugin github.com/hashicorp/amazon v1.3.9 in "~/.config/packer/plugins/github.com/hashicorp/amazon/packer-plugin-amazon_v1.3.9_x5.0_darwin_arm64"
```
---
## atmos packer inspect
import File from '@site/src/components/File'
import Terminal from '@site/src/components/Terminal'
import useBaseUrl from '@docusaurus/useBaseUrl';
:::note purpose
Use this command to inspect the various components that a Packer template configured for an Atmos component in a stack defines.
The command will show what variables a template accepts, the builders it defines, the provisioners it defines and the order they'll run, and more.
:::
## Usage
Execute the `packer inspect` command like this:
```shell
atmos packer inspect --stack [flags] -- [packer-options]
```
:::tip
For more details on the `packer inspect` command and options, refer to [Packer inspect command reference](https://developer.hashicorp.com/packer/docs/commands/inspect).
:::
## Arguments
- `component` (required)
-
Atmos Packer component.
## Flags
- `--stack` (alias `-s`)(required)
-
Atmos stack.
- `--template` (alias `-t`)(optional)
-
Packer template.
It can be specified in the `settings.packer.template` section in the Atmos component manifest,
or on the command line via the flag `--template ` (shorthand `-t`).
The command line flag takes precedence over `settings.packer.template`.
## Examples
```shell
atmos packer inspect aws/bastion --stack nonprod
atmos packer inspect aws/bastion -s prod --template main.pkr.hcl
atmos packer inspect aws/bastion -s nonprod -t main.nonprod.pkr.hcl
```
```shell
> atmos packer inspect aws/bastion --stack nonprod
Packer Inspect: HCL2 mode
> input-variables:
var.ami_name: "bastion-al2023-1754457104"
var.ami_org_arns: "[\n \"arn:aws:organizations::xxxxxxxxxxxx:organization/o-xxxxxxxxx\",\n]"
var.ami_ou_arns: "[]"
var.ami_tags: "{\n \"ScanStatus\" = \"pending\"\n \"SourceAMI\" = \"ami-0013ceeff668b979b\"\n \"SourceAMIDescription\" = \"Amazon Linux 2023 AMI 2023.7.20250527.1 arm64 HVM kernel-6.12\"\n \"SourceAMIName\" = \"al2023-ami-2023.7.20250527.1-kernel-6.12-arm64\"\n \"SourceAMIOwnerAccountId\" = \"137112412989\"\n \"Stage\" = \"nonprod\"\n}"
var.ami_users: "[]"
var.associate_public_ip_address: "true"
var.assume_role_arn: "null"
var.assume_role_duration_seconds: "1800"
var.assume_role_session_name: "atmos-packer"
var.encrypt_boot: "false"
var.force_delete_snapshot: "false"
var.force_deregister: "false"
var.instance_type: "t4g.small"
var.kms_key_arn: "null"
var.manifest_file_name: "manifest.json"
var.manifest_strip_path: "false"
var.provisioner_shell_commands: "[\n \"sudo systemctl enable --now amazon-ssm-agent\",\n \"sudo -E bash -c 'dnf install -y jq && dnf clean all && cloud-init clean'\",\n]"
var.region: "us-east-2"
var.skip_create_ami: "false"
var.source_ami: "ami-0013ceeff668b979b"
var.ssh_username: "ec2-user"
var.stage: "nonprod"
var.volume_size: "8"
var.volume_type: "gp3"
> local-variables:
> builds:
> <0>:
sources:
amazon-ebs.al2023
provisioners:
shell
post-processors:
0:
manifest
```
---
## atmos packer output
import File from '@site/src/components/File'
import Terminal from '@site/src/components/Terminal'
import useBaseUrl from '@docusaurus/useBaseUrl';
:::note purpose
Use this command to get an output from a Packer manifest.
Manifests are generated by Packer when executing `packer build` commands (if configured in the Packer template and Atmos stack).
[YQ](https://mikefarah.gitbook.io/yq/) expressions and functions are supported to get any section or attribute from the manifest.
:::
## Usage
Execute the `packer output` command like this:
```shell
atmos packer output --stack --query
```
:::note
`atmos packer output` command is specific to Atmos (Packer itself does not have an `output` command).
The command is used to get an output from a Packer manifest.
Manifests are generated by Packer when executing `packer build` commands (if configured in the Packer template and Atmos stack).
:::
## Arguments
- `component` (required)
-
Atmos Packer component.
## Flags
- `--stack` (alias `-s`)(required)
-
Atmos stack.
- `--query` (alias `-q`)(optional)
-
[YQ](https://mikefarah.gitbook.io/yq/) expression to get sections and attributes from a [Packer manifest](https://developer.hashicorp.com/packer/docs/post-processors/manifest).
## Examples
```shell
atmos packer output aws/bastion -s prod
atmos packer output aws/bastion -s prod --query '.builds[0].artifact_id'
atmos packer output aws/bastion -s prod -q '.builds[0].artifact_id | split(":")[1]'
```
```shell
> atmos packer output aws/bastion -s prod
builds:
- artifact_id: us-east-2:ami-0c2ca16b7fcac7529
build_time: 1.753281956e+09
builder_type: amazon-ebs
custom_data: null
files: null
name: al2023
packer_run_uuid: 5114a723-92f6-060f-bae4-3ac2d0324557
- artifact_id: us-east-2:ami-0b2b3b68aa3c5ada8
build_time: 1.7540253e+09
builder_type: amazon-ebs
custom_data: null
files: null
name: al2023
packer_run_uuid: a57874d1-c478-63d7-cfde-9d91e513eb9a
last_run_uuid: a57874d1-c478-63d7-cfde-9d91e513eb9a
```
```shell
# Use a YQ expression to get a specific section or attribute from the Packer manifest,
# in this case, the `artifact_id` from the first build.
> atmos packer output aws/bastion -s nonprod --query '.builds[0].artifact_id'
us-east-2:ami-0c2ca16b7fcac7529
```
```shell
# Use a YQ expression to get a specific section or attribute from the Packer manifest,
# in this case, the AMI (second part after the `:`) from the `artifact_id` from the first build.
> atmos packer output aws/bastion -s nonprod -q '.builds[0].artifact_id | split(":")[1]'
ami-0c2ca16b7fcac7529
```
---
## atmos packer validate
import File from '@site/src/components/File'
import Terminal from '@site/src/components/Terminal'
import useBaseUrl from '@docusaurus/useBaseUrl';
:::note purpose
Use this command to validate the syntax and configuration of a Packer template configured for an Atmos component in a stack.
:::
## Usage
Execute the `packer validate` command like this:
```shell
atmos packer validate --stack [flags] -- [packer-options]
```
:::tip
For more details on the `packer validate` command and options, refer to [Packer validate command reference](https://developer.hashicorp.com/packer/docs/commands/validate).
:::
## Arguments
- `component` (required)
-
Atmos Packer component.
## Flags
- `--stack` (alias `-s`)(required)
-
Atmos stack.
- `--template` (alias `-t`)(optional)
-
Packer template.
It can be specified in the `settings.packer.template` section in the Atmos component manifest,
or on the command line via the flag `--template ` (shorthand `-t`).
The command line flag takes precedence over `settings.packer.template`.
## Examples
```shell
atmos packer validate aws/bastion --stack prod
atmos packer validate aws/bastion -s prod --template main.pkr.hcl
atmos packer validate aws/bastion -s nonprod -t main.nonprod.pkr.hcl
```
---
## atmos packer version
import useBaseUrl from '@docusaurus/useBaseUrl';
:::note purpose
Use this command to display the currently installed Packer version.
:::
## Usage
Execute the `packer version` command like this:
```shell
atmos packer version
```
---
## atmos packer
import Screengrab from '@site/src/components/Screengrab'
import DocCardList from '@theme/DocCardList'
import File from '@site/src/components/File'
import Terminal from '@site/src/components/Terminal'
import useBaseUrl from '@docusaurus/useBaseUrl';
import Intro from '@site/src/components/Intro'
Use these subcommands to interact with [HashiCorp Packer](https://developer.hashicorp.com/packer)
to build automated machine images.
## Usage
```shell
atmos packer --stack [atmos-flags] -- [packer-options]
```
:::tip
For more details on the Packer commands and options, refer to [Packer Commands](https://developer.hashicorp.com/packer/docs/commands).
:::
## Atmos Flags
- `--stack` (alias `-s`)
-
Atmos stack.
- `--template` (alias `-t`)(optional)
-
Packer template.
It can be specified in the `settings.packer.template` section in the Atmos component manifest,
or on the command line via the flag `--template ` (shorthand `-t`).
The command line flag takes precedence over `settings.packer.template`.
- `--query` (alias `-q`)(optional)
-
[YQ](https://mikefarah.gitbook.io/yq/) expression to get sections and attributes from a [Packer manifest](https://developer.hashicorp.com/packer/docs/post-processors/manifest).
Used in the `atmos packer output` command.
## Examples
```shell
atmos packer version
atmos packer validate aws/bastion --stack prod
atmos packer validate aws/bastion -s prod --template main.pkr.hcl
atmos packer validate aws/bastion -s nonprod -t main.nonprod.pkr.hcl
atmos packer inspect aws/bastion -s prod
atmos packer inspect aws/bastion -s prod --template main.pkr.hcl
atmos packer inspect aws/bastion -s nonprod -t main.nonprod.pkr.hcl
atmos packer init aws/bastion -s prod
atmos packer init aws/bastion -s prod --template main.pkr.hcl
atmos packer init aws/bastion -s nonprod -t main.nonprod.pkr.hcl
atmos packer build aws/bastion -s prod
atmos packer build aws/bastion -s prod --template main.pkr.hcl
atmos packer build aws/bastion -s nonprod -t main.nonprod.pkr.hcl
atmos packer output aws/bastion -s prod
atmos packer output aws/bastion -s prod --query '.builds[0].artifact_id'
atmos packer output aws/bastion -s prod -q '.builds[0].artifact_id | split(":")[1]'
```
## Subcommands
---
## atmos pro lock
import Screengrab from "@site/src/components/Screengrab";
import Intro from '@site/src/components/Intro'
This command implements the locking feature of [Atmos Pro](https://atmos-pro.com/docs). Use this command to lock
a stack in Atmos Pro so that it cannot be planned or applied by another process (pull request, CI/CD, etc.)
## Usage
Execute the `pro lock` command like this:
```shell
atmos pro lock --component --stack --ttl --message
```
## Description
Atmos pro supports locking a stack in Atmos Pro so that it cannot be planned or applied by another process (pull
request, CI/CD, etc.). Your CI/CD pipeline can use the `atmos pro lock` command to ensure it is the exclusive process
interacting with a stack at the current time. Once your work is complete, you can unlock the stack by running the `atmos
pro unlock` command.
:::tip
Run `atmos pro lock --help` to see all the available options
:::
## Examples
```shell
atmos pro lock --component vpc --stack plat-ue2-dev --ttl 300 --message "Locked by $GITHUB_RUN_ID"
atmos pro lock --component vpc --stack plat-ue2-dev --ttl 300
```
## Flags
- `--component` (alias `-c`) (required)
- Atmos component to lock.
- `--stack` (alias `-s`) (required)
- Atmos stack to lock.
- `--ttl` (alias `-t`) (optional)
- The time to live (TTL) for the lock, in seconds. Defaults to 30.
- `--message` (alias `-m`) (optional)
- A message to display to other users who try to lock the stack. Defaults to "Locked by Atmos".
---
## atmos pro unlock
import Screengrab from "@site/src/components/Screengrab";
import Intro from '@site/src/components/Intro'
This command implements the locking feature of [Atmos Pro](https://atmos-pro.com/docs). Use this command to unlock
a stack in Atmos Pro that has previously been locked by the lock command.
## Usage
Execute the `pro unlock` command like this:
```shell
atmos pro unlock --component --stack
```
## Description
Atmos pro supports locking a stack in Atmos Pro so that it cannot be planned or applied by another process (pull
request, CI/CD, etc.). Your CI/CD pipeline can use the `atmos pro lock` command to ensure it is the exclusive process
interacting with a stack at the current time. Once your work is complete, you can unlock the stack by running the `atmos
pro unlock` command.
:::tip
Run `atmos pro unlock --help` to see all the available options
:::
## Examples
```shell
atmos pro unlock --component vpc --stack plat-ue2-dev
```
## Flags
- `--component` (alias `-c`) (required)
- Atmos component to unlock.
- `--stack` (alias `-s`) (required)
- Atmos stack to unlock.
---
## atmos pro
import Screengrab from "@site/src/components/Screengrab";
import DocCardList from "@theme/DocCardList";
import Intro from '@site/src/components/Intro'
Use these subcommands to interact with Atmos Pro.
## Subcommands
---
## atmos terraform clean
import Screengrab from '@site/src/components/Screengrab'
import Terminal from '@site/src/components/Terminal'
:::note purpose
Use this command to delete the `.terraform` folder, the folder that `TF_DATA_DIR` ENV var points to, `.terraform.lock.hcl` file, `varfile`
and `planfile` for a
component in a stack.
:::
## Usage
Execute the `terraform clean` command like this:
```shell
atmos terraform clean -s [--skip-lock-file] [--everything] [--force]
```
:::warning
The `clean` command, by default, deletes all Terraform-related files, including local state files, but will prompt for confirmation before proceeding. Using the `--force` flag skips the confirmation prompt and executes the deletion immediately.
Use these flags with extreme caution as they can lead to irreversible data loss.
:::
:::tip
Run `atmos terraform clean --help` to see all the available options
:::
## Examples
```shell
# Delete all Terraform-related files for all components (with confirmation)
atmos terraform clean
# Force delete all Terraform-related files for all components (no confirmation)
atmos terraform clean --force
atmos terraform clean top-level-component1 -s tenant1-ue2-dev
atmos terraform clean infra/vpc -s tenant1-ue2-staging
atmos terraform clean infra/vpc -s tenant1-ue2-staging --skip-lock-file
atmos terraform clean test/test-component -s tenant1-ue2-dev
atmos terraform clean test/test-component-override-2 -s tenant2-ue2-prod
atmos terraform clean test/test-component-override-3 -s tenant1-ue2-dev
```
## Arguments
- `component` (required)
-
Atmos terraform component.
## Flags
- `--stack` (alias `-s`) (required)
-
Atmos stack.
- `--dry-run` (optional)
-
Dry run.
```shell
atmos terraform clean -s --dry-run=true
```
- `--skip-lock-file` (optional)
-
Skip deleting the `.terraform.lock.hcl` file.
---
## atmos terraform deploy
import Screengrab from '@site/src/components/Screengrab'
import Terminal from '@site/src/components/Terminal'
:::note purpose
Use this command to execute `terraform apply -auto-approve` on an Atmos component in an Atmos stack.
:::
## Usage
Execute the `terraform deploy` subcommand like this:
```shell
atmos terraform deploy -s
```
- `atmos terraform deploy` command supports `--deploy-run-init=true|false` flag to enable/disable running `terraform init` before executing the
command
- `atmos terraform deploy` command automatically sets `-auto-approve` flag when running `terraform apply`
- `atmos terraform deploy` command supports `--from-plan` flag. If the flag is specified, the command will use the planfile previously generated
by `atmos terraform plan` command instead of generating a new planfile, e.g. `atmos terraform deploy -s --from-plan`. Note that
in this case, the planfile name is in the format supported by Atmos and is saved to the component's folder
- `atmos terraform deploy` command supports `--planfile` flag to specify the path to a planfile. The `--planfile` flag should be used instead of the
planfile argument in the native `terraform apply ` command. For example, you can execute the command
`atmos terraform plan -s -out=`, which will save the generated plan to a file on disk,
and then execute the command `atmos terraform deploy -s --planfile ` to apply the previously generated planfile
See [all flags](#flags).
:::tip
Run `atmos terraform deploy --help` to see all the available options
:::
## Examples
### Simple Example
Deploy the `top-level-component1` using the configuration specified in the `tenant1-ue2-dev` stack. This command explicitly targets a stack, which defines the environment and region settings for the deployment.
```shell
atmos terraform deploy top-level-component1 --stack tenant1-ue2-dev
```
### Planfiles
Deploy `top-level-component1` based on a previously generated execution plan. The `-s` flag specifies the `tenant1-ue2-dev` stack, and `--from-plan` indicates that the deploy should proceed with the plan that was previously created, ensuring that the deployment matches the plan's specifications.
```shell
atmos terraform deploy top-level-component1 -s tenant1-ue2-dev --from-plan
```
Or use `-s` for a specific execution plan file located at `` to ensure precision in what is deployed.
```shell
atmos terraform deploy top-level-component1 -s tenant1-ue2-dev --planfile
```
### Targeting Specific Stages
This demonstrates how Atmos can be used to deploy infrastructure components, like a VPC, specifying the stack to ensure the deployment occurs within the correct environment and configuration context.
```shell
atmos terraform deploy infra/vpc -s tenant1-ue2-staging
atmos terraform deploy test/test-component -s tenant1-ue2-dev
atmos terraform deploy test/test-component-override-2 -s tenant2-ue2-prod
atmos terraform deploy test/test-component-override-3 -s tenant1-ue2-dev
```
## Arguments
- `component` (required)
-
Atmos terraform component.
## Flags
- `--stack` (alias `-s`) (required)
-
Atmos stack.
- `--dry-run` (optional)
-
Dry run.
```shell
atmos terraform deploy -s --dry-run=true
```
- `--deploy-run-init` (optional)
-
Enable/disable running `terraform init` before executing the command.
```shell
atmos terraform deploy -s --deploy-run-init
```
- `--from-plan` (optional)
-
If the flag is specified, use the `planfile` previously generated by Atmos instead of generating a new `planfile`.
The planfile name is in the format supported by Atmos and is saved to the component's folder.
```shell
atmos terraform deploy -s --from-plan
```
- `--planfile` (optional)
-
The path to a planfile. The `--planfile` flag should be used instead of the planfile argument in the native `terraform apply ` command .
```shell
atmos terraform apply -s --planfile
```
- `--process-templates` (optional)
-
Enable/disable Go template processing in Atmos stack manifests when executing terraform commands.
If the flag is not passed, template processing is enabled by default.
```shell
atmos terraform deploy -s --process-templates=false
```
- `--process-functions` (optional)
-
Enable/disable YAML functions processing in Atmos stack manifestswhen executing terraform commands.
If the flag is not passed, YAML function processing is enabled by default.
```shell
atmos terraform deploy -s --process-functions=false
```
- `--skip` (optional)
-
Skip processing a specific Atmos YAML function in Atmos stacks manifests when executing terraform commands.
To specify more than one function, use multiple `--skip` flags, or separate the functions with a comma.
```shell
atmos terraform deploy -s --skip=eval --skip=include
atmos terraform deploy -s --skip=terraform.output,include
```
:::note
The `atmos terraform deploy` command supports all native `terraform apply` options described
in [Terraform apply options](https://developer.hashicorp.com/terraform/cli/commands/apply#apply-options), with the exception that a planfile argument
can't be provided on the command line. To use a previously generated planfile, use the `--from-plan` or `--planfile` command-line flags
:::
---
## atmos terraform generate backend
import Screengrab from '@site/src/components/Screengrab'
import Terminal from '@site/src/components/Terminal'
:::note purpose
Use this command to generate a Terraform backend config file for an Atmos terraform component in a stack.
:::
## Usage
Execute the `terraform generate backend` command like this:
```shell
atmos terraform generate backend -s
```
This command generates a backend config file for an Atmos terraform component in a stack.
:::tip
Run `atmos terraform generate backend --help` to see all the available options
:::
## Examples
```shell
atmos terraform generate backend top-level-component1 -s tenant1-ue2-dev
atmos terraform generate backend infra/vpc -s tenant1-ue2-staging
atmos terraform generate backend test/test-component -s tenant1-ue2-dev
atmos terraform generate backend test/test-component-override-2 -s tenant2-ue2-prod
```
## Arguments
- `component` (required)
-
Atmos terraform component.
## Flags
- `--stack` (alias `-s`) (required)
-
Atmos stack.
- `--dry-run` (optional)
-
Dry run.
```shell
atmos terraform generate backend -s --dry-run=true
```
- `--process-templates` (optional)
-
Enable/disable Go template processing in Atmos stack manifests when executing terraform commands.
If the flag is not passed, template processing is enabled by default.
```shell
atmos terraform generate backend -s --process-templates=false
```
- `--process-functions` (optional)
-
Enable/disable YAML functions processing in Atmos stack manifestswhen executing terraform commands.
If the flag is not passed, YAML function processing is enabled by default.
```shell
atmos terraform generate backend -s --process-functions=false
```
- `--skip` (optional)
-
Skip processing a specific Atmos YAML function in Atmos stacks manifests when executing terraform commands.
To specify more than one function, use multiple `--skip` flags, or separate the functions with a comma.
```shell
atmos terraform generate backend -s --skip=eval --skip=include
atmos terraform generate backend -s --skip=terraform.output,include
```
:::info
Refer to [Terraform backend configuration](https://developer.hashicorp.com/terraform/language/settings/backends/configuration) for more details
on `terraform` backends and supported formats
:::
---
## atmos terraform generate backends
import Screengrab from '@site/src/components/Screengrab'
import Terminal from '@site/src/components/Terminal'
:::note purpose
Use this command to generate the Terraform backend config files for all Atmos terraform [components](/core-concepts/components) in
all [stacks](/core-concepts/stacks).
:::
## Usage
Execute the `terraform generate backends` command like this:
```shell
atmos terraform generate backends [options]
```
This command generates backend config files for all Atmos terraform components in all stacks.
:::tip
Run `atmos terraform generate backends --help` to see all the available options
:::
## Examples
```shell
atmos terraform generate backends --file-template {component-path}/{tenant}/{environment}-{stage}.tf.json --format json
atmos terraform generate backends --file-template {component-path}/backends/{tenant}-{environment}-{stage}.tf.json --format json
atmos terraform generate backends --file-template backends/{tenant}/{environment}/{region}/{component}.tf --format hcl
atmos terraform generate backends --file-template backends/{tenant}-{environment}-{stage}-{component}.tf
atmos terraform generate backends --file-template /{tenant}/{stage}/{region}/{component}.tf
atmos terraform generate backends --file-template backends/{tenant}-{environment}-{stage}-{component}.tfbackend --format backend-config
atmos terraform generate backends --stacks orgs/cp/tenant1/staging/us-east-2,orgs/cp/tenant2/dev/us-east-2 --file-template
atmos terraform generate backends --stacks tenant1-ue2-staging,tenant1-ue2-prod --file-template
atmos terraform generate backends --stacks orgs/cp/tenant1/staging/us-east-2,tenant1-ue2-prod --file-template
atmos terraform generate backends --components , --file-template
atmos terraform generate backends --format hcl --file-template
atmos terraform generate backends --format json --file-template
atmos terraform generate backends --format backend-config --file-template
```
## Flags
- `--file-template` (optional)
-
Backend file template (path, file name, and file extension).
Supports absolute and relative paths.
Supports context tokens: `{namespace}`, `{tenant}`, `{environment}`, `{region}`, `{stage}`, `{base-component}`, `{component}`, `{component-path}`.
All subdirectories in the path will be created automatically.
If the flag is not specified, all backend config files will be written to the corresponding terraform component folders.
- `--stacks` (optional)
-
Only process the specified stacks (comma-separated values).
The names of top-level stack manifests and Atmos stack names are supported.
- `--components` (optional)
-
Only generate backend files for the specified Atmos components (comma-separated values).
- `--format` (optional)
-
Backend file format: `json`, `hcl`, `backend-config` (`json` is default) .
- `--dry-run` (optional)
-
Dry run.
:::info
Refer to [Terraform backend configuration](https://developer.hashicorp.com/terraform/language/settings/backends/configuration) for more details
on `terraform` backends and supported formats
:::
---
## atmos terraform generate planfile
import Screengrab from '@site/src/components/Screengrab'
:::note purpose
Use this command to generate a planfile for an Atmos Terraform/OpenTofu [component](/core-concepts/components) in a [stack](/core-concepts/stacks).
:::
## Usage
Execute the `terraform generate planfile` command like this:
```shell
atmos terraform generate planfile -s [options]
```
This command generates a Terraform planfile for a specified Atmos component in a stack.
Under the hood, Atmos executes `terraform plan` to create a binary planfile, then uses `terraform show` to convert it into a human-readable format (YAML or JSON). This enables easy integration with other tooling like `checkov`.
:::tip
Run `atmos terraform generate planfile --help` to see all the available options
:::
## Examples
```shell
atmos terraform generate planfile component1 -s plat-ue2-dev
atmos terraform generate planfile component1 -s plat-ue2-prod --format=json
atmos terraform generate planfile component1 -s plat-ue2-prod --format=yaml
atmos terraform generate planfile -s --file=planfile.json
atmos terraform generate planfile -s --format=yaml --file=planfiles/planfile.yaml
atmos terraform generate planfile -s --file=/Users/me/Documents/atmos/infra/planfile.json
```
## Arguments
- `component` (required)
-
Atmos terraform component.
## Flags
- `--stack` (alias `-s`) (required)
-
Atmos stack.
- `--format` (optional)
-
Output format (`json` or `yaml`, `json` is default).
```shell
atmos terraform generate planfile -s --format=json
atmos terraform generate planfile -s --format=yaml
```
- `--file` (alias `-f`) (optional)
-
Planfile name.
Supports absolute and relative paths.
If not provided, Atmos generates the planfile in the Terraform component directory with the name
`-.planfile.json` or `-.planfile.yaml`, depending on the format specified
with `--format` flag (`json` is default).
If an absolute path is provided, the file will be created in the specified directory:
```shell
atmos terraform generate planfile -s --file=/Users/me/Documents/atmos/infra/planfile.json
```
If a relative path is specified, the file will be created in the Terraform component directory:
```shell
atmos terraform generate planfile -s --file=planfile.json
atmos terraform generate planfile -s --format=yaml --file=planfiles/planfile.yaml
```
- `--process-templates` (optional)
-
Enable/disable Go template processing in Atmos stack manifests when executing terraform commands.
If the flag is not passed, template processing is enabled by default.
```shell
atmos terraform generate planfile -s --process-templates=false
```
- `--process-functions` (optional)
-
Enable/disable YAML functions processing in Atmos stack manifestswhen executing terraform commands.
If the flag is not passed, YAML function processing is enabled by default.
```shell
atmos terraform generate planfile -s --process-functions=false
```
- `--skip` (optional)
-
Skip processing a specific Atmos YAML function in Atmos stacks manifests when executing terraform commands.
To specify more than one function, use multiple `--skip` flags, or separate the functions with a comma.
```shell
atmos terraform generate planfile -s --skip=eval --skip=include
atmos terraform generate planfile -s --skip=terraform.output,include
```
## Validate Terraform/OpenTofu planfiles using Checkov
You can generate a planfile for a component in a stack and validate it using [Checkov](https://www.checkov.io/).
```shell
atmos terraform generate planfile -s
checkov --file components/terraform//-.planfile.json --framework terraform_plan
```
Refer to [Evaluate Checkov Policies on Terraform Plan](https://www.checkov.io/7.Scan%20Examples/Terraform%20Plan%20Scanning.html)
for more information.
---
## atmos terraform generate varfile
import Screengrab from '@site/src/components/Screengrab'
:::note purpose
Use this command to generate a varfile (`.tfvar` ) for an Atmos terraform [component](/core-concepts/components) in a [stack](/core-concepts/stacks).
:::
## Usage
Execute the `terraform generate varfile` command like this:
```shell
atmos terraform generate varfile -s
```
This command generates a varfile for an Atmos terraform component in a stack.
:::tip
Run `atmos terraform generate varfile --help` to see all the available options
:::
## Examples
```shell
atmos terraform generate varfile top-level-component1 -s tenant1-ue2-dev
atmos terraform generate varfile infra/vpc -s tenant1-ue2-staging
atmos terraform generate varfile test/test-component -s tenant1-ue2-dev
atmos terraform generate varfile test/test-component-override-2 -s tenant2-ue2-prod
atmos terraform generate varfile test/test-component-override-3 -s tenant1-ue2-dev -f vars.json
```
## Arguments
- `component` (required)
-
Atmos terraform component.
## Flags
- `--stack` (alias `-s`) (required)
-
Atmos stack.
- `--dry-run` (optional)
-
Dry run.
```shell
atmos terraform generate varfile -s --dry-run=true
```
- `--process-templates` (optional)
-
Enable/disable Go template processing in Atmos stack manifests when executing terraform commands.
If the flag is not passed, template processing is enabled by default.
```shell
atmos terraform generate varfile -s --process-templates=false
```
- `--process-functions` (optional)
-
Enable/disable YAML functions processing in Atmos stack manifestswhen executing terraform commands.
If the flag is not passed, YAML function processing is enabled by default.
```shell
atmos terraform generate varfile -s --process-functions=false
```
- `--skip` (optional)
-
Skip processing a specific Atmos YAML function in Atmos stacks manifests when executing terraform commands.
To specify more than one function, use multiple `--skip` flags, or separate the functions with a comma.
```shell
atmos terraform generate varfile -s --skip=eval --skip=include
atmos terraform generate varfile -s --skip=terraform.output,include
```
---
## atmos terraform generate varfiles
import Screengrab from '@site/src/components/Screengrab'
import Intro from '@site/src/components/Intro'
Use this command to generate the Terraform varfiles (`.tfvar`) for all Atmos terraform [components](/core-concepts/components) in
all [stacks](/core-concepts/stacks).
## Usage
Executes `terraform generate varfiles` command.
```shell
atmos terraform generate varfiles [options]
```
This command generates varfiles for all Atmos terraform components in all stacks.
:::tip
Run `atmos terraform generate varfiles --help` to see all the available options
:::
## Examples
```shell
atmos terraform generate varfiles --file-template {component-path}/{environment}-{stage}.tfvars.json
atmos terraform generate varfiles --file-template /configs/{tenant}/{environment}/{stage}/{component}.json
atmos terraform generate varfiles --file-template /{tenant}/{stage}/{region}/{component}.yaml
atmos terraform generate varfiles --stacks orgs/cp/tenant1/staging/us-east-2,orgs/cp/tenant2/dev/us-east-2
atmos terraform generate varfiles --stacks tenant1-ue2-staging,tenant1-ue2-prod
atmos terraform generate varfiles --stacks orgs/cp/tenant1/staging/us-east-2,tenant1-ue2-prod
atmos terraform generate varfiles --components , --file-template
atmos terraform generate varfiles --format hcl --file-template
atmos terraform generate varfiles --format json --file-template
atmos terraform generate varfiles --format yaml --file-template
```
## Flags
- `--file-template` (required)
-
Varfile template (path, file name, and file extension).
Supports absolute and relative paths.
Supports context tokens: `{namespace}`, `{tenant}`, `{environment}`, `{region}`, `{stage}`, `{base-component}`, `{component}`, `{component-path}`.
All subdirectories in the path will be created automatically.
- `--stacks` (optional)
-
Only process the specified stacks (comma-separated values).
The names of top-level stack manifests and Atmos stack names are supported.
- `--components` (optional)
-
Only generate backend files for the specified Atmos components (comma-separated values).
- `--format` (optional)
-
Backend file format: `json`, `hcl`, `backend-config` (`json` is default) .
- `--dry-run` (optional)
-
Dry run.
---
## atmos terraform plan-diff
import Tabs from "@theme/Tabs";
import TabItem from "@theme/TabItem";
# terraform plan-diff
The `atmos terraform plan-diff` command compares two Terraform plans and shows the differences between them.
It takes an original plan file (`--orig`) and optionally a new plan file (`--new`). If the new plan file is not provided, it will generate one by running `terraform plan` with the current configuration.
The command shows differences in variables, resources, and outputs between the two plans.
## Usage
```shell
atmos terraform plan-diff -s --orig= [--new=] [options]
```
## Arguments
- `component` (required)
- The name of the component to run the command against.
## Flags
- `-s` / `--stack` (required)
- The stack name to use.
- `--orig` (required)
- Path to the original Terraform plan file.
- `--new` (optional)
- Path to the new Terraform plan file.
- `--skip-init` (optional)
- Skip running `terraform init` before executing the command.
You can also pass any additional flags and arguments that are supported by the `terraform plan` command when generating a new plan.
## Examples
### Compare an existing plan with a new plan generated with current configuration
```shell
atmos terraform plan-diff myapp -s dev --orig=orig.plan
```
### Compare two existing plan files
```shell
atmos terraform plan-diff myapp -s dev --orig=orig.plan --new=new.plan
```
## Output Format
When there are no differences between the two plan files:
```text
The planfiles are identical
```
When there are differences between the two plan files:
```text
Diff Output
=========
Variables:
----------
+ added_var: "new value"
- removed_var: "old value"
~ changed_var: "old value" => "new value"
Resources:
-----------
+ aws_s3_bucket.new_bucket
- aws_instance.removed_instance
~ aws_security_group.modified_group
~ ingress.cidr_blocks: ["10.0.0.0/16"] => ["10.0.0.0/8"]
+ egress.port: 443
Outputs:
--------
+ new_output: "value"
- removed_output: "value"
~ changed_output: "old" => "new"
```
## Exit Codes
| Exit Code | Description |
| --------- | ----------------------------------------- |
| 0 | Success - no differences found |
| 1 | Error occurred during execution |
| 2 | Success - differences found between plans |
## Use Cases
The `plan-diff` command is useful for:
1. **Validating changes**: Compare a previously saved plan with the current state to see what has changed.
2. **Reviewing variable impacts**: See how changing variables affects the infrastructure plan.
3. **CI/CD workflows**: Use the exit code to determine if changes are expected or unexpected.
4. **Documentation**: Generate human-readable diffs for change management and approvals.
## How It Works
The command:
1. Runs `terraform init` in the component directory
2. If `--new` is not specified, runs a plan and captures the output
3. Runs `terraform show -json` for each plan to get the JSON representation
4. Sorts the JSON for consistent comparison
5. Creates a diff between the two plans
6. Handles sensitive values properly by displaying `(sensitive value)`
7. Returns appropriate exit code based on whether differences were found
---
## atmos terraform shell
import Screengrab from '@site/src/components/Screengrab'
import Intro from '@site/src/components/Intro'
This command starts a new `SHELL` configured with the environment for an Atmos component in a Stack to allow executing all native terraform commands
inside the shell without using any atmos-specific arguments and flags.
## Usage
Execute the `terraform shell` command like this:
```shell
atmos terraform shell -s
```
The command configures the environment for an Atmos component in a stack and starts a new shell suitable for executing all terraform commands natively
without going through Atmos.
The command does the following:
- Processes the stack manifests, generates the required variables for the Atmos component in the stack, and writes them to a file in the
component's folder
- Generates a backend config file for the Atmos component in the stack and writes it to a file in the component's folder (or as specified by the
[Atmos configuration setting](/cli/configuration))
- Creates a `terraform` workspace for the component in the stack
- Drops the user into a separate shell (process) with all the required paths and ENV vars set
- Inside the shell, the user can execute all `terraform` commands using the native syntax
- Atmos sets the `ATMOS_SHLVL` environment variable to track the nesting level of shells:
- If `ATMOS_SHLVL` is not already set, Atmos initializes it to `1`.
- If `ATMOS_SHLVL` is already set, Atmos increments its value by `1` for each new nested shell.
:::tip
Run `atmos terraform shell --help` to see all the available options
:::
## Examples
```shell
atmos terraform shell top-level-component1 -s tenant1-ue2-dev
atmos terraform shell infra/vpc -s tenant1-ue2-staging
atmos terraform shell test/test-component-override-3 -s tenant2-ue2-prod
```
## Arguments
- `component` (required)
-
Atmos terraform component.
## Flags
- `--stack` (alias `-s`) (required)
-
Atmos stack.
- `--dry-run` (optional)
-
Dry run.
```shell
atmos terraform shell -s --dry-run=true
```
- `--process-templates` (optional)
-
Enable/disable Go template processing in Atmos stack manifests when executing terraform commands.
If the flag is not passed, template processing is enabled by default.
```shell
atmos terraform shell -s --process-templates=false
```
- `--process-functions` (optional)
-
Enable/disable YAML functions processing in Atmos stack manifestswhen executing terraform commands.
If the flag is not passed, YAML function processing is enabled by default.
```shell
atmos terraform shell -s --process-functions=false
```
- `--skip` (optional)
-
Skip processing a specific Atmos YAML function in Atmos stacks manifests when executing terraform commands.
To specify more than one function, use multiple `--skip` flags, or separate the functions with a comma.
```shell
atmos terraform shell -s --skip=eval --skip=include
atmos terraform shell -s --skip=terraform.output,include
```
---
## atmos terraform workspace
import Screengrab from '@site/src/components/Screengrab'
import Intro from '@site/src/components/Intro'
Use this command to calculate the `terraform` workspace for an Atmos component (from the context variables and stack config). It will
run `terraform init -reconfigure` and then select the workspace by executing the `terraform workspace select` command.
## Usage
Execute the `terraform workspace` command like this:
```shell
atmos terraform workspace -s
```
This command calculates the `terraform` workspace for an Atmos component (from the context variables and stack config), then
runs `terraform init -reconfigure`, then selects the workspace by executing the `terraform workspace select` command.
If the workspace does not exist, the command creates it by executing the `terraform workspace new` command.
:::tip
Run `atmos terraform workspace --help` to see all the available options
:::
## Examples
```shell
atmos terraform workspace top-level-component1 -s tenant1-ue2-dev
atmos terraform workspace infra/vpc -s tenant1-ue2-staging
atmos terraform workspace test/test-component -s tenant1-ue2-dev
atmos terraform workspace test/test-component-override-2 -s tenant2-ue2-prod
atmos terraform workspace test/test-component-override-3 -s tenant1-ue2-dev
```
## Arguments
- `component` (required)
-
Atmos terraform component.
## Flags
- `--stack` (alias `-s`) (required)
-
Atmos stack.
- `--dry-run` (optional)
-
Dry run.
```shell
atmos terraform workspace -s --dry-run=true
```
- `--process-templates` (optional)
-
Enable/disable Go template processing in Atmos stack manifests when executing terraform commands.
If the flag is not passed, template processing is enabled by default.
```shell
atmos terraform workspace -s --process-templates=false
```
- `--process-functions` (optional)
-
Enable/disable YAML functions processing in Atmos stack manifestswhen executing terraform commands.
If the flag is not passed, YAML function processing is enabled by default.
```shell
atmos terraform workspace -s --process-functions=false
```
- `--skip` (optional)
-
Skip processing a specific Atmos YAML function in Atmos stacks manifests when executing terraform commands.
To specify more than one function, use multiple `--skip` flags, or separate the functions with a comma.
```shell
atmos terraform workspace -s --skip=eval --skip=include
atmos terraform workspace -s --skip=terraform.output,include
```
---
## atmos terraform
import Screengrab from '@site/src/components/Screengrab'
import DocCardList from '@theme/DocCardList'
import File from '@site/src/components/File'
import Terminal from '@site/src/components/Terminal'
import Intro from '@site/src/components/Intro'
Use these subcommands to interact with Terraform and OpenTofu.
Atmos Terraform/OpenTofu commands fall into two categories:
- Single-Component: Run Terraform for one component at a time
- Multi-Component (Filtered/Bulk): Run Terraform across multiple components using stack names, selectors, or change detection
Atmos supports all Terraform and OpenTofu commands and options described in
[Terraform CLI Overview](https://developer.hashicorp.com/terraform/cli/commands)
and [OpenTofu Basic CLI Features](https://opentofu.org/docs/cli/commands/).
In addition, for the Single-Component commands, the `component` argument and `stack` flag are required to generate
variables and backend config for the component in the stack.
:::note Disambiguation
The term "Terraform" is used in this documentation to refer to generic concepts such as providers, modules, stacks, the
HCL-based domain-specific language and its interpreter. Atmos works with [OpenTofu](/core-concepts/projects/configuration/opentofu).
:::
## Single-Component Commands Usage
Use single-component commands when you want to execute Terraform operations on one component at a time, offering precise control over individual resources.
```shell
# Execute `terraform ` on a `component` in a `stack`
atmos terraform -s [options]
atmos terraform --stack [options]
```
## Multi-Component Commands (Bulk Operations) Usage
Use multi-component commands to run Terraform operations across multiple components simultaneously. You can target components by stack, selector, query, or change detection—often making this approach more efficient than using Atmos workflows for certain use cases.
```shell
# Execute `terraform ` on all components in the stack `prod`
atmos terraform --stack prod
# Execute `terraform ` on components `component-1` and `component-2` in all stacks
atmos terraform --components component-1,component-2
# Execute `terraform ` on components `component-1` and `component-2` in the stack `prod`
atmos terraform --stack prod --components component-1,component-2
# Execute `terraform ` on all components in all stacks
atmos terraform --all
# Execute `terraform ` on all components in the stack `prod`
atmos terraform --all --stack prod
# Execute `terraform ` on all the directly affected components in all stacks in dependency order
# (if component dependencies are configured)
atmos terraform --affected
# Execute `terraform ` on all the directly affected components in the `prod` stack in dependency order
# (if component dependencies are configured)
atmos terraform --affected --stack prod
# Execute `terraform ` on all the directly affected components in all stacks in dependency order.
# For each directly affected component, detect the dependent components and process them in dependency order, recursively.
# Dependents are components that are indirectly affected, meaning that nothing in the current branch modifies their code
# or configs, but they are configured as dependencies of the components that are modified
atmos terraform --affected --include-dependents
# Execute `terraform ` on all the directly affected components in the `prod` stack in dependency order.
# For each directly affected component, detect the dependent components and process them in dependency order, recursively.
atmos terraform --affected --include-dependents --stack prod
# Execute `terraform ` on all components that have `vars.tags.team == "data"`, in all stacks
atmos terraform --query '.vars.tags.team == "data"'
# Execute `terraform ` on all components that have `vars.tags.team == "eks"`, in the stack `prod`
atmos terraform --query '.vars.tags.team == "eks"' --stack prod
# Execute `terraform ` on all components that have `settings.context.account_id == 12345`, in all stacks
atmos terraform --query '.settings.context.account_id == 12345'
```
## Additions and differences from native Terraform and OpenTofu
- before executing other `terraform` commands, Atmos runs `terraform init`
- you can skip over atmos calling `terraform init` if you know your project is already in a good working state by using the `--skip-init` flag like
so `atmos terraform -s --skip-init`
- `atmos terraform deploy` command executes `terraform apply -auto-approve` (sets `-auto-approve` flag when running `terraform apply`)
- `atmos terraform deploy` command supports `--deploy-run-init=true|false` flag to enable/disable running `terraform init` before executing the
command
- `atmos terraform apply` and `atmos terraform deploy` commands support `--from-plan` flag. If the flag is specified, the commands will use
the planfile previously generated by `atmos terraform plan` command instead of generating a new planfile,
e.g. `atmos terraform apply -s --from-plan`. Note that in this case, the planfile name is in the format supported by Atmos and
is saved to the component's folder
- `atmos terraform apply` and `atmos terraform deploy` commands support `--planfile` flag to specify the path to a planfile.
The `--planfile` flag should be used instead of the planfile argument in the native `terraform apply ` command.
For example, you can execute the command `atmos terraform plan -s -out=`, which will save the generated plan to a
file on disk, and then execute the command `atmos terraform apply -s --planfile ` to apply the previously generated
planfile
- `atmos terraform plan` command accepts a `--skip-planfile` flag to skip writing the plan to a file. If the flag is set to `true`
(e.g., `atmos terraform plan -s --skip-planfile=true`), Atmos will not pass the `-out` flag to Terraform
when executing the command. Set it to `true` when using Terraform Cloud since the `-out` flag is not supported.
Terraform Cloud automatically stores plans in its backend and can't store it in a local file
- `atmos terraform clean` command deletes the `.terraform` folder, `.terraform.lock.hcl` lock file, and the previously generated `planfile`
and `varfile` for the specified component and stack. Use the `--skip-lock-file` flag to skip deleting the `.terraform.lock.hcl` file.
It deletes all local Terraform state files and directories
(including [`terraform.tfstate.d`](https://developer.hashicorp.com/terraform/cli/workspaces#workspace-internals)
used for local state) for a component in a stack.
The `--force` flag bypasses the safety confirmation prompt and forces the deletion. Use with caution.
:::warning
The `clean` command performs destructive operations that can lead to permanent state loss, if not using remote backends.
Always ensure you have remote state configured in your components before proceeding.
:::
- `atmos terraform workspace` command first runs `terraform init -reconfigure`, then `terraform workspace select`, and if the workspace was not
created before, it then runs `terraform workspace new`
- `atmos terraform import` command searches for `region` in the variables for the specified component and stack, and if it finds it,
sets `AWS_REGION=` ENV var before executing the command
- `atmos terraform generate backend` command generates a backend config file for an Atmos component in a stack
- `atmos terraform generate backends` command generates backend config files for all Atmos components in all stacks
- `atmos terraform generate varfile` command generates a varfile for an Atmos component in a stack
- `atmos terraform generate varfiles` command generates varfiles for all Atmos components in all stacks
- `atmos terraform plan-diff` command compares two Terraform plans and shows the differences between them. It takes an original plan file (`--orig`) and optionally a new plan file (`--new`). If the new plan file is not provided, it will generate one by running `terraform plan` with the current configuration.
- `atmos terraform shell` command configures an environment for an Atmos component in a stack and starts a new shell allowing executing all native
terraform commands inside the shell
- double-dash `--` can be used to signify the end of the options for Atmos and the start of the additional native arguments and flags for
the `terraform` commands. For example:
- `atmos terraform plan -s -- -refresh=false`
- `atmos terraform apply -s -- -lock=false`
:::tip
Run `atmos terraform --help` to see all the available options
:::
## Examples
```shell
atmos terraform plan test/test-component-override-3 -s tenant1-ue2-dev
atmos terraform plan test/test-component-override-3 -s tenant1-ue2-dev --skip-lock-file
atmos terraform plan test/test-component-override-2 -s tenant1-ue2-dev --redirect-stderr /dev/stdout
atmos terraform plan test/test-component-override -s tenant1-ue2-dev --redirect-stderr ./errors.txt
atmos terraform apply test/test-component-override-3 -s tenant1-ue2-dev
atmos terraform apply test/test-component-override-2 -s tenant1-ue2-dev --redirect-stderr /dev/stdout
atmos terraform apply test/test-component-override -s tenant1-ue2-dev --redirect-stderr ./errors.txt
atmos terraform destroy test/test-component-override-3 -s tenant1-ue2-dev
atmos terraform destroy test/test-component-override-2 -s tenant1-ue2-dev --redirect-stderr /dev/stdout
atmos terraform destroy test/test-component-override -s tenant1-ue2-dev --redirect-stderr /dev/null
atmos terraform init test/test-component-override-3 -s tenant1-ue2-dev
# Clean all components (with confirmation)
atmos terraform clean
# Clean a specific component
atmos terraform clean vpc
# Clean a specific component in a stack
atmos terraform clean vpc --stack dev
# Clean without confirmation prompt
atmos terraform clean --force
atmos terraform clean test/test-component-override-3 -s tenant1-ue2-dev
atmos terraform workspace test/test-component-override-3 -s tenant1-ue2-dev
atmos terraform workspace test/test-component-override-3 -s tenant1-ue2-dev --redirect-stderr /dev/null
atmos terraform workspace test/test-component-override-3 -s tenant1-ue2-dev --redirect-stderr /dev/stdout
atmos terraform workspace test/test-component-override-3 -s tenant1-ue2-dev --redirect-stderr ./errors.txt
atmos terraform plan test/test-component -s tenant1-ue2-dev -- -refresh=false -lock=false
atmos terraform plan test/test-component -s tenant1-ue2-dev --append-user-agent "Acme/1.0 (Build 1234; arm64)"
```
## Arguments
- `component` (required for Single-Component commands)
-
Atmos Terraform/OpenTofu component.
## Flags
- `--stack` (alias `-s`) (required for Single-Component commands)
-
Atmos stack.
```shell
atmos terraform plan --stack
atmos terraform apply --all -s
```
- `--dry-run` (optional)
-
Dry run.
Simulate the command without making any changes.
```shell
atmos terraform -s --dry-run
atmos terraform --all --dry-run
atmos terraform --affected --dry-run
```
- `--redirect-stderr` (optional)
-
File descriptor to redirect `stderr` to.
Errors can be redirected to any file or any standard file descriptor (including `/dev/null`).
- `--append-user-agent` (optional)
-
Append a custom User-Agent to Terraform requests.
Can also be set using the `ATMOS_COMPONENTS_TERRAFORM_APPEND_USER_AGENT` environment variable.
- `--skip-init` (optional)
-
Skip running `terraform init` before executing terraform commands.
```shell
atmos terraform apply -s --skip-init
```
- `--skip-planfile` (optional)
-
Skip writing the plan to a file.
If the flag is set to `true`, Atmos will not pass the `-out` flag to Terraform
when executing `terraform plan` commands. Set it to `true` when using Terraform Cloud since the `-out` flag is not supported.
Terraform Cloud automatically stores plans in its backend and can't store it in a local file
```shell
atmos terraform plan -s --skip-planfile=true
```
- `--process-templates` (optional)
-
Enable/disable Go template processing in Atmos stack manifests when executing terraform commands.
If the flag is not passed, template processing is enabled by default.
```shell
atmos terraform plan -s --process-templates=false
```
- `--process-functions` (optional)
-
Enable/disable YAML functions processing in Atmos stack manifestswhen executing terraform commands.
If the flag is not passed, YAML function processing is enabled by default.
```shell
atmos terraform plan -s --process-functions=false
```
- `--skip` (optional)
-
Skip processing a specific Atmos YAML function in Atmos stacks manifests when executing terraform commands.
To specify more than one function, use multiple `--skip` flags, or separate the functions with a comma.
```shell
atmos terraform plan -s --skip=eval --skip=include
atmos terraform apply -s --skip=terraform.output,include
```
- `--components` (optional)
-
Execute the command on the specified components in all stacks or in a specific stack.
```shell
atmos terraform plan --components
atmos terraform plan --components ,
atmos terraform apply --components --components
atmos terraform apply --components , --stack --logs-level=Debug
```
- `--all` (optional)
-
Execute the command on all components in all stacks or in a specific stack.
```shell
atmos terraform plan --all
atmos terraform apply --all --stack
atmos terraform apply --all --dry-run
atmos terraform deploy --all --logs-level=Debug
```
- `--query` (optional)
-
Execute the command on the components filtered by a [YQ](https://mikefarah.gitbook.io/yq) expression, in all stacks or in a specific stack.
__NOTE__: All Atmos sections are available in the expression, e.g. `vars`, `settings`, `env`, `metadata`, `backend`, etc.
```shell
atmos terraform plan --query '.vars.tags.team == "data"'
atmos terraform apply --query '.vars.tags.team == "eks"' --stack
atmos terraform apply --query '.settings.context.account_id == 12345'
atmos terraform deploy --query '.vars.tags.team == "data"' --dry-run --logs-level=Debug
```
- `--affected` (optional)
-
Execute the command on all the directly affected components, in all stacks or in a specific stack,
in dependency order (if [component dependencies](/core-concepts/stacks/dependencies/) are configured).
__NOTE__: When using the `--affected` flag, Atmos supports all the flags from the [`atmos describe affected`](/cli/commands/describe/affected) CLI command.
```shell
atmos terraform plan --affected
atmos terraform apply --affected --stack
atmos terraform apply --affected --dry-run
atmos terraform apply --affected --clone-target-ref=true
atmos terraform deploy --affected --include-dependents
atmos terraform apply --affected --include-dependents --dry-run --logs-level=Debug
```
- `--include-dependents` (optional; can only be used in conjunction with the `--affected` flag)
-
For each directly affected component, detect the dependent components and process them in dependency order, recursively.
Dependents are components that are indirectly affected, meaning that nothing in the current branch modifies their code
or configs, but they are configured as [dependencies](/core-concepts/stacks/dependencies/) of the components that are modified.
```shell
atmos terraform plan --affected --include-dependents --logs-level=Debug
atmos terraform apply --affected --include-dependents --dry-run
atmos terraform apply --affected --include-dependents --stack prod --dry-run
```
- `--ref` (optional; can only be used in conjunction with the `--affected` flag)
-
[Git Reference](https://git-scm.com/book/en/v2/Git-Internals-Git-References) with which to compare the current working branch.
If the reference is a branch, the command will compare the current working branch with the branch.
If the reference is a tag, the command will compare the current working branch with the tag.
If the flags are not provided, the ref will be set automatically to the head to the default branch (`refs/remotes/origin/HEAD` Git ref, usually the `main` branch)
- `--sha` (optional; can only be used in conjunction with the `--affected` flag)
-
Git commit SHA with which to compare the current working branch
- `--ssh-key` (optional; can only be used in conjunction with the `--affected` flag)
-
Path to PEM-encoded private key to clone private repos using SSH
- `--ssh-key-password` (optional; can only be used in conjunction with the `--affected` flag)
-
Encryption password for the PEM-encoded private key if the key contains a password-encrypted PEM block
- `--repo-path` (optional; can only be used in conjunction with the `--affected` flag)
-
Path to the already cloned target repository with which to compare the current branch. Conflicts with `--ref`, `--sha`, `--ssh-key` and `--ssh-key-password`
- `--clone-target-ref` (optional; can only be used in conjunction with the `--affected` flag)
-
Clone the target reference with which to compare the current branch.
```shell
atmos terraform plan --affected --clone-target-ref=true
atmos terraform deploy --affected --clone-target-ref=true --dry-run
atmos terraform apply --affected --clone-target-ref=true --dry-run --logs-level=Debug
```
If the flag is not passed or set to `false` (default), the target reference will be checked out instead.
This requires that the target reference is already cloned by Git, and the information about it exists in the `.git` directory
:::note
All native Terraform/OpenTofu flags are supported.
:::
## Multi-Component Commands (Bulk Operations) Examples
Let's assume that we have the following Atmos stack manifests in the `prod` and `nonprod` stacks,
with [dependencies between the components](/core-concepts/stacks/dependencies/):
```yaml
components:
terraform:
vpc:
vars:
tags:
# Team `network` manages the `vpc` component
team: network
eks/cluster:
vars:
tags:
# Team `eks` manages the `eks/cluster` component
team: eks
settings:
depends_on:
# `eks/cluster` depends on the `vpc` component
1:
component: vpc
eks/external-dns:
vars:
tags:
# Team `eks` manages the `eks/external-dns` component
team: eks
settings:
depends_on:
# `eks/external-dns` depends on the `eks/cluster` component
1:
component: eks/cluster
eks/karpenter:
vars:
tags:
# Team `eks` manages the `eks/karpenter` component
team: eks
settings:
depends_on:
# `eks/karpenter` depends on the `eks/cluster` component
1:
component: eks/cluster
eks/karpenter-node-pool:
vars:
tags:
# Team `eks` manages the `eks/karpenter-node-pool` component
team: eks
settings:
# `eks/karpenter-node-pool` depends on the `eks/cluster` and `eks/karpenter` components
depends_on:
1:
component: eks/cluster
2:
component: eks/karpenter
eks/istio/base:
vars:
tags:
# Team `istio` manages the `eks/istio/base` component
team: istio
settings:
# `eks/istio/base` depends on the `eks/cluster` component
depends_on:
1:
component: eks/cluster
eks/istio/istiod:
vars:
tags:
# Team `istio` manages the `eks/istio/istiod` component
team: istio
settings:
# `eks/istio/istiod` depends on the `eks/cluster` and `eks/istio/base` components
depends_on:
1:
component: eks/cluster
2:
component: eks/istio/base
eks/istio/test-app:
vars:
tags:
# Team `istio` manages the `eks/istio/test-app` component
team: istio
settings:
# `eks/istio/test-app` depends on the `eks/cluster`, `eks/istio/istiod` and `eks/istio/base` components
depends_on:
1:
component: eks/cluster
2:
component: eks/istio/istiod
3:
component: eks/istio/base
```
Let's run the following Multi-Component commands in `dry-run` mode and review the output to understand what each command executes:
```shell
# Execute the `terraform apply` command on all components in all stacks
> atmos terraform apply --all --dry-run
Executing command="atmos terraform apply vpc -s nonprod"
Executing command="atmos terraform apply eks/cluster -s nonprod"
Executing command="atmos terraform apply eks/external-dns -s nonprod"
Executing command="atmos terraform apply eks/istio/base -s nonprod"
Executing command="atmos terraform apply eks/istio/istiod -s nonprod"
Executing command="atmos terraform apply eks/istio/test-app -s nonprod"
Executing command="atmos terraform apply eks/karpenter -s nonprod"
Executing command="atmos terraform apply eks/karpenter-node-pool -s nonprod"
Executing command="atmos terraform apply vpc -s prod"
Executing command="atmos terraform apply eks/cluster -s prod"
Executing command="atmos terraform apply eks/external-dns -s prod"
Executing command="atmos terraform apply eks/istio/base -s prod"
Executing command="atmos terraform apply eks/istio/istiod -s prod"
Executing command="atmos terraform apply eks/istio/test-app -s prod"
Executing command="atmos terraform apply eks/karpenter -s prod"
Executing command="atmos terraform apply eks/karpenter-node-pool -s prod"
```
```shell
# Execute the `terraform apply` command on all components in the `prod` stack
> atmos terraform apply --all --stack prod --dry-run
Executing command="atmos terraform apply vpc -s prod"
Executing command="atmos terraform apply eks/cluster -s prod"
Executing command="atmos terraform apply eks/external-dns -s prod"
Executing command="atmos terraform apply eks/istio/base -s prod"
Executing command="atmos terraform apply eks/istio/istiod -s prod"
Executing command="atmos terraform apply eks/istio/test-app -s prod"
Executing command="atmos terraform apply eks/karpenter -s prod"
Executing command="atmos terraform apply eks/karpenter-node-pool -s prod"
```
```shell
# Execute the `terraform apply` command on all components in the `prod` stack
> atmos terraform apply --stack prod --dry-run
Executing command="atmos terraform apply vpc -s prod"
Executing command="atmos terraform apply eks/cluster -s prod"
Executing command="atmos terraform apply eks/external-dns -s prod"
Executing command="atmos terraform apply eks/istio/base -s prod"
Executing command="atmos terraform apply eks/istio/istiod -s prod"
Executing command="atmos terraform apply eks/istio/test-app -s prod"
Executing command="atmos terraform apply eks/karpenter -s prod"
Executing command="atmos terraform apply eks/karpenter-node-pool -s prod"
```
```shell
# Execute the `terraform apply` command on the `vpc` and `eks/cluster` components
# in all stacks.
> atmos terraform apply --components vpc,eks/cluster --dry-run
Executing command="atmos terraform apply vpc -s nonprod"
Executing command="atmos terraform apply eks/cluster -s nonprod"
Executing command="atmos terraform apply vpc -s prod"
Executing command="atmos terraform apply eks/cluster -s prod"
```
```shell
# Execute the `terraform apply` command on the `vpc` and `eks/cluster` components
# in the `prod` stack.
> atmos terraform apply --stack prod --components vpc,eks/cluster --dry-run
Executing command="atmos terraform apply vpc -s prod"
Executing command="atmos terraform apply eks/cluster -s prod"
```
```shell
# Execute the `terraform apply` command on the components filtered by the query expression,
# in all stacks.
> atmos terraform apply --query '.vars.tags.team == "eks"' --dry-run
Skipping the component because the query criteria not satisfied command="atmos terraform apply vpc -s nonprod" query=".vars.tags.team == \"eks\""
Executing command="atmos terraform apply eks/cluster -s nonprod"
Executing command="atmos terraform apply eks/external-dns -s nonprod"
Skipping the component because the query criteria not satisfied command="atmos terraform apply eks/istio/base -s nonprod" query=".vars.tags.team == \"eks\""
Skipping the component because the query criteria not satisfied command="atmos terraform apply eks/istio/istiod -s nonprod" query=".vars.tags.team == \"eks\""
Skipping the component because the query criteria not satisfied command="atmos terraform apply eks/istio/test-app -s nonprod" query=".vars.tags.team == \"eks\""
Executing command="atmos terraform apply eks/karpenter -s nonprod"
Executing command="atmos terraform apply eks/karpenter-node-pool -s nonprod"
Skipping the component because the query criteria not satisfied command="atmos terraform apply vpc -s prod" query=".vars.tags.team == \"eks\""
Executing command="atmos terraform apply eks/cluster -s prod"
Executing command="atmos terraform apply eks/external-dns -s prod"
Skipping the component because the query criteria not satisfied command="atmos terraform apply eks/istio/base -s prod" query=".vars.tags.team == \"eks\""
Skipping the component because the query criteria not satisfied command="atmos terraform apply eks/istio/istiod -s prod" query=".vars.tags.team == \"eks\""
Skipping the component because the query criteria not satisfied command="atmos terraform apply eks/istio/test-app -s prod" query=".vars.tags.team == \"eks\""
Executing command="atmos terraform apply eks/karpenter -s prod"
Executing command="atmos terraform apply eks/karpenter-node-pool -s prod"
```
```shell
# Execute the `terraform apply` command on the components filtered by the query expression,
# in the `prod` stack.
> atmos terraform apply --query '.vars.tags.team == "eks"' --stack prod --dry-run
Skipping the component because the query criteria not satisfied command="atmos terraform apply vpc -s prod" query=".vars.tags.team == \"eks\""
Executing command="atmos terraform apply eks/cluster -s prod"
Executing command="atmos terraform apply eks/external-dns -s prod"
Skipping the component because the query criteria not satisfied command="atmos terraform apply eks/istio/base -s prod" query=".vars.tags.team == \"eks\""
Skipping the component because the query criteria not satisfied command="atmos terraform apply eks/istio/istiod -s prod" query=".vars.tags.team == \"eks\""
Skipping the component because the query criteria not satisfied command="atmos terraform apply eks/istio/test-app -s prod" query=".vars.tags.team == \"eks\""
Executing command="atmos terraform apply eks/karpenter -s prod"
Executing command="atmos terraform apply eks/karpenter-node-pool -s prod"
```
```shell
# Execute the `terraform apply` command on all components affected by the changes
# in the current branch, in all stacks, in dependency order.
# Assume that the components `vpc` and `eks/cluster` in all stacks are affected (e.g. just added).
> atmos terraform apply --affected --dry-run
Executing command="atmos terraform apply vpc -s nonprod"
Executing command="atmos terraform apply eks/cluster -s nonprod"
Executing command="atmos terraform apply vpc -s prod"
Executing command="atmos terraform apply eks/cluster -s prod"
```
```shell
# Execute the `terraform apply` command on all components affected by the changes
# in the current branch, in the `prod` stack, in dependency order.
# Assume that the components `vpc` and `eks/cluster` in the `prod` stack are affected (e.g. just added).
> atmos terraform apply --affected --stack prod --dry-run
Executing command="atmos terraform apply vpc -s prod"
Executing command="atmos terraform apply eks/cluster -s prod"
```
```shell
# Execute the `terraform apply` command on all the components affected by the changes
# in the current branch, in all stacks.
# For each directly affected component, detect the dependent components and process
# them in dependency order, recursively.
# Dependents are components that are indirectly affected, meaning that nothing in the
# current branch modifies their code or configs, but they are configured as
# dependencies of the components that are modified.
> atmos terraform apply --affected --include-dependents --dry-run
Executing command="atmos terraform apply vpc -s nonprod"
Executing command="atmos terraform apply eks/cluster -s nonprod" dependency of component=vpc in stack=nonprod
Executing command="atmos terraform apply eks/karpenter -s nonprod" dependency of component=eks/cluster in stack=nonprod
Executing command="atmos terraform apply eks/karpenter-node-pool -s nonprod" dependency of component=eks/karpenter in stack=nonprod
Executing command="atmos terraform apply eks/external-dns -s nonprod" dependency of component=eks/cluster in stack=nonprod
Executing command="atmos terraform apply eks/istio/base -s nonprod" dependency of component=eks/cluster in stack=nonprod
Executing command="atmos terraform apply eks/istio/istiod -s nonprod" dependency of component=eks/istio/base in stack=nonprod
Executing command="atmos terraform apply eks/istio/test-app -s nonprod" dependency of component=eks/istio/istiod in stack=nonprod
Executing command="atmos terraform apply vpc -s prod"
Executing command="atmos terraform apply eks/cluster -s prod" dependency of component=vpc in stack=prod
Executing command="atmos terraform apply eks/external-dns -s prod" dependency of component=eks/cluster in stack=prod
Executing command="atmos terraform apply eks/istio/base -s prod" dependency of component=eks/cluster in stack=prod
Executing command="atmos terraform apply eks/istio/istiod -s prod" dependency of component=eks/istio/base in stack=prod
Executing command="atmos terraform apply eks/istio/test-app -s prod" dependency of component=eks/istio/istiod in stack=prod
Executing command="atmos terraform apply eks/karpenter -s prod" dependency of component=eks/cluster in stack=prod
Executing command="atmos terraform apply eks/karpenter-node-pool -s prod" dependency of component=eks/karpenter in stack=prod
```
```shell
# Execute the `terraform apply` command on all the components affected by the changes
# in the current branch, in the `prod` stack.
# For each directly affected component, detect the dependent components and process
# them in dependency order, recursively.
# Dependents are components that are indirectly affected, meaning that nothing in the
# current branch modifies their code or configs, but they are configured as
# dependencies of the components that are modified.
> atmos terraform apply --affected --stack prod --include-dependents --dry-run
Executing command="atmos terraform apply vpc -s prod"
Executing command="atmos terraform apply eks/cluster -s prod" dependency of component=vpc in stack=prod
Executing command="atmos terraform apply eks/external-dns -s prod" dependency of component=eks/cluster in stack=prod
Executing command="atmos terraform apply eks/istio/base -s prod" dependency of component=eks/cluster in stack=prod
Executing command="atmos terraform apply eks/istio/istiod -s prod" dependency of component=eks/istio/base in stack=prod
Executing command="atmos terraform apply eks/istio/test-app -s prod" dependency of component=eks/istio/istiod in stack=prod
Executing command="atmos terraform apply eks/karpenter -s prod" dependency of component=eks/cluster in stack=prod
Executing command="atmos terraform apply eks/karpenter-node-pool -s prod" dependency of component=eks/karpenter in stack=prod
```
## Subcommands
---
## atmos validate
import Screengrab from '@site/src/components/Screengrab'
import DocCardList from '@theme/DocCardList';
import Intro from '@site/src/components/Intro'
Use these subcommands to validate Atmos configurations.
## Subcommands
---
## atmos validate component
import Screengrab from '@site/src/components/Screengrab'
:::note purpose
Use this command to validate an Atmos component in a stack using JSON Schema and OPA policies.
:::
## Usage
Execute the `validate component` command like this:
```shell
atmos validate component -s [options]
```
This command validates an Atmos component in a stack using JSON Schema and OPA policies.
:::tip
Run `atmos validate component --help` to see all the available options
:::
## Examples
```shell
atmos validate component infra/vpc -s tenant1-ue2-dev
atmos validate component infra/vpc -s tenant1-ue2-dev --schema-path vpc/validate-infra-vpc-component.json --schema-type jsonschema
atmos validate component infra/vpc -s tenant1-ue2-dev --schema-path vpc/validate-infra-vpc-component.rego --schema-type opa
atmos validate component infra/vpc -s tenant1-ue2-dev --schema-path vpc/validate-infra-vpc-component.rego --schema-type opa --module-paths catalog/constants
atmos validate component infra/vpc -s tenant1-ue2-dev --schema-path vpc/validate-infra-vpc-component.rego --schema-type opa --module-paths catalog
atmos validate component infra/vpc -s tenant1-ue2-dev --timeout 15
```
## Arguments
- `component` (required)
- Atmos component.
## Flags
- `--stack` / `-s` (required)
- Atmos stack.
- `--schema-path` (optional)
- Path to the schema file.Can be an absolute path or a path relative to `schemas.jsonschema.base_path`and `schemas.opa.base_path` defined in `atmos.yaml`.
- `--schema-type` (optional)
- Schema type: `jsonschema` or `opa`.
- `--module-paths` (optional)
- Comma-separated string of filesystem paths (folders or individual files) to the additional modulesfor schema validation. Each path can be an absolute path or a path relative to`schemas.opa.base_path` defined in `atmos.yaml`.
- `--timeout` (optional)
- Validation timeout in seconds. Can also be specified in `settings.validation` component config. If not provided, timeout of 20 seconds is used by default.
---
## atmos validate editorconfig
import Screengrab from '@site/src/components/Screengrab'
:::note purpose
Use this command to validate files against the rules defined in .editorconfig file.
:::
## Usage
Execute the `validate editorconfig` command like this:
```shell
atmos validate editorconfig
```
This command validates files against the formatting rules defined in your .editorconfig file.
:::tip
Run `atmos validate editorconfig --help` to see all the available options
:::
## Examples
```shell
atmos validate editorconfig
atmos validate editorconfig --logs-level Trace
atmos validate editorconfig --no-color
atmos validate editorconfig --dry-run
```
## Flags
- `--config` (optional)
- Path to the configuration file (e.g., `.editorconfig`, `.editorconfig-checker.json`, `.ecrc`).
- `--disable-end-of-line` (optional)
- Disable end-of-line check (default `false`).
- `--disable-indent-size` (optional)
- Disable indent size check (default `false`).
- `--disable-indentation` (optional)
- Disable indentation check (default `false`).
- `--disable-insert-final-newline` (optional)
- Disable final newline check (default `false`).
- `--disable-max-line-length` (optional)
- Disable max line length check (default `false`).
- `--disable-trim-trailing-whitespace` (optional)
- Disable trailing whitespace check (default `false`).
- `--dry-run` (optional)
- Show which files would be checked (default `false`).
- `--exclude` (optional)
- Regex to exclude files from checking.
- `--format` (optional)
- Specify the output format: default, gcc (default `default`).
- `--help` (optional)
- help for editorconfig.
- `--ignore-defaults` (optional)
- Ignore default excludes (default `false`).
- `--init` (optional)
- Create an initial configuration (default `false`).
- `--no-color` (optional)
- Don't print colors (default `false`).
- `--version` (optional)
- Print the version number (default `false`).
---
## atmos validate schema
import Screengrab from '@site/src/components/Screengrab'
:::note purpose
Use this command to validate files against the rules defined in your schema in atmos.yaml.
:::
## Usage
Execute the `validate schema` command like this:
```shell
atmos validate schema
```
This command validates files against the formatting rules defined in your .editorconfig file.
:::tip
Run `atmos validate schema --help` to see all the available options
:::
## Examples
```shell
atmos validate schema
atmos validate schema
```
## How to set my schema validators?
You need to use the `schemas` key in atmos config.
```yaml
schemas:
my_custom_key:
schema: !import https://www.jsonschema.com/example.json # json to be used for validation
matches:
- folder/*.yaml # pattern of the file to be validated
```
## Flags
- `--schemas-atmos-manifest` (optional)
- Specifies the path to a JSON schema file used to validate the structure and content of the Atmos manifest file.
---
## atmos validate stacks
import Screengrab from '@site/src/components/Screengrab'
import Terminal from '@site/src/components/Terminal'
import Intro from '@site/src/components/Intro'
Use this command to validate Atmos stack manifest configurations.
## Usage
Execute the `validate stacks` command like this:
```shell
atmos validate stacks
```
This command validates Atmos stack manifests and checks the following:
- All YAML manifest files for YAML errors and inconsistencies
- Note: Template files (`.yaml.tmpl`, `.yml.tmpl`, `.tmpl`) are excluded from validation since they may contain template placeholders that are invalid YAML before being rendered
- Template files are still automatically detected and processed during normal operations (imports, etc.)
- All imports: if they are configured correctly, have valid data types, and point to existing manifest files
- Schema: if all sections in all YAML manifest files are correctly configured and have valid data types
- Misconfiguration and duplication of components in stacks. If the same Atmos component in the same Atmos stack is
defined in more than one stack manifest file, and the component configurations are different, an error message will
be displayed similar to the following:
```console
The Atmos component 'vpc' in the stack 'plat-ue2-dev' is defined in more than one
top-level stack manifest file: orgs/acme/plat/dev/us-east-2-extras, orgs/acme/plat/dev/us-east-2.
The component configurations in the stack manifests are different.
To check and compare the component configurations in the stack manifests, run the following commands:
- atmos describe component vpc -s orgs/acme/plat/dev/us-east-2-extras
- atmos describe component vpc -s orgs/acme/plat/dev/us-east-2
You can use the '--file' flag to write the results of the above commands to files
(refer to https://atmos.tools/cli/commands/describe/component).
You can then use the Linux 'diff' command to compare the files line by line and show the differences
(refer to https://man7.org/linux/man-pages/man1/diff.1.html)
When searching for the component 'vpc' in the stack 'plat-ue2-dev', Atmos can't decide which
stack manifest file to use to get configuration for the component. This is a stack misconfiguration.
Consider the following solutions to fix the issue:
- Ensure that the same instance of the Atmos 'vpc' component in the stack 'plat-ue2-dev'
is only defined once (in one YAML stack manifest file)
- When defining multiple instances of the same component in the stack,
ensure each has a unique name
- Use multiple-inheritance to combine multiple configurations together
(refer to https://atmos.tools/core-concepts/stacks/inheritance)
```
:::tip
Run `atmos validate stacks --help` to see all the available options
:::
## Examples
```shell
# Use the default (embedded) JSON Schema
atmos validate stacks
# Point to the JSON Schema on the local filesystem
atmos validate stacks --schemas-atmos-manifest schemas/atmos/atmos-manifest/1.0/atmos-manifest.json
# Point to the remote JSON Schema
atmos validate stacks --schemas-atmos-manifest https://atmos.tools/schemas/atmos/atmos-manifest/1.0/atmos-manifest.json
```
## Flags
- `--schemas-atmos-manifest` (optional)
- Path to JSON Schema to validate Atmos stack manifests.Can be a URL, an absolute path,or a path relative to the `base_path` setting in `atmos.yaml`.
## Validate Atmos Manifests using JSON Schema
Atmos uses the [Atmos Manifest JSON Schema](pathname:///schemas/atmos/atmos-manifest/1.0/atmos-manifest.json) to validate Atmos manifests, and has a default (embedded) JSON Schema.
If you don't configure the path to a JSON Schema in `atmos.yaml` and don't provide it on the command line using the `--schemas-atmos-manifest` flag,
the default (embedded) JSON Schema will be used when executing the command `atmos validate stacks`.
To override the default behavior, configure JSON Schema in `atmos.yaml`:
- Add the [Atmos Manifest JSON Schema](pathname:///schemas/atmos/atmos-manifest/1.0/atmos-manifest.json) to your repository, for example
in [`stacks/schemas/atmos/atmos-manifest/1.0/atmos-manifest.json`](https://github.com/cloudposse/atmos/blob/main/examples/quick-start-advanced/stacks/schemas/atmos/atmos-manifest/1.0/atmos-manifest.json)
- Configure the following section in the `atmos.yaml` [CLI config file](/cli/configuration)
```yaml title="atmos.yaml"
# Validation schemas (for validating atmos stacks and components)
schemas:
# JSON Schema to validate Atmos manifests
atmos:
# Can also be set using 'ATMOS_SCHEMAS_ATMOS_MANIFEST' ENV var, or '--schemas-atmos-manifest' command-line arguments
# Supports both absolute and relative paths (relative to the `base_path` setting in `atmos.yaml`)
manifest: "stacks/schemas/atmos/atmos-manifest/1.0/atmos-manifest.json"
# Also supports URLs
# manifest: "https://atmos.tools/schemas/atmos/atmos-manifest/1.0/atmos-manifest.json"
```
- Instead of configuring the `schemas.atmos.manifest` section in `atmos.yaml`, you can provide the path to
the [Atmos Manifest JSON Schema](pathname:///schemas/atmos/atmos-manifest/1.0/atmos-manifest.json) file by using the ENV variable `ATMOS_SCHEMAS_ATMOS_MANIFEST`
or the `--schemas-atmos-manifest` command line flag:
```shell
ATMOS_SCHEMAS_ATMOS_MANIFEST=stacks/schemas/atmos/atmos-manifest/1.0/atmos-manifest.json atmos validate stacks
atmos validate stacks --schemas-atmos-manifest stacks/schemas/atmos/atmos-manifest/1.0/atmos-manifest.json
atmos validate stacks --schemas-atmos-manifest https://atmos.tools/schemas/atmos/atmos-manifest/1.0/atmos-manifest.json
```
In case of any validation errors (invalid YAML syntax, Atmos manifest JSON Schema errors, invalid imports, etc.), you'll get an output from the
command similar to the following:
```console
no matches found for the import 'globals/tenant1-globals-does-not-exist' in the
file 'catalog/invalid-yaml-and-schema/invalid-import-1.yaml'
invalid import in the file 'catalog/invalid-yaml-and-schema/invalid-import-2.yaml'
The file imports itself in 'catalog/invalid-yaml-and-schema/invalid-import-2'
invalid stack manifest 'catalog/invalid-yaml-and-schema/invalid-yaml-1.yaml'
yaml: line 15: found unknown directive name
invalid stack manifest 'catalog/invalid-yaml-and-schema/invalid-yaml-3.yaml'
yaml: line 13: did not find expected key
invalid stack manifest 'catalog/invalid-yaml-and-schema/invalid-yaml-5.yaml'
yaml: mapping values are not allowed in this context
invalid stack manifest 'catalog/invalid-yaml-and-schema/invalid-yaml-6.yaml'
yaml: line 2: block sequence entries are not allowed in this context
invalid stack manifest 'catalog/invalid-yaml-and-schema/invalid-yaml-7.yaml'
yaml: line 4: could not find expected ':'
Atmos manifest JSON Schema validation error in the
file 'catalog/invalid-yaml-and-schema/invalid-import-5.yaml':
{
"valid": false,
"errors": [
{
"keywordLocation": "",
"absoluteKeywordLocation": "tests/fixtures/scenarios/complete/schemas/atmos/atmos-manifest/1.0/atmos-manifest.json#",
"instanceLocation": "",
"error": "doesn't validate with tests/fixtures/scenarios/complete/schemas/atmos/atmos-manifest/1.0/atmos-manifest.json#"
},
{
"keywordLocation": "/properties/import/$ref",
"absoluteKeywordLocation": "tests/fixtures/scenarios/complete/schemas/atmos/atmos-manifest/1.0/atmos-manifest.json#/properties/import/$ref",
"instanceLocation": "/import",
"error": "doesn't validate with '/definitions/import'"
},
{
"keywordLocation": "/properties/import/$ref/type",
"absoluteKeywordLocation": "tests/fixtures/scenarios/complete/schemas/atmos/atmos-manifest/1.0/atmos-manifest.json#/definitions/import/type",
"instanceLocation": "/import",
"error": "expected array, but got object"
}
]
}
Atmos manifest JSON Schema validation error in the
file 'catalog/invalid-yaml-and-schema/invalid-schema-8.yaml':
{
"valid": false,
"errors": [
{
"keywordLocation": "",
"absoluteKeywordLocation": "tests/fixtures/scenarios/complete/schemas/atmos/atmos-manifest/1.0/atmos-manifest.json#",
"instanceLocation": "",
"error": "doesn't validate with tests/fixtures/scenarios/complete/schemas/atmos/atmos-manifest/1.0/atmos-manifest.json#"
},
{
"keywordLocation": "/properties/env/$ref",
"absoluteKeywordLocation": "tests/fixtures/scenarios/complete/schemas/atmos/atmos-manifest/1.0/atmos-manifest.json#/properties/env/$ref",
"instanceLocation": "/env",
"error": "doesn't validate with '/definitions/env'"
},
{
"keywordLocation": "/properties/env/$ref/type",
"absoluteKeywordLocation": "tests/fixtures/scenarios/complete/schemas/atmos/atmos-manifest/1.0/atmos-manifest.json#/definitions/env/type",
"instanceLocation": "/env",
"error": "expected object, but got array"
}
]
}
```
---
## atmos vendor
import Screengrab from '@site/src/components/Screengrab'
import DocCardList from '@theme/DocCardList';
import Intro from '@site/src/components/Intro'
Use these subcommands to vendor Atmos components and stacks.
## Subcommands
---
## atmos vendor pull
import Screengrab from '@site/src/components/Screengrab'
import Intro from '@site/src/components/Intro'
This command implements [Atmos Vendoring](/core-concepts/vendor/). Use this command to download sources from local and remote
repositories for Terraform and Helmfile components and stacks.
With Atmos vendoring, you can copy components and other artifacts from the following sources:
- Copy all files from an [OCI Registry](https://opencontainers.org) into a local folder
- Copy all files from Git, Mercurial, Amazon S3, Google GCP into a local folder
- Copy all files from an HTTP/HTTPS endpoint into a local folder
- Copy a single file from an HTTP/HTTPS endpoint to a local file
- Copy a local file into a local folder (keeping the same file name)
- Copy a local file to a local file with a different file name
- Copy a local folder (all files) into a local folder
## Usage
Execute the `vendor pull` command like this:
```shell
atmos vendor pull
atmos vendor pull --everything
atmos vendor pull --component [options]
atmos vendor pull -c [options]
atmos vendor pull --tags , [options]
```
## Description
Atmos supports two different ways of vendoring components, stacks and other artifacts:
- Using `component.yaml` vendoring manifest
- Using `vendor.yaml` vendoring manifest
The `component.yaml` vendoring manifest can be used to vendor components from remote repositories.
A `component.yaml` file placed into a component's directory is used to describe the vendoring config for one component only.
Using `component.yaml` is not recommended, and it's maintained for backwards compatibility.
The `vendor.yaml` vendoring manifest provides more functionality than using `component.yaml` files.
It's used to describe vendoring config for all components, stacks and other artifacts for the entire infrastructure.
The file is placed into the directory from which the `atmos vendor pull` command is executed. It's the recommended way to describe vendoring
configurations.
## Vendoring using `vendor.yaml` manifest
- The `vendor.yaml` vendoring manifest supports Kubernetes-style YAML config to describe vendoring configuration for components, stacks,
and other artifacts.
- The `source` attribute supports all protocols (local files, Git, Mercurial, HTTP, HTTPS, Amazon S3, Google GCP), and all URL and
archive formats as described in [go-getter](https://github.com/hashicorp/go-getter), and also the `oci://` scheme to download artifacts from
[OCI registries](https://opencontainers.org). See [Vendor URL Syntax](/core-concepts/vendor/url-syntax) for complete documentation on supported URL formats and authentication.
- The `targets` in the `sources` support absolute paths and relative paths (relative to the `vendor.yaml` file). Note: if the `targets` paths
are set as relative, and if the `vendor.yaml` file is detected by Atmos using the `base_path` setting in `atmos.yaml`, the `targets` paths
will be considered relative to the `base_path`. Multiple targets can be specified.
- `included_paths` and `excluded_paths` support [POSIX-style greedy Globs](https://en.wikipedia.org/wiki/Glob_(programming)) for filenames/paths
(double-star/globstar `**` is supported as well).
- The `tags` in each source specifies a list of tags to apply to the component. This allows you to only vendor the components that have the
specified tags by executing a command `atmos vendor pull --tags ,`
:::tip
Refer to [`Atmos Vendoring`](/core-concepts/vendor) for more details
:::
## Vendoring using `component.yaml` manifest
- The `component.yaml` vendoring manifest supports Kubernetes-style YAML config to describe component vendoring configuration.
The file is placed into the component's folder.
- The URIs (`uri`) in `component.yaml` support all protocols (local files, Git, Mercurial, HTTP, HTTPS, Amazon S3, Google GCP), and all URL and
archive formats as described in [go-getter](https://github.com/hashicorp/go-getter), and also the `oci://` scheme to download artifacts from
[OCI registries](https://opencontainers.org).
- `included_paths` and `excluded_paths` in `component.yaml` support [POSIX-style greedy Globs](https://en.wikipedia.org/wiki/Glob_(programming)) for
file names/paths (double-star/globstar `**` is supported as well).
:::tip
Refer to [`Atmos Component Vendoring`](/core-concepts/vendor/component-manifest) for more details
:::
## Vendoring from OCI Registries
The following config can be used to download the `vpc` component from an AWS public ECR registry:
```yaml
apiVersion: atmos/v1
kind: ComponentVendorConfig
metadata:
name: vpc-vendor-config
description: Config for vendoring of 'vpc' component
spec:
source:
# Download the component from the AWS public ECR registry (https://docs.aws.amazon.com/AmazonECR/latest/public/public-registries.html)
uri: "oci://public.ecr.aws/cloudposse/components/terraform/stable/aws/vpc:{{.Version}}"
version: "latest"
```
## Vendoring from SSH
Atmos supports SSH for accessing non-public Git repositories, which is convenient for local development. Atmos will use any installed SSH keys automatically.
:::tip
In automated systems like GitHub Actions, we recommend sticking with the `https://` scheme for vendoring. Atmos will automatically inject the `GITHUB_TOKEN`.
:::
There are two primary ways to specify an SSH source.
### SCP-style Sources
Atmos supports traditional SCP-style sources, which use a colon to separate the host from the repository, like this:
```shell
git::git@github.com:cloudposse/terraform-null-label.git?ref={{.Version}}
```
Atmos rewrites this URL to the following format:
```shell
git::ssh://git@github.com/cloudposse/terraform-null-label.git?depth=1&ref={{.Version}}
```
If no username is supplied and the host is `github.com`, Atmos automatically injects the default username `git`.
### Explicit SSH Sources
When the `ssh://` scheme is explicitly specified, the URL is used as provided, and no rewriting occurs.
For example:
```shell
git::ssh://git@github.com/cloudposse/terraform-null-label.git?ref={{ .Version }}
```
### Important Notes
- The following URL is **invalid** because `go-getter` misinterprets `github.com:` as a URL scheme (like `http:` or `git:`), causing a parsing error:
```shell
github.com:cloudposse/terraform-null-label.git?ref={{ .Version }}
```
- When a URL has no scheme, Atmos defaults to **HTTPS** and injects credentials if available.
```shell
github.com/cloudposse/terraform-null-label.git?ref={{ .Version }}
```
## Git over HTTPS Vendoring
Atmos supports vendoring components using **Git over HTTPS**.
For example:
```
github.com/cloudposse/terraform-null-label.git?ref={{ .Version }}
```
is automatically resolved as:
```
git::https://github.com/cloudposse/terraform-null-label.git?depth=1&ref={{ .Version }}
```
## Authentication & Token Usage for HTTPS
Atmos prioritizes authentication credentials based on predefined environment variables. The priority order for each provider is:
### GitHub
- `ATMOS_GITHUB_TOKEN`
- Bearer token for GitHub API requests, enabling authentication for private repositories and higher rate limits.
- `GITHUB_TOKEN`
- Used as a fallback if `ATMOS_GITHUB_TOKEN` is not set.
**Default Username for HTTPS:** `x-access-token`
### Bitbucket
- `ATMOS_BITBUCKET_TOKEN`
- Bitbucket app password for API requests; used to avoid rate limits. When both `ATMOS_BITBUCKET_TOKEN` and `BITBUCKET_TOKEN` are defined, the former prevails.
- `BITBUCKET_TOKEN`
- Used as a fallback when `ATMOS_BITBUCKET_TOKEN` is not set.
- `ATMOS_BITBUCKET_USERNAME`
- Bitbucket username for authentication. Takes precedence over `BITBUCKET_USERNAME`.
- `BITBUCKET_USERNAME`
- Used as a fallback when `ATMOS_BITBUCKET_USERNAME` is not set. Bitbucket requires a valid username and does not accept dummy values like `x-access-token`.
### GitLab
- `ATMOS_GITLAB_TOKEN`
- Personal Access Token (PAT) for GitLab authentication. Takes precedence over `GITLAB_TOKEN`.
- `GITLAB_TOKEN`
- Used as a fallback if `ATMOS_GITLAB_TOKEN` is not set.
**Default Username for HTTPS:** `"oauth2"`
## How HTTPS URLs Are Resolved
When resolving Git sources, Atmos follows these rules:
1. If a **full HTTPS URL** is provided (`git::https://github.com/...`), it is used as-is. No token data is injected, even if environment variables are set.
2. If a **repository name** is provided without a scheme (`github.com/org/repo.git`), it defaults to `https://`, and if a token is set, it is injected into the URL.
3. If a **username and repository name** are provided in SCP format (`git@github.com:org/repo.git`), it is rewritten as an SSH URL.
:::note
For more details on configuration, refer to [Atmos Configuration](/cli/configuration).
:::
:::tip
Run `atmos vendor pull --help` to see all the available options
:::
## Examples
```shell
atmos vendor pull
atmos vendor pull --everything
atmos vendor pull --component vpc
atmos vendor pull -c vpc-flow-logs-bucket
atmos vendor pull -c echo-server --type helmfile
atmos vendor pull --tags dev,test
atmos vendor pull --tags networking --dry-run
```
:::note
When executing the `atmos vendor pull` command, Atmos performs the following steps to decide which vendoring manifest to use:
- If `vendor.yaml` manifest is found (in the directory from which the command is executed), Atmos will parse the file and execute the command
against it. If the flag `--component` is not specified, Atmos will vendor all the artifacts defined in the `vendor.yaml` manifest.
If the flag `--component` is passed in, Atmos will vendor only that component
- If `vendor.yaml` is not found, Atmos will look for the `component.yaml` manifest in the component's folder. If `component.yaml` is not found,
an error will be thrown. The flag `--component` is required in this case
:::
## Flags
- `--component` / `-c` (optional)
- Atmos component to pull.
- `--everything` (optional)
- Vendor all components.
- `--tags` (optional)
- Only vendor the components that have the specified tags.`tags` is a comma-separated values (CSV) string.
- `--type` / `-t` (optional)
- Component type: `terraform` or `helmfile` (`terraform` is default).
- `--dry-run` (optional)
- Dry run.
---
## atmos version
import Screengrab from '@site/src/components/Screengrab'
import Intro from '@site/src/components/Intro'
Use this command to get the Atmos CLI version
## Usage
Execute the `atmos version` command like this:
```shell
atmos version
```
This will show the CLI version.
From time to time, Atmos will check for updates. The frequency of these checks is configured in the `atmos.yaml` file.
Atmos supports three ways to specify the update check frequency:
1. As an integer: Specify the number of seconds between checks (for example, 3600 for hourly checks).
2. As a duration with a suffix: Use a time suffix to indicate the interval (for example, `1m` for one minute, `5h` for five hours, or `2d` for two days).
3. As one of the predefined keywords: Choose from the following options: minute, hourly, daily, weekly, monthly, and yearly. The default is daily.
The default is to check `daily`, and if any unsupported values are passed this default will be used.
It is also possible to turn off version checks in `atmos.yaml` by setting `version.check.enabled` to `false`,
or by setting the `ATMOS_VERSION_CHECK_ENABLED` environment variable to `false`, which overrides
the `version.check.enabled` settings in `atmos.yaml`.
```shell
atmos version --check
```
## Flags
- `--check` (optional)
- Force Atmos to check for a new version, irrespective of the configuration settings.
- `--format` (optional)
- Specify the output format: `yaml` or `json`.
:::tip
To find the latest version of Atmos, go to the [releases](https://github.com/cloudposse/atmos/releases) page on GitHub.
For help with installing the latest version of Atmos, check out our [installation](/install) page.
:::
When executing the `atmos version` command, Atmos automatically checks for the latest release
from the [Atmos releases](https://github.com/cloudposse/atmos/releases) page on GitHub and compares the current
version with the latest release.
If the installed Atmos version is out of date, the following information is presented to the user:
---
## atmos workflow
import Screengrab from '@site/src/components/Screengrab'
import Terminal from '@site/src/components/Terminal'
import Intro from '@site/src/components/Intro'
Use this command to perform sequential execution of `atmos` and `shell` commands defined as workflow steps.
An Atmos workflow is a series of steps that are run in order to achieve some outcome. Every workflow has a name and is
easily executed from the
command line by calling `atmos workflow`. Use workflows to orchestrate any number of commands. Workflows can call
any `atmos` subcommand (including
[Atmos Custom Commands](/core-concepts/custom-commands)), shell commands, and have access to the stack configurations.
:::note
You can use [Atmos Custom Commands](/core-concepts/custom-commands) in [Atmos Workflows](/core-concepts/workflows),
and [Atmos Workflows](/core-concepts/workflows)
in [Atmos Custom Commands](/core-concepts/custom-commands)
:::
## Usage
Execute the `atmos workflow` command like this:
```shell
atmos workflow --file [options]
```
## Screenshots
### Workflow UI
Just run `atmos workflow` to start an interactive UI to view, search and execute the configured Atmos
workflows:
```shell
atmos workflow
```
- Use the `right/left` arrow keys to navigate between the "Workflow Manifests", "Workflows" and the selected workflow
views
- Use the `up/down` arrow keys (or the mouse wheel) to select a workflow manifest and a workflow to execute
- Use the `/` key to filter/search for the workflow manifests and workflows in the corresponding views
- Press `Enter` to execute the selected workflow from the selected workflow manifest starting with the selected step
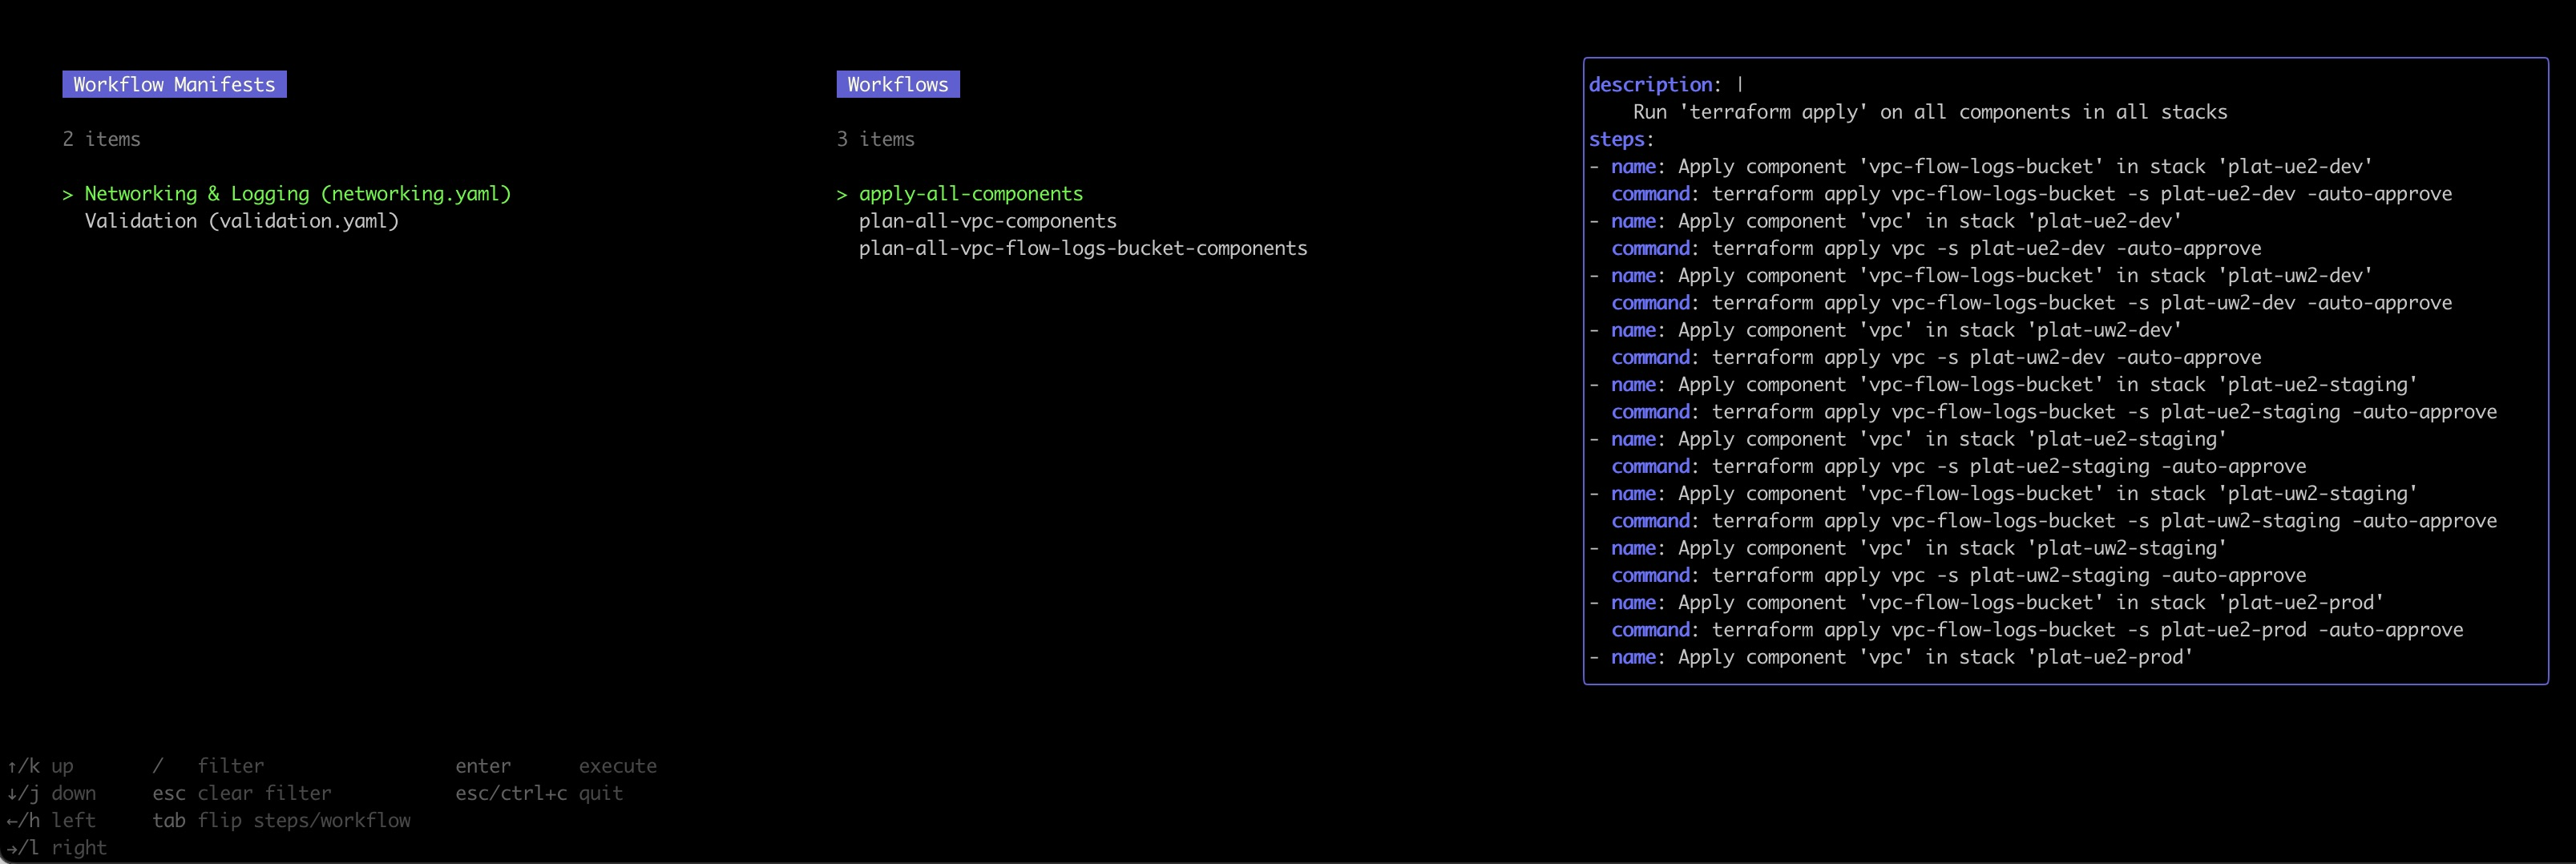
### Execute a Workflow
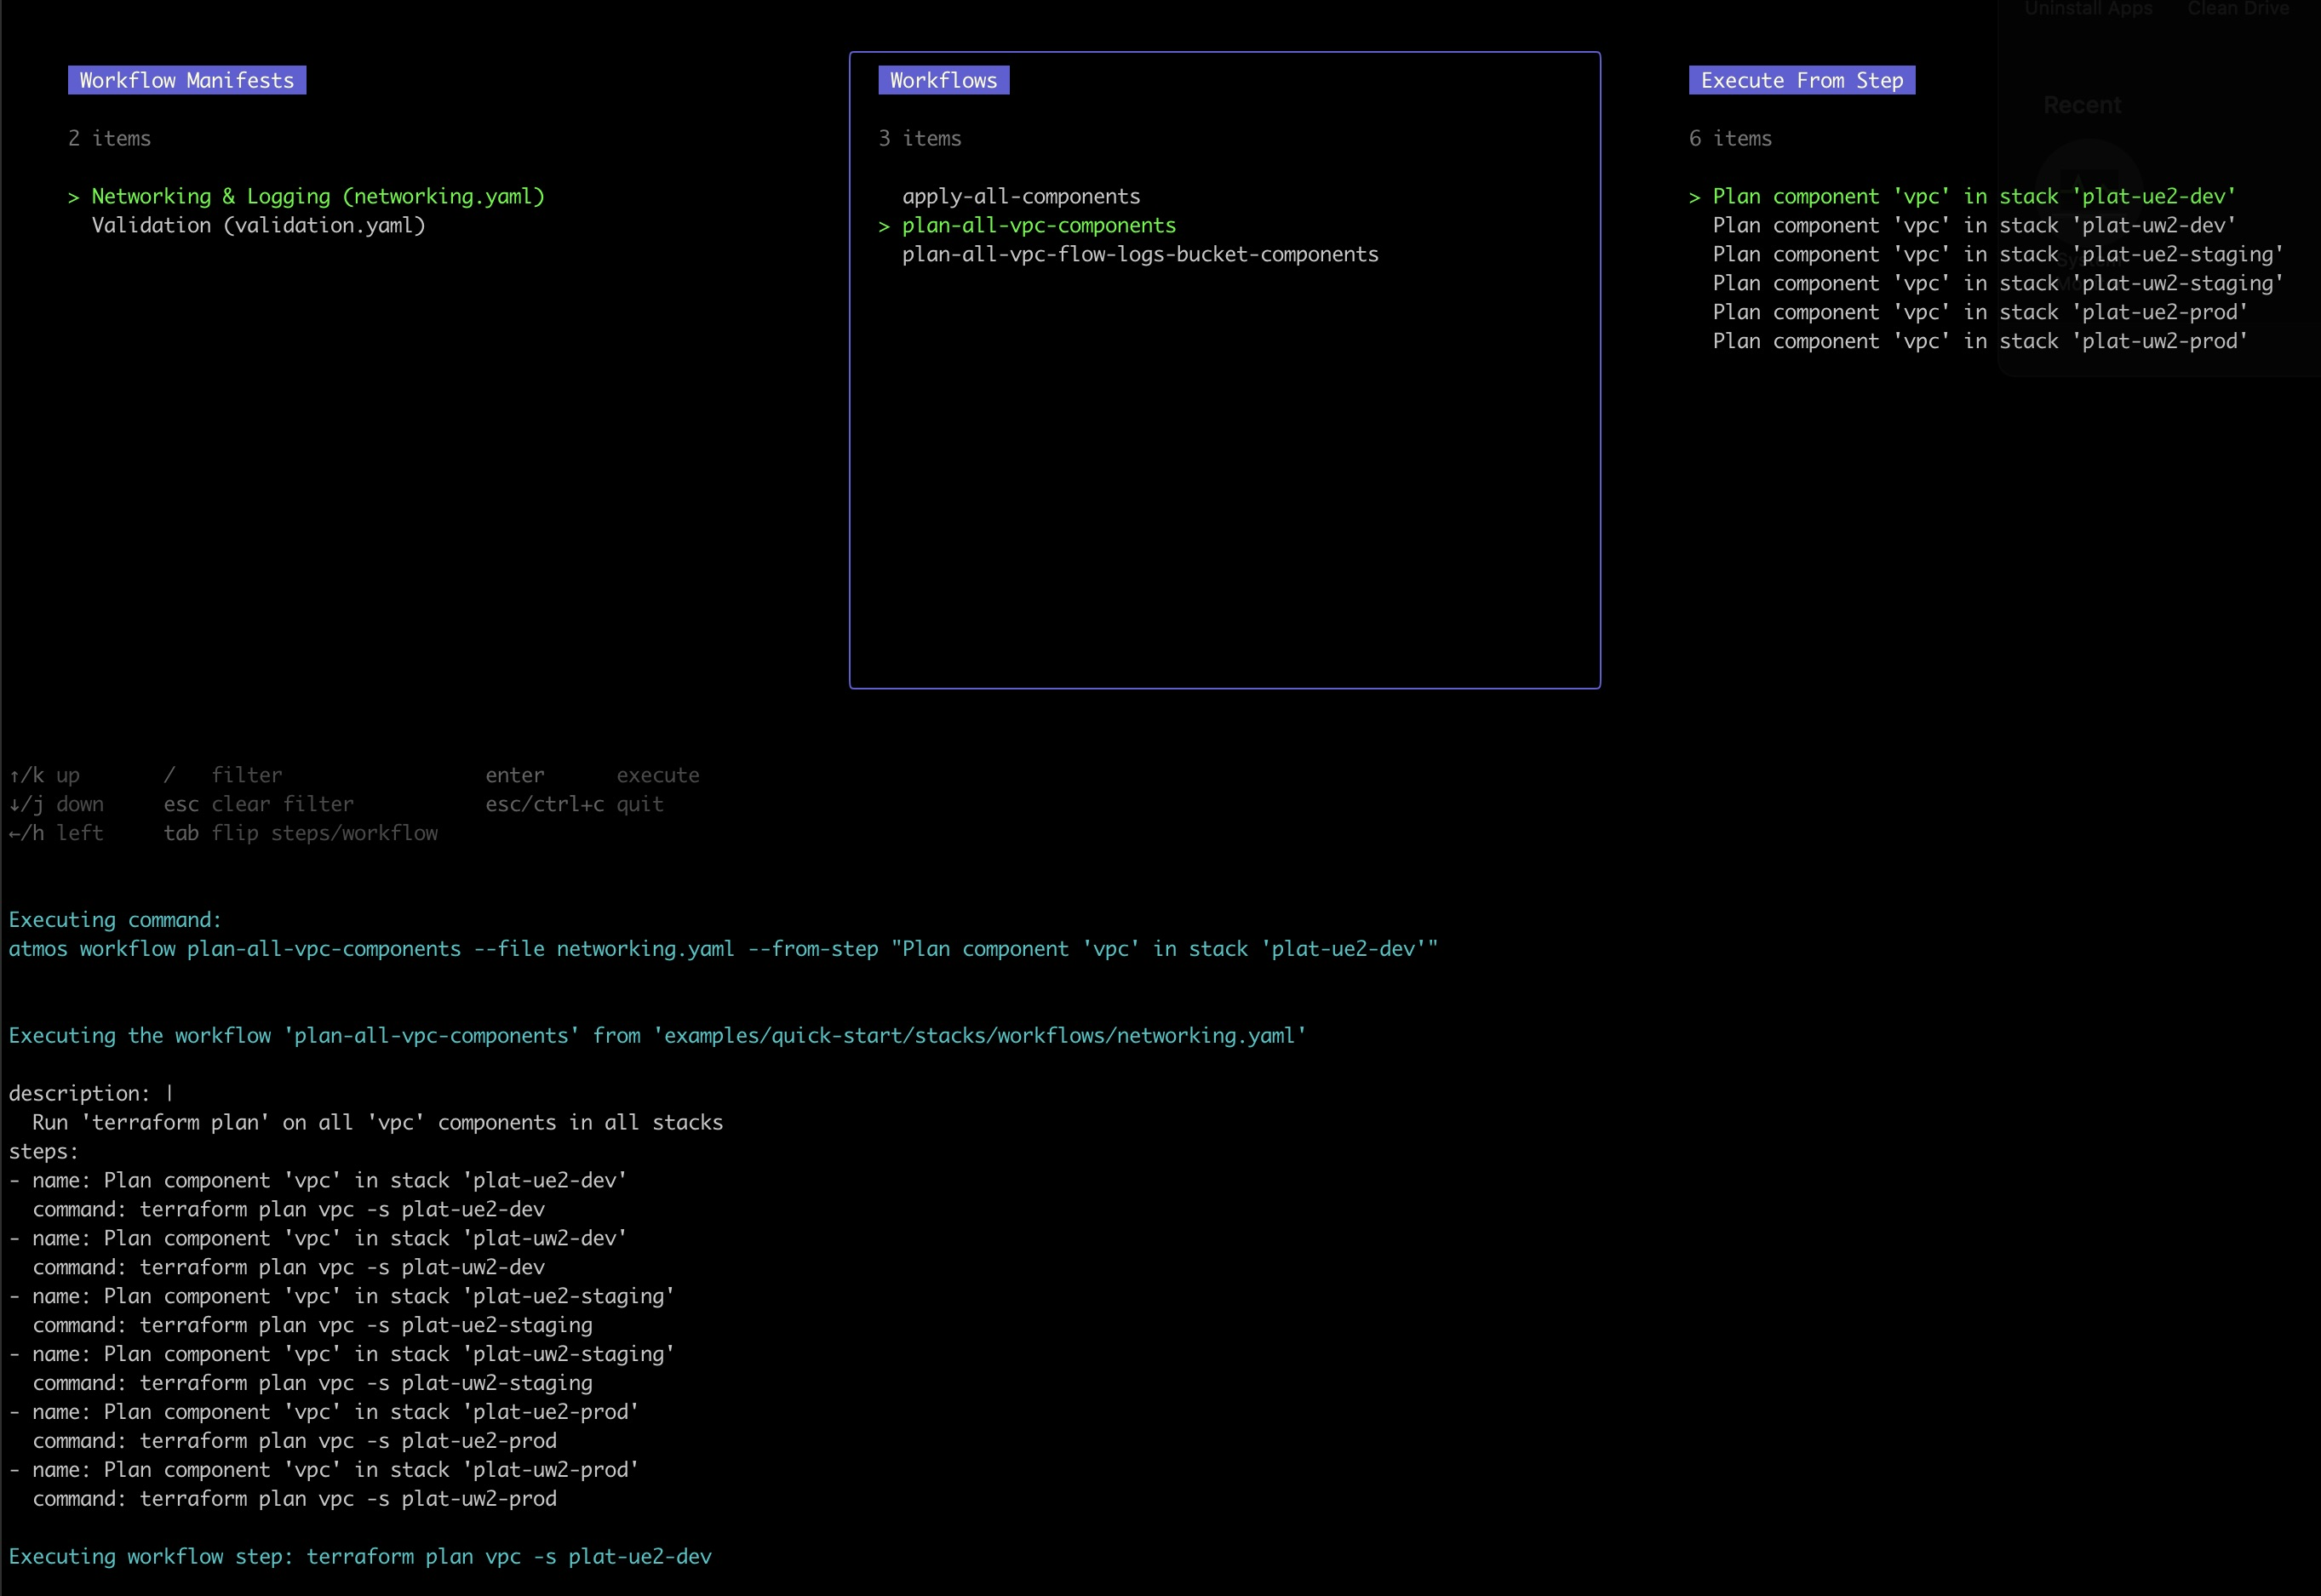
### Run Any Workflow Step
Use the `Tab` key to flip the 3rd column view between the selected workflow steps and full workflow definition.
For example:
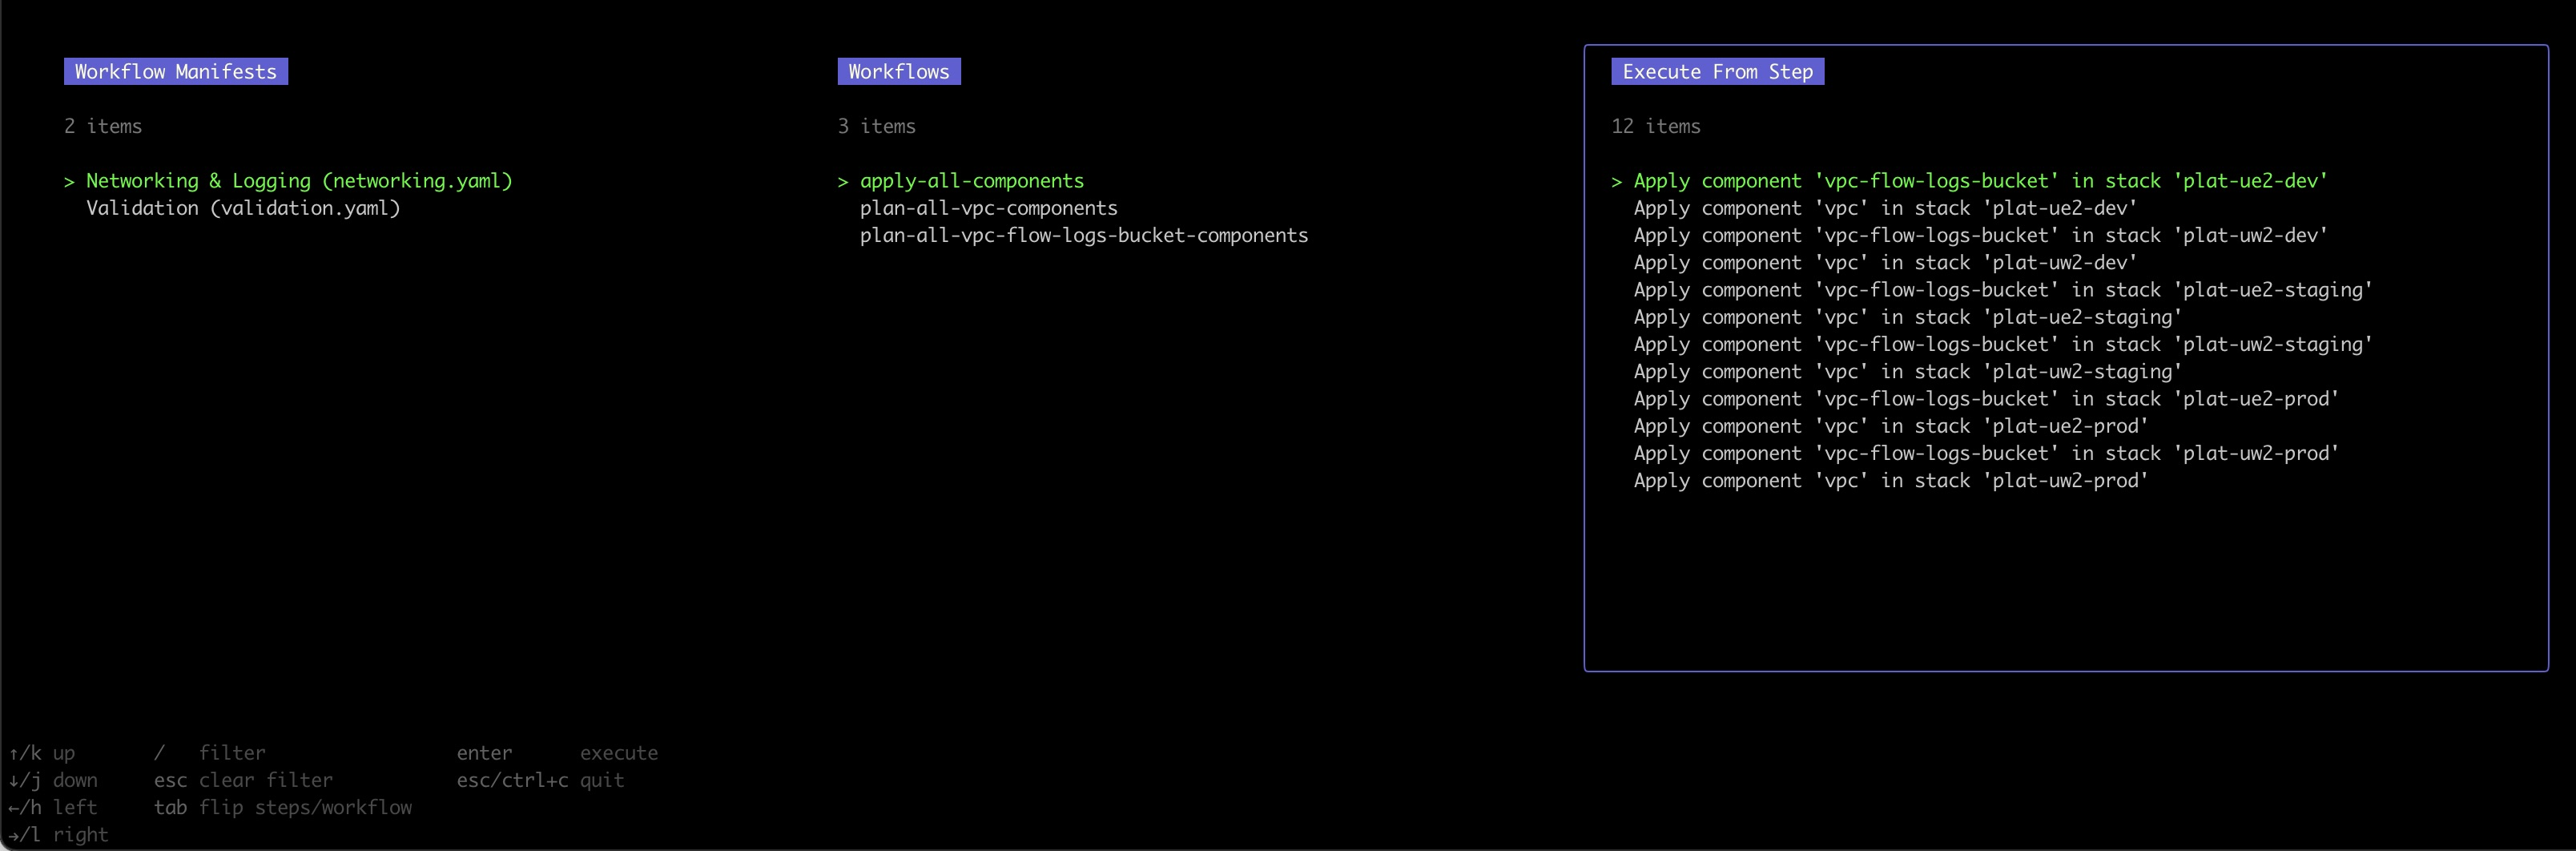
## Examples
```shell
atmos workflow
atmos workflow plan-all-vpc --file networking
atmos workflow apply-all-components -f networking --dry-run
atmos workflow test-1 -f workflow1 --from-step step2
```
:::tip
Run `atmos workflow --help` to see all the available options
:::
## Arguments
- `workflow_name`
- Workflow name
## Flags
- `--file` / `-f` (required)
- File name where the workflow is defined.
- `--stack` / `-s` (optional)
- Atmos stack (if provided, will override stacks defined in the workflow or workflow steps).
- `--from-step` (optional)
- Start the workflow from the named step.
- `--dry-run` (optional)
- Dry run. Print information about the executed workflow steps without executing them.
---
## Customize Commands
import Screengrab from '@site/src/components/Screengrab'
import Terminal from '@site/src/components/Terminal'
import File from '@site/src/components/File'
import Intro from '@site/src/components/Intro'
You can extend the Atmos CLI and add as many custom commands as you want. This is a great way to increase improve the DX by exposing a consistent CLI interface to developers.
For example, one great way to use custom commands is to tie all the miscellaneous scripts into one consistent CLI interface.
Then we can kiss those ugly, inconsistent arguments to bash scripts goodbye! Just wire up the commands in atmos to call the script.
Then, developers can just run `atmos help` and discover all available commands.
Here are some examples to play around with to get started.
```yaml
# Custom CLI commands
commands:
- name: tf
description: Execute 'terraform' commands
# subcommands
commands:
- name: plan
description: This command plans terraform components
arguments:
- name: component
description: Name of the component
flags:
- name: stack
shorthand: s
description: Name of the stack
required: true
env:
- key: ENV_VAR_1
value: ENV_VAR_1_value
- key: ENV_VAR_2
# 'valueCommand' is an external command to execute to get the value for the ENV var
# Either 'value' or 'valueCommand' can be specified for the ENV var, but not both
valueCommand: echo ENV_VAR_2_value
# steps support Go templates
steps:
- atmos terraform plan {{ .Arguments.component }} -s {{ .Flags.stack }}
- name: terraform
description: Execute 'terraform' commands
# subcommands
commands:
- name: provision
description: This command provisions terraform components
arguments:
- name: component
description: Name of the component
flags:
- name: stack
shorthand: s
description: Name of the stack
required: true
# ENV var values support Go templates
env:
- key: ATMOS_COMPONENT
value: "{{ .Arguments.component }}"
- key: ATMOS_STACK
value: "{{ .Flags.stack }}"
steps:
- atmos terraform plan $ATMOS_COMPONENT -s $ATMOS_STACK
- atmos terraform apply $ATMOS_COMPONENT -s $ATMOS_STACK
- name: show
description: Execute 'show' commands
# subcommands
commands:
- name: component
description: Execute 'show component' command
arguments:
- name: component
description: Name of the component
flags:
- name: stack
shorthand: s
description: Name of the stack
required: true
# ENV var values support Go templates and have access to {{ .ComponentConfig.xxx.yyy.zzz }} Go template variables
env:
- key: ATMOS_COMPONENT
value: "{{ .Arguments.component }}"
- key: ATMOS_STACK
value: "{{ .Flags.stack }}"
- key: ATMOS_TENANT
value: "{{ .ComponentConfig.vars.tenant }}"
- key: ATMOS_STAGE
value: "{{ .ComponentConfig.vars.stage }}"
- key: ATMOS_ENVIRONMENT
value: "{{ .ComponentConfig.vars.environment }}"
- key: ATMOS_IS_PROD
value: "{{ .ComponentConfig.settings.config.is_prod }}"
# If a custom command defines 'component_config' section with 'component' and 'stack', 'atmos' generates the config for the component in the stack
# and makes it available in {{ .ComponentConfig.xxx.yyy.zzz }} Go template variables,
# exposing all the component sections (which are also shown by 'atmos describe component' command)
component_config:
component: "{{ .Arguments.component }}"
stack: "{{ .Flags.stack }}"
# Steps support using Go templates and can access all configuration settings (e.g. {{ .ComponentConfig.xxx.yyy.zzz }})
# Steps also have access to the ENV vars defined in the 'env' section of the 'command'
steps:
- 'echo Atmos component from argument: "{{ .Arguments.component }}"'
- 'echo ATMOS_COMPONENT: "$ATMOS_COMPONENT"'
- 'echo Atmos stack: "{{ .Flags.stack }}"'
- 'echo Terraform component: "{{ .ComponentConfig.component }}"'
- 'echo Backend S3 bucket: "{{ .ComponentConfig.backend.bucket }}"'
- 'echo Terraform workspace: "{{ .ComponentConfig.workspace }}"'
- 'echo Namespace: "{{ .ComponentConfig.vars.namespace }}"'
- 'echo Tenant: "{{ .ComponentConfig.vars.tenant }}"'
- 'echo Environment: "{{ .ComponentConfig.vars.environment }}"'
- 'echo Stage: "{{ .ComponentConfig.vars.stage }}"'
- 'echo settings.spacelift.workspace_enabled: "{{ .ComponentConfig.settings.spacelift.workspace_enabled }}"'
- 'echo Dependencies: "{{ .ComponentConfig.deps }}"'
- 'echo settings.config.is_prod: "{{ .ComponentConfig.settings.config.is_prod }}"'
- 'echo ATMOS_IS_PROD: "$ATMOS_IS_PROD"'
- name: list
description: Execute 'atmos list' commands
# subcommands
commands:
- name: stacks
description: |
List all Atmos stacks.
steps:
- >
atmos describe stacks --process-templates=false --sections none | grep -e "^\S" | sed s/://g
- name: components
description: |
List all Atmos components in all stacks or in a single stack.
Example usage:
atmos list components
atmos list components -s tenant1-ue1-dev
atmos list components --stack tenant2-uw2-prod
flags:
- name: stack
shorthand: s
description: Name of the stack
required: false
steps:
- >
{{ if .Flags.stack }}
atmos describe stacks --stack {{ .Flags.stack }} --format json --sections none | jq ".[].components.terraform" | jq -s add | jq -r "keys[]"
{{ else }}
atmos describe stacks --format json --sections none | jq ".[].components.terraform" | jq -s add | jq -r "keys[]"
{{ end }}
- name: set-eks-cluster
description: |
Download 'kubeconfig' and set EKS cluster.
Example usage:
atmos set-eks-cluster eks/cluster -s tenant1-ue1-dev -r admin
atmos set-eks-cluster eks/cluster -s tenant2-uw2-prod --role reader
verbose: false # Set to `true` to see verbose outputs
arguments:
- name: component
description: Name of the component
flags:
- name: stack
shorthand: s
description: Name of the stack
required: true
- name: role
shorthand: r
description: IAM role to use
required: true
# If a custom command defines 'component_config' section with 'component' and 'stack',
# Atmos generates the config for the component in the stack
# and makes it available in {{ .ComponentConfig.xxx.yyy.zzz }} Go template variables,
# exposing all the component sections (which are also shown by 'atmos describe component' command)
component_config:
component: "{{ .Arguments.component }}"
stack: "{{ .Flags.stack }}"
env:
- key: KUBECONFIG
value: /dev/shm/kubecfg.{{ .Flags.stack }}-{{ .Flags.role }}
steps:
- >
aws
--profile {{ .ComponentConfig.vars.namespace }}-{{ .ComponentConfig.vars.tenant }}-gbl-{{ .ComponentConfig.vars.stage }}-{{ .Flags.role }}
--region {{ .ComponentConfig.vars.region }}
eks update-kubeconfig
--name={{ .ComponentConfig.vars.namespace }}-{{ .Flags.stack }}-eks-cluster
--kubeconfig="${KUBECONFIG}"
> /dev/null
- chmod 600 ${KUBECONFIG}
- echo ${KUBECONFIG}
```
:::tip
For more information, refer to [Atmos Custom Commands](/core-concepts/custom-commands)
:::
---
## Customize Component Behavior
import Screengrab from '@site/src/components/Screengrab'
import Terminal from '@site/src/components/Terminal'
import File from '@site/src/components/File'
import Intro from '@site/src/components/Intro'
In Atmos, every component is associated with a command. The command is what drives or provisions that component.
For example, [Terraform "root modules"](/core-concepts/components/terraform) can be used as components in Atmos.
To instruct Atmos how to interact with that component, we must specify the command to run and and where the code
for the component is located. Then, depending on the type of component, certain behaviors can be configured.
The `components` section of the `atmos.yaml` is how we do it. It defines how Atmos locates and executes your components.
Think of it as the bootstrapping configuration. This is where we can define the the `command` to run,
the `base_path` location of the components, and so forth.
:::important
Do not confuse this configuration with [configuring components in stacks](/core-concepts/stacks/define-components).
This configuration below is defined in the `atmos.yaml` and meant for specifying default behaviors for components,
such as what command to use when running Terraform commands, the base path for Terraform, and more.
:::
## Terraform Component Behavior
For additional details on configuring Terraform components, refer to the [Terraform](/core-concepts/projects/configuration/terraform)
and [OpenTofu](/core-concepts/projects/configuration/opentofu) documentation.
:::note Disambiguation
The term “Terraform” is used in this documentation to refer to generic concepts such as providers, modules, stacks, the
HCL-based domain-specific language and its interpreter. Atmos works with [OpenTofu](/core-concepts/projects/configuration/opentofu).
:::
```yaml
components:
terraform:
# Optional `command` specifies the executable to be called by Atmos when running Terraform commands
# If not defined, `terraform` is used
# Examples:
# command: terraform
# command: /usr/local/bin/terraform
# command: /usr/local/bin/terraform-1.8
# command: tofu
# command: /usr/local/bin/tofu-1.7.1
# Can also be set using 'ATMOS_COMPONENTS_TERRAFORM_COMMAND' ENV var, or '--terraform-command' command-line argument
command: terraform
# Can also be set using 'ATMOS_COMPONENTS_TERRAFORM_BASE_PATH' ENV var, or '--terraform-dir' command-line argument
# Supports both absolute and relative paths
base_path: "components/terraform"
# Can also be set using 'ATMOS_COMPONENTS_TERRAFORM_APPLY_AUTO_APPROVE' ENV var
apply_auto_approve: false
# Can also be set using 'ATMOS_COMPONENTS_TERRAFORM_DEPLOY_RUN_INIT' ENV var, or '--deploy-run-init' command-line argument
deploy_run_init: true
# Can also be set using 'ATMOS_COMPONENTS_TERRAFORM_INIT_RUN_RECONFIGURE' ENV var, or '--init-run-reconfigure' command-line argument
init_run_reconfigure: true
# Can also be set using 'ATMOS_COMPONENTS_TERRAFORM_AUTO_GENERATE_BACKEND_FILE' ENV var, or '--auto-generate-backend-file' command-line argument
auto_generate_backend_file: true
init:
# Can also be set using 'ATMOS_COMPONENTS_TERRAFORM_INIT_PASS_VARS' ENV var, or '--init-pass-vars' command-line argument
pass_vars: false
plan:
# Can also be set using 'ATMOS_COMPONENTS_TERRAFORM_PLAN_SKIP_PLANFILE' ENV var, or '--skip-planfile' command-line argument
skip_planfile: false
```
- `command`
-
Specifies the executable to be called by `atmos` when running Terraform/OpenTofu commands.
If not defined, `terraform` is used. Can also be set using `ATMOS_COMPONENTS_TERRAFORM_COMMAND` ENV var,
or `--terraform-command` command-line argument.
Example values: `terraform`, `/usr/local/bin/terraform`, `tofu`, `/usr/local/bin/tofu-1.7.1`.
- `base_path`
-
Base path to the Terraform/OpenTofu components.
Example value: "components/terraform". Can also be set using `ATMOS_COMPONENTS_TERRAFORM_BASE_PATH` ENV var,
or `--terraform-dir` command-line argument.
Supports both absolute and relative paths.
- `apply_auto_approve`
-
If set to `true`, Atmos automatically adds the `-auto-approve` option to instruct Terraform to apply the plan without
asking for confirmation when executing `terraform apply` command
- `deploy_run_init`
-
If set to `true`, Atmos runs `terraform init` before executing [`atmos terraform deploy`](/cli/commands/terraform/deploy) command
- `init_run_reconfigure`
-
If set to `true`, Atmos automatically adds the `-reconfigure` option to update the backend configuration when executing `terraform init` command
- `auto_generate_backend_file`
-
If set to `true`, Atmos automatically generates the Terraform backend file from the component configuration when executing `terraform plan` and `terraform apply` commands
- `init.pass_vars`
-
If set to `true`, Atmos automatically passes the generated varfile to the `tofu init` command using the `--var-file` flag.
[OpenTofu supports passing a varfile to `init`](https://opentofu.org/docs/cli/commands/init/#general-options) to dynamically configure backends
## Helmfile Component Behavior
```yaml
components:
helmfile:
# Optional `command` specifies the executable to be called by Atmos when running Helmfile commands
# If not defined, `helmfile` is used
# Examples:
# command: helmfile
# command: /usr/local/bin/helmfile
# Can also be set using 'ATMOS_COMPONENTS_HELMFILE_COMMAND' ENV var, or '--helmfile-command' command-line argument
command: helmfile
# Can also be set using 'ATMOS_COMPONENTS_HELMFILE_BASE_PATH' ENV var, or '--helmfile-dir' command-line argument
# Supports both absolute and relative paths
base_path: "components/helmfile"
# Can also be set using 'ATMOS_COMPONENTS_HELMFILE_USE_EKS' ENV var
# If not specified, defaults to 'true'
use_eks: true
# Can also be set using 'ATMOS_COMPONENTS_HELMFILE_KUBECONFIG_PATH' ENV var
kubeconfig_path: "/dev/shm"
# Can also be set using 'ATMOS_COMPONENTS_HELMFILE_HELM_AWS_PROFILE_PATTERN' ENV var
helm_aws_profile_pattern: "{namespace}-{tenant}-gbl-{stage}-helm"
# Can also be set using 'ATMOS_COMPONENTS_HELMFILE_CLUSTER_NAME_PATTERN' ENV var
cluster_name_pattern: "{namespace}-{tenant}-{environment}-{stage}-eks-cluster"
```
- `command`
-
Specifies the executable to be called by `atmos` when running Helmfile commands.
If not defined, `helmfile` is used. Can also be set using `ATMOS_COMPONENTS_HELMFILE_COMMAND` ENV var,
or `--helmfile-command` command-line argument.
Example values: `helmfile`, `/usr/local/bin/helmfile`.
- `base_path`
-
Base path to the Helmfile components.
Example value: "components/helmfile". Can also be set using `ATMOS_COMPONENTS_HELMFILE_BASE_PATH` ENV var,
or `--helmfile-dir` command-line argument.
Supports both absolute and relative paths.
- `use_eks`
-
If not specified, defaults to `true`.
Can also be set using `ATMOS_COMPONENTS_HELMFILE_USE_EKS` ENV var.
- `kubeconfig_path`
-
Can also be set using `ATMOS_COMPONENTS_HELMFILE_KUBECONFIG_PATH` ENV var.
Example value: `/dev/shm`.
- `helm_aws_profile_pattern`
-
Can also be set using `ATMOS_COMPONENTS_HELMFILE_HELM_AWS_PROFILE_PATTERN` ENV var.
Example value:
```
{namespace}-{tenant}-{gbl}-{stage}-helm
```
- `cluster_name_pattern`
-
Can also be set using ATMOS_COMPONENTS_HELMFILE_CLUSTER_NAME_PATTERN` ENV var.
Example value:
```
{namespace}-{tenant}-{environment}-{stage}-eks-cluster`
```
---
## CLI Configuration
import Screengrab from '@site/src/components/Screengrab'
import Terminal from '@site/src/components/Terminal'
import File from '@site/src/components/File'
import Intro from '@site/src/components/Intro'
import Tabs from '@theme/Tabs'
import TabItem from '@theme/TabItem'
# CLI Configuration
Use the `atmos.yaml` configuration file to control the behavior of the [Atmos CLI](/cli)
Everything in the [Atmos CLI](/cli) is configurable. The defaults are established in the `atmos.yaml` configuration file. The CLI configuration should not
be confused with [Stack configurations](/core-concepts/stacks/), which have a different schema.
Think of this file as where you [bootstrap the settings or configuration of your project](/core-concepts/projects). If you'll be using
[terraform](/core-concepts/components/terraform), then [this is where](/cli/configuration/components#terraform-component-behavior)
you'd specify the command to run (e.g. [`opentofu`](/core-concepts/projects/configuration/opentofu)),
the base path location of the components, and so forth.
## Configuration File (`atmos.yaml`)
The --config flag allows you to specify a relative or absolute path to a valid configuration file. Only the configuration files specified by this flag will be loaded.
The --config-path flag designates a directory containing Atmos configuration files. files name should be (atmos.yaml, .atmos.yaml,atmos.yml, .atmos.yml). Only files from the specified directory will be loaded.
You can use both --config and --config-path multiple times in a single command. Configurations will be deep-merged in the order provided,
with the first specified config having the lowest priority and the last one having the highest. This allows later configurations to override settings from earlier ones.
For example, to load multiple configuration files, you would run:
```bash
atmos --config /path/to/config1.yaml --config /path/to/config2.yaml --config-path /path/first/config/ -config-path /path/second/config/ ...
```
Configuration Load Order
If --config and --config-path not specified in command
The CLI config is loaded from the following locations (from lowest to highest priority):
- System directory (`/usr/local/etc/atmos/atmos.yaml` on Linux, `%LOCALAPPDATA%/atmos/atmos.yaml` on Windows)
- Home directory (`~/.atmos/atmos.yaml`)
- Current directory (`./atmos.yaml`)
- Environment variable `ATMOS_CLI_CONFIG_PATH` (the ENV var should point to a folder without specifying the file name)
Each configuration file discovered is deep-merged with the preceding configurations.
:::tip Pro-Tip
Atmos supports [POSIX-style greedy Globs](https://en.wikipedia.org/wiki/Glob_(programming)) for all file
names/paths (double-star/globstar `**` is supported as well)
:::
## Default CLI Configuration
If `atmos.yaml` is not found in any of the searched locations, Atmos will use the following default CLI configuration:
```yaml
base_path: "."
vendor:
base_path: "./vendor.yaml"
components:
terraform:
base_path: components/terraform
apply_auto_approve: false
deploy_run_init: true
init_run_reconfigure: true
auto_generate_backend_file: true
init:
pass_vars: false
helmfile:
base_path: components/helmfile
use_eks: true
kubeconfig_path: /dev/shm
helm_aws_profile_pattern: '{namespace}-{tenant}-gbl-{stage}-helm'
cluster_name_pattern: '{namespace}-{tenant}-{environment}-{stage}-eks-cluster'
stacks:
base_path: stacks
included_paths:
- "orgs/**/*"
excluded_paths:
- "**/_defaults.yaml"
# To define Atmos stack naming convention, use either `name_pattern` or `name_template`.
# `name_template` has higher priority (if `name_template` is specified, `name_pattern` will be ignored).
# `name_pattern` uses the predefined context tokens {namespace}, {tenant}, {environment}, {stage}.
# `name_pattern` can also be set using 'ATMOS_STACKS_NAME_PATTERN' ENV var
name_pattern: "{tenant}-{environment}-{stage}"
# `name_template` is a Golang template.
# For the template tokens, and you can use any Atmos sections and attributes that the Atmos command
# `atmos describe component -s ` generates (refer to https://atmos.tools/cli/commands/describe/component).
# `name_template` can also be set using 'ATMOS_STACKS_NAME_TEMPLATE' ENV var
# name_template: "{{.vars.tenant}}-{{.vars.environment}}-{{.vars.stage}}"
workflows:
base_path: stacks/workflows
logs:
# Can also be set using 'ATMOS_LOGS_FILE' ENV var, or '--logs-file' command-line argument
# File or standard file descriptor to write logs to
# Logs can be written to any file or any standard file descriptor, including `/dev/stdout`, `/dev/stderr` and `/dev/null`
file: "/dev/stderr"
# Supported log levels: Trace, Debug, Info, Warning, Off
# Can also be set using 'ATMOS_LOGS_LEVEL' ENV var, or '--logs-level' command-line argument
level: Info
profiler:
# Enable or disable the pprof profiling server
# Can also be set using '--profiler-enabled' command-line flag
enabled: false
# Host to bind the profiling server to
# Can also be set using '--profiler-host' command-line flag
host: "localhost"
# Port to run the profiling server on
# Can also be set using '--profiler-port' command-line flag
port: 6060
schemas:
jsonschema:
base_path: stacks/schemas/jsonschema
opa:
base_path: stacks/schemas/opa
# https://atmos.tools/core-concepts/stacks/templates
# https://pkg.go.dev/text/template
templates:
settings:
enabled: true
# https://masterminds.github.io/sprig
sprig:
enabled: true
# https://docs.gomplate.ca
gomplate:
enabled: true
settings:
list_merge_strategy: replace
terminal:
color: true # Enable colored output (Can be set using 'ATMOS_COLOR' or 'COLOR' ENV var)
# no_color: false # DEPRECATED in config file - use 'color: false' instead
# Note: NO_COLOR and ATMOS_NO_COLOR env vars are NOT deprecated
max_width: 120 # Maximum width for terminal output
pager: false # Pager disabled by default (set to true or pager command to enable)
```
If Atmos does not find an `atmos.yaml` file and the default CLI config is used, and if you set the ENV variable `ATMOS_LOGS_LEVEL` to `Debug`
(e.g. `export ATMOS_LOGS_LEVEL=Debug`) before executing Atmos commands, you'll see the following message:
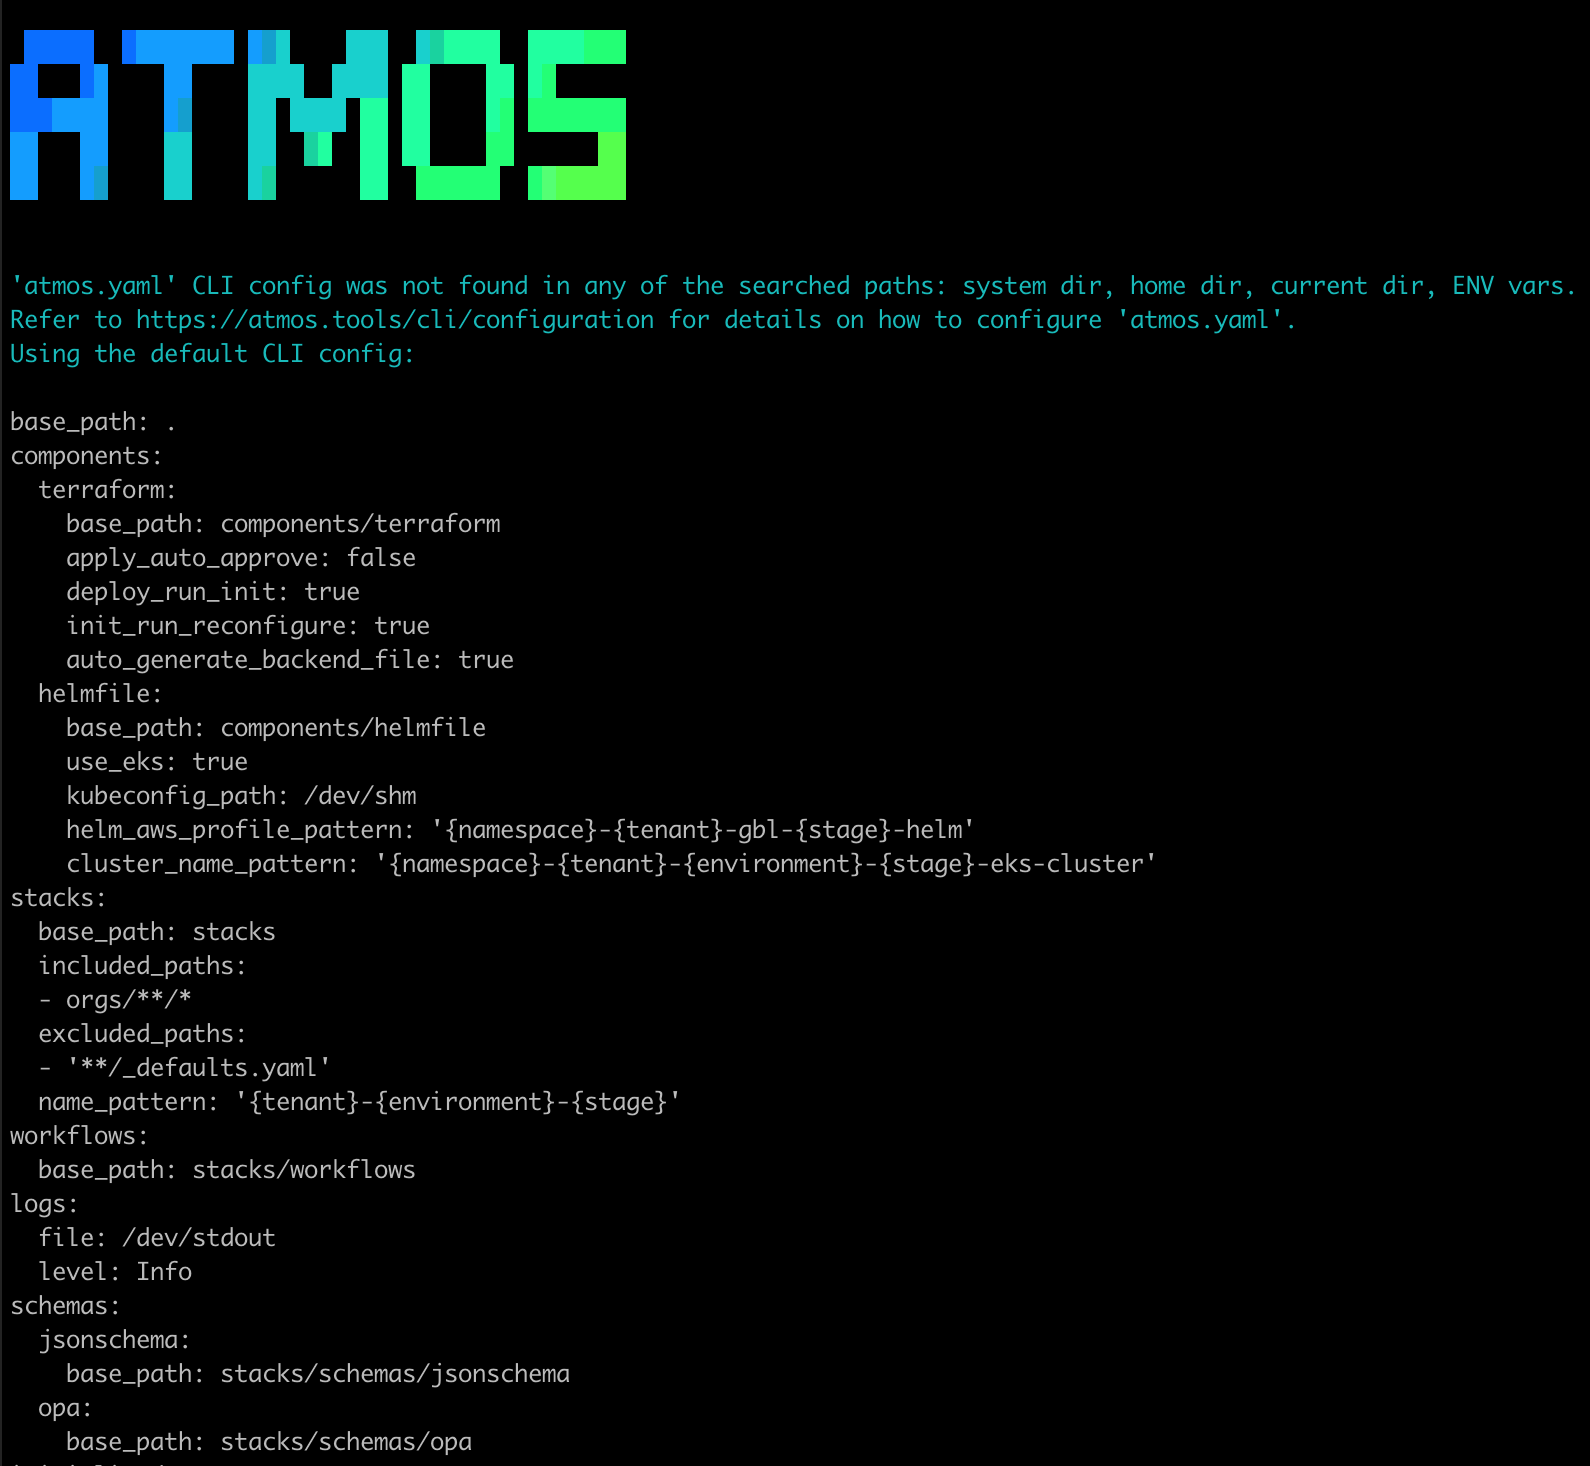
What follows are all the sections of the `atmos.yaml` configuration file.
## YAML Functions
Atmos extends standard YAML with several custom functions that can be used in atmos configuration `atmos.yaml` file. These functions provide powerful tools for dynamic configuration:
- `!env`
-
Used to retrieve environment variables.
See the [`!env` documentation](/functions/yaml/env) for more details.
- `!exec`
-
Used to execute shell scripts and assign their output.
See the [`!exec` documentation](/functions/yaml/exec) for more details.
- `!include`
-
Used to include other YAML files into the current configuration.
See the [`!include` documentation](/functions/yaml/include) for more details.
- `!repo-root`
-
Used to retrieve the root directory of the Atmos repository. If the Git root is not found, it will return a default value if specified; otherwise, it returns an error.
See the [`!repo-root` documentation](/functions/yaml/repo-root) for more details.
## Imports
Additionally, Atmos supports `imports` of other CLI configurations. Use imports to break large Atmos CLI configurations into smaller ones, such as organized by top-level section. File imports are relative to the base path (if `import` section is set in the config). All imports are processed at the time the configuration is loaded, and then deep-merged in order, so that the last file in the list supersedes settings in the preceding imports. For an example, see [`scenarios/demo-atmos-cli-imports`](https://github.com/cloudposse/atmos/tree/main/tests/fixtures/scenarios/atmos-cli-imports).
:::tip Pro-Tip
Atmos supports [POSIX-style greedy Globs](https://en.wikipedia.org/wiki/Glob_(programming)) for all file
names/paths (double-star/globstar `**` is supported as well)
:::
Imports can be any of the following:
- Remote URL
- Specific Path
- Wildcard globs (`*`), including recursive globs (`**`), can be combined (e.g., `**/*` matches all files and subfolders recursively). Only files ending in `.yml` or `.yaml` will be considered for import when using globs.
For example, we can import from multiple locations like this:
```yaml
import:
# Load the Atmos configuration from the main branch of the 'cloudposse/atmos' repository
- "https://raw.githubusercontent.com/cloudposse/atmos/refs/heads/main/atmos.yaml"
# Then merge the configs
- "configs.d/**/*"
# Finally, override some logging settings
- "./logs.yaml"
```
Note, templated imports of Atmos configuration are not supported (unlike stacks).
:::warning Be Careful with Remote Imports
- Always use HTTPS URLs (currently correctly demonstrated in the example).
- Verify the authenticity of remote sources.
- Consider pinning to specific commit hashes instead of branch references
:::
Each configuration file discovered is deep-merged with the preceding configurations.
## Base Path
The base path for components, stacks, workflows and validation configurations.
It can also be set using `ATMOS_BASE_PATH` environment variable, or by passing the `--base-path` command-line argument.
It supports both absolute and relative paths.
If not provided or is an empty string, `components.terraform.base_path`, `components.helmfile.base_path`, `stacks.base_path` and `workflows.base_path`
are independent settings (supporting both absolute and relative paths).
If `base_path` is provided, `components.terraform.base_path`, `components.helmfile.base_path`, `stacks.base_path`, `workflows.base_path`,
`schemas.jsonschema.base_path` and `schemas.opa.base_path` are considered paths relative to `base_path`.
```yaml
base_path: "."
```
### Windows Path Handling
When configuring paths in `atmos.yaml` on Windows, there are important considerations for how YAML interprets backslashes:
:::warning Windows Path Escaping
Backslashes (`\`) are treated as escape characters only inside double-quoted YAML scalars. Single-quoted and plain scalars treat backslashes literally. Use single quotes or plain scalars for Windows paths, or double-escape backslashes in double quotes.
:::
#### Correct Ways to Specify Windows Paths
```yaml
# Forward slashes work on all platforms including Windows
components:
terraform:
base_path: "C:/Users/username/projects/components/terraform"
```
```yaml
# Double backslashes to escape them in YAML
components:
terraform:
base_path: "C:\\Users\\username\\projects\\components\\terraform"
```
```yaml
# Single quotes treat backslashes as literal characters
components:
terraform:
base_path: 'C:\Users\username\projects\components\terraform'
```
```yaml
# Unquoted paths with forward slashes also work
components:
terraform:
base_path: C:/Users/username/projects/components/terraform
```
#### Incorrect Windows Path Format
```yaml
# ❌ WRONG: Single backslashes get interpreted as escape sequences
components:
terraform:
base_path: "C:\Users\username\projects\components\terraform"
# This becomes: C:Usersusernameprojectscomponentsterraform (invalid)
```
:::tip Best Practice
Use forward slashes (`/`) for all paths in `atmos.yaml`. They work correctly on all operating systems including Windows, Linux, and macOS.
:::
## Settings
The `settings` section configures Atmos global settings.
```yaml
settings:
# `list_merge_strategy` specifies how lists are merged in Atmos stack manifests.
# Can also be set using 'ATMOS_SETTINGS_LIST_MERGE_STRATEGY' environment variable, or '--settings-list-merge-strategy' command-line argument
# The following strategies are supported:
# `replace`: Most recent list imported wins (the default behavior).
# `append`: The sequence of lists is appended in the same order as imports.
# `merge`: The items in the destination list are deep-merged with the items in the source list.
# The items in the source list take precedence.
# The items are processed starting from the first up to the length of the source list (the remaining items are not processed).
# If the source and destination lists have the same length, all items in the destination lists are
# deep-merged with all items in the source list.
list_merge_strategy: replace
# Terminal settings for displaying content
terminal:
max_width: 120 # Maximum width for terminal output
pager: false # Pager disabled by default
color: true # Enable colored output
inject_github_token: true # Adds the GITHUB_TOKEN as a Bearer token for GitHub API requests.
```
- `settings.list_merge_strategy`
-
Specifies how lists are merged in Atmos stack manifests.
The following strategies are supported:
- `replace`
- Most recent list imported wins (the default behavior).
- `append`
- The sequence of lists is appended in the same order as imports.
- `merge`
- The items in the destination list are deep-merged with the items in the source list. The items in the source list take precedence. The items are processed starting from the first up to the length of the source list (the remaining items are not processed). If the source and destination lists have the same length, all items in the destination lists are deep-merged with all items in the source list.
- `settings.terminal`
-
Specifies how content is displayed in the terminal.
The following settings are supported:
- `max_width`
- The maximum width for displaying content in the terminal.
- `pager`
- Configure pager behavior. Can be set to `false` (disabled, default), `true` (enabled), or a specific pager like `less` or `more`.
- `color`
- Enable or disable colored output (default: `true`). Can be overridden with `--no-color` flag or `NO_COLOR`/`ATMOS_NO_COLOR` environment variables.
:::info Environment Variables for Portability
**Configuration Deprecation**: The `no_color` field in `atmos.yaml` is deprecated. Use `color: false` instead.
**Environment Variables Still Supported**: The `NO_COLOR` and `ATMOS_NO_COLOR` environment variables remain fully supported for portability across different environments and CI/CD systems.
:::
- `settings.inject_github_token`
-
Adds the `GITHUB_TOKEN` as a Bearer token for GitHub API requests, enabling authentication for private repositories and increased rate limits. If `ATMOS_GITHUB_TOKEN` is set, it takes precedence, overriding this behavior.
- `settings.docs` (Deprecated)
-
:::warning Deprecated
The `settings.docs` section is deprecated and will be removed in a future version. Please use `settings.terminal` instead.
:::
- `max-width` (Deprecated)
- Use `settings.terminal.max_width` instead.
- `pagination` (Deprecated)
- Use `settings.terminal.pager` instead.
## Workflows
```yaml
workflows:
# Can also be set using 'ATMOS_WORKFLOWS_BASE_PATH' ENV var, or '--workflows-dir' command-line argument
# Supports both absolute and relative paths
base_path: "stacks/workflows"
```
## Integrations
Atmos supports many native Atmos integrations. They extend the core functionality of Atmos.
```yaml
# Integrations
integrations:
# Atlantis integration
# https://www.runatlantis.io/docs/repo-level-atlantis-yaml.html
atlantis:
# Path and name of the Atlantis config file 'atlantis.yaml'
# Supports absolute and relative paths
# All the intermediate folders will be created automatically (e.g. 'path: /config/atlantis/atlantis.yaml')
# Can be overridden on the command line by using '--output-path' command-line argument in 'atmos atlantis generate repo-config' command
# If not specified (set to an empty string/omitted here, and set to an empty string on the command line), the content of the file will be dumped to 'stdout'
# On Linux/macOS, you can also use '--output-path=/dev/stdout' to dump the content to 'stdout' without setting it to an empty string in 'atlantis.path'
path: "atlantis.yaml"
# Config templates
# Select a template by using the '--config-template ' command-line argument in 'atmos atlantis generate repo-config' command
config_templates:
config-1:
version: 3
automerge: true
delete_source_branch_on_merge: true
parallel_plan: true
parallel_apply: true
allowed_regexp_prefixes:
- dev/
- staging/
- prod/
# Project templates
# Select a template by using the '--project-template ' command-line argument in 'atmos atlantis generate repo-config' command
project_templates:
project-1:
# generate a project entry for each component in every stack
name: "{tenant}-{environment}-{stage}-{component}"
workspace: "{workspace}"
dir: "{component-path}"
terraform_version: v1.2
delete_source_branch_on_merge: true
autoplan:
enabled: true
when_modified:
- "**/*.tf"
- "varfiles/$PROJECT_NAME.tfvars.json"
apply_requirements:
- "approved"
# Workflow templates
# https://www.runatlantis.io/docs/custom-workflows.html#custom-init-plan-apply-commands
# https://www.runatlantis.io/docs/custom-workflows.html#custom-run-command
workflow_templates:
workflow-1:
plan:
steps:
- run: terraform init -input=false
# When using workspaces, you need to select the workspace using the $WORKSPACE environment variable
- run: terraform workspace select $WORKSPACE || terraform workspace new $WORKSPACE
# You must output the plan using '-out $PLANFILE' because Atlantis expects plans to be in a specific location
- run: terraform plan -input=false -refresh -out $PLANFILE -var-file varfiles/$PROJECT_NAME.tfvars.json
apply:
steps:
- run: terraform apply $PLANFILE
```
:::tip
For more information, refer to Atmos Integrations.
- [GitHub Actions](/integrations/github-actions)
- [Atlantis](/integrations/atlantis)
- [Spacelift](/integrations/spacelift)
:::
## Schemas
Configure the paths where to find OPA and JSON Schema files to validate Atmos stack manifests and components.
```yaml
# Validation schemas (for validating atmos stacks and components)
schemas:
# https://json-schema.org
jsonschema:
# Can also be set using 'ATMOS_SCHEMAS_JSONSCHEMA_BASE_PATH' ENV var, or '--schemas-jsonschema-dir' command-line argument
# Supports both absolute and relative paths
base_path: "stacks/schemas/jsonschema"
# https://www.openpolicyagent.org
opa:
# Can also be set using 'ATMOS_SCHEMAS_OPA_BASE_PATH' ENV var, or '--schemas-opa-dir' command-line argument
# Supports both absolute and relative paths
base_path: "stacks/schemas/opa"
# JSON Schema to validate Atmos manifests
# https://atmos.tools/cli/schemas/
# https://atmos.tools/cli/commands/validate/stacks/
# https://atmos.tools/quick-start/advanced/configure-validation/
# https://atmos.tools/schemas/atmos/atmos-manifest/1.0/atmos-manifest.json
# https://json-schema.org/draft/2020-12/release-notes
atmos:
# Can also be set using 'ATMOS_SCHEMAS_ATMOS_MANIFEST' ENV var, or '--schemas-atmos-manifest' command-line argument
# Supports both absolute and relative paths (relative to the `base_path` setting in `atmos.yaml`)
manifest: "stacks/schemas/atmos/atmos-manifest/1.0/atmos-manifest.json"
```
:::tip
For more information, refer to:
- [Atmos Manifests Validation](/cli/schemas)
- [Atmos Component Validation](/core-concepts/validate)
:::
## Logs
Logs are configured in the `logs` section:
```yaml
logs:
# Can also be set using 'ATMOS_LOGS_FILE' ENV var, or '--logs-file' command-line argument
# File or standard file descriptor to write logs to
# Logs can be written to any file or any standard file descriptor, including `/dev/stdout`, `/dev/stderr` and `/dev/null`
file: "/dev/stderr"
# Supported log levels: Trace, Debug, Info, Warning, Off
# Can also be set using 'ATMOS_LOGS_LEVEL' ENV var, or '--logs-level' command-line argument
level: Info
```
- `logs.file` - the file to write Atmos logs to. Logs can be written to any file or any standard file descriptor,
including `/dev/stdout`, `/dev/stderr` and `/dev/null`. If omitted, `/dev/stdout` will be used.
The environment variable `ATMOS_LOGS_FILE` can also be used to specify the log file
- `logs.level` - Log level. Supported log levels are `Trace`, `Debug`, `Info`, `Warning`, `Off`. If the log level is set to `Off`, Atmos will not log
any messages (note that this does not prevent other tools like Terraform from logging).
The environment variable `ATMOS_LOGS_LEVEL` can also be used to specify the log level
To prevent Atmos from logging any messages (except for the outputs of the executed commands), you can do one of the following:
- Set `logs.file` or the ENV variable `ATMOS_LOGS_FILE` to `/dev/null`
- Set `logs.level` or the ENV variable `ATMOS_LOGS_LEVEL` to `Off`
Note that when you set the log level to `Debug` or `Trace`, Atmos will log additional messages before printing the output
of an executed command. For example, let's consider the `atmos describe affected` command:
```yaml
logs:
file: "/dev/stdout"
level: Trace
```
```console
Checking out Git ref 'refs/remotes/origin/HEAD' ...
Checked out Git ref 'refs/remotes/origin/HEAD'
Current HEAD: ffd2154e1daa32357b75460b9f45d268922b51e1 refs/heads/update-logs
BASE: f7aa382aa8b3d48be8f06cfdb27aad344b89aff4 HEAD
Changed files:
examples/quick-start-advanced/Dockerfile
examples/quick-start-advanced/atmos.yaml
Affected components and stacks:
[
{
"component": "vpc",
"component_type": "terraform",
"component_path": "examples/quick-start-advanced/components/terraform/vpc",
"stack": "plat-uw2-prod",
"stack_slug": "plat-uw2-prod-vpc",
"affected": "stack.vars"
},
{
"component": "vpc",
"component_type": "terraform",
"component_path": "examples/quick-start-advanced/components/terraform/vpc",
"stack": "plat-ue2-prod",
"stack_slug": "plat-ue2-prod-vpc",
"affected": "stack.vars"
}
]
````
With `logs.level: Trace`, and `logs.file: "/dev/stdout"`, all the messages and the command's JSON output will be printed
to the console to the `/dev/stdout` standard output.
This behavior might be undesirable when you execute the command `atmos describe affected` in CI/CD (e.g. GitHub Actions).
For example, you might want to log all the Atmos messages (by setting `logs.level: Trace`) for debugging purposes,
and also want to parse the JSON output of the command (e.g. by using `jq`) for further processing. In this case, `jq`
will not be able to parse the JSON output because all the other messages make the output an invalid JSON document.
To deal with that, you can set `logs.file` to `/dev/stderr` in `atmos.yaml`:
```yaml
logs:
file: "/dev/stderr"
level: Trace
```
Now when the `atmos describe affected` command is executed, the additional messages are printed to `/dev/stderr`,
but the command's JSON output is printed to `/dev/stdout`, allowing `jq` to parse it without errors.
```console
# NOTE: These messages are printed to `/dev/stderr`
Checking out Git ref 'refs/remotes/origin/HEAD' ...
Checked out Git ref 'refs/remotes/origin/HEAD'
Current HEAD: ffd2154e1daa32357b75460b9f45d268922b51e1 refs/heads/update-logs
BASE: f7aa382aa8b3d48be8f06cfdb27aad344b89aff4 HEAD
# NOTE: This JSON output is printed to `/dev/stdout`
[
{
"component": "vpc",
"component_type": "terraform",
"component_path": "examples/quick-start-advanced/components/terraform/vpc",
"stack": "plat-uw2-prod",
"stack_slug": "plat-uw2-prod-vpc",
"affected": "stack.vars"
},
{
"component": "vpc",
"component_type": "terraform",
"component_path": "examples/quick-start-advanced/components/terraform/vpc",
"stack": "plat-ue2-prod",
"stack_slug": "plat-ue2-prod-vpc",
"affected": "stack.vars"
}
]
````
## Profiler
Atmos includes built-in performance profiling capabilities using Go's pprof profiler. This allows you to analyze CPU usage, memory allocations, goroutines, and other performance metrics when running Atmos commands.
The profiler is configured in the `profiler` section:
```yaml
profiler:
# Enable or disable the pprof profiling server
enabled: false
# Host to bind the profiling server to (default: localhost)
host: "localhost"
# Port to run the profiling server on (default: 6060)
port: 6060
```
- `profiler.enabled`
-
Enable or disable the pprof profiling server. When enabled, Atmos will start an HTTP server that serves pprof endpoints for performance analysis. Can also be set using the `--profiler-enabled` command-line flag.
- `profiler.host`
-
The host address to bind the profiling server to. Defaults to `localhost` for security. Can also be set using the `--profiler-host` command-line flag.
- `profiler.port`
-
The port number for the profiling server. Defaults to `6060` (the standard pprof port). Can also be set using the `--profiler-port` command-line flag.
### Using the Profiler
When the profiler is enabled, Atmos will start a pprof server and display the URL when any command is run:
```console
pprof profiler available at: http://localhost:6060/debug/pprof/
Executing 'terraform plan' command...
```
The profiler provides several endpoints for different types of analysis:
- **CPU Profile**: `http://localhost:6060/debug/pprof/profile` - 30-second CPU profile
- **Memory Profile**: `http://localhost:6060/debug/pprof/heap` - Memory heap profile
- **Goroutines**: `http://localhost:6060/debug/pprof/goroutine` - Stack traces of all current goroutines
- **Web Interface**: `http://localhost:6060/debug/pprof/` - Interactive web interface
### Analyzing Performance Data
You can use Go's pprof tool to analyze the profiling data:
```console
# Capture and analyze CPU profile
go tool pprof http://localhost:6060/debug/pprof/profile
# Capture and analyze memory profile
go tool pprof http://localhost:6060/debug/pprof/heap
# Generate a web-based visualization
go tool pprof -http=:8080 http://localhost:6060/debug/pprof/profile
```
### Security Considerations
:::warning Security Notice
The profiler exposes detailed runtime information about your Atmos process. Only enable it when needed for debugging or performance analysis, and ensure the host/port are not accessible from untrusted networks.
:::
By default, the profiler binds to `localhost` only, which prevents external access. If you need to access the profiler from another machine, make sure to use appropriate network security measures.
## Aliases
CLI command aliases are configured in the `aliases` section.
An alias lets you create a shortcut name for an existing CLI command. Any CLI command can be aliased, including the Atmos
native commands like `terraform apply` or `describe stacks`, as well as [Atmos Custom Commands](/core-concepts/custom-commands).
For example:
```yaml
# CLI command aliases
aliases:
# Aliases for Atmos native commands
tf: terraform
tp: terraform plan
up: terraform apply
down: terraform destroy
ds: describe stacks
dc: describe component
# Aliases for Atmos custom commands
ls: list stacks
lc: list components
```
Execute an alias as you would any Atmos native or custom command:
```console
> atmos ls
plat-ue2-dev
plat-ue2-prod
plat-ue2-staging
plat-uw2-dev
plat-uw2-prod
plat-uw2-staging
```
The aliases configured in the `aliases` section automatically appear in Atmos help, and are shown as
`alias for ''`.
For example:
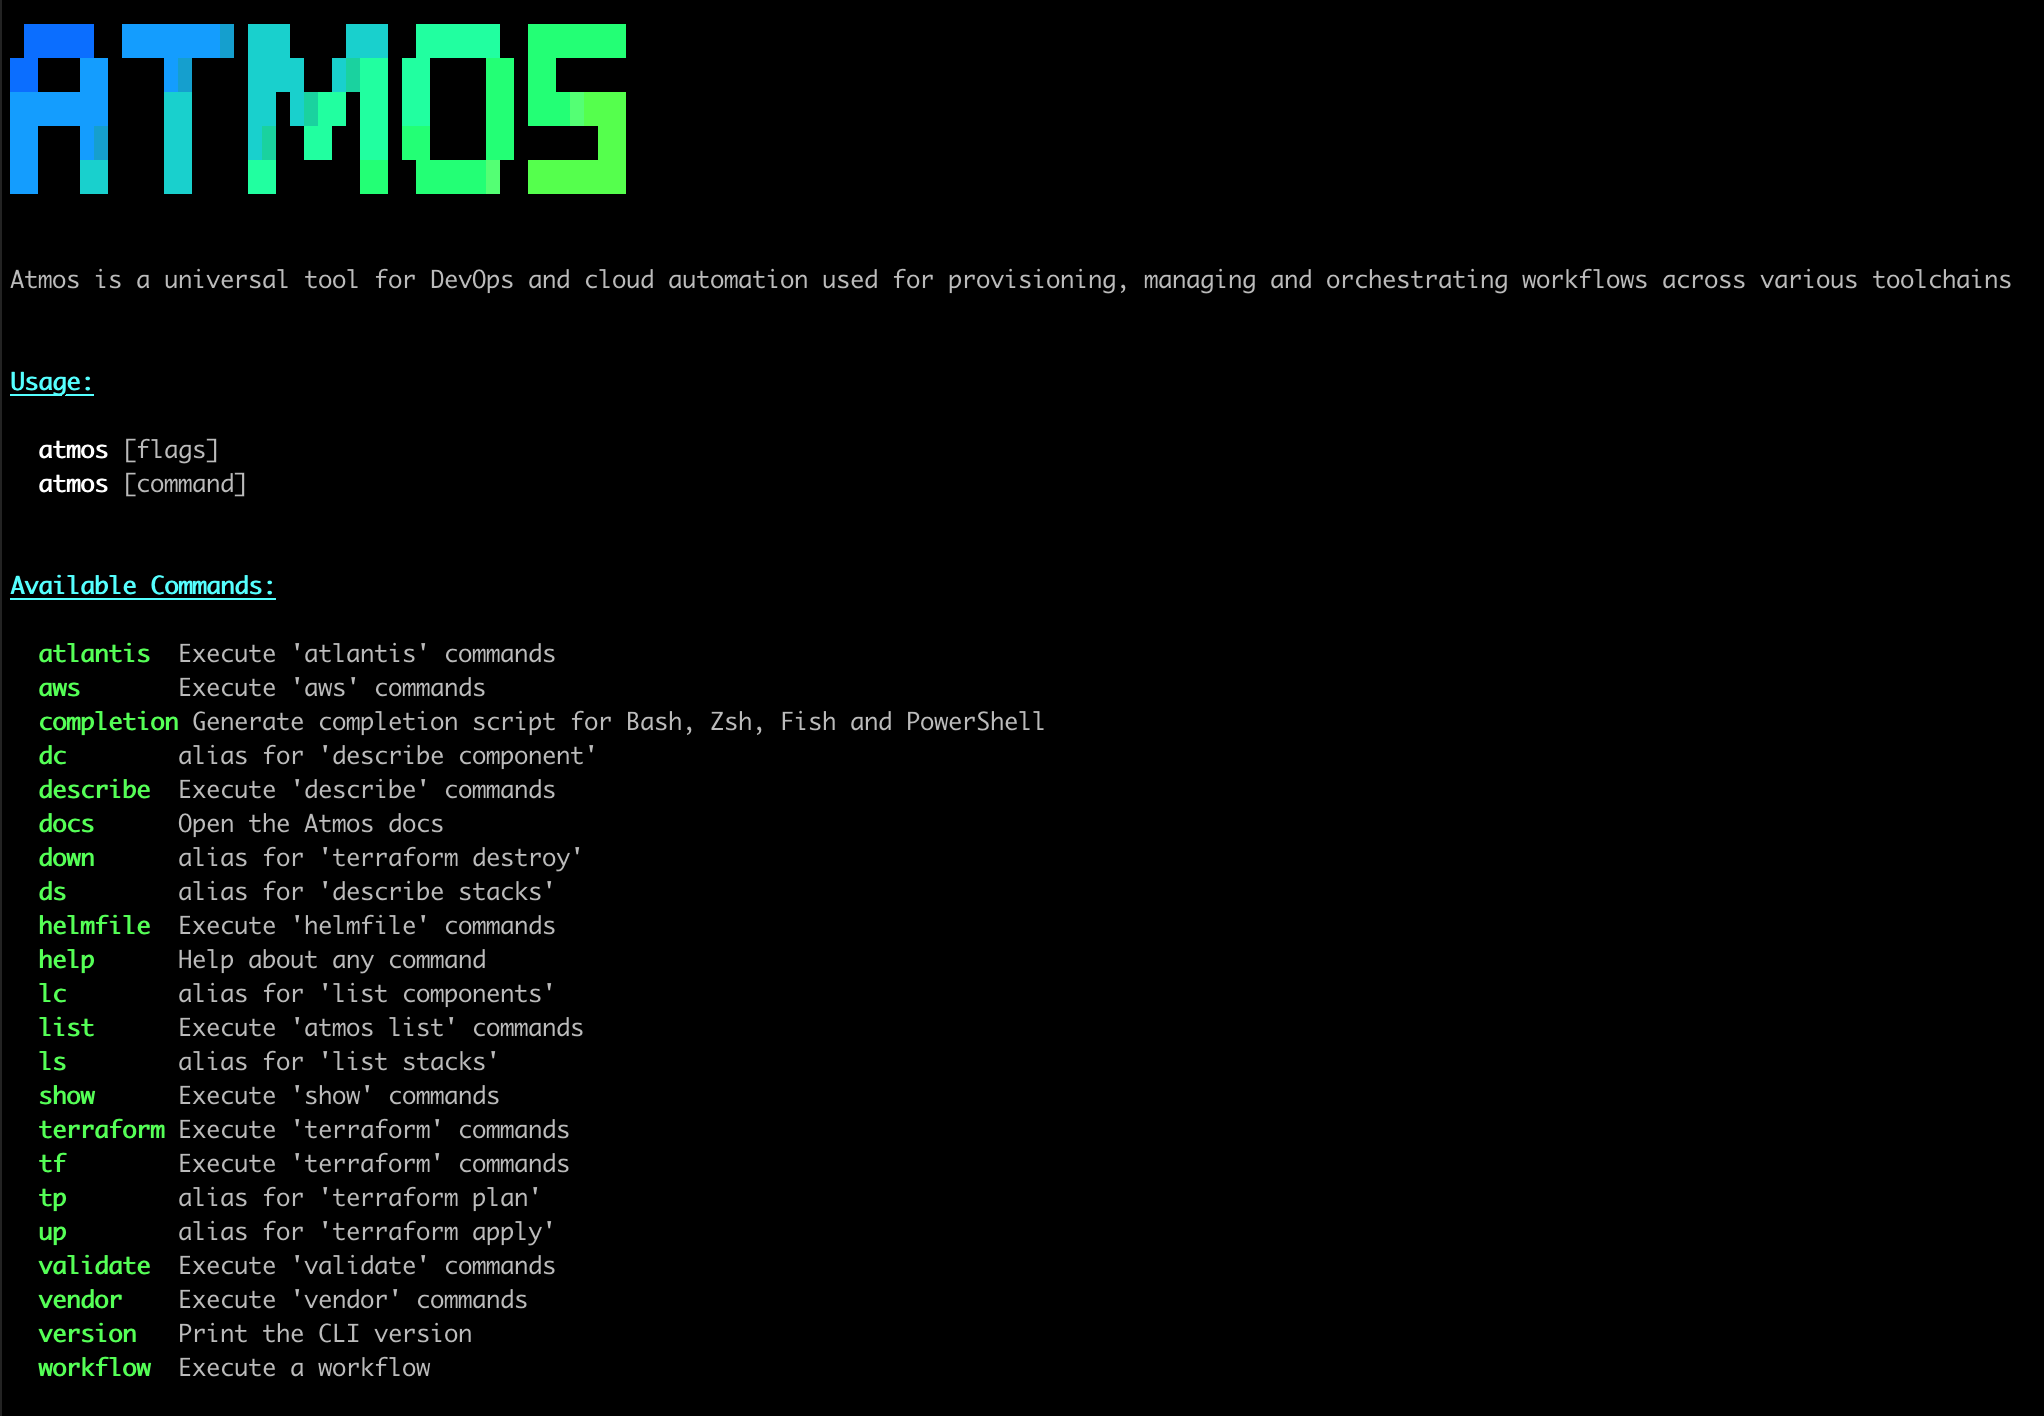
An alias automatically supports all command line arguments and flags that the aliased command accepts.
For example:
- `atmos up -s ` supports all the parameters from the aliased command `atmos terraform apply -s `
- `atmos dc -s ` supports all the parameters from the aliased command `atmos describe component -s `
## Templates
Atmos supports [Go templates](https://pkg.go.dev/text/template) in stack manifests, and the following template
functions and data sources:
- [Go `text/template` functions](https://pkg.go.dev/text/template#hdr-Functions)
- [Atmos Template Functions](/functions/template)
- [Sprig Functions](https://masterminds.github.io/sprig/)
- [Gomplate Functions](https://docs.gomplate.ca/functions/)
- [Gomplate Datasources](https://docs.gomplate.ca/datasources/)
:::tip
For more details, refer to [Atmos Stack Manifest Templating](/core-concepts/stacks/templates)
:::
```yaml
# https://pkg.go.dev/text/template
templates:
settings:
enabled: true
# https://masterminds.github.io/sprig
sprig:
enabled: true
# https://docs.gomplate.ca
# https://docs.gomplate.ca/functions
gomplate:
enabled: true
# Timeout in seconds to execute the datasources
timeout: 5
# https://docs.gomplate.ca/datasources
datasources:
# 'http' datasource
# https://docs.gomplate.ca/datasources/#using-file-datasources
ip:
url: "https://api.ipify.org?format=json"
# https://docs.gomplate.ca/datasources/#sending-http-headers
# https://docs.gomplate.ca/usage/#--datasource-header-h
headers:
accept:
- "application/json"
# 'file' datasources
# https://docs.gomplate.ca/datasources/#using-file-datasources
config-1:
url: "./config1.json"
config-2:
url: "file:///config2.json"
```
- `templates.settings.enabled` - a boolean flag to enable/disable the processing of `Go` templates in Atmos stack manifests.
If set to `false`, Atmos will not process `Go` templates in stack manifests
- `templates.settings.sprig.enabled` - a boolean flag to enable/disable the [Sprig Functions](https://masterminds.github.io/sprig/)
in Atmos stack manifests
- `templates.settings.gomplate.enabled` - a boolean flag to enable/disable the [Gomplate Functions](https://docs.gomplate.ca/functions/)
and [Gomplate Datasources](https://docs.gomplate.ca/datasources) in Atmos stack manifests
- `templates.settings.gomplate.timeout` - timeout in seconds to execute [Gomplate Datasources](https://docs.gomplate.ca/datasources)
- `templates.settings.gomplate.datasources` - a map of [Gomplate Datasource](https://docs.gomplate.ca/datasources) definitions:
- The keys of the map are the datasource names, which are used in `Go` templates in Atmos stack manifests.
For example:
```yaml
terraform:
vars:
tags:
provisioned_by_ip: '{{ (datasource "ip").ip }}'
config1_tag: '{{ (datasource "config-1").tag }}'
config2_service_name: '{{ (datasource "config-2").service.name }}'
```
- The values of the map are the datasource definitions with the following schema:
- `url` - the [Datasource URL](https://docs.gomplate.ca/datasources/#url-format)
- `headers` - a map of [HTTP request headers](https://developer.mozilla.org/en-US/docs/Web/HTTP/Headers) for
the [`http` datasource](https://docs.gomplate.ca/datasources/#sending-http-headers).
The keys of the map are the header names. The values of the map are lists of values for the header.
The following configuration will result in the
[`accept: application/json`](https://developer.mozilla.org/en-US/docs/Web/HTTP/Headers/Accept) HTTP header
being sent with the HTTP request to the datasource:
```yaml
headers:
accept:
- "application/json"
```
:::warning
Some functions are present in both [Sprig](https://masterminds.github.io/sprig/) and [Gomplate](https://docs.gomplate.ca/functions/).
For example, the `env` function has the same name in [Sprig](https://masterminds.github.io/sprig/os.html) and
[Gomplate](https://docs.gomplate.ca/functions/env/), but has different syntax and accept different number of arguments.
If you use the `env` function from one templating engine and enable both [Sprig](https://masterminds.github.io/sprig/)
and [Gomplate](https://docs.gomplate.ca/functions/), it will be invalid in the other templating engine, and an error will be thrown.
For this reason, you can use the `templates.settings.sprig.enabled` and `templates.settings.gomplate.enabled` settings to selectively
enable/disable the [Sprig](https://masterminds.github.io/sprig/) and [Gomplate](https://docs.gomplate.ca/functions/)
functions.
:::
## Environment Variables
### Configuration
Most YAML settings can also be defined by environment variables. This is helpful while doing local development. For example,
setting `ATMOS_STACKS_BASE_PATH` to a path in `/localhost` to your local development folder, will enable you to rapidly iterate.
| Variable | YAML Path | Description |
|:------------------------------------------------------|:------------------------------------------------|:--------------------------------------------------------------------------------------------------------------------------------------------------------------------------------------------------------------------------------------------------------------------|
| ATMOS_CLI_CONFIG_PATH | N/A | Where to find `atmos.yaml`. Path to a folder where `atmos.yaml` CLI config file is located (e.g. `/config`) |
| ATMOS_BASE_PATH | base_path | Base path to `components` and `stacks` folders |
| ATMOS_VENDOR_BASE_PATH | vendor.base_path | Path to vendor configuration file or directory containing vendor files. If a directory is specified, all .yaml files in the directory will be processed in lexicographical order. Supports both absolute and relative paths. |
| ATMOS_COMPONENTS_TERRAFORM_COMMAND | components.terraform.command | The executable to be called by `atmos` when running Terraform commands |
| ATMOS_COMPONENTS_TERRAFORM_BASE_PATH | components.terraform.base_path | Base path to Terraform components |
| ATMOS_COMPONENTS_TERRAFORM_APPLY_AUTO_APPROVE | components.terraform.apply_auto_approve | If set to `true`, auto-generate Terraform backend config files when executing `atmos terraform` commands |
| ATMOS_COMPONENTS_TERRAFORM_DEPLOY_RUN_INIT | components.terraform.deploy_run_init | Run `terraform init` when executing `atmos terraform deploy` command |
| ATMOS_COMPONENTS_TERRAFORM_INIT_RUN_RECONFIGURE | components.terraform.init_run_reconfigure | Run `terraform init -reconfigure` when executing `atmos terraform` commands |
| ATMOS_COMPONENTS_TERRAFORM_INIT_PASS_VARS | components.terraform.init.pass_vars | Pass the generated varfile to `terraform init` using the `--var-file` flag. [OpenTofu supports passing a varfile to `init`](https://opentofu.org/docs/cli/commands/init/#general-options) to dynamically configure backends |
| ATMOS_COMPONENTS_TERRAFORM_PLAN_SKIP_PLANFILE | components.terraform.plan.skip_planfile | Skip writing the plan to a file by not passing the `-out` flag to Terraform when executing `terraform plan` commands. Set it to `true` when using Terraform Cloud since the `-out` flag is not supported. Terraform Cloud automatically stores plans in its backend |
| ATMOS_COMPONENTS_TERRAFORM_AUTO_GENERATE_BACKEND_FILE | components.terraform.auto_generate_backend_file | If set to `true`, auto-generate Terraform backend config files when executing `atmos terraform` commands |
| ATMOS_COMPONENTS_HELMFILE_COMMAND | components.helmfile.command | The executable to be called by `atmos` when running Helmfile commands |
| ATMOS_COMPONENTS_HELMFILE_BASE_PATH | components.helmfile.base_path | Path to helmfile components |
| ATMOS_COMPONENTS_HELMFILE_USE_EKS | components.helmfile.use_eks | If set to `true`, download `kubeconfig` from EKS by running `aws eks update-kubeconfig` command before executing `atmos helmfile` commands |
| ATMOS_COMPONENTS_HELMFILE_KUBECONFIG_PATH | components.helmfile.kubeconfig_path | Path to write the `kubeconfig` file when executing `aws eks update-kubeconfig` command |
| ATMOS_COMPONENTS_HELMFILE_HELM_AWS_PROFILE_PATTERN | components.helmfile.helm_aws_profile_pattern | Pattern for AWS profile to use when executing `atmos helmfile` commands |
| ATMOS_COMPONENTS_HELMFILE_CLUSTER_NAME_PATTERN | components.helmfile.cluster_name_pattern | Pattern for EKS cluster name to use when executing `atmos helmfile` commands |
| ATMOS_STACKS_BASE_PATH | stacks.base_path | Base path to Atmos stack manifests |
| ATMOS_STACKS_INCLUDED_PATHS | stacks.included_paths | List of paths to use as top-level stack manifests |
| ATMOS_STACKS_EXCLUDED_PATHS | stacks.excluded_paths | List of paths to not consider as top-level stacks |
| ATMOS_STACKS_NAME_PATTERN | stacks.name_pattern | Stack name pattern to use as Atmos stack names |
| ATMOS_STACKS_NAME_TEMPLATE | stacks.name_template | Stack name Golang template to use as Atmos stack names |
| ATMOS_WORKFLOWS_BASE_PATH | workflows.base_path | Base path to Atmos workflows |
| ATMOS_SCHEMAS_JSONSCHEMA_BASE_PATH | schemas.jsonschema.base_path | Base path to JSON schemas for component validation |
| ATMOS_SCHEMAS_OPA_BASE_PATH | schemas.opa.base_path | Base path to OPA policies for component validation |
| ATMOS_SCHEMAS_ATMOS_MANIFEST | schemas.atmos.manifest | Path to JSON Schema to validate Atmos stack manifests. For more details, refer to [Atmos Manifest JSON Schema](/cli/schemas) |
| ATMOS_LOGS_FILE | logs.file | The file to write Atmos logs to. Logs can be written to any file or any standard file descriptor, including `/dev/stdout`, `/dev/stderr` and `/dev/null`). If omitted, `/dev/stdout` will be used |
| ATMOS_LOGS_LEVEL | logs.level | Logs level. Supported log levels are `Trace`, `Debug`, `Info`, `Warning`, `Off`. If the log level is set to `Off`, Atmos will not log any messages (note that this does not prevent other tools like Terraform from logging) |
| ATMOS_PROFILER_ENABLED | profiler.enabled | Enable or disable the pprof HTTP profiling server. When enabled, starts an HTTP server for interactive profiling |
| ATMOS_PROFILER_HOST | profiler.host | Host address for the profiling server. Default: `localhost`. Use `0.0.0.0` to allow external connections (security consideration) |
| ATMOS_PROFILER_PORT | profiler.port | Port for the profiling server. Default: `6060` |
| ATMOS_PROFILE_FILE | profiler.file | Write profiling data to the specified file (enables profiling automatically). When specified, enables file-based profiling instead of server-based |
| ATMOS_PROFILE_TYPE | profiler.profile_type | Type of profile to collect when using `ATMOS_PROFILE_FILE`. Options: `cpu`, `heap`, `allocs`, `goroutine`, `block`, `mutex`, `threadcreate`, `trace`. Default: `cpu` |
| ATMOS_SETTINGS_LIST_MERGE_STRATEGY | settings.list_merge_strategy | Specifies how lists are merged in Atmos stack manifests. The following strategies are supported: `replace`, `append`, `merge` |
| ATMOS_VERSION_CHECK_ENABLED | version.check.enabled | Enable/disable Atmos version checks for updates to the newest release |
| ATMOS_GITHUB_TOKEN | N/A | Bearer token for GitHub API requests, enabling authentication for private repositories and higher rate limits |
| ATMOS_BITBUCKET_TOKEN | N/A | App password for Bitbucket API requests is set to avoid rate limits. Unauthenticated Requests are limited to 60 requests per hour across all API resources. |
| ATMOS_BITBUCKET_USERNAME | N/A | Username for Bitbucket authentication. Takes precedence over BITBUCKET_USERNAME. |
| ATMOS_GITLAB_TOKEN | N/A | Personal Access Token (PAT) for GitLab authentication. Unauthenticated users are limited to 6 requests per minute per IP address for certain endpoints, while authenticated users have higher thresholds. |
### Context
Some commands, like [`atmos terraform shell`](/cli/commands/terraform/shell),
spawn an interactive shell with certain environment variables set, in order to enable the user to use other tools
(in the case of `atmos terraform shell`, the Terraform or Tofu CLI) natively, while still being configured for a
specific component and stack. To accomplish this, and to provide visibility and context to the user regarding the
configuration, Atmos may set the following environment variables in the spawned shell:
| Variable | Description |
|:------------------------|:-------------------------------------------------------------------------------------------------------|
| ATMOS_COMPONENT | The name of the active component |
| ATMOS_SHELL_WORKING_DIR | The directory from which native commands should be run |
| ATMOS_SHLVL | The depth of Atmos shell nesting. When present, it indicates that the shell has been spawned by Atmos. |
| ATMOS_STACK | The name of the active stack |
| ATMOS_TERRAFORM_WORKSPACE | The name of the Terraform workspace in which Terraform commands should be run |
| PS1 | When a custom shell prompt has been configured in Atmos, the prompt will be set via `PS1` |
| TF_CLI_ARGS_* | Terraform CLI arguments to be passed to Terraform commands |
---
## Markdown Styling
import File from '@site/src/components/File'
import Intro from '@site/src/components/Intro'
# Markdown Styling
Configure how Atmos displays markdown content in the terminal.
## Configuration
Configure markdown styling in your `atmos.yaml` configuration file:
```yaml
settings:
# Terminal settings for displaying content
terminal:
max_width: 120 # Maximum width for terminal output
pager: true # Use pager for long output
unicode: true
# Markdown element styling
markdown:
document:
color: "${colors.text}"
heading:
color: "${colors.primary}"
bold: true
code_block:
color: "${colors.secondary}"
margin: 1
link:
color: "${colors.primary}"
underline: true
strong:
color: "${colors.secondary}"
bold: true
emph:
color: "${colors.muted}"
italic: true
```
## Style Properties
Each markdown element supports the following properties:
### Common Properties
| Property | Type | Description |
|----------|------|-------------|
| `color` | string | Text color in hex format (e.g., "#FFFFFF") |
| `background_color` | string | Background color in hex format |
| `bold` | boolean | Whether to make the text bold |
| `italic` | boolean | Whether to make the text italic |
| `underline` | boolean | Whether to underline the text |
| `margin` | number | Space around the element |
| `indent` | number | Indentation level |
### Element-Specific Properties
#### Document
Base styling for all text content.
Supports all common properties.
#### Headings (H1-H6)
Individual styling for each heading level (1-6).
```markdown
# Heading 1
## Heading 2
### Heading 3
etc...
```
**Supports:**
- H1 supports additional `background_color` property
- All heading levels support `margin` for vertical spacing
#### Code Blocks
Styling for multi-line code blocks (aka code fences).
````markdown
```
this is a codeblock
```
````
**Supports:**
- `margin` for visual separation
- Color applies to the entire block
#### Block Quotes
Styling for quoted text. Supports all common properties.
```markdown
>
> This is quoted text
>
```
**Supports:**
- `indent` property controls quote indentation
#### Links
Styling for hyperlinks.
```
[This is a link](https://example.com/)
```
**Supports:**
- `underline` property specifically for links
- Color applies to both link text and underline
## Default Styles
If no custom styles are configured, Atmos uses a built-in default theme related to the default atmos brand colors:
```yaml
# Built-in default theme
settings:
markdown:
document:
color: "#FFFFFF" # White text
heading:
color: "#00A3E0" # Blue headings
bold: true
h1:
color: "#FFFFFF" # White text
background_color: "#9B51E0" # Purple background
bold: true
margin: 2
code_block:
color: "#00A3E0" # Blue code
margin: 1
link:
color: "#00A3E0" # Blue links
underline: true
```
## Terminal Compatibility
Atmos uses [termenv](https://github.com/muesli/termenv) and [glamour](https://github.com/charmbracelet/glamour) to automatically detect and adapt to your terminal's capabilities:
- **Full Color Support (24-bit)**
- Renders exact hex colors as specified in your config
- Detected via `$COLORTERM=truecolor` or `$TERM` containing `24bit`/`truecolor`
- Examples: iTerm2, Terminal.app, Windows Terminal
- **256 Color Support**
- Automatically maps hex colors to nearest ANSI 256 colors
- Detected via `$TERM` containing `256color`
- Examples: xterm-256color terminals
- **Basic Color Support (8/16 colors)**
- Automatically maps to basic ANSI colors
- Used when `$TERM` indicates basic terminal
- Examples: xterm, vt100, basic SSH sessions
- **No Color Support**
- Falls back to plain text with basic formatting
- Used when `$TERM=dumb` or no color support detected
- Examples: Basic terminals, some CI environments
The color degradation is handled automatically by termenv's color profile detection. You don't need to configure anything - your styles will work everywhere, automatically adjusting to each terminal's capabilities.
## Examples
### Error Messages
Custom styling can help distinguish different types of messages:
```yaml
settings:
markdown:
# General heading styles
heading:
color: "#00A3E0" # Blue for standard headings
bold: true
# Code blocks for command examples
code_block:
color: "#00FFFF" # Cyan for code examples
margin: 1
# Emphasized text for warnings/errors
emph:
color: "#FF6B6B" # Red for emphasis in error messages
italic: true
# Strong text for important messages
strong:
color: "#FF6B6B" # Red for important parts
bold: true
```
### Help Text
Atmos uses the [Glamour](https://github.com/charmbracelet/glamour) library for markdown rendering and styling. The styling is handled automatically based on your terminal's capabilities and color profile.
Key features of the markdown rendering:
- **Auto-styling**: Adapts to your terminal's color scheme
- **Word wrapping**: Automatically adjusts to terminal width
- **Emoji support**: Renders emoji characters when available
- **Rich formatting**: Supports headings, code blocks, links, and other markdown elements
The styling is managed internally by Glamour and does not require manual configuration in your atmos settings.
## Best Practices
1. **Color Contrast**: Ensure sufficient contrast between text and background colors for readability.
2. **Consistent Styling**: Use a consistent color scheme across different elements.
3. **Terminal Support**: Test your styling in different terminals to ensure compatibility.
4. **Accessibility**: Consider color-blind users when choosing your color scheme.
## Troubleshooting
1. **Verify Terminal Supports True Color:**
- **Check `$COLORTERM`:**
```bash
echo $COLORTERM
```
**Expected Output:** `truecolor` or `24bit`
- **Check `$TERM`:**
```bash
echo $TERM
```
**Recommended Values:** `xterm-256color`, `xterm-direct`, `xterm-truecolor`
2. **Ensure Your Terminal Emulator Supports True Color:**
- Use a terminal emulator known for true color support (e.g., Terminal.app, iTerm2, Windows Terminal, etc).
3. **Configure Environment Variables Correctly:**
- Set `$TERM` to a value that supports true color:
```bash
export TERM=xterm-256color
```
Add this to your shell's configuration file (`~/.bashrc`, `~/.zshrc`, etc.) to make it permanent.
4. **Validate `atmos.yaml` Configuration:**
- Ensure colors are in hex format, boolean values are `true`/`false` (not quoted strings), and numbers are integers.
- Use a YAML linter to validate the syntax.
- Try removing custom styles to see if default styles work.
## See Also
- [CLI Configuration](/cli/configuration)
- [Command Reference](/cli/commands)
---
## Customize Stack Behavior
import Screengrab from '@site/src/components/Screengrab'
import Terminal from '@site/src/components/Terminal'
import File from '@site/src/components/File'
import Intro from '@site/src/components/Intro'
The `stacks` section of the `atmos.yaml` defines how Atmos locates and manages your stack configurations. Think of it as the bootstrapping configuration. Here you can define the stack name pattern or template used to build the "slugs" and specify where to find stack files.
:::important
Do not confuse this configuration with [stack configuration](/core-concepts/stacks).
This configuration below is defined in the `atmos.yaml` and instructs atmos where to find
your stack configurations.
:::
```yaml
stacks:
# Can also be set using 'ATMOS_STACKS_BASE_PATH' ENV var, or '--config-dir' and '--stacks-dir' command-line arguments
# Supports both absolute and relative paths
base_path: "stacks"
# Can also be set using 'ATMOS_STACKS_INCLUDED_PATHS' ENV var (comma-separated values string)
included_paths:
# Tell Atmos to search for the top-level stack manifests in the `orgs` folder and its sub-folders
- "orgs/**/*"
# Can also be set using 'ATMOS_STACKS_EXCLUDED_PATHS' ENV var (comma-separated values string)
excluded_paths:
# Tell Atmos that all `_defaults.yaml` files are not top-level stack manifests
- "**/_defaults.yaml"
# To define Atmos stack naming convention, use either `name_pattern` or `name_template`.
# `name_template` has higher priority (if `name_template` is specified, `name_pattern` will be ignored).
# `name_pattern` uses the predefined context tokens {namespace}, {tenant}, {environment}, {stage}.
# `name_pattern` can also be set using 'ATMOS_STACKS_NAME_PATTERN' ENV var
name_pattern: "{tenant}-{environment}-{stage}"
# `name_template` is a Golang template.
# For the template tokens, and you can use any Atmos sections and attributes that the Atmos command
# `atmos describe component -s ` generates (refer to https://atmos.tools/cli/commands/describe/component).
# `name_template` can also be set using 'ATMOS_STACKS_NAME_TEMPLATE' ENV var
# name_template: "{{.vars.tenant}}-{{.vars.environment}}-{{.vars.stage}}"
```
- `stacks.base_path` specifies the path to the folder where **all** Atmos stack config files (stack manifests) are defined.
If the global `base_path` is not provided or is an empty string, `stacks.base_path` is an independent setting that supports both absolute and
relative paths. If the global `base_path` is defined, `stacks.base_path` is relative to the global `base_path`
- `stacks.included_paths` tells Atmos where to search for the top-level stack manifests
:::note
Atmos top-level stack manifests are configuration files that define **all** settings and components for the corresponding environment (organization,
OU/tenant, account, region), and they are used in `atmos` CLI commands like `atmos terraform plan -s ` and
`atmos terraform apply -s `
:::
- `stacks.excluded_paths` tells Atmos which paths from `stacks.included_paths` to exclude. For example, we will exclude the config files that don't
contain the top-level stack manifests, but just define the default values that get imported into top-level stack manifests
:::note
The `_defaults.yaml` naming convention is the recommended way to define stack manifests with
default configurations for organizations, OUs/tenants, accounts and regions. This is a naming convention, not an Atmos feature.
The `_defaults.yaml` files themselves are not top-level Atmos stacks—they just contain default values
to make the entire configuration reusable and DRY. The underscore prefix ensures these files sort to the top
of directory listings and are visually distinct from actual stack configurations.
:::
:::info
The `_defaults.yaml` stack manifests are not imported into other Atmos manifests automatically.
You must explicitly import them using [imports](/core-concepts/stacks/imports). Atmos has no special
knowledge of this naming pattern—these files are only excluded from stack discovery because they match
the `**/_defaults.yaml` pattern in the `excluded_paths` configuration.
See the [_defaults.yaml Design Pattern](/design-patterns/defaults-pattern) for a complete explanation of this convention.
:::
- `stacks.name_pattern` configures the name pattern for the top-level Atmos stacks using the context variables `namespace`, `tenant`, `environment`
and `stage` as the tokens. Depending on the structure of your organization, OUs, accounts and regions, set `stacks.name_pattern` to the
following:
- `name_pattern: {stage}` - if you use just one region and a few accounts (stages) in just one organization and one OU. In this case, the
top-level Atmos stacks will use just the `stage` (account) in their names, and to provision the Atmos components in the top-level stacks, you will
be executing Atmos commands like `atmos terraform apply --stack dev`, `atmos terraform apply --stack staging`
and `atmos terraform apply --stack prod`
- `name_pattern: {environment}-{stage}` - if you have multiple regions and accounts (stages) in just one organization and one OU. In this case, the
top-level Atmos stacks will use the `environment` (region) and `stage` (account) in their names, and to provision the Atmos components in the
top-level stacks, you will be executing Atmos commands
like `atmos terraform apply --stack ue2-dev`, `atmos terraform apply --stack uw2-staging`
and `atmos terraform apply --stack ue1-prod`. Note that the `name_pattern` can also be defined
as `{stage}-{environment}`, in which case the Atmos commands will look like `atmos terraform apply --stack dev-ue2`
- `name_pattern: {tenant}-{environment}-{stage}` - if you have multiple regions, OUs (tenants) and accounts (stages) in just one organization. In
this case, the top-level Atmos stacks will use the `tenant`, `environment` (region) and `stage` (account) in their names, and to provision the
Atmos components in the top-level stacks, you will be executing Atmos commands
like `atmos terraform apply --stack plat-ue2-dev`, `atmos terraform apply --stack core-uw2-staging`
and `atmos terraform apply --stack plat-ue1-prod`, where `plat` and `core` are the OUs/tenants in your organization
- `name_pattern: {namespace}-{tenant}-{environment}-{stage}` - if you have a multi-org, multi-tenant, multi-account and multi-region architecture.
In this case, the top-level Atmos stacks will use the `namespace`, `tenant`, `environment` (region) and `stage` (account) in their names, and to
provision the Atmos components in the top-level stacks, you will be executing Atmos commands
like `atmos terraform apply --stack org1-plat-ue2-dev`, `atmos terraform apply --stack org2-core-uw2-staging`
and `atmos terraform apply --stack org2-plat-ue1-prod`, where `org1` and `org2` are the organization names (defined as `namespace` in
the corresponding `_defaults.yaml` config files for the organizations)
- `stacks.name_template` serves the same purpose as `stacks.name_pattern` (defines the naming convention for the top-level Atmos stacks), but
provides much more functionality. Instead of using the predefined context variables as tokens, it uses [Go templates](https://pkg.go.dev/text/template).
[Atmos Template Functions](/functions/template),
[Sprig Functions](https://masterminds.github.io/sprig/),
[Gomplate Functions](https://docs.gomplate.ca/functions/),
and [Gomplate Datasources](https://docs.gomplate.ca/datasources/) are supported as well
- For the `Go` template tokens, and you can use any Atmos sections (e.g. `vars`, `providers`, `settings`)
that the Atmos command [`atmos describe component -s `](/cli/commands/describe/component) generates
for a component in a stack.
- `name_template: "{{.vars.tenant}}-{{.vars.environment}}-{{.vars.stage}}"` defines the same name pattern for the top-level
Atmos stacks as `name_pattern: "{tenant}-{environment}-{stage}"` does
- Since `stacks.name_template` allows using any variables form the `vars` section (and other sections), you can define
your own naming convention for your organization or for different clouds (AWS, Azure, GCP). For example, in the
corresponding `_defaults.yaml` stack manifests, you can use the following variables:
- `org` instead of `namespace`
- `division` instead of `tenant`
- `region` instead of `environment`
- `account` instead of `stage`
Then define the following `stacks.name_template` in `atmos.yaml`:
```yaml title="atmos.yaml"
stacks:
name_template: "{{.vars.division}}-{{.vars.account}}-{{.vars.region}}"
```
You will be able to execute all Atmos commands using the newly defined naming convention:
```shell
atmos terraform plan -s
atmos terraform apply -s
atmos describe component -s
```
`name_template` can have complex logic and use template expressions and functions.
The following template defines a `name_template` that builds a `stack_name` string by validating and concatenating
several input variables in a hierarchical order.
```yaml
name_template: |-
{{- $ns := .vars.namespace -}}
{{- $tenant := .vars.tenant -}}
{{- $env := .vars.environment -}}
{{- $stage := .vars.stage -}}
{{- $stack_name := "" -}}
{{- if eq $ns "" -}}
{{- fail "Error: 'namespace' is required." -}}
{{- end -}}
{{- if and (ne $tenant "") (eq $ns "") -}}
{{- fail "Error: 'tenant' requires 'namespace'." -}}
{{- end -}}
{{- if and (ne $env "") (or (eq $tenant "") (eq $ns "")) -}}
{{- fail "Error: 'environment' requires 'tenant' and 'namespace'." -}}
{{- end -}}
{{- if and (ne $stage "") (or (eq $env "") (eq $tenant "") (eq $ns "")) -}}
{{- fail "Error: 'stage' requires 'environment', 'tenant', and 'namespace'." -}}
{{- end -}}
{{- if ne $tenant "" -}}
{{- $stack_name = $tenant -}}
{{- end -}}
{{- if ne $env "" -}}
{{- $stack_name = printf "%s-%s" $stack_name $env -}}
{{- end -}}
{{- if ne $stage "" -}}
{{- $stack_name = printf "%s-%s" $stack_name $stage -}}
{{- end -}}
{{- $stack_name -}}
```
It pulls values from the Atmos section `vars` and assigns them to local template variables:
- `namespace`
- `tenant`
- `environment`
- `stage`
The template enforces hierarchical dependencies between variables:
- `namespace` is required
- If `tenant` is provided, `namespace` must also be set
- If `environment` is provided, both `tenant` and `namespace` must be set
- If `stage` is provided, then `environment`, `tenant`, and `namespace` must all be set
If validations pass, it constructs the `stack_name` progressively:
- Starts with `tenant` if it exists
- Appends `environment` if it exists
- Appends `stage` if it exists
The template outputs the resulting stack name. For example, if the variables are:
```yaml
namespace: acme
tenant: plat
environment: ue2
stage: prod
```
The resulting stack name will be `plat-ue2-prod`.
:::note
Use either `stacks.name_pattern` or `stacks.name_template` to define the naming convention for the top-level Atmos stacks.
`stacks.name_template` has higher priority.
If `stacks.name_template` is specified, `stacks.name_pattern` will be ignored.
:::
:::tip
Refer to [Atmos Design Patterns](/design-patterns) for the examples on how to configure the `stacks` section in `atmos.yaml` for different use-cases
:::
---
## Terminal Settings
import Intro from '@site/src/components/Intro';
import KeyPoints from '@site/src/components/KeyPoints';
import Note from '@site/src/components/Note';
import File from '@site/src/components/File';
Atmos provides configurable terminal settings that allow you to customize the output appearance, including syntax highlighting for YAML and JSON outputs. These settings can be configured in your `atmos.yaml` configuration file.
- Configure syntax highlighting for terminal output
- Customize color schemes and formatting options
- Control output pagination and line wrapping
- Set display preferences for different output formats
## General Terminal Settings
Configure general terminal behavior. These are also the default settings if not specified in your `atmos.yaml`:
```yaml
settings:
terminal:
max_width: 120 # Maximum width for terminal output
pager: false # Pager disabled by default (set to true, or pager name like 'less' to enable)
color: true # Enable colored output (default: true)
unicode: true # Use Unicode characters in output
tab_width: 2 # Number of spaces for YAML indentation (default: 2)
```
## Configuration Precedence
Atmos follows a clear precedence order for terminal settings, with command-line flags having the highest priority:
### Pager Configuration Precedence
1. **CLI Flags** (highest priority): `--pager=false`, `--pager=less`
2. **NO_PAGER Environment Variable**: `NO_PAGER=1` (standard CLI convention)
3. **ATMOS_PAGER Environment Variable**: `ATMOS_PAGER=less`
4. **PAGER Environment Variable**: `PAGER=more` (system default)
5. **Configuration File** (lowest priority): `settings.terminal.pager: true`
### Color Configuration Precedence
1. **CLI Flags** (highest priority): `--no-color`
2. **NO_COLOR Environment Variable**: `NO_COLOR=1` (standard CLI convention)
3. **ATMOS_NO_COLOR Environment Variable**: `ATMOS_NO_COLOR=true`
4. **ATMOS_COLOR Environment Variable**: `ATMOS_COLOR=false`
5. **COLOR Environment Variable**: `COLOR=false`
6. **Configuration File** (lowest priority): `settings.terminal.color: false`
## Syntax Highlighting
You can customize the syntax highlighting behavior for terminal output using the following settings:
```yaml
settings:
terminal:
# Main terminal settings
pager: true # Enable pager for all terminal output
max_width: 120 # Maximum width for terminal output
color: true # Enable colored output
# Syntax highlighting specific settings
syntax_highlighting:
enabled: true # Enable/disable syntax highlighting
formatter: terminal # Output formatter
theme: dracula # Color scheme to use
line_numbers: false # Show line numbers
wrap: false # Wrap long lines
```
### Terminal Configuration Options
- `max_width`
- Maximum width for terminal output (default: `120`)
- `pager`
-
Configure pager behavior for output display.
- `false` or empty: Pager disabled (default)
- `true` or `on`: Enable pager with system default
- Pager command (e.g., `less`, `more`): Use specific pager program
- Environment variables: `NO_PAGER` (disable), `ATMOS_PAGER`, `PAGER` (system default)
- CLI control: `--pager` global flag
- `color`
-
Enable colored terminal output (default: `true`).
- Environment variables: `NO_COLOR` (standard), `ATMOS_NO_COLOR`, `ATMOS_COLOR`, `COLOR`
- CLI control: `--no-color` global flag
- `unicode`
- Use Unicode characters in output (default: `true`)
- `tab_width`
- Number of spaces for YAML indentation (default: `2`)
### Syntax Highlighting Configuration Options
- `enabled`
- Enable or disable syntax highlighting (default: `true`)
- `formatter`
- Output formatter (default: `terminal`)
- `theme`
-
Color scheme for syntax highlighting. Available options include:
`vim`
`monokai`
`github`
`dracula`
...and many other standard themes
You can find the full list of supported themes [here](https://xyproto.github.io/splash/docs/).
- `line_numbers`
- Show line numbers in output (default: `false`)
- `wrap`
- Wrap long lines (default: `false`)
### Example Usage
The syntax highlighting is automatically applied when using commands that output YAML or JSON, such as:
```bash
# Display config in YAML format with syntax highlighting
atmos describe config -f yaml
# Display config in JSON format with syntax highlighting
atmos describe config
```
When the output is piped to another command, syntax highlighting is automatically disabled to ensure compatibility:
```bash
# Syntax highlighting is disabled when piping
atmos describe config | grep base_path
```
## Supported Themes
Atmos supports a wide range of themes for syntax highlighting. You can find the full list of supported themes [here](https://xyproto.github.io/splash/docs/).
---
## Global Flags
import Intro from '@site/src/components/Intro';
import Note from '@site/src/components/Note';
# Global Flags
Global flags are available for all Atmos commands and control the overall behavior of the CLI. These flags take
precedence over environment variables and configuration files.
## Core Global Flags
These flags are available for every Atmos command:
- `--base-path`
-
Base path for the Atmos project. This is the root directory where Atmos will look for configuration files,
stacks, and components.
- Can also use `ATMOS_BASE_PATH` environment variable
- Supports both absolute and relative paths
- `--config`
-
Path to a specific Atmos configuration file.
- Can be used multiple times for deep merging (later files override earlier ones)
- Example: `--config=base.yaml --config=override.yaml`
- `--config-path`
-
Path to a directory containing Atmos configuration files.
- Can be used multiple times
- Atmos looks for `atmos.yaml`, `.atmos.yaml`, `atmos.yml`, or `.atmos.yml` in these directories
- `--logs-level`
-
Set the logging level for Atmos operations.
- Options: `Trace`, `Debug`, `Info`, `Warning`, `Off`
- Default: `Warning`
- Can also use `ATMOS_LOGS_LEVEL` environment variable
- `--logs-file`
-
File to write Atmos logs to.
- Default: `/dev/stderr`
- Can be any file path or standard file descriptor (`/dev/stdout`, `/dev/stderr`, `/dev/null`)
- Can also use `ATMOS_LOGS_FILE` environment variable
- `--no-color`
-
Disable colored terminal output.
- Useful for CI/CD environments or when piping output
- Can also use `ATMOS_NO_COLOR` or `NO_COLOR` environment variables
- The `NO_COLOR` env var follows the standard from https://no-color.org/
- `--pager`
-
Configure pager behavior for command output.
- `--pager` (no value): Enable pager with default settings
- `--pager=true` or `--pager=on`: Explicitly enable pager
- `--pager=false` or `--pager=off`: Explicitly disable pager
- Any non-boolean value is treated as a pager command (first token) with following tokens as arguments
**Examples:**
- `--pager='less -R'`: Use less with raw control chars
- `--pager="less --RAW-CONTROL-CHARS"`: Alternative syntax for less with options
- `export ATMOS_PAGER='less -R +Gg'` or `export PAGER='less -R'`: Set via environment variables
**Environment Variables:**
- `NO_PAGER`: Standard CLI convention to disable pager (e.g., `NO_PAGER=1`)
- `ATMOS_PAGER`: Atmos-specific pager configuration
- `PAGER`: System default pager (fallback)
**Precedence**: `--pager` flag > `NO_PAGER` > `ATMOS_PAGER` > `PAGER` > config file
**Default**: Pager is disabled unless explicitly enabled
**Note**: Use quotes around the value to preserve spaces and prevent shell splitting when passing pager
arguments. The `NO_PAGER` environment variable follows the standard CLI convention for disabling pagers.
- `--redirect-stderr`
-
Redirect stderr to a file or file descriptor.
- Can redirect to any file path or standard file descriptor
- Example: `--redirect-stderr=/dev/null` to suppress error output
## Command-Specific Flags
These flags are available across multiple commands but not universally:
### Processing Flags
- `--process-templates`
-
Enable or disable Go template processing in Atmos manifests.
- Default: `true`
- Available in: `describe stacks`, `list`, `validate` commands
- `--process-functions`
-
Enable or disable YAML function processing in Atmos manifests.
- Default: `true`
- Available in: `describe stacks`, `list`, `validate` commands
- `--skip`
-
Skip processing specific Atmos functions in manifests.
- Can be used multiple times
- Example: `--skip=terraform.output --skip=include`
- Available in: `describe` commands
### Output Flags
- `--format` / `-f`
-
Specify the output format.
- Common values: `yaml`, `json`, `table`, `csv`
- Available in: `describe`, `list`, `validate` commands
- `--file`
-
Write output to a file instead of stdout.
- Available in: `describe`, `generate` commands
- `--query` / `-q`
-
Query output using JSONPath or yq expressions.
- Example: `--query='.components.vpc.vars'`
- Available in: `describe` commands
### Profiling Flags
- `--profiler-enabled`
-
Enable the pprof HTTP profiling server.
- Default: `false`
- When enabled, starts an HTTP server for interactive profiling
- Can also use `ATMOS_PROFILER_ENABLED` environment variable
- `--profiler-host`
-
Host address for the profiling server.
- Default: `localhost`
- Use `0.0.0.0` to allow external connections (security consideration)
- Can also use `ATMOS_PROFILER_HOST` environment variable
- `--profiler-port`
-
Port for the profiling server.
- Default: `6060`
- Can also use `ATMOS_PROFILER_PORT` environment variable
- `--profile-file`
-
Write profiling data to the specified file (enables profiling automatically).
- When specified, enables file-based profiling instead of server-based
- File extension should match profile type (e.g., `.prof` for CPU, `.out` for trace)
- Can also use `ATMOS_PROFILE_FILE` environment variable
- `--profile-type`
-
Type of profile to collect when using `--profile-file`.
- Options: `cpu`, `heap`, `allocs`, `goroutine`, `block`, `mutex`, `threadcreate`, `trace`
- Default: `cpu`
- Only used with `--profile-file`, ignored for server-based profiling
- Can also use `ATMOS_PROFILE_TYPE` environment variable
### Performance Heatmap Flags
- `--heatmap`
-
Display performance heatmap visualization after command execution.
- Default: `false`
- Shows function call counts, execution times, and performance metrics
- Automatically tracks function execution with microsecond precision
- Includes P95 latency calculations using High Dynamic Range histograms
- Displays interactive TUI if terminal is available, otherwise static output
- `--heatmap-mode`
-
Visualization mode for the performance heatmap.
- Options: `bar`, `ascii`, `sparkline`, `table`
- Default: `bar`
- `bar`: Colored horizontal bar chart with function names and durations
- `ascii`: Color-coded ASCII bars (Red >1ms, Orange >500µs, Yellow >100µs, Green <100µs)
- `sparkline`: Compact sparklines showing relative performance
- `table`: Interactive table with sortable columns
- Only used with `--heatmap` flag
## Environment Variables
All global flags can be set using environment variables. The precedence order is:
1. Command-line flags (the highest priority)
2. Environment variables
3. Configuration file (`atmos.yaml`)
4. Default values (lowest priority)
### Core Environment Variables
- `ATMOS_BASE_PATH`
- Sets the base path for the Atmos project
- `ATMOS_LOGS_LEVEL`
- Sets the logging level
- `ATMOS_LOGS_FILE`
- Sets the log file location
- `ATMOS_COLOR` / `COLOR`
-
Enable or disable colored output.
- Set to `true` to enable color (default)
- Set to `false` to disable color
- Both `ATMOS_COLOR` and `COLOR` are supported for maximum portability
- `ATMOS_NO_COLOR` / `NO_COLOR`
-
Disable colored output (any non-empty value disables color).
- `NO_COLOR` is a standard environment variable supported by many CLI tools (https://no-color.org/)
- Maintained for portability across different systems and CI/CD environments
- Takes precedence over `ATMOS_COLOR`/`COLOR` settings
- Both `ATMOS_NO_COLOR` and `NO_COLOR` are fully supported
- `ATMOS_PAGER` / `PAGER`
-
Configure pager settings.
- `PAGER` is a standard Unix environment variable maintained for portability
- Both `ATMOS_PAGER` and `PAGER` are supported to ensure compatibility across different systems
- `ATMOS_PROFILER_ENABLED`
- Enable the pprof HTTP profiling server
- `ATMOS_PROFILER_HOST`
- Set the host address for the profiling server
- `ATMOS_PROFILER_PORT`
- Set the port for the profiling server
- `ATMOS_PROFILE_FILE`
- Set the file path for file-based profiling
- `ATMOS_PROFILE_TYPE`
- Set the profile type for file-based profiling (cpu, heap, allocs, goroutine, block, mutex, threadcreate, trace)
## Portability Notes
Atmos supports both standard and Atmos-prefixed environment variables to ensure maximum portability:
- **Standard Variables** (`NO_COLOR`, `COLOR`, `PAGER`): Work across many CLI tools and Unix systems
- **Atmos Variables** (`ATMOS_NO_COLOR`, `ATMOS_COLOR`, `ATMOS_PAGER`): Provide namespace isolation when needed
This dual support ensures your scripts and CI/CD pipelines work consistently across different environments without modification.
## Examples
### Basic Usage
```bash
# Disable color and pager for CI environment
atmos describe config --no-color --pager=off
# Use specific pager with custom log level
atmos describe stacks --pager=less --logs-level=Debug
# Multiple config files with base path
atmos --base-path=/infrastructure \
--config=base.yaml \
--config=override.yaml \
terraform plan vpc -s prod
```
### Pager Control Examples
```bash
# Enable pager (multiple ways)
atmos describe config --pager # Enable with default pager
atmos describe config --pager=true # Explicitly enable
atmos describe config --pager=less # Use specific pager
ATMOS_PAGER=true atmos describe config # Via environment variable
# Disable pager (explicit)
atmos describe config --pager=false # Explicitly disable
atmos describe config --pager=off # Alternative syntax
ATMOS_PAGER=false atmos describe config # Via environment variable
# Disable pager using NO_PAGER (standard CLI convention)
NO_PAGER=1 atmos describe config # Standard way to disable pager
export NO_PAGER=1; atmos describe config # Set for entire session
# Default behavior (no flag = pager disabled)
atmos describe config # Pager is OFF by default
```
### Color Control Examples
```bash
# Multiple ways to disable color
atmos describe config --no-color # Using flag
NO_COLOR=1 atmos describe config # Using NO_COLOR standard
ATMOS_NO_COLOR=1 atmos describe config # Using ATMOS_NO_COLOR
ATMOS_COLOR=false atmos describe config # Using ATMOS_COLOR
COLOR=false atmos describe config # Using COLOR
# Explicitly enable color (overrides config file setting)
ATMOS_COLOR=true atmos describe config
```
### Environment Variable Usage
```bash
# Set environment variables
export ATMOS_PAGER=off
export ATMOS_COLOR=false
export ATMOS_LOGS_LEVEL=Debug
# Commands will use these settings
atmos describe config
```
### CI/CD Configuration
```bash
# Typical CI/CD settings
export ATMOS_NO_COLOR=true
export ATMOS_PAGER=off
export ATMOS_LOGS_LEVEL=Warning
export ATMOS_LOGS_FILE=/var/log/atmos.log
# Run commands without interactive features
atmos terraform apply --auto-approve
```
### Profiling Examples
```bash
# File-based CPU profiling (default profile type)
atmos terraform plan vpc -s prod --profile-file=cpu.prof
# File-based memory heap profiling
atmos terraform plan vpc -s prod --profile-file=heap.prof --profile-type=heap
# File-based execution trace profiling
atmos terraform plan vpc -s prod --profile-file=trace.out --profile-type=trace
# Server-based profiling for interactive analysis
atmos terraform apply vpc -s prod --profiler-enabled --profiler-port=8080
# Environment variable configuration
export ATMOS_PROFILE_FILE=debug.prof
export ATMOS_PROFILE_TYPE=goroutine
atmos describe stacks
# Multiple profile types for comprehensive analysis
atmos terraform plan vpc -s prod --profile-file=cpu.prof --profile-type=cpu
atmos terraform plan vpc -s prod --profile-file=heap.prof --profile-type=heap
atmos terraform plan vpc -s prod --profile-file=trace.out --profile-type=trace
```
### CI/CD Portability Example
```bash
# These environment variables work across many tools, not just Atmos
export NO_COLOR=1 # Disables color in Atmos and other NO_COLOR-compliant tools
export ATMOS_PAGER=off # Properly disables paging in Atmos
# Run various CLI tools - all respect the same env vars
atmos describe config
terraform plan
kubectl get pods
```
When output is piped to another command, Atmos automatically disables color output and pager to ensure
compatibility:
```bash
# Color and pager automatically disabled
atmos describe stacks | grep production
```
## See Also
- [CLI Configuration](/cli/configuration) - Detailed configuration file reference
- [Terminal Settings](/cli/configuration/terminal) - Terminal-specific configuration options
- [Environment Variables](/cli/configuration#environment-variables) - Complete environment variable reference
---
## Atmos Manifest JSON Schema
import Terminal from '@site/src/components/Terminal'
import Intro from '@site/src/components/Intro'
[Atmos Manifest JSON Schema](pathname:///schemas/atmos/atmos-manifest/1.0/atmos-manifest.json) can be used to validate Atmos stack manifests and provide auto-completion.
### Validate and Auto-Complete Atmos Manifests in IDEs
In supported editors like [JetBrains IDEs](https://www.jetbrains.com/), [Microsoft Visual Studio](https://visualstudio.microsoft.com/)
or [Visual Studio Code](https://code.visualstudio.com/), the schema can offer auto-completion and validation to ensure that Atmos stack manifests, and
all sections in them, are
correct.
:::tip
A list of editors that support validation using [JSON Schema](https://json-schema.org/) can be
found [here](https://json-schema.org/implementations#editors).
:::
### Validate Atmos Manifests on the Command Line
Atmos can use the [Atmos Manifest JSON Schema](pathname:///schemas/atmos/atmos-manifest/1.0/atmos-manifest.json) to validate Atmos stack manifests on the
command line by executing the command [`atmos validate stacks`](/cli/commands/validate/stacks).
For this to work, configure the following:
- Add the _optional_ [Atmos Manifest JSON Schema](pathname:///schemas/atmos/atmos-manifest/1.0/atmos-manifest.json) to your repository, for example
in `stacks/schemas/atmos/atmos-manifest/1.0/atmos-manifest.json`. If not specified, Atmos will default to the [schema](pathname:///schemas/atmos/atmos-manifest/1.0/atmos-manifest.json) corresponding to the currently installed version of Atmos.
- Configure the following section in the `atmos.yaml` [CLI config file](/cli/configuration)
```yaml title="atmos.yaml"
# Validation schemas (for validating atmos stacks and components)
schemas:
# JSON Schema to validate Atmos manifests
atmos:
# Can also be set using 'ATMOS_SCHEMAS_ATMOS_MANIFEST' ENV var, or '--schemas-atmos-manifest' command-line arguments
# Supports both absolute and relative paths (relative to the `base_path` setting in `atmos.yaml`)
manifest: "stacks/schemas/atmos/atmos-manifest/1.0/atmos-manifest.json"
```
- Execute the command [`atmos validate stacks`](/cli/commands/validate/stacks)
- Instead of configuring the `schemas.atmos.manifest` section in `atmos.yaml`, you can provide the path to the Atmos Manifest JSON Schema file by
using the ENV variable `ATMOS_SCHEMAS_ATMOS_MANIFEST` or the `--schemas-atmos-manifest` command line argument:
```shell
ATMOS_SCHEMAS_ATMOS_MANIFEST=stacks/schemas/atmos/atmos-manifest/1.0/atmos-manifest.json atmos validate stacks
atmos validate stacks --schemas-atmos-manifest stacks/schemas/atmos/atmos-manifest/1.0/atmos-manifest.json
```
In case of any validation errors (invalid YAML syntax, Atmos manifest JSON Schema errors, invalid imports, etc.), you'll get an output from the
command similar to the following:
```text
Atmos manifest JSON Schema validation error in the
file 'catalog/invalid-yaml-and-schema/invalid-import-5.yaml':
{
"valid": false,
"errors": [
{
"keywordLocation": "",
"absoluteKeywordLocation": "tests/fixtures/scenarios/complete/schemas/atmos/atmos-manifest/1.0/atmos-manifest.json#",
"instanceLocation": "",
"error": "doesn't validate with tests/fixtures/scenarios/complete/schemas/atmos/atmos-manifest/1.0/atmos-manifest.json#"
},
{
"keywordLocation": "/properties/import/$ref",
"absoluteKeywordLocation": "tests/fixtures/scenarios/complete/schemas/atmos/atmos-manifest/1.0/atmos-manifest.json#/properties/import/$ref",
"instanceLocation": "/import",
"error": "doesn't validate with '/definitions/import'"
},
{
"keywordLocation": "/properties/import/$ref/type",
"absoluteKeywordLocation": "tests/fixtures/scenarios/complete/schemas/atmos/atmos-manifest/1.0/atmos-manifest.json#/definitions/import/type",
"instanceLocation": "/import",
"error": "expected array, but got object"
}
]
}
Atmos manifest JSON Schema validation error in the
file 'catalog/invalid-yaml-and-schema/invalid-schema-8.yaml':
{
"valid": false,
"errors": [
{
"keywordLocation": "",
"absoluteKeywordLocation": "tests/fixtures/scenarios/complete/schemas/atmos/atmos-manifest/1.0/atmos-manifest.json#",
"instanceLocation": "",
"error": "doesn't validate with tests/fixtures/scenarios/complete/schemas/atmos/atmos-manifest/1.0/atmos-manifest.json#"
},
{
"keywordLocation": "/properties/env/$ref",
"absoluteKeywordLocation": "tests/fixtures/scenarios/complete/schemas/atmos/atmos-manifest/1.0/atmos-manifest.json#/properties/env/$ref",
"instanceLocation": "/env",
"error": "doesn't validate with '/definitions/env'"
},
{
"keywordLocation": "/properties/env/$ref/type",
"absoluteKeywordLocation": "tests/fixtures/scenarios/complete/schemas/atmos/atmos-manifest/1.0/atmos-manifest.json#/definitions/env/type",
"instanceLocation": "/env",
"error": "expected object, but got array"
}
]
}
no matches found for the import 'globals/tenant1-globals-does-not-exist' in the
file 'catalog/invalid-yaml-and-schema/invalid-import-1.yaml'
invalid import in the file 'catalog/invalid-yaml-and-schema/invalid-import-2.yaml'
The file imports itself in 'catalog/invalid-yaml-and-schema/invalid-import-2'
invalid stack manifest 'catalog/invalid-yaml-and-schema/invalid-yaml-1.yaml'
yaml: line 15: found unknown directive name
invalid stack manifest 'catalog/invalid-yaml-and-schema/invalid-yaml-3.yaml'
yaml: line 13: did not find expected key
invalid stack manifest 'catalog/invalid-yaml-and-schema/invalid-yaml-5.yaml'
yaml: mapping values are not allowed in this context
invalid stack manifest 'catalog/invalid-yaml-and-schema/invalid-yaml-6.yaml'
yaml: line 2: block sequence entries are not allowed in this context
invalid stack manifest 'catalog/invalid-yaml-and-schema/invalid-yaml-7.yaml'
yaml: line 4: could not find expected ':'
```
## References
- https://json-schema.org
- https://json-schema.org/draft/2020-12/release-notes
- https://www.schemastore.org/json
- https://github.com/SchemaStore/schemastore
- https://www.jetbrains.com/help/idea/json.html#ws_json_using_schemas
- https://code.visualstudio.com/docs/languages/json
---
## Telemetry
import Terminal from '@site/src/components/Terminal'
import Intro from '@site/src/components/Intro'
import File from '@site/src/components/File'
Atmos collects **anonymous telemetry** to help improve the product by understanding how it's used.
This data helps us identify which features are most valuable and where we can make improvements.
### What Data is Collected
Atmos collects the following anonymous information:
- **Command Usage**: Tracks which Atmos commands are executed (e.g., `atmos describe`, `atmos terraform`, `atmos helmfile`)
- **Error Reports**: Captures anonymized error messages and exit codes to help identify and fix issues
- **System Details**: Includes OS, CPU architecture, Atmos version, and other diagnostic metadata
- **CI Provider information**: If Atmos is running as part of CI workflow, CI provider name
:::info Privacy First
We **never** collect:
- Personal information (names, emails, IP addresses)
- Your actual configuration files or stack manifests
- Sensitive data or secrets
- Repository contents or code
:::
### Atmos Pro Users
If you're using [**Atmos Pro**](https://atmos-pro.com), Atmos includes your **Workspace ID** with telemetry. This allows us to associate usage with your account and better support your team by understanding adoption and usage patterns.
### How Telemetry Works
Telemetry data is collected locally and sent securely to [PostHog](https://posthog.com/) analytics service. The data is:
- **Anonymous**: No personally identifiable information is included
- **Secure**: Transmitted over HTTPS with encryption
- **Minimal**: Only essential usage data is collected
- **Transparent**: You can see exactly what's being collected
### Opting Out of Telemetry
You can disable telemetry collection in any of the following ways:
Add the following to your `atmos.yaml` configuration file:
```yaml
settings:
telemetry:
enabled: false
```
or set environment variable `ATMOS_TELEMETRY_ENABLED` to `false`
### Collect your own telemetry
You can switch telemetry to your own [PostHog](https://posthog.com/) account:
Add the following to your `atmos.yaml` configuration file:
```yaml
settings:
telemetry:
enabled: true
token: {provide your posthog token}
endpoint: {provide your posthog endpoint}
```
or set environment variables `ATMOS_TELEMETRY_TOKEN` and `ATMOS_TELEMETRY_ENDPOINT` to your own values
### Telemetry Logging Configuration
By default, PostHog internal logging messages are suppressed to prevent cluttering your terminal output. If you need to debug telemetry issues, you can enable PostHog internal logging:
```yaml
settings:
telemetry:
logging: true # Enable PostHog internal debug messages (default: false)
```
or set environment variable `ATMOS_TELEMETRY_LOGGING` to `true`
:::tip
PostHog logging is useful for debugging telemetry connection issues or when configuring your own PostHog instance. When enabled, PostHog internal messages will be routed through Atmos logging at the DEBUG level.
:::
---
## Atmos Versioning
import Intro from '@site/src/components/Intro'
Atmos follows the Semantic Versioning (SemVer) convention: major.minor.patch.
Incompatible changes increment the major version, adding backwards-compatible functionality increments the minor version,
and backwards-compatible bug fixes increment the patch version.
## Release Schedule
### Major Release
A major release will be published when there is a breaking change introduced in `atmos`.
Several release candidates will be published prior to a major release in order to get feedback before the final release.
An outline of what is changing and why will be included with the release candidates.
### Minor Release
A minor release will be published when a new feature is added or changes that are non-breaking are introduced.
We will heavily test any changes so that we are confident with the release, but with new code comes the potential for new issues.
### Patch Release
A patch release will be published when bug fixes were included, but no breaking changes were introduced.
To ensure patch releases can fix existing code without introducing new issues from the new features, patch releases will always be published prior to
a minor release.
## Changelog
To see a list of all notable changes to `atmos` please refer to
the changelog.
It contains an ordered list of all bug fixes and new features under each release.
---
## Community
import DocCardList from '@theme/DocCardList'
import Intro from '@site/src/components/Intro'
# Community Resources
Need help? Join the community!
Atmos has a great community of active users who are all more than willing to help each other out. So, join us!
Found a bug or issue? Please report it in [our issue tracker](https://github.com/cloudposse/atmos/issues)
:::tip Join us on Office Hours
We hold ["office hours" every Wednesday at 11:30am PST](/community/office-hours).
:::
Are you more into email? Sign up for [Cloud Posse's Weekly Newsletter](https://newsletter.cloudposse.com) to get the latest news about things happening in our community and other news about building Open Source infrastructure—straight into your inbox.
---
## Office Hours
import HubspotForm from 'react-hubspot-form'
# Office Hours Registration
console.log('Submit!')}
onReady={(form) => console.log('Form ready!')}
loading={Loading...}
/>
---
## #atmos
## Join our Slack Community!
Atmos has a great community of active users who are all more than willing to help each other out. So, join us!
---
## Code of Conduct
import Intro from '@site/src/components/Intro'
As contributors and maintainers of the Atmos project by [Cloud Posse](https://cloudposse.com), we pledge to respect everyone who contributes by posting issues, updating documentation, submitting pull requests, providing feedback in comments, and any other activities.
Communication through any of Cloud Posse's channels ([GitHub](https://github.com/cloudposse), [Slack](https://slack.cloudposse.com), [mailing lists](https://cloudposse.com/newsletter), [Twitter](https://twitter.com/cloudposse), etc.) must be constructive and never resort to personal attacks, trolling, public or private harassment, insults, or other unprofessional conduct.
We promise to extend courtesy and respect to everyone involved in this project regardless of gender, gender identity,
sexual orientation, disability, age, race, ethnicity, religion, or level of experience. We expect anyone contributing to the Atmos project to do the same.
If any member of the community violates this code of conduct, the maintainers of the Atmos project may take action,
removing issues, comments, and PRs or blocking accounts as deemed appropriate.
---
## Contributing
import DocCardList from '@theme/DocCardList'
---
## How to Contribute
Thanks for the interest in contributing to the Atmos project!
## Contributing Etiquette
Please see the [Contributor Code of Conduct](/contribute/coc) for information on the rules of conduct.
## Creating an Issue
- It is required that you clearly describe the steps necessary to reproduce the issue you are running into. Although we would love to help our users
as much as possible, diagnosing issues without clear reproduction steps is extremely time-consuming and simply not sustainable.
- The issue list of the [atmos](https://github.com/cloudposse/atmos) repository is exclusively for bug reports and feature requests. Non-conforming
issues will be closed immediately.
- Issues with no clear steps to reproduce will not be triaged. If an issue is labeled with "needs: reply" and receives no further replies from the
author of the issue for more than 14 days, it will be closed.
- If you think you have found a bug, or have a new feature idea, please start by making sure it hasn't already
been [reported](https://github.com/cloudposse/atmos/issues?utf8=%E2%9C%93&q=is%3Aissue). You can search through existing issues to see if there is a
similar one reported. Include closed issues as it may have been closed with a solution.
- Next, [create a new issue](https://github.com/cloudposse/atmos/issues/new/choose) that thoroughly explains the problem. Please fill out the
populated issue form before submitting the issue.
## Creating a Good Code Reproduction
### What is a Code Reproduction?
A code reproduction is a small application that demonstrates a particular issue. The code reproduction should contain the minimum amount of code needed to reproduce the issue and should focus on a single issue.
### Why Should You Create a Reproduction?
A code reproduction of the issue you are experiencing helps us better isolate the cause of the problem. This is an important first step to getting any bug fixed!
Without a reliable code reproduction, it is unlikely we will be able to resolve the issue, leading to it being closed. In other words, creating a code reproduction of the issue helps us help you.
## Creating a Pull Request
- We appreciate you taking the time to contribute! Before submitting a pull request, we ask that you please [create an issue](#creating-an-issue) explaining the bug or feature request and let us know that you plan on making a pull request. If an issue already exists, please comment on that issue letting us know you would like to submit a pull request for it. This helps us to keep track of the pull request and make sure there isn't duplicated effort.
- Looking for an issue to fix? Make sure to look through our issues with the [help wanted](https://github.com/cloudposse/atmos/issues?q=is%3Aopen+is%3Aissue+label%3A%22help+wanted%22) label!
## License
By contributing your code to the `cloudposse/atmos` GitHub Repository, you agree to license your contribution under
the [Apache license](http://www.apache.org/licenses).
---
## Component Library
import Intro from '@site/src/components/Intro'
A component library is a collection of reusable "components" that are reused any number of times from within [Stacks](/core-concepts/stacks). It's helpful to think of these "building blocks" as the essentials of infrastructure, like VPCs, clusters or databases. They should all be kept in a library.
:::tip
Get a head start by utilizing Cloud Posse's free [Terraform components for AWS](https://github.com/cloudposse/terraform-aws-components), available on GitHub.
:::
## Use-cases
- **Developer Productivity** Create a component library of vetted terraform root modules that should be used by teams anytime they need to spin
up infrastructure for VPCs, clusters, and databases.
- **Compliance and Governance:** Establish a component library to enforce infrastructure standards, security policies, and compliance requirements.
By using pre-approved modules, organizations can maintain control over their infrastructure's configuration, reducing the risk of non-compliance.
- **Rapid Prototyping and Scalability:** Utilize a component library to quickly prototype and scale applications. Pre-built modules for common
infrastructure patterns allow teams to focus on application development rather than infrastructure setup, accelerating time-to-market and ensuring scalability from the outset.
## Filesystem Layouts
There's no "one way" to organize your components, since it's configurable based on your needs in the [CLI Configuration](/cli/configuration). However, here are some popular ways we've seen components organized.
### Simple Filesystem Layout by Toolchain
By convention, we recommend placing components in a folder organized by the tool, within the `components/` folder.
In the following example, our toolchain consists of `docker`, `helmfile` and `terraform`, so a folder is created for each one, with the code
for that component inside of it.
If using `terraform` with multiple clouds, use the [multi-cloud filesystem layout](#multi-cloud-filesystem-layout).
```console
└── components/
├── docker/
│ └── Dockerfile
├── helmfile/
│ └── example-app
│ └── helmfile.yaml
└── terraform/
└── example/ # This is a terraform "root" module
├── main.tf
├── outputs.tf
├── modules/ # You can include submodules inside the component folder,
│ ├── bar/ # and then reference them inside the of your root module.
│ └── foo/ # e.g.
│ ├── main.tf # module "foo" {
│ ├── outputs.tf # source = "./modules/foo"
│ └── variables.tf # ...
└── variables.tf # }
```
:::tip
Organizing the components on the filesystem is configurable in the [Atmos CLI configuration](/cli/configuration/#configuration-file-atmosyaml).
:::
### Multi-Cloud Filesystem Layout
One good way to organize components is by the cloud provider for multi-cloud architectures.
For example, if an architecture consists of infrastructure in AWS, GCP, and Azure, it would look like this:
```console
└── components/
└── terraform/
├── aws/ # Components for Amazon Web Services (AWS)
│ └── example/
│ ├── main.tf
│ ├── outputs.tf
│ └── variables.tf
├── gcp/ # Components for Google Cloud (GCP)
│ └── example/
│ ├── main.tf
│ ├── outputs.tf
│ └── variables.tf
└── azure/ # Components for Microsoft Azure (Azure)
└── example/
├── main.tf
├── outputs.tf
└── variables.tf
```
## Terraform Conventions
For terraform, we recommend placing the terraform "root" modules in the `components/terraform` folder. If the root modules depend on other child modules that are not hosted by a registry, we recommend placing them in a subfolder called `modules/`.
Make your Terraform components small, so they are easily reusable, but not so small that they only do to provide a single resource, which results in large, complicated configurations. A good rule of thumb is they should do one thing well. For example, provision a VPC along with all the subnets, NAT gateways, Internet gateways, NACLs, etc.
Use multiple component to break infrastructure apart into smaller pieces based on how their lifecycles are connected. For example, a single component seldom provides a VPC and a Kubernetes cluster. That's because we should be able to destroy the Kubernetes cluster without destroying the VPC and all the other resources provisioned inside of the VPC (e.g. databases). The VPC, Kubernetes cluster and Databases all have different lifecycles. Similarly, we should be able to deploy a database and destroy it without also destroying all associated backups. Therefore the backups of a database should be a separate component from the database itself.
---
## Atmos Components
import Intro from '@site/src/components/Intro'
When you design cloud architectures with Atmos, you start by breaking them apart into pieces called components. Then, you [implement Terraform "root modules"](/core-concepts/components/terraform) for each of those components, and [compose them with Stack configurations](/core-concepts/stacks).
The most common use-case for Atmos is using implementing components using [Terraform "root modules"](https://developer.hashicorp.com/terraform/language/modules#the-root-module). But since Atmos was designed to be tool-agnostic, [custom commands](/core-concepts/custom-commands) can be used to implement components for any type of tooling.
Components can be as small as you'd like (but we don't recommend too small), or as large as a [Terralith](/terms/terralith) (but we don't recommend that either). See our [best practices for components](/best-practices/components) to get a sense of what we recommend.
:::tip
Typical components of an architecture are things like VPCs, clusters, databases, buckets, load balancers, and applications. Implement components using [Terraform "root" modules](https://developer.hashicorp.com/terraform/language/modules#the-root-module).
:::
## Use-cases
Components offer a multitude of applications across various business scenarios. Cloud Posse publishes its AWS components for free, so you can see some [technical use-cases for Terraform components](https://docs.cloudposse.com/components/category/aws/).
- **Accelerate Development Cycles:** By reusing components, development teams can significantly shorten the time from concept to deployment, facilitating faster product iterations and quicker responses to market changes.
- **Security policies and compliance controls** DevOps and SecOps teams implement components to uniformly apply security policies and compliance controls across all cloud environments, ensuring regulatory adherence.
- **Enhance Collaboration Across Teams:** Components foster a shared understanding and approach to infrastructure, promoting collaboration between development, operations, and security teams, leading to more cohesive and secure product development.
## Flavors of Components
Atmos natively supports two kinds of components, but using [custom commands](/core-concepts/custom-commands), the [CLI](/cli) can be extended to support anything (e.g. `docker`, `packer`, `ansible`, etc.)
1. [Terraform](/core-concepts/components/terraform): These are stand-alone "root modules" that implement some piece of your infrastructure. For example, typical components might be an
EKS cluster, RDS cluster, EFS filesystem, S3 bucket, DynamoDB table, etc. You can find
the [full library of SweetOps Terraform components on GitHub](https://github.com/cloudposse/terraform-aws-components). By convention, we store
components in the `components/terraform/` directory within the infrastructure repository.
2. [Helmfiles](/core-concepts/components/helmfile): These are stand-alone applications deployed using [`helmfile`](https://github.com/helmfile) to Kubernetes. For example, typical
helmfiles might deploy the DataDog agent, `cert-manager` controller, `nginx-ingress` controller, etc. By convention, we store these types of components in the `components/helmfile/` directory within the infrastructure repository.
## Terraform Components
One important distinction about components that is worth noting about Terraform components is they should be opinionated Terraform "root" modules that typically call other child modules. Components are the building blocks of your infrastructure. This is where you define all the business logic for provisioning some common piece of infrastructure like ECR repos (with the [ecr](https://github.com/cloudposse/terraform-aws-components/tree/main/modules/ecr) component) or EKS clusters (with the [eks/cluster](https://github.com/cloudposse/terraform-aws-components/tree/main/modules/eks/cluster) component). Our convention is to stick Terraform components in the `components/terraform/` directory.
---
## Using Helmfiles
import Intro from '@site/src/components/Intro'
Atmos natively supports opinionated workflows for [Helmfile](https://github.com/helmfile/helmfile). Helmfile provides a declarative specification for deploying helm charts.
For a complete list of supported commands, please see the Atmos [helmfile](/cli/commands/helmfile/usage) documentation.
## Example: Provision Helmfile Component
To provision a helmfile component using the `atmos` CLI, run the following commands in the container shell:
```shell
atmos helmfile diff nginx-ingress --stack=ue2-dev
atmos helmfile apply nginx-ingress --stack=ue2-dev
```
where:
- `nginx-ingress` is the helmfile component to provision (from the `components/helmfile` folder)
- `--stack=ue2-dev` is the stack to provision the component into
Short versions of the command-line arguments can be used:
```shell
atmos helmfile diff nginx-ingress -s ue2-dev
atmos helmfile apply nginx-ingress -s ue2-dev
```
## Example: Helmfile Diff
To execute `diff` and `apply` in one step, use `helmfile deploy` command:
```shell
atmos helmfile deploy nginx-ingress -s ue2-dev
```
---
## Terraform/OpenTofu Backends
import Terminal from '@site/src/components/Terminal'
import Intro from '@site/src/components/Intro'
Backends define where [Terraform](https://opentofu.org/docs/language/state/) and
[OpenTofu](https://opentofu.org/docs/language/state/) store its state.
Atmos supports all the backends supported by Terraform:
- [local](https://developer.hashicorp.com/terraform/language/settings/backends/local)
- [s3](https://developer.hashicorp.com/terraform/language/settings/backends/s3)
- [azurerm](https://developer.hashicorp.com/terraform/language/settings/backends/azurerm)
- [gcs](https://developer.hashicorp.com/terraform/language/settings/backends/gcs)
- [remote](https://developer.hashicorp.com/terraform/language/settings/backends/remote)
- [consul](https://developer.hashicorp.com/terraform/language/settings/backends/consul)
- [cos](https://developer.hashicorp.com/terraform/language/settings/backends/cos)
- [http](https://developer.hashicorp.com/terraform/language/settings/backends/http)
- [kubernetes](https://developer.hashicorp.com/terraform/language/settings/backends/kubernetes)
- [oss](https://developer.hashicorp.com/terraform/language/settings/backends/oss)
- [pg](https://developer.hashicorp.com/terraform/language/settings/backends/pg)
- [cloud](https://developer.hashicorp.com/terraform/cli/cloud/settings)
Atmos supports all the backends supported by OpenTofu:
- [local](https://opentofu.org/docs/language/settings/backends/local)
- [s3](https://opentofu.org/docs/language/settings/backends/s3)
- [azurerm](https://opentofu.org/docs/language/settings/backends/azurerm)
- [gcs](https://opentofu.org/docs/language/settings/backends/gcs)
- [remote](https://opentofu.org/docs/language/settings/backends/remote)
- [consul](https://opentofu.org/docs/language/settings/backends/consul)
- [cos](https://opentofu.org/docs/language/settings/backends/cos)
- [http](https://opentofu.org/docs/language/settings/backends/http)
- [kubernetes](https://opentofu.org/docs/language/settings/backends/kubernetes)
- [oss](https://opentofu.org/docs/language/settings/backends/oss)
- [pg](https://opentofu.org/docs/language/settings/backends/pg)
## Local Backend
By default, Terraform will use a backend called [local](https://developer.hashicorp.com/terraform/language/settings/backends/local), which stores
Terraform state on the local filesystem, locks that state using system APIs, and performs operations locally.
Terraform's local backend is designed for development and testing purposes and is generally not recommended for production use. There are several reasons why using the local backend in a production environment may not be suitable:
- **Not Suitable for Collaboration**: Local backend doesn't support easy state sharing.
- **No Concurrency and Locking**: Local backend lacks locking, leading to race conditions when multiple users modify the state.
- **Lacks Durability and Backup**: Local backend has no durability or backup. Machine failures can lead to data loss.
- **Unsuitable for CI/CD**: Local backend isn't ideal for CI/CD pipelines.
To address these concerns, it's recommended to use one of the supported remote backends, such as Amazon S3, Azure Storage, Google Cloud Storage, HashiCorp Consul, or Terraform Cloud, for production environments. Remote backends provide better scalability, collaboration support, and durability, making them more suitable for managing infrastructure at scale in production environments.
## AWS S3 Backend
Terraform's [S3](https://developer.hashicorp.com/terraform/language/settings/backends/s3) backend is a popular remote
backend for storing Terraform state files in an Amazon Simple Storage Service (S3) bucket. Using S3 as a backend offers
many advantages, particularly in production environments.
To configure Terraform to use an S3 backend, you typically provide the S3 bucket name and an optional key prefix in your Terraform configuration.
Here's a simplified example:
```hcl
terraform {
backend "s3" {
acl = "bucket-owner-full-control"
bucket = "your-s3-bucket-name"
key = "path/to/terraform.tfstate"
region = "your-aws-region"
encrypt = true
dynamodb_table = "terraform_locks"
}
}
```
In the example, `terraform_locks` is a DynamoDB table used for state locking. DynamoDB is recommended for locking when using the S3 backend to ensure
safe concurrent access.
Once the S3 bucket and DynamoDB table are provisioned, you can start using them to store Terraform state for the Terraform components.
There are two ways of doing this:
- Manually create `backend.tf` file in each component's folder with the following content:
```hcl
terraform {
backend "s3" {
acl = "bucket-owner-full-control"
bucket = "your-s3-bucket-name"
dynamodb_table = "your-dynamodb-table-name"
encrypt = true
key = "terraform.tfstate"
region = "your-aws-region"
role_arn = "arn:aws:iam::xxxxxxxx:role/IAM Role with permissions to access the Terraform backend"
workspace_key_prefix = "component name, e.g. `vpc` or `vpc-flow-logs-bucket`"
}
}
```
- Configure Terraform S3 backend with Atmos to automatically generate a backend file for each Atmos component. This is the recommended way
of configuring Terraform state backend since it offers many advantages and will save you from manually creating a backend configuration file for
each component
Configuring Terraform S3 backend with Atmos consists of three steps:
- Set `auto_generate_backend_file` to `true` in the `atmos.yaml` CLI config file in the `components.terraform` section:
```yaml
components:
terraform:
# Can also be set using 'ATMOS_COMPONENTS_TERRAFORM_AUTO_GENERATE_BACKEND_FILE' ENV var, or '--auto-generate-backend-file' command-line argument
auto_generate_backend_file: true
```
- Configure the S3 backend in one of the `_defaults.yaml` manifests. You can configure it for the entire Organization, or per OU/tenant, or per
region, or per account.
:::note
The `_defaults.yaml` stack manifests contain the default settings for Organizations, Organizational Units, and accounts.
:::
:::info
The `_defaults.yaml` stack manifests are not imported into other Atmos manifests automatically.
You need to explicitly import them using [imports](/core-concepts/stacks/imports).
:::
To configure the S3 backend for the entire Organization, add the following config in `stacks/orgs/acme/_defaults.yaml`:
```yaml
terraform:
backend_type: s3
backend:
s3:
acl: "bucket-owner-full-control"
encrypt: true
bucket: "your-s3-bucket-name"
dynamodb_table: "your-dynamodb-table-name"
key: "terraform.tfstate"
region: "your-aws-region"
role_arn: "arn:aws:iam::xxxxxxxx:role/IAM Role with permissions to access the Terraform backend"
```
- (This step is optional) For each component, you can add `workspace_key_prefix` similar to the following:
```yaml
components:
terraform:
# `vpc` is the Atmos component name
vpc:
# Optional backend configuration for the component
backend:
s3:
workspace_key_prefix: vpc
metadata:
# Point to the Terraform component
component: vpc
settings: {}
vars: {}
env: {}
```
Note that this is optional. If you don’t add `backend.s3.workspace_key_prefix` to the component manifest, the Atmos component name will be used
automatically (which is this example is `vpc`). `/` (slash) in the Atmos component name will be replaced with `-` (dash).
We usually don’t specify `workspace_key_prefix` for each component and let Atmos use the component name as `workspace_key_prefix`.
Once all the above is configured, when you run the commands `atmos terraform plan vpc -s `
or `atmos terraform apply vpc -s `, before executing the Terraform commands, Atmos will [deep-merge](#backend-inheritance)
the backend configurations from the `_defaults.yaml` manifest and from the component itself, and will generate a backend
config JSON file `backend.tf.json` in the component's folder, similar to the following example:
```json
{
"terraform": {
"backend": {
"s3": {
"acl": "bucket-owner-full-control",
"bucket": "your-s3-bucket-name",
"dynamodb_table": "your-dynamodb-table-name",
"encrypt": true,
"key": "terraform.tfstate",
"region": "your-aws-region",
"role_arn": "arn:aws:iam::xxxxxxxx:role/IAM Role with permissions to access the Terraform backend",
"workspace_key_prefix": "vpc"
}
}
}
}
```
You can also generate the backend configuration file for a component in a stack by executing the
command [atmos terraform generate backend](/cli/commands/terraform/generate-backend). Or generate the backend configuration files for all components
by executing the command [atmos terraform generate backends](/cli/commands/terraform/generate-backends).
## Azure Blob Storage Backend
[`azurerm`](https://developer.hashicorp.com/terraform/language/settings/backends/azurerm) backend stores the state as a
Blob with the given Key within the Blob Container within the Blob Storage Account. This backend supports state locking
and consistency checking with Azure Blob Storage native capabilities.
To configure the [Azure Blob Storage backend](https://developer.hashicorp.com/terraform/language/settings/backends/azurerm)
in Atmos, add the following config to an Atmos manifest in `_defaults.yaml`:
```yaml
terraform:
backend_type: azurerm
backend:
azurerm:
resource_group_name: "StorageAccount-ResourceGroup"
storage_account_name: "abcd1234"
container_name: "tfstate"
# Other parameters
```
For each component, you can optionally add the `key` parameter similar to the following:
```yaml
components:
terraform:
my-component:
# Optional backend configuration for the component
backend:
azurerm:
key: "my-component"
```
If the `key` is not specified for a component, Atmos will use the component name (`my-component` in the example above)
to auto-generate the `key` parameter in the format `.terraform.tfstate` replacing ``
with the Atmos component name. In ``, all occurrences of `/` (slash) will be replaced with `-` (dash).
If `auto_generate_backend_file` is set to `true` in the `atmos.yaml` CLI config file in the `components.terraform` section,
Atmos will [deep-merge](#backend-inheritance) the backend configurations from the `_defaults.yaml` manifests and
from the component itself, and will generate a backend config JSON file `backend.tf.json` in the component's folder,
similar to the following example:
```json
{
"terraform": {
"backend": {
"azurerm": {
"resource_group_name": "StorageAccount-ResourceGroup",
"storage_account_name": "abcd1234",
"container_name": "tfstate",
"key": "my-component.terraform.tfstate"
}
}
}
}
```
## Google Cloud Storage Backend
[`gcs`](https://developer.hashicorp.com/terraform/language/settings/backends/gcs) backend stores the state as an object
in a configurable `prefix` in a pre-existing bucket on Google Cloud Storage (GCS).
The bucket must exist prior to configuring the backend. The backend supports state locking.
To configure the [Google Cloud Storage backend](https://developer.hashicorp.com/terraform/language/settings/backends/gcs)
in Atmos, add the following config to an Atmos manifest in `_defaults.yaml`:
```yaml
terraform:
backend_type: gcs
backend:
gcs:
bucket: "tf-state"
# Other parameters
```
For each component, you can optionally add the `prefix` parameter similar to the following:
```yaml
components:
terraform:
my-component:
# Optional backend configuration for the component
backend:
gcp:
prefix: "my-component"
```
If the `prefix` is not specified for a component, Atmos will use the component name (`my-component` in the example above)
to auto-generate the `prefix`. In the component name, all occurrences of `/` (slash) will be replaced with `-` (dash).
If `auto_generate_backend_file` is set to `true` in the `atmos.yaml` CLI config file in the `components.terraform` section,
Atmos will [deep-merge](#backend-inheritance) the backend configurations from the `_defaults.yaml` manifests and
from the component itself, and will generate a backend config JSON file `backend.tf.json` in the component's folder,
similar to the following example:
```json
{
"terraform": {
"backend": {
"gcp": {
"bucket": "tf-state",
"prefix": "my-component"
}
}
}
}
```
## Terraform Cloud Backend
[Terraform Cloud](https://developer.hashicorp.com/terraform/cli/cloud/settings) backend uses a `cloud` block to specify
which organization and workspace(s) to use.
To configure the [Terraform Cloud backend](https://developer.hashicorp.com/terraform/cli/cloud/settings)
in Atmos, add the following config to an Atmos manifest in `_defaults.yaml`:
```yaml
terraform:
backend_type: cloud
backend:
cloud:
organization: "my-org"
hostname: "app.terraform.io"
workspaces:
# Parameters for workspaces
```
For each component, you can optionally specify the `workspaces.name` parameter similar to the following:
```yaml
components:
terraform:
my-component:
# Optional backend configuration for the component
backend:
cloud:
workspaces:
name: "my-component-workspace"
```
If `auto_generate_backend_file` is set to `true` in the `atmos.yaml` CLI config file in the `components.terraform` section,
Atmos will [deep-merge](#backend-inheritance) the backend configurations from the `_defaults.yaml` manifests and
from the component itself, and will generate a backend config JSON file `backend.tf.json` in the component's folder,
similar to the following example:
```json
{
"terraform": {
"cloud": {
"hostname": "app.terraform.io",
"organization": "my-org",
"workspaces": {
"name": "my-component-workspace"
}
}
}
}
```
Instead of specifying the `workspaces.name` parameter for each component in the component manifests, you can use
the `{terraform_workspace}` token in the `cloud` backend config in the `_defaults.yaml` manifest.
The token `{terraform_workspace}` will be automatically replaced by Atmos with the Terraform workspace for each component.
This will make the entire configuration DRY.
```yaml
terraform:
backend_type: cloud
backend:
cloud:
organization: "my-org"
hostname: "app.terraform.io"
workspaces:
# The token `{terraform_workspace}` will be automatically replaced with the
# Terraform workspace for each Atmos component
name: "{terraform_workspace}"
```
:::tip
Refer to [Terraform Workspaces in Atmos](/core-concepts/components/terraform/workspaces) for more information on how
Atmos calculates Terraform workspaces for components, and how workspaces can be overridden for each component.
:::
## Backend Inheritance
Suppose that for security and audit reasons, you want to use different Terraform backends for `dev`, `staging` and `prod`.
Each account needs to have a separate S3 bucket, DynamoDB table, and IAM role with different permissions
(for example, the `development` Team should be able to access the Terraform backend only in the `dev` account, but not in `staging` and `prod`).
Atmos supports this use-case by using deep-merging of stack manifests, [Imports](/core-concepts/stacks/imports)
and [Inheritance](/core-concepts/stacks/inheritance), which makes the backend configuration reusable and DRY.
We'll split the backend config between the Organization and the accounts.
Add the following config to the Organization stack manifest in `stacks/orgs/acme/_defaults.yaml`:
```yaml
terraform:
backend_type: s3
backend:
s3:
acl: "bucket-owner-full-control"
encrypt: true
key: "terraform.tfstate"
region: "your-aws-region"
```
Add the following config to the `dev` stack manifest in `stacks/orgs/acme/plat/dev/_defaults.yaml`:
```yaml
terraform:
backend_type: s3
backend:
s3:
bucket: "your-dev-s3-bucket-name"
dynamodb_table: "your-dev-dynamodb-table-name"
role_arn: "IAM Role with permissions to access the 'dev' Terraform backend"
```
Add the following config to the `staging` stack manifest in `stacks/orgs/acme/plat/staging/_defaults.yaml`:
```yaml
terraform:
backend_type: s3
backend:
s3:
bucket: "your-staging-s3-bucket-name"
dynamodb_table: "your-staging-dynamodb-table-name"
role_arn: "IAM Role with permissions to access the 'staging' Terraform backend"
```
Add the following config to the `prod` stack manifest in `stacks/orgs/acme/plat/prod/_defaults.yaml`:
```yaml
terraform:
backend_type: s3
backend:
s3:
bucket: "your-prod-s3-bucket-name"
dynamodb_table: "your-prod-dynamodb-table-name"
role_arn: "IAM Role with permissions to access the 'prod' Terraform backend"
```
When you provision the `vpc` component into the `dev` account (by executing the command `atmos terraform apply vpc -s plat-ue2-dev`), Atmos will
deep-merge the backend configuration from the Organization-level manifest with the configuration from the `dev` manifest, and will automatically
add `workspace_key_prefix` for the component, generating the following final deep-merged backend config for the `vpc` component in the `dev` account:
```json
{
"terraform": {
"backend": {
"s3": {
"acl": "bucket-owner-full-control",
"bucket": "your-dev-s3-bucket-name",
"dynamodb_table": "your-dev-dynamodb-table-name",
"encrypt": true,
"key": "terraform.tfstate",
"region": "your-aws-region",
"role_arn": "",
"workspace_key_prefix": "vpc"
}
}
}
}
```
In the same way, you can create different Terraform backends per Organizational Unit, per region, per account (or a group of accounts, e.g. `prod`
and `non-prod`), or even per component or a set of components (e.g. root-level components like `account` and IAM roles can have a separate backend),
and then configure parts of the backend config in the corresponding Atmos stack manifests. Atmos will deep-merge all the parts from the
different scopes and generate the final backend config for the components in the stacks.
## Terraform/OpenTofu Backend with Multiple Component Instances
We mentioned before that you can configure the Terraform backend for the components manually (by creating a file `backend.tf` in each Terraform
component's folder), or you can set up Atmos to generate the backend configuration for each component in the stacks automatically. While
auto-generating the backend config file is helpful and saves you from creating the backend files for each component, it becomes a requirement
when you provision multiple instances of a Terraform component into the same environment (same account and region).
You can provision more than one instance of the same Terraform component (with the same or different settings) into the same environment by defining
many Atmos components that provide configuration for the Terraform component.
:::tip
For more information on configuring and provision multiple instances of a Terraform component,
refer to [Multiple Component Instances Atmos Design Patterns](/design-patterns/multiple-component-instances)
:::
For example, the following config shows how to define two Atmos
components, `vpc/1` and `vpc/2`, which both point to the same Terraform component `vpc`:
```yaml
import:
# Import the defaults for all VPC components
- catalog/vpc/defaults
components:
terraform:
# Atmos component `vpc/1`
vpc/1:
metadata:
# Point to the Terraform component in `components/terraform/vpc`
component: vpc
# Inherit the defaults for all VPC components
inherits:
- vpc/defaults
# Define variables specific to this `vpc/1` component
vars:
name: vpc-1
ipv4_primary_cidr_block: 10.9.0.0/18
# Optional backend configuration for the component
# If not specified, the Atmos component name `vpc/1` will be used (`/` will be replaced with `-`)
backend:
s3:
workspace_key_prefix: vpc-1
# Atmos component `vpc/2`
vpc/2:
metadata:
# Point to the Terraform component in `components/terraform/vpc`
component: vpc
# Inherit the defaults for all VPC components
inherits:
- vpc/defaults
# Define variables specific to this `vpc/2` component
vars:
name: vpc-2
ipv4_primary_cidr_block: 10.10.0.0/18
# Optional backend configuration for the component
# If not specified, the Atmos component name `vpc/2` will be used (`/` will be replaced with `-`)
backend:
s3:
workspace_key_prefix: vpc-2
```
If we manually create a `backend.tf` file for the `vpc` Terraform component in the `components/terraform/vpc` folder
using `workspace_key_prefix: "vpc"`, then both `vpc/1` and `vpc/2` Atmos components will use the same `workspace_key_prefix`, and they will
not function correctly.
On the other hand, if we configure Atmos to auto-generate the backend config file, then each component will have a different `workspace_key_prefix`
auto-generated by Atmos by using the Atmos component name (or you can override this behavior by specifying `workspace_key_prefix` for each component
in the component manifest in the `backend.s3.workspace_key_prefix` section).
For example, when the command `atmos terraform apply vpc/1 -s plat-ue2-dev` is executed, the following `backend.tf.json` file is generated in the
`components/terraform/vpc` folder:
```json
{
"terraform": {
"backend": {
"s3": {
"acl": "bucket-owner-full-control",
"bucket": "your-dev-s3-bucket-name",
"dynamodb_table": "your-dev-dynamodb-table-name",
"encrypt": true,
"key": "terraform.tfstate",
"region": "your-aws-region",
"role_arn": "",
"workspace_key_prefix": "vpc-1"
}
}
}
}
```
Similarly, when the command `atmos terraform apply vpc/2 -s plat-ue2-dev` is executed, the following `backend.tf.json` file is generated in the
`components/terraform/vpc` folder:
```json
{
"terraform": {
"backend": {
"s3": {
"acl": "bucket-owner-full-control",
"bucket": "your-dev-s3-bucket-name",
"dynamodb_table": "your-dev-dynamodb-table-name",
"encrypt": true,
"key": "terraform.tfstate",
"region": "your-aws-region",
"role_arn": "",
"workspace_key_prefix": "vpc-2"
}
}
}
}
```
The generated files will have different `workspace_key_prefix` attribute auto-generated by Atmos.
For this reason, configuring Atmos to auto-generate the backend configuration for the components in the stacks is recommended
for all supported backend types.
## References
- [Terraform Backend Configuration](https://developer.hashicorp.com/terraform/language/settings/backends/configuration)
- [OpenTofu Backend Configuration](https://opentofu.org/docs/language/settings/backends/configuration)
- [Terraform Cloud Settings](https://developer.hashicorp.com/terraform/cli/cloud/settings)
- [Multiple Component Instances Atmos Design Patterns](/design-patterns/multiple-component-instances)
---
## Brownfield Considerations
import Intro from '@site/src/components/Intro'
There are some considerations you should be aware of when adopting Atmos in a brownfield environment. Atmos works best when you adopt the [Atmos mindset](/quick-start/mindset).
The term "brownfield" comes from urban planning and refers to the redevelopment of land that was previously used and may need cleaning or modification. As it relates to infrastructure, [Brownfield development](https://en.wikipedia.org/wiki/Brownfield_(software_development)) describes the development and deployment of new software systems in the presence of existing (legacy) software applications/systems. Anytime this happens, new software architectures must take into account and coexist with the existing software.
Atmos is not just a tool; it is a framework that provides a set of opinionated conventions, methodologies, design patterns, and best practices to ensure teams succeed with Terraform from the start. It can be hard to shoehorn existing systems that are not designed according to the [Atmos mindset](/quick-start/mindset).
- **Decomposition**: Not only do you have challenges around how to decompose your architecture, but also the difficulty of making changes to live systems.
- **Technical Debt:** You may have significant technical debt that needs to be addressed
- **Knowledge Gaps**: There may be gaps in knowledge within the team regarding Atmos conventions and methodologies.
By understanding these challenges, teams can better prepare for a smooth transition to using Atmos effectively.
## Brownfield Development in Atmos
Atmos is easier for new organizations or "greenfield" environments because you need to architect Terraform according to
our [best practices](/best-practices/components) to get all the benefits of Atmos. For example, when using our [Terraform components](https://github.com/cloudposse/terraform-aws-components), we frequently use [Terraform Remote State](/core-concepts/share-data/remote-state) to retrieve the outputs from other components.
This works well when you use our components but less so when you operate in a "brownfield" environment, for example,
with an existing VPC, S3 bucket, or IAM role.
When you approach brownfield development with Atmos, begin by designing what your architecture could look like if you break it down into various pieces. Then devise a plan to decompose those pieces into components you implement as Terraform "root modules".
The process of configuring Atmos components and stacks for the existing, already provisioned resources, will depend on how easy or hard this decomposition will be. Working on and updating existing infrastructure rather than creating a new one from scratch, known as "greenfield" development, will always be more difficult.
The process needs to respect the existing systems' constraints while progressively introducing improvements and modern practices. This will ultimately lead to more robust, flexible, and efficient systems.
## Remote State in Brownfield Development
So what happens when infrastructure wasn't provisioned by Atmos or predates your infrastructure? Then there's no way to retrieve that state in Terraform.
For this reason, we support something we refer to as the `static` remote state backend. Using the static remote state backend, you can
populate a virtual state backend with the outputs as though it had been provisioned with Terraform. You can use this
technique anytime you want to use the remote state functionality in Atmos, but when the remote state was provisioned
elsewhere.
### Hacking Remote State with `static` Backends
Atmos supports brownfield configuration by using the remote state of type `static`.
Suppose that we need to provision
the [`vpc`](https://github.com/cloudposse/atmos/tree/main/examples/quick-start-advanced/components/terraform/vpc)
Terraform component and, instead of provisioning an S3 bucket for VPC Flow Logs, we want to use an existing bucket.
The `vpc` Terraform component needs the outputs from the `vpc-flow-logs-bucket` Terraform component to
configure [VPC Flow Logs](https://docs.aws.amazon.com/vpc/latest/userguide/flow-logs.html).
Let's redesign the example with the `vpc` and `vpc-flow-logs-bucket` components described in
[Terraform Component Remote State](/core-concepts/share-data/remote-state) and configure the `static` remote state for
the `vpc-flow-logs-bucket` component to use an existing S3 bucket.
## Examples
### Configure the `vpc-flow-logs-bucket` Component
In the `stacks/catalog/vpc-flow-logs-bucket.yaml` file, add the following configuration for
the `vpc-flow-logs-bucket/defaults` Atmos component:
```yaml title="stacks/catalog/vpc-flow-logs-bucket.yaml"
components:
terraform:
vpc-flow-logs-bucket/defaults:
metadata:
type: abstract
# Use `static` remote state to configure the attributes for an existing
# S3 bucket for VPC Flow Logs
remote_state_backend_type: static
remote_state_backend:
static:
# ARN of the existing S3 bucket
# `vpc_flow_logs_bucket_arn` is used as an input for the `vpc` component
vpc_flow_logs_bucket_arn: "arn:aws:s3:::my-vpc-flow-logs-bucket"
```
In the `stacks/ue2-dev.yaml` stack config file, add the following config for the `vpc-flow-logs-bucket-1` Atmos
component in the `ue2-dev` Atmos stack:
```yaml title="stacks/ue2-dev.yaml"
# Import the base Atmos component configuration from the `catalog`.
# `import` supports POSIX-style Globs for file names/paths (double-star `**` is supported).
# File extensions are optional (if not specified, `.yaml` is used by default).
import:
- catalog/vpc-flow-logs-bucket
components:
terraform:
vpc-flow-logs-bucket-1:
metadata:
# Point to the Terraform component in `components/terraform` folder
component: infra/vpc-flow-logs-bucket
inherits:
# Inherit all settings and variables from the
# `vpc-flow-logs-bucket/defaults` base Atmos component
- vpc-flow-logs-bucket/defaults
```
### Configure and Provision the `vpc` Component
In the `components/terraform/infra/vpc/remote-state.tf` file, configure the
[remote-state](https://github.com/cloudposse/terraform-yaml-stack-config/tree/main/modules/remote-state) Terraform
module to obtain the remote state for the `vpc-flow-logs-bucket-1` Atmos component:
```hcl title="components/terraform/infra/vpc/remote-state.tf"
module "vpc_flow_logs_bucket" {
count = local.vpc_flow_logs_enabled ? 1 : 0
source = "cloudposse/stack-config/yaml//modules/remote-state"
version = "1.5.0"
# Specify the Atmos component name (defined in YAML stack config files)
# for which to get the remote state outputs
component = var.vpc_flow_logs_bucket_component_name
# `context` input is a way to provide the information about the stack (using the context
# variables `namespace`, `tenant`, `environment`, `stage` defined in the stack config)
context = module.this.context
}
```
In the `components/terraform/infra/vpc/vpc-flow-logs.tf` file, configure the `aws_flow_log` resource for the `vpc`
Terraform component to use the remote state output `vpc_flow_logs_bucket_arn` from the `vpc-flow-logs-bucket-1` Atmos
component:
```hcl title="components/terraform/infra/vpc/vpc-flow-logs.tf"
locals {
enabled = module.this.enabled
vpc_flow_logs_enabled = local.enabled && var.vpc_flow_logs_enabled
}
resource "aws_flow_log" "default" {
count = local.vpc_flow_logs_enabled ? 1 : 0
# Use the remote state output `vpc_flow_logs_bucket_arn` of the `vpc_flow_logs_bucket` component
log_destination = module.vpc_flow_logs_bucket[0].outputs.vpc_flow_logs_bucket_arn
log_destination_type = var.vpc_flow_logs_log_destination_type
traffic_type = var.vpc_flow_logs_traffic_type
vpc_id = module.vpc.vpc_id
tags = module.this.tags
}
```
In the `stacks/catalog/vpc.yaml` file, add the following default config for the `vpc/defaults` Atmos component:
```yaml title="stacks/catalog/vpc.yaml"
components:
terraform:
vpc/defaults:
metadata:
# `metadata.type: abstract` makes the component `abstract`,
# explicitly prohibiting the component from being deployed.
# `atmos terraform apply` will fail with an error.
# If `metadata.type` attribute is not specified, it defaults to `real`.
# `real` components can be provisioned by `atmos` and CI/CD like Spacelift and Atlantis.
type: abstract
# Default variables, which will be inherited and can be overridden in the derived components
vars:
public_subnets_enabled: false
nat_gateway_enabled: false
nat_instance_enabled: false
max_subnet_count: 3
vpc_flow_logs_enabled: false
vpc_flow_logs_log_destination_type: s3
vpc_flow_logs_traffic_type: "ALL"
```
In the `stacks/ue2-dev.yaml` stack config file, add the following config for the `vpc/1` Atmos component in
the `ue2-dev` stack:
```yaml title="stacks/ue2-dev.yaml"
# Import the base component configuration from the `catalog`.
# `import` supports POSIX-style Globs for file names/paths (double-star `**` is supported).
# File extensions are optional (if not specified, `.yaml` is used by default).
import:
- catalog/vpc
components:
terraform:
vpc/1:
metadata:
# Point to the Terraform component in `components/terraform` folder
component: infra/vpc
inherits:
# Inherit all settings and variables from the `vpc/defaults` base Atmos component
- vpc/defaults
vars:
# Define variables that are specific for this component
# and are not set in the base component
name: vpc-1
ipv4_primary_cidr_block: 10.8.0.0/18
# Override the default variables from the base component
vpc_flow_logs_enabled: true
vpc_flow_logs_traffic_type: "REJECT"
# Specify the name of the Atmos component that provides configuration
# for the `infra/vpc-flow-logs-bucket` Terraform component
vpc_flow_logs_bucket_component_name: vpc-flow-logs-bucket-1
```
Having the stacks configured as shown above, we can now provision the `vpc/1` Atmos component in the `ue2-dev` stack
by executing the following Atmos commands:
```shell
atmos terraform plan vpc/1 -s ue2-dev
atmos terraform apply vpc/1 -s ue2-dev
```
When the commands are executed, the `vpc_flow_logs_bucket` remote-state module detects that the `vpc-flow-logs-bucket-1`
component has the `static` remote state configured, and instead of reading its remote state from the S3 state
bucket, it just returns the static values from the `remote_state_backend.static` section.
The `vpc_flow_logs_bucket_arn` is then used as an input for the `vpc` component.
---
## Terraform Providers
import File from '@site/src/components/File'
import Terminal from '@site/src/components/Terminal'
import Intro from '@site/src/components/Intro'
Terraform utilizes plugins known as [providers](https://developer.hashicorp.com/terraform/language/providers) for
communication with cloud providers, SaaS providers, and various APIs.
In order for Terraform to install these providers, the corresponding Terraform configurations need to
explicitly state what providers are required. Furthermore, certain providers require additional configuration, such as
specifying endpoint URLs or cloud regions, before they can be used.
## Provider Configuration in Terraform
When working with Terraform, you specify provider configurations in your Terraform code. This involves
declaring which providers your infrastructure requires and providing any necessary configuration parameters.
These parameters may include endpoint URLs, cloud regions, access credentials, or any other provider-specific
configuration parameters.
To declare a provider in Terraform, use a `provider` block within your Terraform configuration files,
usually in a `providers.tf` file in the component (a.k.a. root module) directory.
The `provider` block specifies the provider type and all the necessary configuration parameters.
Here's an AWS provider configuration example for a `vpc` component. The provider config is defined in
the `components/terraform/vpc/providers.tf` file:
```hcl
provider "aws" {
region = "us-east-2"
assume_role {
role_arn: "IAM Role ARN"
}
}
```
In this example, the `aws` provider block includes the region and IAM role required for Terraform to communicate
with the AWS services.
By correctly defining provider configurations in your Terraform code, you ensure that Terraform can seamlessly install,
configure, and use the necessary plugins to manage your infrastructure across various cloud and services.
## Provider Configuration and Overrides in Atmos Manifests
Atmos allows you to define and override provider configurations using the `providers` section in Atmos stack manifests.
The section can be defined globally for the entire organization, OU/tenant, account, region, or per component.
For example, the `providers` section at the global scope can look like this:
```yaml
terraform:
providers:
aws:
region: "us-east-2"
assume_role:
role_arn: "IAM Role ARN"
```
Similarly, it can be defined (or overridden) at the OU/tenant, account and region scopes in the corresponding
`_defaults.yaml` stack manifests.
If you want to override a provider configuration for a specific component, use the `component.terraform..providers`
section. For example, the following config can be used to override the `assume_role` parameter just for the `vpc` component:
```yaml
components:
terraform:
vpc:
providers:
aws:
assume_role:
role_arn: "IAM Role ARN for VPC"
```
You can include the `providers` sections in any Atmos stack manifest at any level of inheritance. Atmos will process,
deep-merge and override all the `providers` configurations for a component in the following order:
- Global scopes (`terraform.providers` sections for the Org, OUs, accounts and regions)
- Base component scope (`component.terraform..providers` section)
- Current component scope (`component.terraform..providers` section)
:::tip
Refer to [Atmos Component Inheritance](/core-concepts/stacks/inheritance) for more information on all types of component inheritance
supported by Atmos
:::
When you define the `providers` sections, Atmos processes the inheritance chain for a component and generates a
file `providers_override.tf.json` in the component's folder with the final values for all the defined providers.
For example:
```console
> atmos terraform plan vpc -s plat-ue2-prod --logs-level=Trace
Variables for the component 'vpc' in the stack 'plat-ue2-prod':
environment: ue2
max_subnet_count: 3
name: common
namespace: cp
region: us-east-2
stage: prod
tenant: plat
Writing the variables to file:
components/terraform/vpc/plat-ue2-prod.terraform.tfvars.json
Writing the provider overrides to file:
components/terraform/vpc/providers_override.tf.json
```
The generated `providers_override.tf.json` file would look like this:
```json
{
"provider": {
"aws": {
"assume_role": {
"role_arn": "IAM Role ARN for VPC"
}
}
}
}
```
Terraform then uses the values in the generated `providers_override.tf.json` to
[override](https://developer.hashicorp.com/terraform/language/files/override) the parameters for all the providers in the file.
## `alias`: Multiple Provider Configuration in Atmos Manifests
Atmos allows you to define multiple configurations for the same provider using a list of provider blocks and the
`alias` meta-argument.
The generated `providers_override.tf.json` file will have a list of provider configurations, and Terraform/OpenTofu
will use and override the providers as long as the aliased providers are defined in the Terraform component.
For example:
```yaml
components:
terraform:
vpc:
providers:
aws:
- region: us-west-2
assume_role:
role_arn: "role-1"
- region: us-west-2
alias: "account-2"
assume_role:
role_arn: "role-2"
```
:::warning
The above example uses a list of configuration blocks for the `aws` provider.
Since it's a list, by default it doesn't work with deep-merging of stacks in the
[inheritance](/core-concepts/stacks/inheritance) chain since list are not deep-merged, they are replaced.
If you want to use the above configuration in the inheritance chain and allow appending or merging of lists, consider
configuring the `settings.list_merge_strategy` in the `atmos.yaml` CLI config file.
For more details, refer to [Atmos CLI Settings](/cli/configuration/#settings).
:::
## References
- [Terraform Providers](https://developer.hashicorp.com/terraform/language/providers)
- [Terraform Override Files](https://developer.hashicorp.com/terraform/language/files/override)
- [alias: Multiple Provider Configurations](https://developer.hashicorp.com/terraform/language/providers/configuration#alias-multiple-provider-configurations)
---
## State Backend Configuration
import Intro from '@site/src/components/Intro'
Atmos supports configuring [Terraform/OpenTofu Backends](/core-concepts/components/terraform/backends)
to define where [Terraform](https://developer.hashicorp.com/terraform/language/state) and [OpenTofu](https://opentofu.org/docs/language/state/) store its state,
and [Remote State](/core-concepts/share-data/remote-state) to get the outputs of a [Terraform/OpenTofu component](/core-concepts/components),
provisioned in the same or a different [Atmos stack](/core-concepts/stacks), and use the outputs as inputs to another Atmos component.
Bear in mind that Atmos is simply managing the configuration of the Backend;
provisioning the backend resources themselves is the responsibility of a Terraform/OpenTofu component.
Atmos also supports Remote State Backends (in the `remote_state_backend` section), which can be used to configure the
following:
- Override [Terraform Backend](/core-concepts/components/terraform/backends) configuration to access the
remote state of a component (e.g. override the IAM role to assume, which in this case can be a read-only role)
- Configure a remote state of type `static` which can be used to provide configurations for
[Brownfield development](https://en.wikipedia.org/wiki/Brownfield_(software_development))
## Override Terraform Backend Configuration to Access Remote State
Atmos supports the `remote_state_backend` section which can be used to provide configuration to access the remote state
of components.
To access the remote state of components, you can override
any [Terraform Backend](/core-concepts/components/terraform/backends)
configuration in the `backend` section using the `remote_state_backend` section. The `remote_state_backend` section
is a first-class section, and it can be defined globally at any scope (organization, tenant, account, region), or per
component, and then deep-merged using [Atmos Component Inheritance](/core-concepts/stacks/inheritance).
For example, let's suppose we have the following S3 backend configuration for the entire organization
(refer to [AWS S3 Backend](/core-concepts/components/terraform/backends#aws-s3-backend) for more details):
```yaml title="stacks/orgs/acme/_defaults.yaml"
terraform:
backend_type: s3
backend:
s3:
acl: "bucket-owner-full-control"
encrypt: true
bucket: "your-s3-bucket-name"
dynamodb_table: "your-dynamodb-table-name"
key: "terraform.tfstate"
region: "your-aws-region"
role_arn: "arn:aws:iam::xxxxxxxx:role/terraform-backend-read-write"
```
Let's say we also have a read-only IAM role, and we want to use it to access the remote state instead of the read-write
role, because accessing remote state is a read-only operation, and we don't want to give the role more permissions than
it requires - this is the [principle of least privilege](https://en.wikipedia.org/wiki/Principle_of_least_privilege).
We can add the `remote_state_backend` and `remote_state_backend_type` to override the required attributes from the
`backend` section:
```yaml title="stacks/orgs/acme/_defaults.yaml"
terraform:
backend_type: s3 # s3, remote, vault, azurerm, gcs, cloud
backend:
s3:
acl: "bucket-owner-full-control"
encrypt: true
bucket: "your-s3-bucket-name"
dynamodb_table: "your-dynamodb-table-name"
key: "terraform.tfstate"
region: "your-aws-region"
role_arn: "arn:aws:iam::xxxxxxxx:role/terraform-backend-read-write"
remote_state_backend_type: s3 # s3, remote, vault, azurerm, gcs, cloud, static
remote_state_backend:
s3:
role_arn: "arn:aws:iam::xxxxxxxx:role/terraform-backend-read-only"
# Override the other attributes from the `backend.s3` section as needed
```
In the example above, we've overridden the `role_arn` attribute for the `s3` backend to use the read-only role when
accessing the remote state of all components. All other attributes will be taken from the `backend` section (Atmos
deep-merges the `remote_state_backend` section with the `backend` section).
When working with Terraform backends and writing/updating the state, the `terraform-backend-read-write` role will be
used. But when reading the remote state of components, the `terraform-backend-read-only` role will be used.
---
## Terraform Root Modules
import DocCardList from '@theme/DocCardList'
import KeyPoints from '@site/src/components/KeyPoints'
import Intro from '@site/src/components/Intro'
Use Atmos to provision your Terraform root modules and manage their configurations consistently and repeatably
by leveraging imports and inheritance for DRY configurations and reduced blast radius of changes.
- Why does Terraform need additional tooling
- How does Atmos change how you write Terraform code
- How to use Terraform with Atmos
Atmos can change how you think about the Terraform modules that you use to build your infrastructure.
When you design cloud architectures with Atmos, you will first break it apart into pieces called components.
Then, you will implement Terraform "root modules" for each of your components.
To make them highly reusable, they should serve a "single purpose" so that they are the smallest possible
unit of infrastructure managed in the software development lifecycle (SDLC).
Finally, you will connect your components together using stacks, so that everything comes together.
In the [Quick Start](/quick-start/simple) tutorial, we’ll guide you through the thought process of building Terraform "root modules" that are suitable for use as components.
## What is Terraform?
Terraform is a command-line utility or interpreter (like Perl or Ruby), that processes infrastructure configurations
written in ["HashiCorp's Configuration Language" ("HCL")](https://en.wikipedia.org/wiki/HCL) to orchestrate infrastructure provisioning.
Its chief role is to delineate and structure infrastructure definitions. Terraform by itself is not a framework.
:::note Disambiguation
The term “Terraform” is used in this documentation to refer to generic concepts such as providers, modules, stacks, the
HCL-based domain-specific language and its interpreter. Atmos works with [OpenTofu](/core-concepts/projects/configuration/opentofu).
:::
Fun Fact!
HCL is backward compatible with JSON, although it's not a strict superset of JSON.
HCL is more human-friendly and readable, while JSON is often used for machine-generated configurations.
This means you can write Terraform configurations in HCL or JSON, and Terraform will understand them.
This feature is particularly useful for programmatically generating configurations or integration with systems that already use JSON.
## How has Terraform HCL Evolved?
Terraform's HCL started strictly as a configuration language, not a markup or programming language, although it has evolved
considerably over the years.
As Terraform progressed and HCL evolved, notably from version _0.12_ onwards, HCL began incorporating features typical
of programming languages (albeit without a debugger!). This shift enriched infrastructure definitions, positioning HCL
more as a [domain-specific programming language (DSL)](https://en.wikipedia.org/wiki/Domain-specific_language) for
defining infrastructure than strictly a configuration language (aka data interchange formats like JSON). As a result,
the complexity of configuring Terraform projects has risen, while Terraform's inherent capabilities to be configured
haven't evolved at the same pace.
- **Rich Expressions:** Introduced a richer expression syntax, removing the need for interpolations.
- **For Loops and Conditionals:** Added for expressions and conditional expressions.
- **Type System:** Introduced a more explicit type system for input and output values.
## Why is additional tooling needed when using Terraform?
**Every foundational tool begins simply.**
As users grow more advanced and their ambitions expand, the need for advanced tooling emerges. These shifts demonstrate that core
technologies naturally progress, spawning more advanced constructs to tackle increased intricacies and enhance efficiency -- all
while retaining their core essence. Just as CSS, NodeJS, Docker, Helm, and many other tools have evolved to
include higher-order utilities, Terraform, too, benefits from additional orchestration tools, given the complexities and challenges
users face at different stages of adoption.
Examples of tools like these are numerous, like:
- **CSS has Sass:** Sass provides more expressive styling capabilities, variables, and functions, making stylesheets more maintainable and organized, especially for large projects.
- **NodeJS has React:** React brings component-based architecture to JavaScript, enhancing the creation of interactive UIs, improving code reusability, and better supporting the development of large-scale applications.
- **Docker has Docker Compose:** Docker Compose simplifies the management and orchestration of multi-container Docker applications, making it easier to define, run, and scale services collectively.
- **Helm charts have Helmfiles:** While Helm charts define the blueprints of Kubernetes services, Helmfiles enable better orchestration, management, and deployment of multiple charts, similar to coordinating various instruments in a symphony.
- **Kubernetes manifests have Kustomize:** Kustomize allows customization of Kubernetes manifests without changing their original form, facilitating dynamic configurations tailored to specific deployment scenarios.
**These days, no one would dream of building a modern web app without a framework. Why should Terraform be any different?**
When considering Terraform in the context of large-scale organizations or enterprises, it's clear that Terraform and its inherent language don't address all challenges. This is why teams progress through [10 stages of maturity](/introduction/why-atmos). With hundreds or even of components spread across hundreds of accounts, cloud providers and managed by a vast number of DevOps engineers and developers, the complexity becomes overwhelming and difficult to manage.
A lot of the same challenges faced by NodeJS, Docker, Helm and Kubernetes also exist in Terraform as well.
**Challenges in Terraform are centered around Root Modules:**
- **Large-Scale Architectures**: Providing better support for large-scale service-oriented architectures
- **Composition**: Making it straightforward to compose architectures of multiple "root modules"
- **Code Reusability and Maintainability**: Simplifying the definition and reuse of "root modules"
- **Ordered Dependencies**: Handling orchestration, management, and deployment of multiple loosely coupled "root modules"
- **Sharing State**: Sharing state between "root modules"
- **CI/CD Automation**: Enhancing CI/CD automation, especially in monorepos, when there are no rollback capabilities
These are not language problems. These are framework problems. Without a coherent framework, Terraform is hard to use at scale.
Ultimately, the goal is to make Terraform more scalable, maintainable, and developer-friendly, especially in complex and large-scale environments.
## Refresher on Terraform Concepts
- Child Modules
- Child modules are reusable pieces of Terraform code that accept parameters (variables) for customization and emit outputs.
Outputs can be passed between child modules and used to connect them together.
They are stateless and can be invoked multiple times. Child modules can also call other child modules, making
them a primary method for reducing repetition in Terraform HCL code; it's how you DRY up your HCL code.
- Root Modules
- Root modules in Terraform are the topmost modules that can call child modules or directly use Terraform code.
The key distinction between root and child modules is that root modules maintain Terraform state,
typically stored in a remote state backend like S3. Root modules cannot call other root modules,
but they can access the outputs of any other root module using Remote State.
- State Backends
- State Backends are where the desired state of your infrastructure code is stored.
It's always defined exactly once per "root module". This where the computed state of your HCL code is stored,
and it is what `terraform apply` will execute. The most common state backend is object storage
like S3, but there are many other types of state backends available.
- Remote State
- Remote state refers to the concept of retrieving the outputs from other root modules.
Terraform natively supports passing information between "root modules" without any additional tooling,
a capability we rely on in Atmos.
:::info Disambiguation
- **Terraform Component** is a [Terraform Root Module](https://developer.hashicorp.com/terraform/language/modules#the-root-module) and stored typically in `components/terraform/$name` that consists of the resources defined in the `.tf` files in a working directory
(e.g. [components/terraform/infra/vpc](https://github.com/cloudposse/atmos/tree/main/examples/quick-start-advanced/components/terraform/vpc))
- **Stack** provides configuration (variables and other settings) for a Terraform Component and is defined in one or more Atmos stack manifests
(a.k.a. stack config files)
:::
## Example: Provision Terraform Component
To provision a Terraform component using the `atmos` CLI, run the following commands in the container shell:
```console
atmos terraform plan eks --stack=ue2-dev
atmos terraform apply eks --stack=ue2-dev
```
where:
- `eks` is the Terraform component to provision (from the `components/terraform` folder)
- `--stack=ue2-dev` is the stack to provision the component into
Short versions of all command-line arguments can be used:
```console
atmos terraform plan eks -s ue2-dev
atmos terraform apply eks -s ue2-dev
```
The `atmos terraform deploy` command executes `terraform apply -auto-approve` to provision components in stacks without
user interaction:
```console
atmos terraform deploy eks -s ue2-dev
```
## Using Submodules (Child Modules)
If your components rely on local submodules, our convention is to use a `modules/` subfolder of the component to store them.
## Terraform Usage with Atmos
Learn how to best leverage Terraform together with Atmos.
---
## Terraform Workspaces
import File from '@site/src/components/File'
import Terminal from '@site/src/components/Terminal'
import Intro from '@site/src/components/Intro'
In Terraform, a [workspace](https://developer.hashicorp.com/terraform/language/state/workspaces) is a feature that allows
you to manage multiple "state" environments within a Terraform configuration. Each workspace maintains its own state,
allowing you to deploy and manage infrastructure configurations independently.
Workspaces are useful in several scenarios:
- **Environment Isolation**: Workspaces enable you to have separate environments within a Terraform configuration.
Each workspace can have its own set of resources and configurations.
- **Parallel Development**: Workspaces facilitate parallel development by allowing different team members to work on
different workspaces concurrently without interfering with each other's changes.
- **Testing and Experimentation**: Workspaces are helpful for testing and experimentation.
You can create temporary workspaces to test changes or new configurations without affecting the main production environment.
- **State Management**: Workspaces manage separate states for each environment.
This helps in maintaining clarity and avoiding conflicts when multiple environments are being managed.
- **Deployment Strategies**: Workspaces can be used to implement different deployment strategies.
For example, you might use separate workspaces for blue-green deployments or canary releases.
To work with workspaces in Terraform, you can use commands like `terraform workspace new`, `terraform workspace select`,
and `terraform workspace delete` to create, switch between, and delete workspaces respectively.
Atmos automatically manages Terraform workspaces for you when you provision components in a stack.
## Terraform Workspaces in Atmos
Atmos automatically calculates Terraform workspace names and uses workspaces to manage top-level stacks. By default, Atmos uses the stack
name as the Terraform workspace when provisioning components in the stack. For example, consider the following manifest
for the component `vpc` in the stack `ue2-dev`:
```yaml
vars:
# Context variables that define the Atmos stack `ue2-dev`
environment: ue2
stage: dev
components:
terraform:
vpc:
metadata:
# Point to the Terraform component in `components/terraform/vpc`
component: vpc
# Define the variables specific to this component
vars:
name: my-vpc
ipv4_primary_cidr_block: 10.9.0.0/18
```
When you provision the `vpc` component in the stack `ue2-dev` by executing the following command:
```shell
atmos terraform apply vpc -s ue2-dev
```
Atmos computes the workspace name to be `ue2-dev`. Any Atmos Terraform command other than `init`, using this stack,
will cause Atmos to select this workspace, creating it if needed. (This leaves the workspace selected as a side effect
for subsequent Terraform commands run outside of Atmos. Atmos version 1.55 took away this side effect, but it was
restored in version 1.69.)
The exception to the default rule (using the stack name as Terraform workspace) is when we provision more than one
instance of the same Terraform component (with the same or different settings) into the same stack by defining multiple
Atmos components. In this case, Atmos calculates the Terraform workspace for each component by joining the stack name
with the component name.
For example, the following manifest shows how to define two Atmos components, `vpc/1` and `vpc/2`,
which both point to the same Terraform component `vpc`, in the stack `ue2-dev`:
```yaml
vars:
# Context variables that define the Atmos stack `ue2-dev`
environment: ue2
stage: dev
components:
terraform:
# Atmos component `vpc/1`
vpc/1:
metadata:
# Point to the Terraform component in `components/terraform/vpc`
component: vpc
# Inherit the defaults for all VPC components
inherits:
- vpc/defaults
# Define/override variables specific to this `vpc/1` component
vars:
name: vpc-1
ipv4_primary_cidr_block: 10.9.0.0/18
# Atmos component `vpc/2`
vpc/2:
metadata:
# Point to the Terraform component in `components/terraform/vpc`
component: vpc
# Inherit the defaults for all VPC components
inherits:
- vpc/defaults
# Define/override variables specific to this `vpc/2` component
vars:
name: vpc-2
ipv4_primary_cidr_block: 10.10.0.0/18
```
When you provision the components by executing the commands:
```shell
atmos terraform apply vpc/1 -s ue2-dev
atmos terraform apply vpc/2 -s ue2-dev
```
Atmos computes the workspace names as `ue2-dev-vpc-1` and `ue2-dev-vpc-2` respectively,
and selects the appropriate workspace for each component (again, creating it if needed).
This is done because the same Terraform component `vpc` is used as the workspace prefix
(in case of [AWS S3 backend](https://developer.hashicorp.com/terraform/language/settings/backends/s3),
folder in the S3 state bucket), and it's necessary to have different subfolders (`ue2-dev-vpc-1`
and `ue2-dev-vpc-2` instead of just `ue2-dev`) to store the Terraform state files.
## Terraform Workspace Override in Atmos
You can override Terraform workspaces for Atmos components by using `metadata.terraform_workspace` and
`metadata.terraform_workspace_pattern` attributes. For example:
```yaml
vars:
environment: ue2
stage: dev
components:
terraform:
vpc/1:
metadata:
component: vpc
# Override Terraform workspace
terraform_workspace: "vpc-1-workspace-override"
vpc/2:
metadata:
component: vpc
# Override Terraform workspace
terraform_workspace_pattern: "{environment}-{stage}-{component}-workspace-override"
```
When you provision the components by executing the commands:
```shell
atmos terraform apply vpc/1 -s ue2-dev
atmos terraform apply vpc/2 -s ue2-dev
```
Atmos sets the Terraform workspace `vpc-1-workspace-override` for the `vpc/1` component, and
`ue2-dev-vpc-2-workspace-override` for the `vpc/2` component.
The following context tokens are supported by the `metadata.terraform_workspace_pattern` attribute:
- `{namespace}`
- `{tenant}`
- `{environment}`
- `{region}`
- `{stage}`
- `{attributes}`
- `{component}`
- `{base-component}`
:::tip
For more information on Atmos base and derived components, and to understand the `{base-component}` token,
refer to [Atmos Component Inheritance](/core-concepts/stacks/inheritance)
:::
## References
- [Terraform Workspaces](https://developer.hashicorp.com/terraform/language/state/workspaces)
- [Managing Terraform Workspaces](https://developer.hashicorp.com/terraform/cli/workspaces)
- [Terraform Environment Variables](https://developer.hashicorp.com/terraform/cli/config/environment-variables)
## Disabling Terraform Workspaces
In some cases, you may want to disable Terraform workspaces entirely, particularly when using backends that don't support workspaces. By default, Atmos automatically manages workspaces for supported backend types, but you can control this behavior using the `components.terraform.workspaces_enabled` configuration in your `atmos.yaml` file.
### HTTP Backend and Workspace Support
The [Terraform HTTP backend](https://developer.hashicorp.com/terraform/language/settings/backends/http) does not support workspaces. When Atmos detects that you're using an HTTP backend, it automatically disables workspaces for the affected components, regardless of other configuration settings. This ensures compatibility with HTTP backends while still allowing you to use the same configuration for other backend types.
For example, when you execute a Terraform command with an HTTP backend:
```shell
atmos terraform apply vpc -s ue2-dev
```
Atmos will execute Terraform without attempting to create or select a workspace, using the default workspace instead.
### Explicitly Disabling Workspaces
If you need to disable workspaces for all components, regardless of backend type, you can set the `workspaces_enabled` configuration option in your `atmos.yaml` file:
```yaml
components:
terraform:
# Disable workspaces for all Terraform components
workspaces_enabled: false
# Other Terraform configuration...
```
When workspaces are disabled:
- Atmos will not attempt to create or select workspaces before running Terraform commands
- All Terraform operations will use the default workspace
- Workspace-related variables will be empty in component configurations
:::note
Setting `workspaces_enabled: true` for an HTTP backend will be ignored with a warning message since HTTP backends don't support workspaces.
:::
### When to Disable Workspaces
Consider disabling workspaces in the following scenarios:
- When using backends that don't support workspaces (e.g., HTTP backend)
- When you need consistent behavior with other tools that don't manage workspaces
- When you prefer to manage state files without workspace isolation
- When your workflow already handles environment separation through other means
By properly configuring workspace support, you can ensure that Atmos works seamlessly with all backend types while maintaining the flexibility to adapt to different deployment strategies.
---
## Core Concepts of the Atmos Framework
import DocCardList from '@theme/DocCardList'
Atmos simplifies the process of managing and deploying your infrastructure across cloud platforms.
Dive into these core concepts of Atmos to discover how they facilitate these processes.
You're about to discover a new way to think about things...
---
## Atmos Custom Commands
import File from '@site/src/components/File'
import Intro from '@site/src/components/Intro'
Atmos can be easily extended to support any number of custom CLI commands. Custom commands are exposed through the `atmos` CLI when you run `atmos help`. It's a great way to centralize the way operational tools are run in order to improve DX.
For example, one great way to use custom commands is to tie all the miscellaneous scripts into one consistent CLI interface. Then we can kiss those
ugly, inconsistent arguments to bash scripts goodbye! Just wire up the commands in atmos to call the script. Then developers can just run `atmos help`
and discover all available commands.
## Simple Example
Here is an example to play around with to get started.
Adding the following to `atmos.yaml` will introduce a new `hello` command.
```yaml
# Custom CLI commands
commands:
- name: hello
description: This command says Hello world
steps:
- "echo Hello world!"
```
We can run this example like this:
```shell
atmos hello
```
## Positional Arguments
Atmos also supports positional arguments. If a positional argument is required but not provided by the user,
the command will fail—unless you define a default in your config.
For the example, adding the following to `atmos.yaml` will introduce a new `greet` command that accepts one `name` argument,
but uses a default of "John Doe" if none is provided.
```yaml
# subcommands
commands:
- name: greet
description: This command says hello to the provided name
arguments:
- name: name
description: Name to greet
required: true
default: John Doe
steps:
- "echo Hello {{ .Arguments.name }}!"
```
We can run this example like this:
```shell
atmos greet Alice
```
or defaulting to "John Doe"
```shell
atmos greet
```
## Trailing Arguments
Atmos supports **trailing arguments** after `--` (a standalone double-dash). The `--` itself is a delimiter that signals the end of Atmos-specific options. Anything after `--` is passed directly to the underlying command without being interpreted by Atmos. The value of these trailing arguments is accessible in `{{ .TrailingArgs }}`.
For the example, adding the following to `atmos.yaml` will introduce a new `echo` command that accepts one `name` argument and also uses trailingArgs
```yaml
- name: ansible run
description: "Runs an Ansible playbook, allowing extra arguments after --."
arguments:
- name: playbook
description: "The Ansible playbook to run"
default: site.yml
required: true
steps:
- "ansible-playbook {{ .Arguments.playbook }} {{ .TrailingArgs }}"
```
Output:
```bash
$ atmos ansible run -- --limit web
Running: ansible-playbook site.yml --limit web
PLAY [web] *********************************************************************
```
## Passing Flags
Passing flags works much like passing positional arguments, except for that they are passed using long or short flags.
Flags can be optional (this is configured by setting the `required` attribute to `false`).
```yaml
# subcommands
commands:
- name: hello
description: This command says hello to the provided name
flags:
- name: name
shorthand: n
description: Name to greet
required: true
steps:
- "echo Hello {{ .Flags.name }}!"
```
We can run this example like this, using the long flag:
```shell
atmos hello --name world
```
Or, using the shorthand, we can just write:
```shell
atmos hello -n world
```
## Advanced Examples
### Define a New Terraform Command
```yaml
# Custom CLI commands
commands:
- name: terraform
description: Execute 'terraform' commands
# subcommands
commands:
- name: provision
description: This command provisions terraform components
arguments:
- name: component
description: Name of the component
flags:
- name: stack
shorthand: s
description: Name of the stack
required: true
# ENV var values support Go templates
env:
- key: ATMOS_COMPONENT
value: "{{ .Arguments.component }}"
- key: ATMOS_STACK
value: "{{ .Flags.stack }}"
steps:
- atmos terraform plan $ATMOS_COMPONENT -s $ATMOS_STACK
- atmos terraform apply $ATMOS_COMPONENT -s $ATMOS_STACK
```
### Override an Existing Terraform Command
```yaml
# Custom CLI commands
commands:
- name: terraform
description: Execute 'terraform' commands
# subcommands
commands:
- name: apply
description: This command executes 'terraform apply -auto-approve' on terraform components
arguments:
- name: component
description: Name of the component
flags:
- name: stack
shorthand: s
description: Name of the stack
required: true
steps:
- atmos terraform apply {{ .Arguments.component }} -s {{ .Flags.stack }} -auto-approve
```
### Show Component Info
```yaml
# Custom CLI commands
commands:
- name: show
description: Execute 'show' commands
# subcommands
commands:
- name: component
description: Execute 'show component' command
arguments:
- name: component
description: Name of the component
flags:
- name: stack
shorthand: s
description: Name of the stack
required: true
# ENV var values support Go templates and have access to {{ .ComponentConfig.xxx.yyy.zzz }} Go template variables
env:
- key: ATMOS_COMPONENT
value: "{{ .Arguments.component }}"
- key: ATMOS_STACK
value: "{{ .Flags.stack }}"
- key: ATMOS_TENANT
value: "{{ .ComponentConfig.vars.tenant }}"
- key: ATMOS_STAGE
value: "{{ .ComponentConfig.vars.stage }}"
- key: ATMOS_ENVIRONMENT
value: "{{ .ComponentConfig.vars.environment }}"
# If a custom command defines 'component_config' section with 'component' and 'stack', 'atmos' generates the config for the component in the stack
# and makes it available in {{ .ComponentConfig.xxx.yyy.zzz }} Go template variables,
# exposing all the component sections (which are also shown by 'atmos describe component' command)
component_config:
component: "{{ .Arguments.component }}"
stack: "{{ .Flags.stack }}"
# Steps support using Go templates and can access all configuration settings (e.g. {{ .ComponentConfig.xxx.yyy.zzz }})
# Steps also have access to the ENV vars defined in the 'env' section of the 'command'
steps:
- 'echo Atmos component from argument: "{{ .Arguments.component }}"'
- 'echo ATMOS_COMPONENT: "$ATMOS_COMPONENT"'
- 'echo Atmos stack: "{{ .Flags.stack }}"'
- 'echo Terraform component: "{{ .ComponentConfig.component }}"'
- 'echo Backend S3 bucket: "{{ .ComponentConfig.backend.bucket }}"'
- 'echo Terraform workspace: "{{ .ComponentConfig.workspace }}"'
- 'echo Namespace: "{{ .ComponentConfig.vars.namespace }}"'
- 'echo Tenant: "{{ .ComponentConfig.vars.tenant }}"'
- 'echo Environment: "{{ .ComponentConfig.vars.environment }}"'
- 'echo Stage: "{{ .ComponentConfig.vars.stage }}"'
- 'echo Dependencies: "{{ .ComponentConfig.deps }}"'
```
### Set EKS Cluster
```yaml
# Custom CLI commands
commands:
- name: set-eks-cluster
description: |
Download 'kubeconfig' and set EKS cluster.
Example usage:
atmos set-eks-cluster eks/cluster -s plat-ue1-dev -r admin
atmos set-eks-cluster eks/cluster -s plat-uw2-prod --role reader
verbose: false # Set to `true` to see verbose outputs
arguments:
- name: component
description: Name of the component
flags:
- name: stack
shorthand: s
description: Name of the stack
required: true
- name: role
shorthand: r
description: IAM role to use
required: true
# If a custom command defines 'component_config' section with 'component' and 'stack',
# Atmos generates the config for the component in the stack
# and makes it available in {{ .ComponentConfig.xxx.yyy.zzz }} Go template variables,
# exposing all the component sections (which are also shown by 'atmos describe component' command)
component_config:
component: "{{ .Arguments.component }}"
stack: "{{ .Flags.stack }}"
env:
- key: KUBECONFIG
value: /dev/shm/kubecfg.{{ .Flags.stack }}-{{ .Flags.role }}
steps:
- >
aws
--profile {{ .ComponentConfig.vars.namespace }}-{{ .ComponentConfig.vars.tenant }}-gbl-{{ .ComponentConfig.vars.stage }}-{{ .Flags.role }}
--region {{ .ComponentConfig.vars.region }}
eks update-kubeconfig
--name={{ .ComponentConfig.vars.namespace }}-{{ .Flags.stack }}-eks-cluster
--kubeconfig="${KUBECONFIG}"
> /dev/null
- chmod 600 ${KUBECONFIG}
- echo ${KUBECONFIG}
```
### Describe EKS Cluster Kubernetes Version Upgrade
```yaml
# Custom CLI commands
commands:
- name: describe
description: "Execute 'describe' commands"
# subcommands
commands:
- name: eks
description: "Execute 'describe eks' commands"
# subcommands
commands:
- name: upgrade
description: "Describe the steps on how to upgrade an EKS cluster to the next Kubernetes version. Usage: atmos describe eks upgrade -s "
arguments:
- name: component
description: Name of the EKS component
flags:
- name: stack
shorthand: s
description: Name of the stack
required: true
- name: role
shorthand: r
description: Role to assume to connect to the cluster
required: false
# If a custom command defines 'component_config' section with 'component' and 'stack',
# Atmos generates the config for the component in the stack
# and makes it available in {{ .ComponentConfig.xxx.yyy.zzz }} Go template variables,
# exposing all the component sections (which are also shown by 'atmos describe component' command)
component_config:
component: "{{ .Arguments.component }}"
stack: "{{ .Flags.stack }}"
env:
- key: KUBECONFIG
value: /dev/shm/kubecfg-eks-upgrade.{{ .Flags.stack }}
steps:
- |
# Set the environment
color_red="\u001b[31m"
color_green="\u001b[32m"
color_yellow="\u001b[33m"
color_blue="\u001b[34m"
color_magenta="\u001b[35m"
color_cyan="\u001b[36m"
color_black="\u001b[30m"
color_white="\u001b[37m"
color_reset="\u001b[0m"
# Check the requirements
command -v aws >/dev/null 2>&1 || { echo -e >&2 "\n${color_red}'aws' is required but it's not installed.${color_reset}"; exit 1; }
command -v kubectl >/dev/null 2>&1 || { echo -e >&2 "\n${color_red}'kubectl' is required but it's not installed.${color_reset}"; exit 1; }
command -v helm >/dev/null 2>&1 || { echo -e >&2 "\n${color_red}'helm' is required but it's not installed.${color_reset}"; exit 1; }
command -v jq >/dev/null 2>&1 || { echo -e >&2 "\n${color_red}'jq' is required but it's not installed.${color_reset}"; exit 1; }
command -v yq >/dev/null 2>&1 || { echo -e >&2 "\n${color_red}'yq' is required but it's not installed.${color_reset}"; exit 1; }
command -v pluto >/dev/null 2>&1 || { echo -e >&2 "\n${color_red}'pluto' is required but it's not installed.${color_reset}"; exit 1; }
command -v awk >/dev/null 2>&1 || { echo -e >&2 "\n${color_red}'awk' is required but it's not installed.${color_reset}"; exit 1; }
command -v sed >/dev/null 2>&1 || { echo -e >&2 "\n${color_red}'sed' is required but it's not installed.${color_reset}"; exit 1; }
command -v tr >/dev/null 2>&1 || { echo -e >&2 "\n${color_red}'tr' is required but it's not installed.${color_reset}"; exit 1; }
# Set the role to assume to connect to the cluster
role={{ .Flags.role }}
if [[ -z "$role" ]]; then
role=admin
fi
# Download kubeconfig and connect to the cluster
echo -e "\nConnecting to EKS cluster ${color_cyan}{{ .Flags.stack }}${color_reset} and downloading kubeconfig..."
aws \
--profile {{ .ComponentConfig.vars.namespace }}-{{if (index .ComponentConfig.vars "tenant") }}{{ .ComponentConfig.vars.tenant }}-gbl-{{ .ComponentConfig.vars.stage }}{{else}}gbl-{{ .ComponentConfig.vars.stage }}{{end}}-${role} \
--region {{ .ComponentConfig.vars.region }} \
eks update-kubeconfig \
--name={{ .ComponentConfig.vars.namespace }}-{{ .Flags.stack }}-eks-cluster \
--kubeconfig="${KUBECONFIG}"
chmod 600 ${KUBECONFIG}
# Check connectivity to the cluster
kubectl version -o json 2>&1>/dev/null
retVal=$?
if [ $retVal -ne 0 ]; then
echo -e "${color_red}\nCould not connect to the cluster.\nIf the cluster is provisioned in private subnets or only allows private access, make sure you are connected to the VPN.\n${color_reset}"
exit $retVal
fi
# Get the current Kubernetes version from the cluster
current_k8s_version_str=$(kubectl version -o json 2>/dev/null | jq '(.serverVersion.major + "." + .serverVersion.minor)' | sed 's/[+\"]//g')
current_k8s_version=$(echo ${current_k8s_version_str} | jq 'tonumber')
echo -e "\nThe cluster is running Kubernetes version ${current_k8s_version}"
# Get all the supported Kubernetes versions from AWS EKS
supported_eks_k8s_versions=$(aws eks describe-addon-versions | jq -r '[ .addons[].addonVersions[].compatibilities[].clusterVersion ] | unique | sort')
supported_eks_k8s_versions_csv=$(echo ${supported_eks_k8s_versions} | jq -r 'join(", ")')
echo -e "AWS EKS currently supports Kubernetes versions ${supported_eks_k8s_versions_csv}"
# Calculate the next Kubernetes version that the cluster can be upgraded to
next_k8s_version=$(echo ${supported_eks_k8s_versions} | jq -r --arg current_k8s_version "${current_k8s_version}" 'map(select((. |= tonumber) > ($current_k8s_version | tonumber)))[0]')
# Check if the cluster can be upgraded
upgrade_needed=false
if [[ ! -z "$next_k8s_version" ]] && (( $(echo $next_k8s_version $current_k8s_version | awk '{if ($1 > $2) print 1;}') )) ; then
upgrade_needed=true
else
fi
if [ ${upgrade_needed} = false ]; then
echo -e "${color_green}\nThe cluster is running the latest supported Kubernetes version ${current_k8s_version}\n${color_reset}"
exit 0
fi
# Describe the upgrade process
echo -e "${color_green}\nThe cluster can be upgraded to the next Kubernetes version ${next_k8s_version}${color_reset}"
# Describe what will be checked before the upgrade
describe_what_will_be_checked="
\nBefore upgrading the cluster to Kubernetes ${next_k8s_version}, we'll check the following:
- Pods and containers that are not ready or crashing
https://kubernetes.io/docs/concepts/workloads/pods/pod-lifecycle
- Helm releases with removed Kubernetes API versions
https://kubernetes.io/docs/reference/using-api/deprecation-policy
https://helm.sh/docs/topics/kubernetes_apis
- EKS add-ons versions
https://docs.aws.amazon.com/eks/latest/userguide/eks-add-ons.html
"
echo -e "${describe_what_will_be_checked}"
echo -e "${color_cyan}\nPress Enter to continue ...${color_reset}"
read -r
# Show all Pods that are not in 'Running' state
echo -e "\nChecking for Pods that are not in 'Running' state...\n"
kubectl get pods -A | grep -Ev '([0-9]+)/\1'
# Show failed or not ready containers
echo -e "\nChecking for failing containers..."
failing_containers=$(kubectl get pods -A -o json | jq '[ .items[].status.containerStatuses[].state | select(has("waiting")) | .waiting ]')
failing_containers_count=$(echo ${failing_containers} | jq 'length')
if [[ "$failing_containers_count" > 0 ]]; then
echo -e "${color_red}\nThere are ${failing_containers_count} failing container(s) on the cluster:\n${color_reset}"
echo ${failing_containers} | jq -r 'def red: "\u001b[31m"; def reset: "\u001b[0m"; (.[] | [ red + .message + reset ]) | @tsv'
echo -e "\nAlthough the cluster can be upgraded to the next Kubernetes version even with the failing Pods and containers, it's recommended to fix all the issues before upgrading.\n"
else
echo -e "${color_green}\nThere are no failing containers on the cluster\n${color_reset}"
fi
echo -e "${color_cyan}\nPress Enter to continue ...${color_reset}"
read -r
# Show Helm releases with removed Kubernetes API versions
echo -e "\nChecking for Helm releases with removed Kubernetes API versions...\n"
releases_with_removed_versions=$(pluto detect-helm --output json --only-show-removed --target-versions k8s=v${next_k8s_version} 2>/dev/null | jq 'select(has("items")) | [ .items[] ]')
releases_with_removed_versions_count=$(echo ${releases_with_removed_versions} | jq 'length')
if [[ -z "$releases_with_removed_versions_count" ]] || [[ "$releases_with_removed_versions_count" = 0 ]]; then
echo -e "${color_green}\nAll Helm releases are up to date and ready for Kubernetes ${next_k8s_version}${color_reset}"
else
echo -e "${color_red}\nThere are Helm releases with API versions removed in Kubernetes ${next_k8s_version}\n${color_reset}"
pluto detect-helm --output wide --only-show-removed --target-versions k8s=v${next_k8s_version} 2>/dev/null
helm_list_filter=$(echo ${releases_with_removed_versions} | jq -r '[ (.[].name | split("/"))[0] ] | join("|")')
helm list -A -a -f ${helm_list_filter}
# Describe how to fix the Helm releases
describe_how_to_fix_helm_releases="
\nBefore upgrading the cluster to Kubernetes ${next_k8s_version}, the Helm releases need to be fixed.
- For the Helm releases identified, you need to check for the latest version of the Chart (which has supported API versions)
or update the Chart yourself. Then deploy the updated Chart
- If the cluster was already upgraded to a new Kubernetes version without auditing for the removed API versions, it might be already running
with the removed API versions. When trying to redeploy the Helm Chart, you might encounter an error similar to the following:
Error: UPGRADE FAILED: current release manifest contains removed kubernetes api(s)
for this kubernetes version and it is therefore unable to build the kubernetes
objects for performing the diff.
Error from Kubernetes: unable to recognize \"\": no matches for kind "Deployment" in version "apps/v1beta1"
Helm fails in this scenario because it attempts to create a diff patch between the current deployed release
(which contains the Kubernetes APIs that are removed) against the Chart you are passing with the updated/supported API versions.
To fix this, you need to edit the release manifests that are stored in the cluster to use the supported API versions.
You can use the Helm 'mapkubeapis' plugin to update/patch the Helm releases to supported APIs.
Execute the following commands to patch the releases identified above:
helm plugin install https://github.com/helm/helm-mapkubeapis
helm mapkubeapis -n
NOTE: The best practice is to upgrade Helm releases that are using deprecated API versions to supported API versions
prior to upgrading to a Kubernetes version that removes those APIs.
For more information, refer to:
- https://helm.sh/docs/topics/kubernetes_apis
- https://github.com/helm/helm-mapkubeapis
"
echo -e "${describe_how_to_fix_helm_releases}"
fi
echo -e "${color_cyan}\nPress Enter to continue ...${color_reset}"
read -r
# Check EKS add-ons versions
echo -e "\nChecking EKS add-ons versions..."
addons=$(atmos describe component {{ .Arguments.component }} -s {{ .Flags.stack }} --format json | jq -r '.vars.addons')
addons_count=$(echo ${addons} | jq -r '. | keys | length')
if [[ "$addons_count" = 0 ]]; then
echo -e "${color_yellow}
\rCould not detect the 'addons' variable for the component '{{ .Arguments.component }}' in the stack '{{ .Flags.stack }}'.
\rMake sure that EKS add-ons are configured and provisioned on the EKS cluster.
\rRefer to https://docs.aws.amazon.com/eks/latest/userguide/eks-add-ons.html for more details.
${color_reset}"
else
echo -e "\nThere are currently ${addons_count} add-on(s) configured for the EKS component ${color_cyan}{{ .Arguments.component }}${color_reset} in the stack ${color_cyan}{{ .Flags.stack }}${color_reset} in the variable ${color_cyan}addons${color_reset}:\n"
echo ${addons} | yq --prettyPrint '.'
echo -e "\nKubernetes ${next_k8s_version} requires the following versions of the EKS add-ons:\n"
# Detect the latest supported versions of the EKS add-ons
addons_template=$(atmos describe component {{ .Arguments.component }} -s {{ .Flags.stack }} --format json | jq -r '.vars.addons')
for ((i=0; i<${addons_count}; i++)); do
addon_name=$(echo ${addons} | jq -r '(keys)['$i']')
addon_version=$(aws eks describe-addon-versions --kubernetes-version ${next_k8s_version} --addon-name ${addon_name} --query 'addons[].addonVersions[?compatibilities[0].defaultVersion].addonVersion' --output text)
addons_template=$(jq --arg addon_name "${addon_name}" --arg addon_version "${addon_version}" '.[$addon_name].addon_version = $addon_version' <<< "${addons_template}")
done
# Print the add-ons configuration for the desired Kubernetes version
echo ${addons_template} | yq --prettyPrint '.'
fi
# Describe how to provision the EKS component with the new Kubernetes version
echo -e "${color_cyan}\nPress Enter to continue ...${color_reset}"
read -r
echo -e "\nAfter the Pods, Helm releases and EKS add-ons are configured and ready, do the following:\n
- Set the variable ${color_cyan}kubernetes_version${color_reset} to ${color_cyan}${next_k8s_version}${color_reset} for the EKS component ${color_cyan}{{ .Arguments.component }}${color_reset} in the stack ${color_cyan}{{ .Flags.stack }}${color_reset}
- Run the command ${color_cyan}atmos terraform apply {{ .Arguments.component }} -s {{ .Flags.stack }}${color_reset} to provision the component
- Run the command ${color_cyan}kubectl get pods -A${color_reset} to check the status of all Pods after the upgrade
- Run the command ${color_cyan}helm list -A -a${color_reset} to check the status of all Helm releases after the upgrade
"
```
---
## Deploy Components
import Intro from '@site/src/components/Intro';
Once you're done developing your components and configuring them with stacks, you can deploy them with a single command or in a CI/CD pipeline.
In Atmos, when we talk about "Deployment," it refers to taking the [fully rendered and deep-merged configuration](/core-concepts/describe) of a [stack](/core-concepts/stacks) and provisioning an instance of one of the components. We call this a "component instance," and it's simply a component that has been deployed in a specific stack.
### Deployment in Atmos
Deployment in Atmos can be approached in several ways.
1. **Command Line Deployment**: You can always deploy on the command line using Atmos, which is particularly useful for local development or in environments that are less mature and do not yet have CI/CD capabilities. For more complicated deployments, you can leverage [workflows](/core-concepts/workflows) to orchestrate multiple deployments in a specific order or run other commands, including [custom commands](/core-concepts/custom-commands).
2. **CI/CD Integrations**: Atmos supports several common methods for CI/CD, with [GitHub Actions](/integrations/github-actions) being the recommended method. We maintain and invest the most time and effort into GitHub Actions. However, we also support integrations with [Spacelift](/integrations/spacelift) and [Atlantis](/integrations/atlantis).
### Configuring Dependencies Between Components
When deploying components, it's important to consider the dependencies between components. For example, a database component might depend on a network component. When this happens, it's important to ensure that the network component is deployed before the database component.
Make sure to [configure dependencies](/core-concepts/stacks/dependencies) between components using the `settings.depends_on` section.
### Managing Dependency Order Between Components
Sometimes, components have dependencies on other components. For example, a database component might depend on a network component. When this happens, it's important to ensure that the network component is deployed before the database component.
In Atmos, support of ordered dependencies is reliant on the integration and not all integrations support ordered dependencies.
All configurations in Atmos are defined in YAML. If you can write a Terraform module, you can essentially Terraform anything based on the stack configuration. It's important to be aware of dependencies between your components. Depending on the integration mechanism or deployment approach you choose, handling these dependencies can be either built-in or more manual.
- [GitHub Actions](/integrations/github-actions): Currently, our GitHub Actions do not support dependency order application.
- [Spacelift](/integrations/spacelift): Our Spacelift integrations support dependency order application.
- [Atlantis](/integrations/atlantis): By customizing the template generated for Atlantis, similar dependency handling can probably be achieved, although we do not have any documentation on this.
### Automate Cold Starts
Atmos supports [workflows](/core-concepts/workflows), which provide a convenient way to automate deployments, especially for cold starts. A cold start is when you go from zero to a full deployment, typically occurring on day zero in the life cycle of your resources.
---
## Describe Components
import Intro from '@site/src/components/Intro'
import ActionCard from '@site/src/components/ActionCard'
import PrimaryCTA from '@site/src/components/PrimaryCTA'
Describing components helps understand the final, fully deep-merged configuration for an [Atmos component](/core-concepts/components) in each [stack](/core-concepts/stacks).
The more [DRY a configuration is due to imports](/core-concepts/stacks/imports), the more [derived the configuration is due to inheritance](/core-concepts/stacks/inheritance), the harder it may be to understand what the final component configuration will be.
For example, if we wanted to understand what the final configuration looks like for a "vpc" component running in the "production" stack in the `us-east-2` AWS region, we could do that by calling the [`atmos describe component`](/cli/commands/describe/component) command and view the YAML output:
```shell
atmos describe component vpc -s ue2-prod
```
For more powerful filtering options, consider [describing stacks](/core-concepts/describe/stacks) instead.
The other helpful use-case for describing components and stacks is when developing policies for [validation](/core-concepts/validate) of
[Atmos components](/core-concepts/components) and [Atmos stacks](/core-concepts/stacks). OPA policies can enforce what is or is not permitted. Everything in the output can be validated using policies that you develop.
For a deep dive into describing components, refer to the CLI command reference.
Command Reference
---
## Describe Configuration
import DocCardList from '@theme/DocCardList'
import Intro from '@site/src/components/Intro'
Atmos is a framework for defining cloud architectures in YAML. To understand what the fully-deep merged configuration will look like, you can describe it.
In Stacks, you define configurations for all Components, setting up small units of infrastructure like VPCs, Clusters, and Databases. Atmos lets you combine these components into reusable, nestable Stacks using Imports. You can break down everything from simple websites to full-blown multi-account/multi-subscription cloud architectures into components.
In this chapter, you’ll learn to describe all aspects of the fully-deep merged configurations so you can understand what Atmos stacks look like.
---
## Describe Stacks
import Terminal from '@site/src/components/Terminal'
import Intro from '@site/src/components/Intro'
import ActionCard from '@site/src/components/ActionCard'
import PrimaryCTA from '@site/src/components/PrimaryCTA'
Describing stacks is helpful to understand what the final, fully computed and deep-merged configuration of a stack will look like. Use this to slice and dice the Stack configuration to show different information about stacks and component.
For example, if we wanted to understand what the final configuration looks like for the "production" stack, we could do that by calling
the [`atmos describe stacks`](/cli/commands/describe/stacks) command to view the YAML output.
The output can be written to a file by passing the `--file` command-line flag to `atmos` or even formatted as YAML or JSON by using `--format`
command-line flag.
:::tip PRO TIP
If the filtering options built-in to Atmos are not sufficient, redirect the output to [`jq`](https://stedolan.github.io/jq/) for very powerful filtering options.
:::
Since the output of a Stack might be overwhelming, and we're only interested in some particular section of the configuration, the output can be
filtered using flags to narrow the output by `stack`, `component-types`, `components`, and `sections`. The component sections can be further filtered
by `atmos_component`, `atmos_stack`, `atmos_stack_file`, `backend`, `backend_type`, `command`, `component`, `env`, `inheritance`, `metadata`,
`overrides`, `remote_state_backend`, `remote_state_backend_type`, `settings`, `vars`, `workspace`.
For example:
```yaml
plat-ue2-dev:
components:
terraform:
vpc:
backend: {}
backend_type: s3
command: terraform
component: vpc
env: {}
inheritance: []
metadata:
component: vpc
overrides: {}
remote_state_backend: {}
remote_state_backend_type: ""
settings:
validation:
check-vpc-component-config-with-opa-policy:
description: Check 'vpc' component configuration using OPA policy
disabled: false
module_paths:
- catalog/constants
schema_path: vpc/validate-vpc-component.rego
schema_type: opa
timeout: 10
validate-vpc-component-with-jsonschema:
description: Validate 'vpc' component variables using JSON Schema
schema_path: vpc/validate-vpc-component.json
schema_type: jsonschema
vars:
availability_zones:
- us-east-2a
- us-east-2b
- us-east-2c
enabled: true
environment: ue2
map_public_ip_on_launch: true
max_subnet_count: 3
name: common
namespace: acme
nat_gateway_enabled: true
nat_instance_enabled: false
region: us-east-2
stage: dev
tenant: plat
vpc_flow_logs_enabled: true
vpc_flow_logs_log_destination_type: s3
vpc_flow_logs_traffic_type: ALL
workspace: plat-ue2-dev
vpc-flow-logs-bucket:
backend: {}
backend_type: s3
command: terraform
component: vpc-flow-logs-bucket
env: {}
inheritance: []
metadata:
component: vpc-flow-logs-bucket
overrides: {}
remote_state_backend: {}
remote_state_backend_type: ""
settings: {}
vars:
enabled: true
environment: ue2
force_destroy: true
lifecycle_rule_enabled: false
name: vpc-flow-logs
namespace: acme
region: us-east-2
stage: dev
tenant: plat
traffic_type: ALL
workspace: plat-ue2-dev
# Other stacks here
```
```json
{
"plat-ue2-dev": {
"components": {
"terraform": {
"vpc": {
"metadata": {
"component": "vpc"
}
}
}
}
},
"plat-ue2-prod": {
"components": {
"terraform": {
"vpc": {
"metadata": {
"component": "vpc"
}
}
}
}
},
"plat-ue2-staging": {
"components": {
"terraform": {
"vpc": {
"metadata": {
"component": "vpc"
}
}
}
}
},
"plat-uw2-dev": {
"components": {
"terraform": {
"vpc": {
"metadata": {
"component": "vpc"
}
}
}
}
},
"plat-uw2-prod": {
"components": {
"terraform": {
"vpc": {
"metadata": {
"component": "vpc"
}
}
}
}
},
"plat-uw2-staging": {
"components": {
"terraform": {
"vpc": {
"metadata": {
"component": "vpc"
}
}
}
}
}
}
```
For a deep dive on describing stacks, refer to the CLI command reference.
Command Reference
---
## Configure Atmos CLI
import EmbedFile from '@site/src/components/EmbedFile'
import KeyPoints from '@site/src/components/KeyPoints'
import Screengrab from '@site/src/components/Screengrab'
import Intro from '@site/src/components/Intro'
import ActionCard from '@site/src/components/ActionCard'
import PrimaryCTA from '@site/src/components/PrimaryCTA'
The `atmos.yaml` configuration file is used to control the behavior of the `atmos` CLI for your project. This is how Atmos knows where to find your stack configurations and components. Almost everything in Atmos is configurable via this file.
Because this file is crucial to the configuration of the project, it should live along side of it, with your Terraform components and Atmos stacks. It's also where you can [configure integrations](/integrations), like with our [GitHub Actions](/integrations/github-actions).
- What are the different configuration files in Atmos
- How to configure `atmos.yaml` for your project's filesystem layout
- How Atmos finds the `atmos.yaml` file
- How Atmos identifies stack configurations using context variables and naming patterns
To configure Atmos to work with your project, we'll create a file called `atmos.yaml` to tell Atmos where to find the
Terraform components and Atmos stacks. Almost everything in Atmos is configurable via this file.
## Types of Configuration Files
In Atmos, there are some different types of configuration files to be aware of. The most important one is the `atmos.yaml` file, which is used to configure the behavior of the `atmos` CLI. This file is used to control how Atmos finds your Terraform components and Atmos stacks.
- `atmos.yaml`
- CLI configuration for Atmos to find your Terraform components and Atmos stacks. See [vendoring](/cli/configuration).
- `vendor.yaml`
-
Vendoring manifest for any third-party dependencies. See [vendoring](/core-concepts/vendor/vendor-manifest).
__NOTE__: The vendor manifest can import other vendor manifests, allowing you to compose them together.
- `stacks/**/*.yaml`
-
Vendoring manifest for any third-party dependencies. See [vendoring](/core-concepts/vendor/vendor-manifest).
__NOTE__: the actual path to the stacks directory is configurable in the `atmos.yaml` file, via the `stacks.base_path` setting.
- `workflows/**/*.yaml`
-
Workflow definitions. See [workflows](/core-concepts/workflows).
__NOTE__: the actual path to the workflows directory is configurable in the `atmos.yaml` file, via the `workflows.base_path` setting.
- `**/components/**/component.yaml`
-
Component manifest for vendoring individual components. See [component manifest](/core-concepts/vendor/component-manifest).
__NOTE__: the actual path to the components directory is configurable in the `atmos.yaml` file, via the `components..base_path` setting.
- `schemas/*.schema.json`
-
JSON Schema for validating Atmos manifests. See [validation](/core-concepts/validate/json-schema).
__NOTE__, the actual path to the schemas directory is configurable in the `atmos.yaml` file, via the `schemas.atmos.manifest` setting.
- `schemas/*.rego`
-
OPA Policy for validating Atmos manifests. See [validation](/core-concepts/validate/opa).
## Atmos CLI Configuration Schema
Below is the minimum recommended configuration for Atmos to work with Terraform and to configure [Atmos components](/core-concepts/components) and [Atmos stacks](/core-concepts/stacks). Copy this YAML config below into your `atmos.yaml` file.
__NOTE:__ For a detailed description of all the sections, refer to [CLI Configuration](/cli/configuration).
### Stack Names (Slugs)
Atmos uses “slugs” to refer to stacks, so you don't need to pass multiple arguments to identify a stack or a component in a stack.
It's a deliberate design decision of Atmos to rely strictly on configuration, rather than on file names and directory locations, which can change (and would thereby change your state).
For example, with the command `atmos terraform apply myapp -s dev`, Atmos interprets the slug `dev` using the pattern `{stage}` to locate the correct stack configuration in the stacks directory.
The format of this slug, is determined by one of the following settings.
- `stacks.name_template` (newer format, more powerful)
-
The name template allows you to define a custom Go template to format the stack name. This is useful when you want to use a different naming convention for your stacks.
- `stacks.name_pattern` (old format, still supported)
-
The name pattern relies strictly on variables (`var.namespace`, `var.tenant`, `var.environment`, `var.stage`)
to identify the stack. It does not support any other variables.
You'll still see this in many of the examples, but we recommend using the newer `name_template` format.
### Logging
Atmos provides some simple settings to control how it emits events to standard error. By convention, Atmos uses standard error to communicate all events related to its own processing. We reserve standard output (stdout) for the intended output of the commands that Atmos executes. By following this convention, you can safely pipe the output from Atmos into other commands as part of a pipeline.
- `logs.level`
-
Set to `Info` to see the most helpful logs. You can also set it to `Trace` to see all the logs, which is helpful for debugging.
Supported options are:
- `Info` _default_
- Emit standard messages that describe what Atmos is doing
- `Warn`
- Show all messages with a severity of "warning" or less
- `Error`
- Show all messages with a severity of "error" or less
- `Debug`
- Emit helpful debugging information, including all other severities. This is very verbose.
- `Trace`
- Turn off all filters, and just display every single message.
- `logs.file`
-
Set to `/dev/stderr` to send all of Atmos output to the standard error stream. This is useful when running Atmos in a CI/CD pipeline.
### Command Aliases
If you get tired of typing long commands in Atmos, you can alias them using the `aliases` section. This is especially useful for commands that you run frequently, like Terraform. Aliases you define appear in the `atmos help`, so you can see them at a glance.
```yaml
# CLI command aliases
aliases:
# Aliases for Atmos native commands
tf: terraform
tp: terraform plan
up: terraform apply
down: terraform destroy
ds: describe stacks
dc: describe component
# Aliases for Atmos custom commands
ls: list stacks
lc: list components
```
Aliases can make Atmos easier to use by allowing you to define shortcuts for frequently used commands.
Learn Aliases
### Path Configuration
Well-known paths are how Atmos knows how to find all your stack configurations, components and workflows. Here are the essential paths that you need to configure:
- `base_path`
- The base path for components, stacks, and workflows configurations. We set it to `./` so it will use the current working directory. Alternatively, we can override this behavior by setting the ENV var `ATMOS_BASE_PATH` to point to another directory location.
- `components.terraform.base_path`
- The base path to the Terraform components (Terraform root modules). As described in [Configure Repository](/quick-start/advanced/configure-repository), we've decided to put the Terraform components into the `components/terraform` directory, and this setting tells Atmos where to find them. Atmos will join the base path (set in the `ATMOS_BASE_PATH` ENV var) with `components.terraform.base_path` to calculate the final path to the Terraform components
- `stacks.base_path`
- The base path to the Atmos stacks. As described in [Configure Repository](/quick-start/advanced/configure-repository), we've decided to put the stack configurations into the `stacks` directory, and this setting tells Atmos where to find them. Atmos will join the base path (set in the `ATMOS_BASE_PATH` ENV var) with `stacks.base_path` to calculate the final path to the stacks
- `stacks.included_paths`
- List of file paths to the top-level stacks in the `stacks` directory to include in search when Atmos searches for the stack where the component is defined when executing `atmos` commands
- `stacks.excluded_paths`
- List of file paths to the top-level stacks in the `stacks` directory to exclude from search when Atmos searches for the stack where the component is defined when executing `atmos` commands
- `workflows.base_path`
- The base path to Atmos [Workflows](/core-concepts/workflows) files
:::tip Environment variables
Everything in the `atmos.yaml` file can be overridden by environment variables. This is useful for CI/CD pipelines where you might want to control the behavior of Atmos without changing the `atmos.yaml` file.
:::
## Custom Commands
- `commands`
- configuration for [Atmos Custom Commands](/core-concepts/custom-commands)
See our many [practical examples](https://github.com/cloudposse/atmos/tree/main/examples) of using Custom Commands in atmos.
Custom Commands are a versatile and powerful feature of Atmos. They allow you to extend Atmos’s functionality to meet your specific needs without modifying its core.
Learn Custom Commands
## Workflows
Workflows allow you to automate routine operations, such as orchestrating the startup behavior of a series of services. Very little about workflows is configured in the `atmos.yaml`. Only the base path to the workflows is defined here. The workflows themselves are defined in the `workflows.base_path` folder.
Workflows allow you to orchestrate your components or any command. Unlike Custom Commands, Workflows focus on orchestration and are reentrant, allowing you to start at any step in the workflow.
Learn Workflows
## Schema Validation
- `schemas`
-
[JSON Schema](https://json-schema.org/) and [OPA Policy](https://www.openpolicyagent.org/) configurations for:
- [Atmos Manifests Validation](/cli/schemas)
- [Atmos Stack Validation](/core-concepts/validate)
## Atmos Search Paths
Atmos searches for the `atmos.yaml` file in several locations, stopping at the first successful match. The search order (from highest to lowest priority) is:
- Environment variable `ATMOS_CLI_CONFIG_PATH`
- Current working directory
- Home dir (`~/.atmos/atmos.yaml`)
- System dir (`/usr/local/etc/atmos/atmos.yaml` on Linux, `%LOCALAPPDATA%/atmos/atmos.yaml` on Windows)
Initial Atmos configuration can be controlled by these environment variables:
- `ATMOS_CLI_CONFIG_PATH`
- Directory that contains the `atmos.yaml` (just the folder without the file name). It's not possible to change the filename at this time.
- `ATMOS_BASE_PATH`
- Base path to the `components/` and `stacks/` folders.
## Special Considerations for Terraform Components
If you are relying on Atmos discovering the `atmos.yaml` based on your current working directory (e.g. at the root of repository), it will work for the `atmos` CLI; however, it will **not work** for [Component Remote State](/core-concepts/share-data/remote-state) because it uses the [terraform-provider-utils](https://github.com/cloudposse/terraform-provider-utils) Terraform provider.
This is because Terraform executes provider from the component's folder (e.g. `components/terraform/vpc`), so it will no longer find the file in the root of the repository, since the working directory has changed.
Both the `atmos` CLI and [terraform-provider-utils](https://github.com/cloudposse/terraform-provider-utils) Terraform provider use the same `Go` code, which try to locate the [CLI config](/cli/configuration) `atmos.yaml` file before parsing and processing [Atmos stacks](/core-concepts/stacks).
This means that `atmos.yaml` file must be at a location in the file system where all processes can find it, such as by explicitly specifying the path in the `ATMOS_CLI_CONFIG_PATH` environment variable.
For a deep-dive on configuring the Atmos CLI and all of the sections of the `atmos.yaml`, refer to CLI Configuration.
Advanced CLI Configuration
---
## Configure Helmfile
import Intro from '@site/src/components/Intro'
import File from '@site/src/components/File'
Atmos natively supports opinionated workflows for Helmfile. It's compatible with every version of helmfile and designed to work with multiple different versions of Helmfile concurrently.
Keep in mind that Atmos does not handle the downloading or installation of Helmfile (or its dependency Kustomize); it assumes these commands are already installed on your system. For installation instructions, refer to:
- [Helmfile Installation Guide](https://helmfile.readthedocs.io/en/latest/#installation)
- [Kustomize Installation Guide](https://kubectl.docs.kubernetes.io/installation/kustomize/)
To automate the installation process, consider creating a [Custom Command](/core-concepts/custom-commands).
Atmos provides many settings that are specific to Helmfile, which are configured in `atmos.yaml`.
## CLI Configuration
All of the following settings are defined by default in the [Atmos CLI Configuration](/cli/configuration) found in `atmos.yaml`.
:::important
At this time, these settings cannot be overridden in the [Stack](/core-concepts/stacks/#schema) configuration.
:::
The defaults for everything are defined underneath the `components.helmfile` section.
```yaml
components:
helmfile:
# ...
```
The following settings are available for Helmfile:
- `components.helmfile.command`
- The executable to be called by Atmos when running Helmfile commands
- `base_path`
- The root directory where the Helmfile components and configurations are located. This path serves as the starting point for resolving any relative paths within the Helmfile setup.
- `use_eks` (default: `false`)
- A flag indicating whether the component is configured to use Amazon EKS (Elastic Kubernetes Service). When set to `true`, the component will interact with EKS for provisioning and managing Kubernetes clusters. Also, it means `cluster_name_pattern` must be defined.
- `kubeconfig_path`
- The file path to the `kubeconfig` file, which contains the necessary authentication and configuration details to interact with the Kubernetes cluster. This path is essential for managing cluster resources using Helmfile.
- `helm_aws_profile_pattern`
- A pattern that defines which AWS CLI profiles should be used by Helm when interacting with AWS services, such as EKS. This allows for dynamic selection of AWS credentials based on the environment or cluster.
- `cluster_name_pattern` (required when `use_eks=true`)
- A naming pattern used to identify and select the Kubernetes cluster within the Helmfile configuration. This pattern helps automate the management of different clusters by matching their names based on the specified criteria.
## Example Configuration
Here is an example configuration for Helmfile that we use at Cloud Posse in our [refarch for AWS](https://docs.cloudposse.com/).
```yaml
components:
helmfile:
base_path: components/helmfile
use_eks: true
kubeconfig_path: /dev/shm
helm_aws_profile_pattern: '{namespace}-{tenant}-gbl-{stage}-helm'
cluster_name_pattern: '{namespace}-{tenant}-{environment}-{stage}-eks-cluster'
```
---
## Configure OpenTofu
import useBaseUrl from '@docusaurus/useBaseUrl';
import KeyPoints from '@site/src/components/KeyPoints'
import Intro from '@site/src/components/Intro'
Atmos natively supports [OpenTofu](https://opentofu.org), similar to the way it supports [Terraform](/core-concepts/projects/configuration/terraform). It's compatible with every version of `opentofu` and designed to work with multiple different versions of it concurrently, and can even work alongside with [HashiCorp Terraform](/core-concepts/projects/configuration/terraform).
- How to configure Atmos to use OpenTofu for Terraform components
- How to alias `terraform` to `tofu` in Atmos
- How to configure OpenTofu for only specific components
Please see the complete configuration options for [Terraform](/core-concepts/projects/configuration/terraform), as they are the same for OpenTofu. We'll focus
only on what's different in this document, in order to utilize OpenTofu. Keep in mind that Atmos does not handle the downloading or installation
of OpenTofu; it assumes that any required binaries for the commands are already installed on your system.
Additionally, if using Spacelift together with Atmos, make sure you review the [Spacelift Integration](/integrations/spacelift) to make any necessary changes.
## CLI Configuration
All the default configuration settings to support OpenTofu are defined in the [Atmos CLI Configuration](/cli/configuration),
but can also be overridden at any level of the [Stack](/core-concepts/stacks/#schema) configuration.
```yaml
components:
terraform:
# The executable to be called by `atmos` when running Terraform commands
command: "/usr/bin/tofu" # or just `tofu`
# Can also be set using 'ATMOS_COMPONENTS_TERRAFORM_BASE_PATH' ENV var, or '--terraform-dir' command-line argument
# Supports both absolute and relative paths
base_path: "components/tofu"
# Can also be set using 'ATMOS_COMPONENTS_TERRAFORM_APPLY_AUTO_APPROVE' ENV var
apply_auto_approve: false
# Can also be set using 'ATMOS_COMPONENTS_TERRAFORM_DEPLOY_RUN_INIT' ENV var, or '--deploy-run-init' command-line argument
deploy_run_init: true
# Can also be set using 'ATMOS_COMPONENTS_TERRAFORM_INIT_RUN_RECONFIGURE' ENV var, or '--init-run-reconfigure' command-line argument
init_run_reconfigure: true
# Can also be set using 'ATMOS_COMPONENTS_TERRAFORM_AUTO_GENERATE_BACKEND_FILE' ENV var, or '--auto-generate-backend-file' command-line argument
auto_generate_backend_file: false
# Can also be set using 'ATMOS_COMPONENTS_TERRAFORM_APPEND_USER_AGENT' ENV var, or '--append-user-agent' command-line argument
append_user_agent: "Acme/1.0 (Build 1234; arm64)"
init:
# Can also be set using 'ATMOS_COMPONENTS_TERRAFORM_INIT_PASS_VARS' ENV var, or '--init-pass-vars' command-line argument
pass_vars: true
```
- `components.terraform.command`
- The executable to be called by Atmos when running OpenTofu commands
- `components.terraform.base_path`
- The root directory where the OpenTofu components and configurations are located. This path serves as the starting point for resolving any relative paths within the OpenTofu setup.
- `components.terraform.apply_auto_approve`
- if set to `true`, Atmos automatically adds the `-auto-approve` option to instruct Terraform to apply the plan without
asking for confirmation when executing `terraform apply` command
- `components.terraform.deploy_run_init`
- if set to `true`, Atmos runs `terraform init` before executing [`atmos terraform deploy`](/cli/commands/terraform/deploy) command
- `components.terraform.init_run_reconfigure`
- if set to `true`, Atmos automatically adds the `-reconfigure` option to update the backend configuration when executing `terraform init` command
- `components.terraform.auto_generate_backend_file`
- if set to `true`, Atmos automatically generates the Terraform backend file from the component configuration when executing `terraform plan` and `terraform apply` commands
- `components.terraform.init.pass_vars`
-
if set to `true`, Atmos automatically passes the generated varfile to the `tofu init` command using the `--var-file` flag.
[OpenTofu supports passing a varfile to `init`](https://opentofu.org/docs/cli/commands/init/#general-options) to dynamically configure backends
To make OpenTofu the default command when running "terraform", modify [`atmos.yaml`](/cli/configuration) to configure the following global settings:
```yaml
components:
terraform:
# Use the `tofu` command when calling "terraform" in Atmos.
command: "/usr/bin/tofu" # or just `tofu`
# Optionally, specify a different path for OpenTofu components
base_path: "components/tofu"
```
:::important Disambiguation
Atmos consistently utilizes the `terraform` keyword across all configurations, rather than `tofu` or `opentofu`.
The term “Terraform” is used in this documentation to refer to generic concepts such as providers, modules, stacks, the
HCL-based domain-specific language and its interpreter.
:::
Additionally, if you prefer to run `atmos tofu` instead of `atmos terraform`, you can configure an alias.
Just add the following configuration somewhere in the `atmos.yaml` CLI config file:
```yaml
aliases:
tofu: terraform
```
:::important
Creating aliases for `tofu` only changes the CLI invocation of `atmos terraform` and does not directly
influence the actual command that atmos executes when running Terraform. Atmos strictly adheres to the
specific `command` set in the Stack configurations.
:::
## Stack Configuration for Components
Settings for Terraform or OpenTofu can also be specified in stack configurations, where they are compatible with inheritance.
This feature allows projects to tailor behavior according to individual component needs.
While defaults for everything are defined in the `atmos.yaml`, the same settings, can be overridden by Stack configurations at any level:
- `terraform`
- `components.terraform`
- `components.terraform._component_`
For instance, you can modify the command executed for a specific component by overriding the `command` parameter.
This flexibility is particularly valuable for gradually transitioning to OpenTofu or managing components that are
compatible only with HashiCorp Terraform.
```yaml
components:
terraform:
vpc:
command: "/usr/local/bin/tofu-1.7"
```
## Example: Provision a Terraform Component with OpenTofu
:::note
In the following examples, we'll assume that `tofu` is an Atmos alias for the `terraform` command.
```yaml
aliases:
tofu: terraform
```
:::
Once you've configured Atmos to utilize `tofu` — either by adjusting the default `terraform.command` in the `atmos.yaml`
or by specifying the `command` for an individual component — provisioning any component follows the same procedure as
you would typically use for Terraform.
For example, to provision a Terraform component using OpenTofu, run the following commands:
```console
atmos tofu plan eks --stack=ue2-dev
atmos tofu apply eks --stack=ue2-dev
```
where:
- `eks` is the Terraform component to provision (from the `components/terraform` folder)
- `--stack=ue2-dev` is the stack to provision the component into
Short versions of all command-line arguments can be used:
```console
atmos tofu plan eks -s ue2-dev
atmos tofu apply eks -s ue2-dev
```
---
## Configure Packer
import useBaseUrl from '@docusaurus/useBaseUrl';
import KeyPoints from '@site/src/components/KeyPoints'
import Intro from '@site/src/components/Intro'
import File from '@site/src/components/File'
import Terminal from '@site/src/components/Terminal'
Atmos natively supports [HashiCorp Packer](https://developer.hashicorp.com/packer) and lets you create identical
machine images for multiple platforms from a single source template using the power of Atmos components,
stacks, imports, inheritance, templating and YAML functions.
It's compatible with every version of Packer and designed to work with multiple different versions of it concurrently.
- How to configure Atmos to use Packer to build machine images
- Example Packer and Atmos configurations to build an AWS bastion AMI from an Amazon Linux 2023 base image
Keep in mind that Atmos does not handle the downloading or installation
of Packer; it assumes that any required binaries for the commands are already installed on your system.
## CLI Configuration (`atmos.yaml`)
```yaml
components:
packer:
# The executable to be called by Atmos when running Packer commands
command: "packer" # or `/usr/bin/packer`
# Can also be set using 'ATMOS_COMPONENTS_PACKER_BASE_PATH' ENV var, or '--packer-dir' command-line argument
# Supports both absolute and relative paths
base_path: "components/packer"
```
- `components.packer.command`
- The executable to be called by Atmos when running Packer commands
- `components.packer.base_path`
- The root directory where the Packer components and configurations are located. This path serves as the starting point for resolving any relative paths within the Packer setup.
## Stack Configuration for Components
Settings for Packer can also be specified in Atmos stack configurations, where they are compatible with inheritance.
This feature allows projects to tailor behavior according to individual component needs.
While defaults for everything are defined in the `atmos.yaml`, the same settings can be overridden by Stack configurations at any level:
- `packer`
- `components.packer`
- `components.packer._component_`
For instance, you can modify the command executed for a specific component by overriding the `command` parameter.
```yaml
components:
packer:
bastion:
# Use Packer v1.14.1 to provision the `bastion` component
command: "/usr/local/bin/packer-1.14.1"
```
## Example: Configure and Provision a Packer Component with Atmos
### Configure Packer in `atmos.yaml`
```yaml
base_path: "./"
components:
packer:
# Can also be set using 'ATMOS_COMPONENTS_PACKER_COMMAND' ENV var, or '--packer-command' command-line argument
command: packer
# Can also be set using 'ATMOS_COMPONENTS_PACKER_BASE_PATH' ENV var, or '--packer-dir' command-line argument
base_path: "components/packer"
stacks:
base_path: "stacks"
included_paths:
- "deploy/**/*"
excluded_paths:
- "**/_defaults.yaml"
name_template: "{{ .vars.stage }}"
logs:
file: "/dev/stderr"
level: Info
# `Go` templates in Atmos manifests
# https://atmos.tools/core-concepts/stacks/templates
templates:
settings:
enabled: true
evaluations: 1
# https://masterminds.github.io/sprig
sprig:
enabled: true
# https://docs.gomplate.ca
gomplate:
enabled: true
timeout: 10
# https://docs.gomplate.ca/datasources
datasources: {}
```
### Add Packer template (Packer component)
```hcl
# https://developer.hashicorp.com/packer/docs/templates/hcl_templates/blocks/source
# https://developer.hashicorp.com/packer/integrations/hashicorp/amazon/latest/components/builder/ebs
# https://developer.hashicorp.com/packer/integrations/hashicorp/amazon
# https://developer.hashicorp.com/packer/integrations/hashicorp/amazon#authentication
# https://developer.hashicorp.com/packer/tutorials/docker-get-started/docker-get-started-post-processors
# https://developer.hashicorp.com/packer/tutorials/aws-get-started
packer {
required_plugins {
# https://developer.hashicorp.com/packer/integrations/hashicorp/amazon
amazon = {
source = "github.com/hashicorp/amazon"
version = "~> 1"
}
}
}
variable "region" {
type = string
description = "AWS Region"
}
variable "stage" {
type = string
default = null
}
variable "ami_org_arns" {
type = list(string)
description = "List of Amazon Resource Names (ARN) of AWS Organizations that have access to launch the resulting AMI(s). By default no organizations have permission to launch the AMI"
default = []
}
variable "ami_ou_arns" {
type = list(string)
description = "List of Amazon Resource Names (ARN) of AWS Organizations organizational units (OU) that have access to launch the resulting AMI(s). By default no organizational units have permission to launch the AMI."
default = []
}
variable "ami_users" {
type = list(string)
description = "List of account IDs that have access to launch the resulting AMI(s). By default no additional users other than the user creating the AMI has permissions to launch it."
default = []
}
variable "kms_key_arn" {
type = string
description = "KMS Key ARN"
}
variable "instance_type" {
type = string
description = "Instance type"
}
variable "volume_size" {
type = number
description = "Volume size"
}
variable "volume_type" {
type = string
description = "Volume type"
}
variable "ami_name" {
type = string
description = "AMI name"
}
variable "source_ami" {
type = string
description = "Source AMI"
}
variable "ssh_username" {
type = string
description = "Instance type"
}
variable "encrypt_boot" {
type = bool
description = "Encrypt boot"
}
variable "skip_create_ami" {
type = bool
description = "If true, Packer will not create the AMI. Useful for setting to true during a build test stage"
}
variable "ami_tags" {
type = map(string)
description = "AMI tags"
}
# https://developer.hashicorp.com/packer/integrations/hashicorp/amazon#authentication
variable "assume_role_arn" {
type = string
description = "Amazon Resource Name (ARN) of the IAM Role to assume. Refer to https://developer.hashicorp.com/packer/integrations/hashicorp/amazon#authentication"
}
variable "assume_role_session_name" {
type = string
description = "Assume role session name"
}
variable "assume_role_duration_seconds" {
type = number
description = "Assume role duration seconds"
}
variable "manifest_file_name" {
type = string
description = "Manifest file name. Refer to https://developer.hashicorp.com/packer/docs/post-processors/manifest"
}
variable "manifest_strip_path" {
type = bool
description = "Manifest strip path. Refer to https://developer.hashicorp.com/packer/docs/post-processors/manifest"
}
variable "associate_public_ip_address" {
type = bool
description = "If this is `true`, the new instance will get a Public IP"
}
variable "provisioner_shell_commands" {
type = list(string)
description = "List of commands to execute on the machine that Packer builds"
default = []
}
variable "force_deregister" {
type = bool
description = "Force Packer to first deregister an existing AMI if one with the same name already exists"
default = false
}
variable "force_delete_snapshot" {
type = bool
description = "Force Packer to delete snapshots associated with AMIs, which have been deregistered by `force_deregister`"
default = false
}
source "amazon-ebs" "al2023" {
ami_name = var.ami_name
source_ami = var.source_ami
instance_type = var.instance_type
region = var.region
ssh_username = var.ssh_username
ami_org_arns = var.ami_org_arns
ami_ou_arns = var.ami_ou_arns
ami_users = var.ami_users
kms_key_id = var.kms_key_arn
encrypt_boot = var.encrypt_boot
force_deregister = var.force_deregister
force_delete_snapshot = var.force_delete_snapshot
associate_public_ip_address = var.associate_public_ip_address
ami_block_device_mappings {
device_name = "/dev/xvda"
volume_size = var.volume_size
volume_type = var.volume_type
delete_on_termination = true
}
assume_role {
role_arn = var.assume_role_arn
session_name = var.assume_role_session_name
duration_seconds = var.assume_role_duration_seconds
}
aws_polling {
delay_seconds = 5
max_attempts = 100
}
tags = var.ami_tags
}
build {
sources = ["source.amazon-ebs.al2023"]
provisioner "shell" {
inline = var.provisioner_shell_commands
}
# https://developer.hashicorp.com/packer/tutorials/docker-get-started/docker-get-started-post-processors
# https://developer.hashicorp.com/packer/docs/post-processors
# https://developer.hashicorp.com/packer/docs/post-processors/manifest
post-processor "manifest" {
output = var.manifest_file_name
strip_path = var.manifest_strip_path
}
}
```
### Configure defaults for the Packer component in the `catalog`
```yaml
# yaml-language-server: $schema=https://atmos.tools/schemas/atmos/atmos-manifest/1.0/atmos-manifest.json
components:
packer:
aws/bastion:
settings:
packer:
template: "main.pkr.hcl"
source_ami: "ami-0013ceeff668b979b"
source_ami_name: "al2023-ami-2023.7.20250527.1-kernel-6.12-arm64"
source_ami_description: "Amazon Linux 2023 AMI 2023.7.20250527.1 arm64 HVM kernel-6.12"
source_ami_owner_account_id: "137112412989"
region: "us-east-2"
org_id: "o-xxxxxxxxx"
org_management_account_id: "xxxxxxxxxxxx"
metadata:
component: aws/bastion
vars:
# https://masterminds.github.io/sprig/date.html
ami_name: "bastion-al2023-{{ now | unixEpoch }}"
source_ami: "{{ .settings.packer.source_ami }}"
region: "{{ .settings.packer.region }}"
ami_org_arns:
- "arn:aws:organizations::{{ .settings.packer.org_management_account_id }}:organization/{{ .settings.packer.org_id }}"
ami_ou_arns: []
ami_users: []
kms_key_arn: null
encrypt_boot: false
ssh_username: "ec2-user"
associate_public_ip_address: true
volume_type: "gp3"
skip_create_ami: false
manifest_file_name: "manifest.json"
manifest_strip_path: false
assume_role_session_name: "atmos-packer"
assume_role_duration_seconds: 1800
force_deregister: false
force_delete_snapshot: false
# SSM Agent is pre-installed on AL2023 AMIs but should be enabled explicitly as done above.
# `dnf clean all` removes cached metadata and packages to reduce AMI size.
# `cloud-init clean` ensures the image will boot as a new instance on the next launch.
provisioner_shell_commands:
# Enable and start the SSM agent (already installed by default on AL2023)
- "sudo systemctl enable --now amazon-ssm-agent"
# Install packages, clean metadata and cloud-init
- "sudo -E bash -c 'dnf install -y jq && dnf clean all && cloud-init clean'"
# Install other packages
ami_tags:
SourceAMI: "{{ .settings.packer.source_ami }}"
SourceAMIName: "{{ .settings.packer.source_ami_name }}"
SourceAMIDescription: "{{ .settings.packer.source_ami_description }}"
SourceAMIOwnerAccountId: "{{ .settings.packer.source_ami_owner_account_id }}"
ScanStatus: pending
```
### Define Atmos `nonprod` and `prod` stacks
```yaml
# yaml-language-server: $schema=https://atmos.tools/schemas/atmos/atmos-manifest/1.0/atmos-manifest.json
vars:
stage: nonprod
import:
- catalog/aws/bastion/defaults
components:
packer:
aws/bastion:
vars:
# Define the variables specific to the `nonprod` account
instance_type: "t4g.small"
volume_size: 8
assume_role_arn: "arn:aws:iam::NONPROD_ACCOUNT_ID:role/ROLE_NAME"
ami_tags:
Stage: nonprod
```
```yaml
# yaml-language-server: $schema=https://atmos.tools/schemas/atmos/atmos-manifest/1.0/atmos-manifest.json
vars:
stage: prod
import:
- catalog/aws/bastion/defaults
components:
packer:
aws/bastion:
vars:
# Define the variables specific to the `prod` account
instance_type: "t4g.medium"
volume_size: 16
assume_role_arn: "arn:aws:iam::PROD_ACCOUNT_ID:role/ROLE_NAME"
ami_tags:
Stage: prod
```
### Execute Atmos Packer commands
```shell
> atmos packer version
Packer v1.14.1
```
```shell
# https://developer.hashicorp.com/packer/docs/commands/validate
> atmos packer validate aws/bastion -s nonprod
The configuration is valid.
```
```shell
# https://developer.hashicorp.com/packer/docs/commands/inspect
> atmos packer inspect aws/bastion -s nonprod
Packer Inspect: HCL2 mode
> input-variables:
var.ami_name: "bastion-al2023-1754457104"
var.ami_org_arns: "[\n \"arn:aws:organizations::xxxxxxxxxxxx:organization/o-xxxxxxxxx\",\n]"
var.ami_ou_arns: "[]"
var.ami_tags: "{\n \"ScanStatus\" = \"pending\"\n \"SourceAMI\" = \"ami-0013ceeff668b979b\"\n \"SourceAMIDescription\" = \"Amazon Linux 2023 AMI 2023.7.20250527.1 arm64 HVM kernel-6.12\"\n \"SourceAMIName\" = \"al2023-ami-2023.7.20250527.1-kernel-6.12-arm64\"\n \"SourceAMIOwnerAccountId\" = \"137112412989\"\n \"Stage\" = \"nonprod\"\n}"
var.ami_users: "[]"
var.associate_public_ip_address: "true"
var.assume_role_arn: "null"
var.assume_role_duration_seconds: "1800"
var.assume_role_session_name: "atmos-packer"
var.encrypt_boot: "false"
var.force_delete_snapshot: "false"
var.force_deregister: "false"
var.instance_type: "t4g.small"
var.kms_key_arn: "null"
var.manifest_file_name: "manifest.json"
var.manifest_strip_path: "false"
var.provisioner_shell_commands: "[\n \"sudo systemctl enable --now amazon-ssm-agent\",\n \"sudo -E bash -c 'dnf install -y jq && dnf clean all && cloud-init clean'\",\n]"
var.region: "us-east-2"
var.skip_create_ami: "false"
var.source_ami: "ami-0013ceeff668b979b"
var.ssh_username: "ec2-user"
var.stage: "nonprod"
var.volume_size: "8"
var.volume_type: "gp3"
> local-variables:
> builds:
> <0>:
sources:
amazon-ebs.al2023
provisioners:
shell
post-processors:
0:
manifest
```
```shell
# https://developer.hashicorp.com/packer/docs/commands/init
> atmos packer init aws/bastion -s nonprod
Installed plugin github.com/hashicorp/amazon v1.3.9 in "~/.config/packer/plugins/github.com/hashicorp/amazon/packer-plugin-amazon_v1.3.9_x5.0_darwin_arm64"
```
```shell
# https://developer.hashicorp.com/packer/docs/commands/build
> atmos packer build aws/bastion -s nonprod
amazon-ebs.al2023:
==> amazon-ebs.al2023: Prevalidating any provided VPC information
==> amazon-ebs.al2023: Prevalidating AMI Name: bastion-al2023-1754025080
==> amazon-ebs.al2023: Found Image ID: ami-0013ceeff668b979b
==> amazon-ebs.al2023: Setting public IP address to true on instance without a subnet ID
==> amazon-ebs.al2023: No VPC ID provided, Packer will use the default VPC
==> amazon-ebs.al2023: Inferring subnet from the selected VPC "vpc-xxxxxxx"
==> amazon-ebs.al2023: Set subnet as "subnet-xxxxxxx"
==> amazon-ebs.al2023: Creating temporary keypair: packer_688c4c79-f14a-b77e-ca1e-b5b4c17b4581
==> amazon-ebs.al2023: Creating temporary security group for this instance: packer_688c4c7b-3f16-69f9-0c39-88a3fcbe94fd
==> amazon-ebs.al2023: Authorizing access to port 22 from [0.0.0.0/0] in the temporary security groups...
==> amazon-ebs.al2023: Launching a source AWS instance...
==> amazon-ebs.al2023: changing public IP address config to true for instance on subnet "subnet-xxxxxxx"
==> amazon-ebs.al2023: Instance ID: i-0b621ca091aa4c240
==> amazon-ebs.al2023: Waiting for instance (i-0b621ca091aa4c240) to become ready...
==> amazon-ebs.al2023: Using SSH communicator to connect: 18.222.63.67
==> amazon-ebs.al2023: Waiting for SSH to become available...
==> amazon-ebs.al2023: Connected to SSH!
==> amazon-ebs.al2023: Provisioning with shell script: /var/folders/rt/fqmt0tmx3fs1qfzbf3qxxq700000gn/T/packer-shell653292668
==> amazon-ebs.al2023: Waiting for process with pid 2085 to finish.
==> amazon-ebs.al2023: Amazon Linux 2023 Kernel Livepatch repository 154 kB/s | 16 kB 00:00
==> amazon-ebs.al2023: Package jq-1.7.1-49.amzn2023.0.2.aarch64 is already installed.
==> amazon-ebs.al2023: Dependencies resolved.
==> amazon-ebs.al2023: Nothing to do.
==> amazon-ebs.al2023: Complete!
==> amazon-ebs.al2023: 17 files removed
==> amazon-ebs.al2023: Stopping the source instance...
==> amazon-ebs.al2023: Stopping instance
==> amazon-ebs.al2023: Waiting for the instance to stop...
==> amazon-ebs.al2023: Creating AMI bastion-al2023-1754025080 from instance i-0b621ca091aa4c240
==> amazon-ebs.al2023: Attaching run tags to AMI...
==> amazon-ebs.al2023: AMI: ami-0b2b3b68aa3c5ada8
==> amazon-ebs.al2023: Waiting for AMI to become ready...
==> amazon-ebs.al2023: Skipping Enable AMI deprecation...
==> amazon-ebs.al2023: Skipping Enable AMI deregistration protection...
==> amazon-ebs.al2023: Modifying attributes on AMI (ami-0b2b3b68aa3c5ada8)...
==> amazon-ebs.al2023: Modifying: ami org arns
==> amazon-ebs.al2023: Modifying attributes on snapshot (snap-09ad35550e1438fb2)...
==> amazon-ebs.al2023: Adding tags to AMI (ami-0b2b3b68aa3c5ada8)...
==> amazon-ebs.al2023: Tagging snapshot: snap-09ad35550e1438fb2
==> amazon-ebs.al2023: Creating AMI tags
==> amazon-ebs.al2023: Adding tag: "Stage": "nonprod"
==> amazon-ebs.al2023: Adding tag: "ScanStatus": "pending"
==> amazon-ebs.al2023: Adding tag: "SourceAMI": "ami-0013ceeff668b979b"
==> amazon-ebs.al2023: Adding tag: "SourceAMIDescription": "Amazon Linux 2023 AMI 2023.7.20250527.1 arm64 HVM kernel-6.12"
==> amazon-ebs.al2023: Adding tag: "SourceAMIName": "al2023-ami-2023.7.20250527.1-kernel-6.12-arm64"
==> amazon-ebs.al2023: Adding tag: "SourceAMIOwnerAccountId": "137112412989"
==> amazon-ebs.al2023: Creating snapshot tags
==> amazon-ebs.al2023: Terminating the source AWS instance...
==> amazon-ebs.al2023: Cleaning up any extra volumes...
==> amazon-ebs.al2023: No volumes to clean up, skipping
==> amazon-ebs.al2023: Deleting temporary security group...
==> amazon-ebs.al2023: Deleting temporary keypair...
==> amazon-ebs.al2023: Running post-processor: (type manifest)
Build 'amazon-ebs.al2023' finished after 3 minutes 39 seconds.
==> Wait completed after 3 minutes 39 seconds
==> Builds finished. The artifacts of successful builds are:
--> amazon-ebs.al2023: AMIs were created:
us-east-2: ami-0b2b3b68aa3c5ada8
--> amazon-ebs.al2023: AMIs were created:
us-east-2: ami-0b2b3b68aa3c5ada8
```
```shell
# `atmos packer output` command is specific to Atmos (Packer itself does not have an `output` command)
# The command is used to get an output from a Packer manifest
# The manifest is generated by Packer when executing a `packer build` command
> atmos packer output aws/bastion -s nonprod
builds:
- artifact_id: us-east-2:ami-0c2ca16b7fcac7529
build_time: 1.753281956e+09
builder_type: amazon-ebs
custom_data: null
files: null
name: al2023
packer_run_uuid: 5114a723-92f6-060f-bae4-3ac2d0324557
- artifact_id: us-east-2:ami-0b2b3b68aa3c5ada8
build_time: 1.7540253e+09
builder_type: amazon-ebs
custom_data: null
files: null
name: al2023
packer_run_uuid: a57874d1-c478-63d7-cfde-9d91e513eb9a
last_run_uuid: a57874d1-c478-63d7-cfde-9d91e513eb9a
```
```shell
# `atmos packer output` command is specific to Atmos (Packer itself does not have an `output` command)
# The command is used to get an output from a Packer manifest
# The manifest is generated by Packer when executing a `packer build` command
# Use a YQ expression to get a specific section or attribute from the Packer manifest,
# in this case, the `artifact_id` from the first build.
> atmos packer output aws/bastion -s nonprod --query '.builds[0].artifact_id'
us-east-2:ami-0c2ca16b7fcac7529
```
```shell
# `atmos packer output` command is specific to Atmos (Packer itself does not have an `output` command).
# The command is used to get an output from a Packer manifest.
# The manifest is generated by Packer when executing a `packer build` command.
# Use a YQ expression to get a specific section or attribute from the Packer manifest,
# in this case, the AMI (second part after the `:`) from the `artifact_id` from the first build.
> atmos packer output aws/bastion -s nonprod -q '.builds[0].artifact_id | split(":")[1]'
ami-0c2ca16b7fcac7529
```
---
## Configure Stores
import Intro from '@site/src/components/Intro'
Atmos supports the concept of remote stores to facilitate the sharing of values between components or between
some external process and a component. In Atmos, values are saved to stores via
[hooks](/core-concepts/stacks/hooks) and are read using the [`!store`](/functions/yaml/store)
YAML function and [`atmos.Store`](/functions/template/atmos.Store) template function.
Values can also be saved to stores from outside of Atmos, for example, from a CI/CD pipeline or a script.
Currently, the following stores are supported:
- [Artifactory](https://jfrog.com/artifactory/)
- [Azure Key Vault](https://azure.microsoft.com/en-us/products/key-vault)
- [AWS SSM Parameter Store](https://docs.aws.amazon.com/systems-manager/latest/userguide/systems-manager-parameter-store.html)
- [Google Secret Manager](https://cloud.google.com/secret-manager)
- [Redis](https://redis.io/)
Atmos stores are configured in the `atmos.yaml` file and available to use in stacks via the
[store](/functions/yaml/store) YAML function.
## CLI Configuration
All of these settings should be configured in the [Atmos CLI Configuration](/cli/configuration) found in `atmos.yaml`.
### Artifactory
```yaml
stores:
dev/artifactory:
type: artifactory
options:
url: https://mydevartifactory.jfrog.io/artifactory
repo_name: tfsharedstore
prod/artifactory:
type: artifactory
options:
url: https://myprodartifactory.jfrog.io/artifactory
repo_name: tfsharedstore
access_token: !env PROD_JFROG_ACCESS_TOKEN
```
- `stores.[store_name]`
- This map key is the name of the store. It must be unique across all stores. This is how the store is referenced in the `store` function.
- `stores.[store_name].type`
- Must be set to `artifactory`
- `stores.[store_name].options`
- A map of options specific to the store type. For Artifactory, the following options are supported:
- `stores.[store_name].options.access_token (optional)`
- An access token to use for authentication. This is not recommended as it is less secure than using the
`JFROG_ACCESS_TOKEN` or `ARTIFACTORY_ACCESS_TOKEN` environment variables. See [Authentication](#authentication) below
for more information.
- `stores.[store_name].options.prefix (optional)`
- A prefix path that will be added to all keys stored or retrieved from SSM Parameter Store. For example if the prefix
is `/atmos/infra-live/`, and if the stack is `plat-us2-dev`, the component is `vpc`, and the key is `vpc_id`, the full path
would be `/atmos/infra-live/plat-us2-dev/vpc/vpc_id`.
- `stores.[store_name].options.repo_name (required)`
- The name of the Artifactory repository to use.
- `stores.[store_name].options.url (required)`
- The URL of the Artifactory instance.
- `stores.[store_name].options.stack_delimiter (optional)`
-
The delimiter that atmos is using to delimit stacks in the key path. This defaults to `-`. This is used to build the
key path for the store.
#### Authentication
The Artifactory store supports using an access token for authentication. The access token can be set directly in the
`atmos.yaml` or via the `JFROG_ACCESS_TOKEN` or `ARTIFACTORY_ACCESS_TOKEN` environment variables.
It is also possible to specify the access token as `anonymous` to use the anonymous user to access the Artifactory
repository if the repository is configured to allow anonymous access.
**NOTE:** Storing sensitive access tokens in plain text in `atmos.yaml` is not secure and should be avoided. However, it's recommended for the `anonymous` use case or when managing multiple Artifactory stores with different access tokens. In such cases, use [`!env`](/functions/yaml/env) function to reference tokens securely.
YAML function to set the access token from an environment variable.
### Azure Key Vault
```yaml
stores:
dev/azure-key-vault:
type: azure-key-vault
options:
vault_url: https://my-keyvault.vault.azure.net/
prefix: atmos/dev
stack_delimiter: "-"
prod/azure-key-vault:
type: azure-key-vault
options:
vault_url: https://my-prod-keyvault.vault.azure.net/
prefix: atmos/prod
```
- `stores.[store_name]`
- This map key is the name of the store. It must be unique across all stores. This is how the store is referenced in the `store` function.
- `stores.[store_name].type`
- Must be set to `azure-key-vault`
- `stores.[store_name].options`
- A map of options specific to the store type. For Azure Key Vault, the following options are supported:
- `stores.[store_name].options.vault_url (required)`
- The URL of the Azure Key Vault. This should be in the format `https://{vault-name}.vault.azure.net/`.
- `stores.[store_name].options.prefix (optional)`
- A prefix path that will be added to all keys stored or retrieved from Azure Key Vault. For example if the prefix
is `atmos/dev`, and if the stack is `plat-us2-dev`, the component is `vpc`, and the key is `vpc_id`, the full path
would be `atmos-dev-plat-us2-dev-vpc-vpc_id` (after normalization for Azure Key Vault naming restrictions).
- `stores.[store_name].options.stack_delimiter (optional)`
-
The delimiter that atmos is using to delimit stacks in the key path. This defaults to `-`. This is used to build the
key path for the store.
#### Authentication
Azure Key Vault supports multiple authentication methods:
1. **Default Azure Credential Chain**: By default, the Azure Key Vault store uses the DefaultAzureCredential from the Azure Identity library, which attempts authentication through multiple methods in the following order:
- Environment variables (Azure CLI, Visual Studio, etc.)
- Managed Identity
- Azure CLI credentials
- Interactive browser authentication (when running locally)
2. **Environment Variables**: Set these environment variables to authenticate:
- `AZURE_TENANT_ID`: Your Azure Active Directory tenant ID
- `AZURE_CLIENT_ID`: Your Azure Active Directory application ID
- `AZURE_CLIENT_SECRET`: Your Azure Active Directory application secret
3. **Managed Identity**: When running in Azure services with managed identity enabled, authentication is automatic.
For more details, refer to the [Azure Identity Authentication Documentation](https://docs.microsoft.com/en-us/azure/developer/go/azure-sdk-authentication).
### AWS SSM Parameter Store
```yaml
stores:
prod/ssm:
type: aws-ssm-parameter-store
options:
region: us-east-2
read_role_arn: "arn:aws:iam::123456789012:role/ssm-read-role" # Optional role ARN for read operations
write_role_arn: "arn:aws:iam::123456789012:role/ssm-write-role" # Optional role ARN for write operations
```
- `stores.[store_name]`
- This map key is the name of the store. It must be unique across all stores. This is how the store is referenced in the `store` function.
- `stores.[store_name].type`
- Must be set to `aws-ssm-parameter-store`
- `stores.[store_name].options`
- A map of options specific to the store type. For AWS SSM Parameter Store, the following options are supported:
- `stores.[store_name].options.prefix (optional)`
- A prefix path that will be added to all keys stored or retrieved from SSM Parameter Store. For example if the prefix
is `/atmos/infra-live/`, and if the stack is `plat-us2-dev`, the component is `vpc`, and the key is `vpc_id`, the full path
would be `/atmos/infra-live/plat-us2-dev/vpc/vpc_id`.
- `stores.[store_name].options.region (required)`
- The AWS region to use for the SSM Parameter Store.
- `stores.[store_name].options.stack_delimiter (optional)`
-
The delimiter that atmos is using to delimit stacks in the key path. This defaults to `-`. This is used to build the
key path for the store.
- `stores.[store_name].options.read_role_arn (optional)`
- The ARN of an IAM role to assume for read operations. If specified, this role will be assumed before performing any read operations.
- `stores.[store_name].options.write_role_arn (optional)`
- The ARN of an IAM role to assume for write operations. If specified, this role will be assumed before performing any write operations.
#### Authentication
The AWS SSM Parameter Store supports the standard AWS methods for authentication and the `AWS_ACCESS_KEY_ID`,
`AWS_SECRET_ACCESS_KEY`, and `AWS_SESSION_TOKEN` environment variables. Additionally, if `read_role_arn` or `write_role_arn`
is specified, the store will assume that role before performing the respective operations.
### Google Secret Manager
```yaml
stores:
dev/gsm:
type: google-secret-manager
options:
project_id: my-project-id
prefix: atmos/dev
credentials: !env GOOGLE_CREDENTIALS_JSON # Optional: JSON credentials string
prod/gsm:
type: gsm # Alias for google-secret-manager
options:
project_id: my-prod-project
prefix: atmos/prod
# Uses Application Default Credentials
```
- `stores.[store_name]`
- This map key is the name of the store. It must be unique across all stores. This is how the store is referenced in the `store` function.
- `stores.[store_name].type`
- Must be set to either `google-secret-manager` or its alias `gsm`
- `stores.[store_name].options`
- A map of options specific to the store type. For Google Secret Manager, the following options are supported:
- `stores.[store_name].options.project_id (required)`
- The Google Cloud project ID where the secrets are stored.
- `stores.[store_name].options.prefix (optional)`
- A prefix path that will be added to all keys stored or retrieved from Secret Manager. For example if the prefix
is `atmos/infra-live/`, and if the stack is `plat-us2-dev`, the component is `vpc`, and the key is `vpc_id`, the full path
would be `atmos/infra-live/plat-us2-dev/vpc/vpc_id`.
- `stores.[store_name].options.credentials (optional)`
- A JSON string containing Google service account credentials. If not provided, Application Default Credentials will be used.
- `stores.[store_name].options.stack_delimiter (optional)`
-
The delimiter that atmos is using to delimit stacks in the key path. This defaults to `-`. This is used to build the
key path for the store.
#### Authentication
Google Secret Manager supports multiple authentication methods:
1. **Application Default Credentials (ADC)**: If no credentials are specified, the store will use ADC which can be set up by:
- Running `gcloud auth application-default login` for local development
- Using service account attached to GCP resources (like GCE instances)
- Setting the `GOOGLE_APPLICATION_CREDENTIALS` environment variable pointing to a service account key file
2. **Direct Credentials**: You can provide service account credentials directly in the configuration using the `credentials` option.
This is not recommended for production use. Instead, use the `!env` function to read credentials from an environment variable:
```yaml
credentials: !env GOOGLE_CREDENTIALS_JSON
```
3. **Workload Identity**: When running in GCP, you can use Workload Identity which automatically handles authentication
between GCP services.
### Redis
```yaml
stores:
dev/redis:
type: redis
options:
url: redis://localhost:6379
stage/redis:
type: redis
options:
url: !env ATMOS_STAGE_REDIS_URL
prod/redis:
type: redis
# The ATMOS_REDIS_URL environment variable will be used if no URL is specified in the options
```
- `stores.[store_name]`
- This map key is the name of the store. It must be unique across all stores. This is how the store is referenced in the `store` function.
- `stores.[store_name].type`
- Must be set to `redis`
- `stores.[store_name].options`
- A map of options specific to the store type. For Redis, the following options are supported:
- `stores.[store_name].options.prefix (optional)`
- A prefix path that will be added to all keys stored or retrieved from Redis. For example if the prefix
is `/atmos/infra-live/`, and if the stack is `plat-us2-dev`, the component is `vpc`, and the key is `vpc_id`, the full path
would be `/atmos/infra-live/plat-us2-dev/vpc/vpc_id`.
- `stores.[store_name].options.url`
-
The URL of the Redis instance. This is optional and the `ATMOS_REDIS_URL` environment variable will be used if no
URL is specified in the options.
- `stores.[store_name].options.stack_delimiter (optional)`
-
The delimiter that atmos is using to delimit stacks in the key path. This defaults to `-`. This is used to build the
key path for the store.
#### Authentication
The Redis store supports authentication via the URL in options or via the `ATMOS_REDIS_URL` environment variable. The
URL format is described in the Redis [docs](https://redis.github.io/lettuce/user-guide/connecting-redis/).
---
## Configure Terraform
import useBaseUrl from '@docusaurus/useBaseUrl';
import Intro from '@site/src/components/Intro'
Atmos natively supports opinionated workflows for [Terraform](https://www.terraform.io/) and [OpenTofu](/core-concepts/projects/configuration/opentofu).
It's compatible with every version of terraform and designed to work with multiple different versions of Terraform
concurrently.
Keep in mind that Atmos does not handle the downloading or installation of Terraform; it assumes that any
required commands are already installed on your system. To automate this, consider creating a [Custom Command](/core-concepts/custom-commands) to install Terraform.
Atmos provides many settings that are specific to Terraform and OpenTofu.
## CLI Configuration
All of these settings are defined by default in the [Atmos CLI Configuration](/cli/configuration) found in `atmos.yaml`,
but can also be overridden at any level of the [Stack](/core-concepts/stacks/#schema) configuration.
```yaml
components:
terraform:
# The executable to be called by `atmos` when running Terraform commands
command: "/usr/bin/terraform-1"
# Can also be set using 'ATMOS_COMPONENTS_TERRAFORM_BASE_PATH' ENV var, or '--terraform-dir' command-line argument
# Supports both absolute and relative paths
base_path: "components/terraform"
# Can also be set using 'ATMOS_COMPONENTS_TERRAFORM_APPLY_AUTO_APPROVE' ENV var
apply_auto_approve: false
# Can also be set using 'ATMOS_COMPONENTS_TERRAFORM_DEPLOY_RUN_INIT' ENV var, or '--deploy-run-init' command-line argument
deploy_run_init: true
# Can also be set using 'ATMOS_COMPONENTS_TERRAFORM_INIT_RUN_RECONFIGURE' ENV var, or '--init-run-reconfigure' command-line argument
init_run_reconfigure: true
# Can also be set using 'ATMOS_COMPONENTS_TERRAFORM_AUTO_GENERATE_BACKEND_FILE' ENV var, or '--auto-generate-backend-file' command-line argument
auto_generate_backend_file: false
# Can also be set using 'ATMOS_COMPONENTS_TERRAFORM_APPEND_USER_AGENT' ENV var, or '--append-user-agent' command-line argument
append_user_agent: "Acme/1.0 (Build 1234; arm64)"
plan:
# Can also be set using 'ATMOS_COMPONENTS_TERRAFORM_PLAN_SKIP_PLANFILE' ENV var, or '--skip-planfile' command-line argument
skip_planfile: false
```
- `components.terraform.command`
- The executable to be called by Atmos when running Terraform commands
- `components.terraform.base_path`
- The root directory where the Terraform components and configurations are located. This path serves as the starting point for resolving any relative paths within the Terraform setup.
- `components.terraform.apply_auto_approve`
- if set to `true`, Atmos automatically adds the `-auto-approve` option to instruct Terraform to apply the plan without
asking for confirmation when executing `terraform apply` command
- `components.terraform.deploy_run_init`
- if set to `true`, Atmos runs `terraform init` before executing [`atmos terraform deploy`](/cli/commands/terraform/deploy) command
- `components.terraform.init_run_reconfigure`
- if set to `true`, Atmos automatically adds the `-reconfigure` option to update the backend configuration when executing `terraform init` command
- `components.terraform.auto_generate_backend_file`
- if set to `true`, Atmos automatically generates the Terraform backend file from the component configuration when executing `terraform plan` and `terraform apply` commands
- `components.terraform.plan.skip_planfile`
-
if set to `true`, Atmos will skip passing the `-out=FILENAME` flag when executing the `terraform plan` command.
Set it to `true` when using Terraform Cloud since the `-out` flag is not supported.
Terraform Cloud automatically stores plans in its backend
## Configuration
The settings for terraform can be defined in multiple places and support inheritance. This ensures that projects can
override the behavior.
The defaults for everything are defined in the `atmos.yaml`.
```yaml
components:
terraform:
...
```
The same settings, can be overridden by Stack configurations at any level:
- `terraform`
- `components.terraform`
- `components.terraform._component_`
For example, we can change the terraform command used by a component (useful for legacy components)
```yaml
components:
terraform:
vpc:
command: "/usr/local/bin/terraform-0.13"
```
## Terraform Provider
A Terraform provider (`cloudposse/terraform-provider-utils`) implements a `data` source that can read the YAML Stack
configurations natively from
within terraform.
## Terraform Module
A Terraform module (`cloudposse/terraform-yaml-stack-config`) wraps the data source.
Here's an example of accessing the variables for a given component from within a Terraform module.
```hcl
module "vars" {
source = "cloudposse/stack-config/yaml//modules/vars"
# version = "x.x.x"
stack_config_local_path = "./stacks"
stack = "my-stack"
component_type = "terraform"
component = "my-vpc"
context = module.this.context
}
```
---
## Folder Structure
import KeyPoints from '@site/src/components/KeyPoints'
import Intro from '@site/src/components/Intro'
At the root of your project, you’ll typically find an `atmos.yaml` configuration file. This file defines how Atmos should discover your stack files for configuration and your Terraform root modules as components.
- How to organize your project on the file system
- How to separate configuration from components
- Different ways to organize your project
## Recommended Filesystem Layout
Atmos is fully configurable, and you can organize your project in any way that makes sense for your team by adjusting the paths in [`atmos.yaml`](/core-concepts/projects/configuration). We also provide detailed guidance on organizing your folder structure, whether it’s for a simple project or enterprise-scale architecture in our [Design Patterns](/design-patterns) section. Choose the model that best fits the stage you plan to reach when you complete the project.
Here's a simple layout, if you just have 3 deployments for things like dev, staging, and prod:
```plaintext
├── components/ # Folder containing all your components, usually organized by toolchain
│ └── terraform/ # Folder for all Terraform "root modules"
└── stacks/
├── deploy/ # Folder for deployable stacks
│ ├── dev/ # Folder for development environment configurations
│ ├── staging/ # Folder for staging environment configurations
│ └── prod/ # Folder for production environment configurations
├── catalog/ # Folder for the service catalog
├── schemas/ # Folder for the schema validations
└── workflows/ # Folder for workflows that operate on top of stacks
```
Alternatively, here’s a more complex layout for a larger project broken into multiple organizations, organizational units, and environments:
```plaintext
├── components/ # Folder containing all your components, usually organized by toolchain
│ └── terraform/ # Folder for all Terraform "root modules"
└── stacks/
├── orgs/ # Folder for deployable stacks
│ └── acme/ # Folder for the Acme organization
│ ├── core/ # OU for core services
│ │ ├── security/ # Folder for security-related configurations
│ │ ├── audit/ # Folder for audit-related configurations
│ │ ├── identity/ # Folder for identity management configurations
│ │ └── network/ # Folder for networking-related configurations
│ └── plat/ # OU for platform environments
│ ├── dev/ # Folder for development environment configurations
│ ├── staging/ # Folder for staging environment configurations
│ └── prod/ # Folder for production environment configurations
├── catalog/ # Folder for the service catalog
├── schemas/ # Folder for the schema validations
└── workflows/ # Folder for workflows that operate on top of stacks
```
Note, that these are just a couple of examples.
- `components/`
- folder containing all your components, usually organized by your toolchain
- `components/terraform`
- folder for all Terraform "root modules"
- `stacks/orgs/`
- folder for deployable stacks
- `stacks/catalog/`
- folder for the service catalog
- `stacks/workflows/`
- folder for workflows that operate on top of stacks.
You can find some demos of how we organize projects in the Atmos GitHub repository under the [`examples/`](https://github.com/cloudposse/atmos/tree/main/examples) folder. Or check out our [Reference Architecture for AWS](https://docs.cloudposse.com/learn) for a more detailed look at how we organize our projects.
To effectively organize an Atmos project, we want to ensure you have specific locations for Atmos to find your stack configurations and components. At a minimum, we recommend the following folder structure in your project:
## Components Folder
This folder will contain all your components. Organize the components by toolchain. For example, if you have components for Terraform, place them in a Terraform subfolder (e.g. `components/terraform/vpc`).
## Stack Configurations Folder
Next, you’ll have your stacks configurations, which are organized into multiple subfolders depending on their purpose:
### Schema Validations
This folder contains the [JSON or OPA schemas used to validate the stack configurations](/core-concepts/validate).
### Catalogs
This should be a separate top-level folder containing your stack configurations. Stack configurations are divided into several parts:
- **Schemas Folder**: This folder contains the schemas used to validate the stack configurations.
- **Catalog Folder**: This includes all reusable imports, which can be organized into subfolders based on logical groupings.
- **Stacks Folder**: This contains the deployable stacks. Each stack is defined in a separate YAML file.
We follow a few conventions in our reference architecture:
### Deployments
We usually organize our stacks by organization, organizational unit, and environment. For example:
- **Orgs Folder**: Represents the AWS organizations to which you deploy. You might use a folder called deploy if you have a few simple stacks.
- **Multi-Cloud Projects**: If your project involves multiple clouds, consider additional organizational strategies.
---
## Setup Projects for Atmos
import DocCardList from '@theme/DocCardList'
import KeyPoints from '@site/src/components/KeyPoints'
import Intro from '@site/src/components/Intro'
Atmos is a framework, so we suggest some conventions for organizing your infrastructure using folders to separate configuration from components. This separation is key to making your components highly reusable.
By keeping configuration and components distinct, you can easily manage and update each part without affecting the other.
- Where to put your terraform components
- Where to keep your configuration
- How to configure Atmos to work with Terraform
If you're more of a hands-on learner, we also go into some of these details in our [Simple Quick Start](/quick-start/simple).
## Configuration
Learn how to best configure a project to work with Atmos. We recommend some conventions for how to organize your project into folders, then configure the Atmos CLI to use those folders.
---
## Configure Your Editor for Atmos
import TabItem from "@theme/TabItem";
import Tabs from "@theme/Tabs";
import Intro from "@site/src/components/Intro";
import KeyPoints from "@site/src/components/KeyPoints";
A properly configured editor can make working with Atmos configurations more
intuitive and efficient. The right setup can improve readability, speed up
your workflow, and even help you catch configuration errors as you go! Whether
you’re setting up your editor for the first time or refining your current
environment, we have some recommendations to get you started.
- How to configure your VS Code editor to boost productivity
- Ensure your YAML files are validated against the Atmos schema to catch issues early and maintain compliance with best practices
- How to format your code
automatically
To work effectively with Atmos, we recommend configuring your VS Code editor for the best developer experience. Alternatively, you can use a **DevContainer configuration**.
## Configure Visual Studio Code
You can manually configure your VS Code environment with the following settings.
### Recommended Visual Studio Code Extensions
Install these extensions for enhanced productivity:
- [Docker](https://marketplace.visualstudio.com/items?itemName=ms-azuretools.vscode-docker)
- [GitHub Markdown Preview](https://marketplace.visualstudio.com/items?itemName=bierner.github-markdown-preview)
- [Markdown Admonitions](https://marketplace.visualstudio.com/items?itemName=tomasdahlqvist.markdown-admonitions)
- [Terraform](https://marketplace.visualstudio.com/items?itemName=HashiCorp.terraform)
- [YAML](https://marketplace.visualstudio.com/items?itemName=redhat.vscode-yaml)
- [Go Template](https://marketplace.visualstudio.com/items?itemName=casualjim.gotemplate)
- [EditorConfig](https://marketplace.visualstudio.com/items?itemName=EditorConfig.EditorConfig)
### Visual Studio Code Settings
Update your VS Code settings to optimize the experience for working with Atmos. With these configurations, your VS Code editor will be fully optimized for working with Atmos.
Add the following to your `settings.json` for your infrastructure repository (e.g. `infra/.vscode/settings.json`)
```json
{
"git.openRepositoryInParentFolders": "always",
"git.autofetch": true,
"git.showProgress": true,
"workbench.startupEditor": "readme",
"workbench.editor.autoLockGroups": {
"readme": "/welcome.md"
},
"workbench.editorAssociations": {
"*.md": "vscode.markdown.preview.editor"
},
"terminal.integrated.tabs.title": "Atmos (${process})",
"terminal.integrated.tabs.description": "${task}${separator}${local}${separator}${cwdFolder}",
"terminal.integrated.shell.linux": "/bin/zsh",
"terminal.integrated.allowWorkspaceConfiguration": true,
"yaml.schemaStore.enable": true,
"yaml.schemas": {
"https://atmos.tools/schemas/atmos/atmos-manifest/1.0/atmos-manifest.json": [
"**/stacks/**/*.yaml",
"!**/stacks/workflows/**/*.yaml",
"!**/stacks/schemas/**/*.yaml"
]
}
}
```
### Terminal Configuration
Set your terminal to use Zsh for an improved command-line experience:
```json
"terminal.integrated.shell.linux": "/bin/zsh"
```
### YAML Schema Validation
Ensure your YAML files are validated against the Atmos schema:
```json
"yaml.schemas": {
"https://atmos.tools/schemas/atmos/atmos-manifest/1.0/atmos-manifest.json": [
"**/stacks/**/*.yaml",
"!**/stacks/workflows/**/*.yaml",
"!**/stacks/schemas/**/*.yaml"
]
}
```
## Use DevContainers with Atmos
When managing your infrastructure with Atmos, you can enhance your development experience by configuring your **infrastructure repository** with a [dev containers](https://containers.dev/). This ensures a consistent, isolated development environment tailored for working with Atmos and Terraform, integrated natively with your IDE.
## Why Use a DevContainers?
- **Consistent Environment:** Ensures every developer uses the same tools and configurations.
- **Pre-installed Tools:** Includes Atmos, Terraform, and any additional utilities.
- **Simplified Setup:** Developers don’t need to manually install dependencies.
By adding this configuration to your infrastructure repository, you'll streamline collaboration and maintain consistency across your team.
## Setting Up a DevContainer for Your Infrastructure Repository
Follow these steps to configure a **DevContainer** in your repository:
### 1. Create a `.devcontainer` Directory
In the root of your infrastructure repository, create a `.devcontainer` directory to store the configuration files:
```bash
mkdir .devcontainer
```
### 2. Add a `devcontainer.json` File
Inside the `.devcontainer` directory, create a `devcontainer.json` file with the following content:
```json
{
"name": "Atmos DevContainer",
"forwardPorts": [80, 443],
"portsAttributes": {
"80": { "label": "Ingress" },
"443": { "label": "Ingress (TLS)" }
},
"security.workspace.trust.emptyWindow": true,
"security.workspace.trust.untrustedFiles": "prompt",
"security.workspace.trust.domain": {
"*.github.com": true,
"*.app.github.dev": true,
"localhost": true
},
"build": {
"dockerfile": "Dockerfile",
"context": "."
},
"hostRequirements": {
"cpus": 4,
"memory": "8gb",
"storage": "16gb"
},
"runArgs": ["-v", "/var/run/docker.sock:/var/run/docker.sock"],
"postCreateCommand": "/workspace/.devcontainer/post-create.sh",
"features": {
"ghcr.io/devcontainers/features/docker-outside-of-docker": {}
},
"workspaceFolder": "/workspace",
"workspaceMount": "source=${localWorkspaceFolder},target=/workspace,type=bind",
"customizations": {
"vscode": {
"extensions": [
"ms-azuretools.vscode-docker",
"bierner.github-markdown-preview",
"tomasdahlqvist.markdown-admonitions",
"HashiCorp.terraform",
"redhat.vscode-yaml",
"casualjim.gotemplate",
"EditorConfig.EditorConfig"
],
"settings": {
"git.openRepositoryInParentFolders": "always",
"git.autofetch": true,
"workbench.startupEditor": "readme",
"yaml.schemas": {
"https://atmos.tools/schemas/atmos/atmos-manifest/1.0/atmos-manifest.json": [
"**/stacks/**/*.yaml",
"!**/stacks/workflows/**/*.yaml",
"!**/stacks/schemas/**/*.yaml"
]
}
}
}
}
}
```
### 3. Add a `Dockerfile`
In the `.devcontainer` directory, create a `Dockerfile` to define the environment. For Atmos and Terraform, use the following:
```Dockerfile
FROM mcr.microsoft.com/devcontainers/base:ubuntu
# Install dependencies
RUN apt-get update && \
apt-get install -y curl unzip git zsh && \
curl -Lo /tmp/terraform.zip https://releases.hashicorp.com/terraform/1.5.6/terraform_1.5.6_linux_amd64.zip && \
unzip /tmp/terraform.zip -d /usr/local/bin/ && \
rm /tmp/terraform.zip && \
curl -Lo /usr/local/bin/atmos https://github.com/cloudposse/atmos/releases/latest/download/atmos-linux-amd64 && \
chmod +x /usr/local/bin/atmos
# Install Zsh and set as default shell
RUN chsh -s /bin/zsh
```
### 4. (Optional) Add a Post-Create Script
If you need to run additional setup commands after creating the container, add a `post-create.sh` script:
```bash
#!/bin/bash
# Example: Install custom tools or set up environment variables
echo "Post-create script running..."
```
Make it executable:
```bash
chmod +x .devcontainer/post-create.sh
```
### 5. Open Your Repository in the DevContainer
1. Install the **Dev Containers** extension in VS Code:
- [Dev Containers Extension](https://marketplace.visualstudio.com/items?itemName=ms-vscode-remote.remote-containers)
2. Open the infrastructure repository in VS Code.
3. Click on the >< icon in the bottom-left corner and a menu appears.
4. Select **Reopen in Container**.
---
## Using Remote State
import Intro from '@site/src/components/Intro'
import KeyPoints from '@site/src/components/KeyPoints'
import Note from '@site/src/components/Note'
import ActionCard from '@site/src/components/ActionCard'
import PrimaryCTA from '@site/src/components/PrimaryCTA'
import File from '@site/src/components/File'
Terraform natively supports the concept of remote state and there's a very easy way to access the outputs of one Terraform component in another component. We simplify this using the `remote-state` module, which is stack-aware and can be used to access the remote state of a component in the same or a different Atmos stack.
As your architecture grows, it helps to be more intentional about how you deconstruct and organize your components to keep your Terraform state small (see our [best practices](/best-practices/components)). By creating smaller components, your state becomes naturally more manageable. However, this introduces a new problem: there are now dependencies between your components, and the state becomes distributed. We need to find a new way for state to flow between your components and for and [a way to share configuration](/core-concepts/stacks/imports). Plus, we want to [avoid manual duplication of configurations](/core-concepts/stacks/inheritance) as much as possible because that leads to bugs, like copy-paste mistakes.
- How to use the `remote-state` module to access the remote state of a component in the same or a different Atmos stack
- How to configure Atmos to work the `remote-state` module to access the remote state of a component
- Alternatives that might be easier for your use case
In Atmos, this is solved by using these modules:
- [terraform-provider-utils](https://github.com/cloudposse/terraform-provider-utils) - The Cloud Posse Terraform Provider for various utilities,
including stack configuration management
- [remote-state](https://github.com/cloudposse/terraform-yaml-stack-config/tree/main/modules/remote-state) - Terraform module that loads and processes
stack configurations from YAML sources and returns remote state outputs for Terraform components
The [terraform-provider-utils](https://github.com/cloudposse/terraform-provider-utils) is implemented in [Go](https://go.dev/) and uses Atmos `Go` modules to work with [Atmos CLI config](/cli/configuration) and [Atmos stacks](/core-concepts/stacks). The provider processes stack configurations to get the final config for an Atmos component in an Atmos stack. The final component config is then used by the [remote-state](https://github.com/cloudposse/terraform-yaml-stack-config/tree/main/modules/remote-state) Terraform module to return the remote state for the component in the stack.
Terraform remote state is incompatible with the `local` backend type. This is because the local backend is not recommended for production. Review the alternatives [here](/core-concepts/share-data), or consider switching to one of the other backend types.
:::tip New & Improved Ways to Share Data
Atmos now supports new ways to share data between components using the template function `atmos.Component`
and the Atmos YAML functions `!terraform.state` and `!terraform.output` in your Stack configurations:
```shell
{{ (atmos.Component ).outputs. }}
!terraform.state
!terraform.output
```
The `atmos.Component` template function allows reading any Atmos section or any attribute (not just outputs) from a section
of an Atmos component in a stack.
For more details on `atmos.Component` function, refer to [`atmos.Component`](/functions/template/atmos.Component).
The `!terraform.state` and `!terraform.output` Atmos YAML functions allow reading any output (remote state) of an Atmos component in a stack.
For more details on `!terraform.state` YAML function, refer to [`!terraform.state`](/functions/yaml/terraform.state).
For more details on `!terraform.output` YAML function, refer to [`!terraform.output`](/functions/yaml/terraform.output).
:::
## Example
Here is an example.
Suppose that we need to provision two Terraform components:
- [vpc-flow-logs-bucket](https://github.com/cloudposse/atmos/tree/main/examples/quick-start-advanced/components/terraform/vpc-flow-logs-bucket)
- [vpc](https://github.com/cloudposse/atmos/tree/main/examples/quick-start-advanced/components/terraform/vpc)
The `vpc` Terraform component needs the outputs from the `vpc-flow-logs-bucket` Terraform component to
configure [VPC Flow Logs](https://docs.aws.amazon.com/vpc/latest/userguide/flow-logs.html) and store them in the S3 bucket.
We will provision the two Terraform components in the `ue2-dev` Atmos stack (in the `dev` AWS account by setting `stage = "dev"` and in
the `us-east-2` region by setting `environment = "ue2"`).
### Configure and Provision the `vpc-flow-logs-bucket` Component
In the `stacks/catalog/vpc-flow-logs-bucket.yaml` file, add the following default configuration for the `vpc-flow-logs-bucket/defaults` Atmos component:
```yaml
components:
terraform:
vpc-flow-logs-bucket/defaults:
metadata:
# `metadata.type: abstract` makes the component `abstract`,
# explicitly prohibiting the component from being deployed.
# `atmos terraform apply` will fail with an error.
# If `metadata.type` attribute is not specified, it defaults to `real`.
# `real` components can be provisioned by `atmos` and CI/CD like Spacelift and Atlantis.
type: abstract
# Default variables, which will be inherited and can be overridden in the derived components
vars:
force_destroy: false
lifecycle_rule_enabled: false
traffic_type: "ALL"
```
In the `stacks/ue2-dev.yaml` stack config file, add the following config for the `vpc-flow-logs-bucket-1` Atmos component in the `ue2-dev` Atmos
stack:
```yaml
# Import the base Atmos component configuration from the `catalog`.
# `import` supports POSIX-style Globs for file names/paths (double-star `**` is supported).
# File extensions are optional (if not specified, `.yaml` is used by default).
import:
- catalog/vpc-flow-logs-bucket
components:
terraform:
vpc-flow-logs-bucket-1:
metadata:
# Point to the Terraform component in `components/terraform` folder
component: infra/vpc-flow-logs-bucket
inherits:
# Inherit all settings and variables from the
# `vpc-flow-logs-bucket/defaults` base Atmos component
- vpc-flow-logs-bucket/defaults
vars:
# Define variables that are specific for this component
# and are not set in the base component
name: vpc-flow-logs-bucket-1
# Override the default variables from the base component
traffic_type: "REJECT"
```
Having the stacks configured as shown above, we can now provision the `vpc-flow-logs-bucket-1` Atmos component into the `ue2-dev` stack by executing
the following Atmos commands:
```shell
atmos terraform plan vpc-flow-logs-bucket-1 -s ue2-dev
atmos terraform apply vpc-flow-logs-bucket-1 -s ue2-dev
```
### Configure and Provision the `vpc` Component
Having the `vpc-flow-logs-bucket` Terraform component provisioned into the `ue2-dev` stack, we can now configure the `vpc` Terraform component
to obtain the outputs from the remote state of the `vpc-flow-logs-bucket-1` Atmos component.
In the `components/terraform/infra/vpc/remote-state.tf` file, configure the
[remote-state](https://github.com/cloudposse/terraform-yaml-stack-config/tree/main/modules/remote-state) Terraform module to obtain the remote state
for the `vpc-flow-logs-bucket-1` Atmos component:
```hcl
module "vpc_flow_logs_bucket" {
count = local.vpc_flow_logs_enabled ? 1 : 0
source = "cloudposse/stack-config/yaml//modules/remote-state"
version = "1.5.0"
# Specify the Atmos component name (defined in YAML stack config files)
# for which to get the remote state outputs
component = var.vpc_flow_logs_bucket_component_name
# Override the context variables to point to a different Atmos stack if the
# `vpc-flow-logs-bucket-1` Atmos component is provisioned in another AWS account, OU or region
stage = try(coalesce(var.vpc_flow_logs_bucket_stage_name, module.this.stage), null)
tenant = try(coalesce(var.vpc_flow_logs_bucket_tenant_name, module.this.tenant), null)
environment = try(coalesce(var.vpc_flow_logs_bucket_environment_name, module.this.environment), null)
# `context` input is a way to provide the information about the stack (using the context
# variables `namespace`, `tenant`, `environment`, `stage` defined in the stack config)
context = module.this.context
}
```
In the `components/terraform/infra/vpc/vpc-flow-logs.tf` file, configure the `aws_flow_log` resource for the `vpc` Terraform component to use the
remote state output `vpc_flow_logs_bucket_arn` from the `vpc-flow-logs-bucket-1` Atmos component:
```hcl
locals {
enabled = module.this.enabled
vpc_flow_logs_enabled = local.enabled && var.vpc_flow_logs_enabled
}
resource "aws_flow_log" "default" {
count = local.vpc_flow_logs_enabled ? 1 : 0
# Use the remote state output `vpc_flow_logs_bucket_arn` of the `vpc_flow_logs_bucket` component
log_destination = module.vpc_flow_logs_bucket[0].outputs.vpc_flow_logs_bucket_arn
log_destination_type = var.vpc_flow_logs_log_destination_type
traffic_type = var.vpc_flow_logs_traffic_type
vpc_id = module.vpc.vpc_id
tags = module.this.tags
}
```
In the `stacks/catalog/vpc.yaml` file, add the following default config for the `vpc/defaults` Atmos component:
```yaml
components:
terraform:
vpc/defaults:
metadata:
# `metadata.type: abstract` makes the component `abstract`,
# explicitly prohibiting the component from being deployed.
# `atmos terraform apply` will fail with an error.
# If `metadata.type` attribute is not specified, it defaults to `real`.
# `real` components can be provisioned by `atmos` and CI/CD like Spacelift and Atlantis.
type: abstract
# Default variables, which will be inherited and can be overridden in the derived components
vars:
public_subnets_enabled: false
nat_gateway_enabled: false
nat_instance_enabled: false
max_subnet_count: 3
vpc_flow_logs_enabled: false
vpc_flow_logs_log_destination_type: s3
vpc_flow_logs_traffic_type: "ALL"
```
In the `stacks/ue2-dev.yaml` stack config file, add the following config for the `vpc/1` Atmos component in the `ue2-dev` stack:
```yaml
# Import the base component configuration from the `catalog`.
# `import` supports POSIX-style Globs for file names/paths (double-star `**` is supported).
# File extensions are optional (if not specified, `.yaml` is used by default).
import:
- catalog/vpc
components:
terraform:
vpc/1:
metadata:
# Point to the Terraform component in `components/terraform` folder
component: infra/vpc
inherits:
# Inherit all settings and variables from the `vpc/defaults` base Atmos component
- vpc/defaults
vars:
# Define variables that are specific for this component
# and are not set in the base component
name: vpc-1
ipv4_primary_cidr_block: 10.8.0.0/18
# Override the default variables from the base component
vpc_flow_logs_enabled: true
vpc_flow_logs_traffic_type: "REJECT"
# Specify the name of the Atmos component that provides configuration
# for the `infra/vpc-flow-logs-bucket` Terraform component
vpc_flow_logs_bucket_component_name: vpc-flow-logs-bucket-1
# Override the context variables to point to a different Atmos stack if the
# `vpc-flow-logs-bucket-1` Atmos component is provisioned in another AWS account, OU or region.
# If the bucket is provisioned in a different AWS account,
# set `vpc_flow_logs_bucket_stage_name`
# vpc_flow_logs_bucket_stage_name: prod
# If the bucket is provisioned in a different AWS OU,
# set `vpc_flow_logs_bucket_tenant_name`
# vpc_flow_logs_bucket_tenant_name: core
# If the bucket is provisioned in a different AWS region,
# set `vpc_flow_logs_bucket_environment_name`
# vpc_flow_logs_bucket_environment_name: uw2
```
Having the stacks configured as shown above, we can now provision the `vpc/1` Atmos component into the `ue2-dev` stack by
executing the following Atmos commands:
```shell
atmos terraform plan vpc/1 -s ue2-dev
atmos terraform apply vpc/1 -s ue2-dev
```
## Atmos Configuration
Both the `atmos` [CLI](/cli) and [terraform-provider-utils](https://github.com/cloudposse/terraform-provider-utils) Terraform provider use the same `Go` code, which try to locate the [CLI config](/cli/configuration) `atmos.yaml` file before parsing and processing [Atmos stacks](/core-concepts/stacks).
This means that `atmos.yaml` file must be at a location in the file system where all the processes can find it.
While placing `atmos.yaml` at the root of the repository will work for Atmos, it will not work for the [terraform-provider-utils](https://github.com/cloudposse/terraform-provider-utils) Terraform provider because the provider gets executed from the component's directory (e.g. `components/terraform/infra/vpc`), and we don't want to replicate `atmos.yaml` into every component's folder.
:::info
`atmos.yaml` is loaded from the following locations (from lowest to highest priority):
- System dir (`/usr/local/etc/atmos/atmos.yaml` on Linux, `%LOCALAPPDATA%/atmos/atmos.yaml` on Windows)
- Home dir (`~/.atmos/atmos.yaml`)
- Current directory
- ENV variables `ATMOS_CLI_CONFIG_PATH` and `ATMOS_BASE_PATH`
:::
Initial Atmos configuration can be controlled by these ENV vars:
- `ATMOS_CLI_CONFIG_PATH` - where to find `atmos.yaml`. Absolute path to a folder where the `atmos.yaml` CLI config file is located
- `ATMOS_BASE_PATH` - absolute path to the folder containing the `components` and `stacks` folders
### Recommended Options
For this to work for both the `atmos` CLI and the Terraform provider, we recommend doing one of the following:
- Put `atmos.yaml` at `/usr/local/etc/atmos/atmos.yaml` on local host and set the ENV var `ATMOS_BASE_PATH` to point to the absolute path of the root
of the repo
- Put `atmos.yaml` into the home directory (`~/.atmos/atmos.yaml`) and set the ENV var `ATMOS_BASE_PATH` pointing to the absolute path of the root of
the repo
- Put `atmos.yaml` at a location in the file system and then set the ENV var `ATMOS_CLI_CONFIG_PATH` to point to that location. The ENV var must
point to a folder without the `atmos.yaml` file name. For example, if `atmos.yaml` is at `/atmos/config/atmos.yaml`,
set `ATMOS_CLI_CONFIG_PATH=/atmos/config`. Then set the ENV var `ATMOS_BASE_PATH` pointing to the absolute path of the root of the repo
- When working in a Docker container, place `atmos.yaml` in the `rootfs` directory
at [/rootfs/usr/local/etc/atmos/atmos.yaml](https://github.com/cloudposse/atmos/blob/main/examples/quick-start-advanced/rootfs/usr/local/etc/atmos/atmos.yaml)
and then copy it into the container's file system in the [Dockerfile](https://github.com/cloudposse/atmos/blob/main/examples/quick-start-advanced/Dockerfile)
by executing the `COPY rootfs/ /` Docker command. Then in the Dockerfile, set the ENV var `ATMOS_BASE_PATH` pointing to the absolute path of the
root of the repo. Note that the [Atmos example](https://github.com/cloudposse/atmos/blob/main/examples/quick-start)
uses [Geodesic](https://github.com/cloudposse/geodesic) as the base Docker image. [Geodesic](https://github.com/cloudposse/geodesic) sets the ENV
var `ATMOS_BASE_PATH` automatically to the absolute path of the root of the repo on local host
## Summary
- Remote State for an Atmos component in an Atmos stack is obtained by using
the [remote-state](https://github.com/cloudposse/terraform-yaml-stack-config/tree/main/modules/remote-state) Terraform module
- The module calls the [terraform-provider-utils](https://github.com/cloudposse/terraform-provider-utils) Terraform provider which processes the stack
configs and returns the configuration for the Atmos component in the stack.
The [terraform-provider-utils](https://github.com/cloudposse/terraform-provider-utils) Terraform provider utilizes Atmos `Go` modules to parse and
process stack configurations
- The [remote-state](https://github.com/cloudposse/terraform-yaml-stack-config/tree/main/modules/remote-state) module accepts the `component` input as
the Atmos component name for which to get the remote state outputs
- The module accepts the `context` input as a way to provide the information about the stack (using the context
variables `namespace`, `tenant`, `environment`, `stage` defined in the stack manifests)
- If the Atmos component (for which we want to get the remote state outputs) is provisioned in a different Atmos stack (in a different AWS OU, or
different AWS account, or different AWS region), we can override the context variables `tenant`, `stage` and `environment` to point the module to
the correct stack. For example, if the component is provisioned in a different AWS region (let's say `us-west-2`), we can set `environment = "uw2"`,
and the [remote-state](https://github.com/cloudposse/terraform-yaml-stack-config/tree/main/modules/remote-state) module will get the remote state
outputs for the Atmos component provisioned in that region
Atmos supports alternative ways to read the outputs (remote state) of components directly in Atmos stack manifests by
using the [`!terraform.output`](/functions/yaml/terraform.output) Atmos YAML function
and the [`atmos.Component`](/functions/template/atmos.Component) Go template function instead of using
the [`remote-state`](https://github.com/cloudposse/terraform-yaml-stack-config/tree/main/modules/remote-state) module
and configuring Terraform/OpenTofu components to use the module.
Learn how to use '!terraform.output' YAML function
Learn how to use 'atmos.Component' template function
---
## Share Data Between Components
import Intro from '@site/src/components/Intro'
import ActionCard from '@site/src/components/ActionCard'
import PrimaryCTA from '@site/src/components/PrimaryCTA'
import KeyPoints from '@site/src/components/KeyPoints'
import CollapsibleText from '@site/src/components/CollapsibleText'
import File from '@site/src/components/File'
import Note from '@site/src/components/Note'
Breaking up your infrastructure components into loosely coupled components is a great way to manage complexity and
reuse code. However, these smaller components often lead to a situation where you need to share data between components.
In Atmos, there are several ways you can easily share settings, configurations, and outputs among components and even
tap into external data sources and stores.
There are multiple ways to approach this: using native Terraform support for remote state to read outputs from other
components or using template functions in stack configurations. In this chapter, you’ll learn how to share state between
components within the same stack or even across different stacks.
- Why you might need to share data between components
- How to share data between components using Terraform remote state
- How to use template functions to share data between components in stack configurations
## Using YAML Functions
### Function: `!store`
The `!store` YAML function can read data from a remote store such as SSM Parameter Store, Artifactory, or Redis.
For example, we can read the `vpc_id` output of the `vpc` component in the current stack from the SSM Parameter Store
configured in `atmos.yaml` as `ssm/prod` simply by doing:
```yaml
components:
terraform:
cluster:
vars:
vpc_id: !store ssm/prod vpc vpc_id
```
To access the configuration of a component in a different stack, you can specify the stack name as the second argument.
For example, here we're reading the `vpc_id` output of the `vpc` component in the `staging` stack:
```yaml
components:
terraform:
cluster:
vars:
vpc_id: !store ssm/prod staging vpc vpc_id
```
For more advanced examples, check out the `!store` YAML function documentation.
Learn More
### Function: `!terraform.output`
The `!terraform.output` YAML function allows reading the outputs ([remote state](/core-concepts/share-data/remote-state))
of components directly in Atmos stack manifests by internally executing a
[`terraform output`](https://developer.hashicorp.com/terraform/cli/commands/output) or
[`tofu output`](https://opentofu.org/docs/cli/commands/output/) command.
For example, we can read the `vpc_id` output of the `vpc` component in the current stack:
```yaml
components:
terraform:
cluster:
vars:
vpc_id: !terraform.output vpc vpc_id
```
To access the configuration of a component in a different stack, you can specify the stack name as the second argument.
For example, here we're reading the `vpc_id` output of the `vpc` component in the `prod` stack:
```yaml
components:
terraform:
cluster:
vars:
vpc_id: !terraform.output vpc prod vpc_id
```
For more advanced examples, check out the `!terraform.output` YAML function documentation.
Learn More
### Function: `!terraform.state`
The [`!terraform.state`](/functions/yaml/terraform.state) YAML function reads outputs **directly from the configured Terraform or OpenTofu backend**, bypassing the `terraform output` or `tofu output` pipeline — it’s **very fast**, doesn’t require provider initialization, and currently supports [S3 and local backends](/core-concepts/components/terraform/backends) for accessing [remote state](/core-concepts/share-data/remote-state).
For example, we can read the `vpc_id` output of the `vpc` component in the current stack:
```yaml
components:
terraform:
cluster:
vars:
vpc_id: !terraform.state vpc vpc_id
```
To access the configuration of a component in a different stack, you can specify the stack name as the second argument.
For example, here we're reading the `vpc_id` output of the `vpc` component in the `prod` stack:
```yaml
components:
terraform:
cluster:
vars:
vpc_id: !terraform.state vpc prod vpc_id
```
For more advanced examples, check out the `!terraform.state` YAML function documentation.
Learn More
:::tip
The [`!terraform.state`](/functions/yaml/terraform.state) function accepts the same parameters and
produces the same result as the [`!terraform.output`](/functions/yaml/terraform.output) function,
but has significantly less impact on performance as it reads the state file directly from the configured backend without
executing Terraform/OpenTofu commands, generating varfiles and backend config files, and initializing all modules and providers.
To understand the performance implications of the `!terraform.output` and `!terraform.state` functions,
compare the [!terraform.output Execution Flow](/functions/yaml/terraform.output#terraformoutput-function-execution-flow) with the
[!terraform.state Execution Flow](/functions/yaml/terraform.state#terraformstate-function-execution-flow).
:::
## Using Template Functions
### Function: `atmos.Store`
The `atmos.Store` template function can read data from a remote store such as SSM Parameter Store, Artifactory, or Redis.
For example, we can read the `vpc_id` output of the `vpc` component in the current stack from the SSM Parameter Store
configured in `atmos.yaml` as `ssm` simply by doing:
```yaml
components:
terraform:
cluster:
vars:
vpc_id: '{{ atmos.Store "ssm" .stack "vpc" "vpc_id" }}'
```
To access the configuration of a component in a different stack, you can specify the stack name as the second argument.
For example, here we're reading the `vpc_id` output of the `vpc` component in the `staging` stack:
```yaml
components:
terraform:
cluster:
vars:
vpc_id: '{{ atmos.Store "ssm" "staging" "vpc" "vpc_id" }}'
```
For more advanced examples, check out the `atmos.Store` template function documentation.
Learn More
### Function: `atmos.Component`
The `atmos.Component` template function can read all configurations of any Atmos component, including its outputs.
For example, we can read the `vpc_id` output of the `vpc` component in the current `.stack`, simply by doing:
```yaml
components:
terraform:
cluster:
vars:
vpc_id: '{{ (atmos.Component "vpc" .stack).outputs.vpc_id }}'
```
The `atmos.Component` function returns the entire configuration of the component in the stack. The configuration is a map of all the sections of the component, including its outputs. You can access properties using dot (`.`) notation, and chain any number of attributes with dot (`.`) notation.
To access the configuration of a component in a different stack, you can specify the stack name as the second argument. For example, here we're reading the `vpc_id` output of the `vpc` component in the `staging` stack:
```yaml
components:
terraform:
cluster:
vars:
vpc_id: '{{ (atmos.Component "vpc" "staging").outputs.vpc_id }}'
```
For more advanced examples, check out the `atmos.Component` function documentation.
Learn More
### Data Sources
Data sources are incredibly powerful. They let you glue together components leveraging external data sources without modifying a line of Terraform code. This is great when you want to leave your Terraform codebase untouched, especially if you don't control the source.
Data sources allow you to fetch and use data from external sources in your stack configurations. You can use data sources to fetch data from APIs, various key/value storage systems, or even local files.
They can be fetched from any of the following schemes supported by Gomplate:
- **AWS Systems Manager Parameter Store** (`aws+smp://`)
- **AWS Secrets Manager** (`aws+sm://`)
- **Amazon S3** (`s3://`)
- **HashiCorp Consul** (`consul://`, `consul+http://`, `consul+https://`)
- **Environment Variables** (`env://`)
- **Files** (`file://`)
- **Git Repositories** (`git://`, `git+file://`, `git+http://`, `git+https://`, `git+ssh://`)
- **Google Cloud Storage** (`gs://`)
- **HTTP/HTTPS Endpoints** (`http://`, `https://`)
- **Merging Data Sources** (`merge://`)
- **Standard Input** (`stdin://`)
- **HashiCorp Vault** (`vault://`, `vault+http://`, `vault+https://`)
:::tip On-the-Fly Root Modules
When you combine data sources with [vendoring](/core-concepts/vendor), [terraform backends](/core-concepts/components/terraform/backends) and [provider](/core-concepts/components/terraform/providers) generation, you can leverage any Terraform module as a "root module" and provision it as a component with Atmos.
:::
Configure your data sources in `atmos.yaml`, then leverage them inside stack configurations.
Here we set up a data source called `ip`, which will fetch the public IP address by hitting the
`https://api.ipify.org?format=json` endpoint.
```yaml
settings:
templates:
settings:
gomplate:
timeout: 5
datasources:
network_egress:
url: "https://api.ipify.org?format=json"
headers:
accept:
- "application/json"
```
Then, you can use the `network_egress` data source in your stack configurations to fetch the public `ip`. This is useful for setting a tag indicating the IP address that provisioned the resources.
This assumes the Terraform component accepts a `tags` variable and appropriately handles tags.
```yaml
terraform:
vars:
tags:
provisioned_by_ip: '{{ (datasource "ip").ip }}'
```
Use data sources to fetch data from external sources and use it in your Terraform configurations.
Learn More
## Using Terraform Remote State
Atmos provides a [`remote-state`](https://github.com/cloudposse/terraform-yaml-stack-config/tree/main/modules/remote-state) Terraform module that makes it easier to look up the remote state of other components in the stack. This module can be used to share data between components provisioned in the same stack or across different stacks, using native HCL.
Our convention is to place all remote-state dependencies in the `remote-state.tf` file. This file is responsible for fetching the remote state outputs of other components in the stack.
```hcl
module "vpc" {
source = "cloudposse/stack-config/yaml//modules/remote-state"
version = "1.5.0"
# Specify the Atmos component name (defined in YAML stack config files) for which to get the remote state outputs
component = "vpc"
# `context` input is a way to provide the information about the stack (using the context
# variables `namespace`, `tenant`, `environment`, `stage` defined in the stack config)
context = module.this.context
}
```
Then we can use the `module.vpc` as easily as if it were provisioned within the `myapp` component.
This gives us the best of both worlds: the ease of use of Terraform remote state and the reduced blast radius of using smaller components.
```hcl
resource "aws_network_acl" "default" {
vpc_id = module.vpc.vpc_id
ingress {
protocol = "tcp"
rule_no = 100
action = "allow"
cidr_block = "0.0.0.0/0"
from_port = 80
to_port = 80
}
}
```
Use the Terraform-native `remote-state` module to share data between components.
Learn How
---
## Stack Catalogs
import Intro from '@site/src/components/Intro'
As you start splitting your stacks apart into smaller configurations, it often makes to organize those into a catalog of reusable configurations. That way you can take advantage of imports, to reuse configuration in multiple places. Catalogs are how to logically organize all the child [Stack](/core-concepts/stacks) configurations on the filesystem for use by [imports](/core-concepts/stacks/imports).
There's no "right or wrong" way to do it, and Atmos does not enforce any one convention.
What we've come to realize is there's no "one way" to organize Stack configurations. The best way to organize them will come down to
how an organization wants to model its infrastructure.
:::tip See Design Patterns
We go into greater depth on this convention in our [design patterns](/design-patterns/):
- [Component Catalogs](/design-patterns/component-catalog)
- [Component Catalogs with Mixins](/design-patterns/component-catalog-with-mixins)
- [Component Catalogs with Templates](/design-patterns/component-catalog-template)
:::
Below is how we implement them at [Cloud Posse](https://cloudposse.com).
## Conventions
We provide a number of recommended conventions for your Stack catalogs. You can use all of them or some of them. These conventions have come about from our [customer engagements](https://cloudposse.com/services).
[Cloud Posse](https://cloudposse.com) typically uses `orgs` as the parent stacks, which import `teams`, `mixins` and other services from a `catalog`.
## Filesystem Layout
Here's an example of how Stack imports might be organized on disk.
```console
└── stacks/
├── mixins/
│ └── region/
│ ├── us-east-1.yaml
│ ├── us-west-2.yaml
│ └── eu-west-1.yaml
│ └── stage/
├── teams/
│ └── frontend/
│ └── example-application/
│ └── microservice/
│ ├── prod.yaml
│ ├── dev.yaml
│ └── staging.yaml
└── catalogs/
├── vpc/
│ └── baseline.yaml
└── database/
├── baseline.yaml
├── small.yaml
├── medium.yaml
└── large.yaml
```
## Types of Catalogs
### Mixins
We go into more detail on using [Mixins](/core-concepts/stacks/inheritance/mixins) to manage snippets of reusable configuration. These Mixins are frequently used alongside the other conventions such as Teams and Organizations.
### Teams
When infrastructure gets very large and there's numerous teams managing it, it can be helpful to organize Stack configurations around the notion of "teams". This way it's possible to leverage [`CODEOWNERS`](https://docs.github.com/en/repositories/managing-your-repositorys-settings-and-features/customizing-your-repository/about-code-owners) together with [branch protection rules](https://docs.github.com/en/repositories/configuring-branches-and-merges-in-your-repository/defining-the-mergeability-of-pull-requests/about-protected-branches#require-pull-request-reviews-before-merging) to restrict who can merge pull requests that affect infrastructure.
Here's what that might look like:
```console
└── stacks/
└── teams/
└── frontend/
└── ecom-store/
├── checkout/
│ ├── prod.yaml
│ ├── dev.yaml
│ └── staging.yaml
└── cart/
├── prod.yaml
├── dev.yaml
└── staging.yaml
```
In this example, there's a `frontend` team that owns an `ecom-store` application. The application consists of two microservices called `checkout` and `cart`. Each microservice has (3) stages: `dev`, `staging` and `prod`.
### Organizations
The organizational layout of Stacks is useful for modeling how infrastructure gets "physically" deployed with a given Infrastructure as a Service (IaaS) platform like AWS.
AWS infrastructure is hierarchical and can be thought of like this:
1. The top-level account is the "Organization"
2. An "Organization" can have any number of "Organizational Units" (OUs)
3. Each "OU" can have "Member Accounts"
4. Each "Member Account" has "Regions"
5. Each "Region" has "Resources" (the top-level stack)
In sticking with this theme, a good filesystem layout for infrastructure looks like this:
```text
└── stacks/
└── orgs/
└── acme/
├── ou1/
│ ├── account1/
│ │ ├── global-region.yaml
│ │ └── us-east-2.yaml
│ ├── account2/
│ │ ├── global-region.yaml
│ │ └── us-east-2.yaml
│ └── account3/
│ ├── global-region.yaml
│ └── us-east-2.yaml
└── ou2/
├── dev/
│ ├── global-region.yaml
│ └── us-east-2.yaml
├── prod/
│ ├── global-region.yaml
│ └── us-east-2.yaml
└── staging/
├── global-region.yaml
└── us-east-2.yaml
```
:::info
Cloud Posse uses the "Organizations" layout for all the "parent stacks". Parent stacks are the top-level stacks which are responsible for importing
the other child stacks (e.g. teams, mixins, etc.)
:::
What's important to point out is that all these conventions are not mutually exclusive. In fact, we like to combine them.
Here's what that might look like:
```console
└── orgs/
└── acme/
└── platform/
├── prod/
│ ├── us-east-1/
│ │ ├── networking.yaml
│ │ ├── compliance.yaml
│ │ ├── backing-services.yaml
│ │ └── teams.yaml
│ └── us-west-2/
│ ├── networking.yaml
│ ├── compliance.yaml
│ ├── backing-services.yaml
│ └── teams.yaml
├── staging/
│ └── us-west-1/
│ ├── networking.yaml
│ ├── compliance.yaml
│ ├── backing-services.yaml
│ └── teams.yaml
└── dev/
└── us-west-2/
├── networking.yaml
├── backing-services.yaml
└── teams.yaml
```
In this example, there's a single organization called `acme` with an example of one organizational unit (OU) called `platform`. The OU has 3 stages: `dev`, `staging`, and `prod`. Each stage then operates in a number of regions. Each region then has a `networking` layer, a `backing-services` layer, and a `teams` layer. The `staging` and `prod` accounts have both have a `compliance` layer, which isn't needed in the `dev` stages.
The files like `networking.yaml` and `compliance.yaml` can be named anything you want. It's helpful to think about organizing Components based on their lifecycles or according to a concept of layers that stack on top of each other.
### Everything Else
For everything else, we usually have catalog that we just call `catalog/`. We place it underneath the `stacks/` folder. This is for everything else we want to define once and reuse. Use whatever convention makes sense for your company.
## Refactoring Configurations
One of the amazing things about the Atmos [Stack](/core-concepts/stacks) configurations is that the entire state of configuration is stored in the YAML configurations. The filesystem layout has no bearing on the desired state of the configuration. This means that configurations can be easily refactored at at time in the future, if you discover there's a better way to organize your Stack configurations. So long as the deep-merged configuration is the same, it will not affect any of the [Components](/core-concepts/components).
## References
- [Component Catalog Atmos Design Pattern](/design-patterns/component-catalog)
- [Component Catalog with Mixins Atmos Design Pattern](/design-patterns/component-catalog-with-mixins)
- [Component Catalog Template Atmos Design Pattern](/design-patterns/component-catalog-template)
---
## Configuring Components in Stacks
import Intro from '@site/src/components/Intro'
Stacks are used to compose multiple components together and provide their configuration. The schema is the same for all stacks, but the configuration can be different. Use a combination of [imports](/core-concepts/stacks/imports), [inheritance](/core-concepts/stacks/inheritance), and [catalogs](/core-concepts/stacks/catalogs) for a template-free way to reuse configuration and [override](/core-concepts/stacks/overrides) values when needed.
## Component Schema
A Component consists of the infrastructure as code business logic (e.g. a Terraform "root" module) as well as the configuration of that
component. The configuration of a component is stored in a Stack configuration.
To configure a Component in a [Stack](/core-concepts/stacks), you define the component in the `components` section of the Stack configuration.
:::info Disambiguation
- **Terraform Component** is a simply a [Terraform Root Module](https://developer.hashicorp.com/terraform/language/modules#the-root-module)
that consists of the resources defined in the `.tf` files in a working directory
(e.g. [components/terraform/infra/vpc](https://github.com/cloudposse/atmos/tree/main/tests/fixtures/scenarios/complete/components/terraform/infra/vpc))
- **Component Configuration** provides configuration (variables and other settings) for a type of component (e.g. a Terraform component)
and is defined in one or more YAML stack config files (which are called [Atmos stacks](/core-concepts/stacks))
:::
### Terraform Schema
The schema of an Atmos Terraform Component in an Atmos Stack is as follows:
```yaml
components:
terraform:
# the slug of the component
example:
# configuration specific to atmos
metadata:
# Components can be of type "real" (default) or "abstract"
type: real
# This is the directory path of the component.
# In this example, we're referencing a component in the `components/terraform/stable/example` folder.
component: stable/example
# We can leverage multiple inheritance to sequentially deep merge multiple configurations
inherits:
- example-defaults
# Settings are where we store configuration related to integrations.
# It's a freeform map; anything can be placed here.
settings:
spacelift: {}
# Define the terraform variables, which will get deep-merged and exported to a `.tfvars` file by atmos.
vars:
enabled: true
name: superduper
nodes: 10
```
#### Terraform Attributes
- `vars` (optional)
- The `vars` section is a free-form map. Use [component validation](/core-concepts/validate) to enforce policies.
- `vars.namespace` (optional)
-
This is an *optional* [`terraform-null-label`](https://github.com/cloudposse/terraform-null-label) convention.
The namespace of all stacks. Typically, there will be one namespace for the organization.
Example:
```yaml
vars:
namespace: acme
```
- `vars.tenant` (optional)
-
This is an *optional* [`terraform-null-label`](https://github.com/cloudposse/terraform-null-label) convention.
In a multi-tenant configuration, the tenant represents a single `tenant`. By convention, we typically
recommend that every tenant have its own Organizational Unit (OU).
Example:
```yaml
vars:
tenant: platform
```
- `vars.stage` (optional)
-
This is an *optional* [`terraform-null-label`](https://github.com/cloudposse/terraform-null-label) convention.
The `stage` is where workloads run. See our [glossary](/terms) for disambiguation.
Example:
```yaml
vars:
# Production stage
stage: prod
```
- `vars.environment` (optional)
-
This is an *optional* [`terraform-null-label`](https://github.com/cloudposse/terraform-null-label) convention.
The `environment` is used for location where things run. See our [glossary](/terms) for disambiguation.
Example:
```yaml
vars:
# us-east-1
environment: ue1
```
- `metadata` (optional)
- The `metadata` section extends functionality of the component.
- `settings`
- The `settings` block is a free-form map used to pass configuration information to [integrations](/integrations).
### Helmfile Schema
The schema of an Atmos Helmfile Component in an Atmos Stack is as follows:
```yaml
components:
helmfile:
# the slug of the component
example:
# configuration specific to atmos
metadata:
# Components can be of type "real" (default) or "abstract"
type: real
# This is the directory path of the component.
# In this example, we're referencing a component in the `components/terraform/stable/example` folder.
component: stable/example
# We can leverage multiple inheritance to sequentially deep merge multiple configurations
inherits:
- example-defaults
# Define the Helmfile variables, which will get deep-merged into the Helmfile configuration.
vars:
enabled: true
release_name: my-release
chart_version: "1.2.3"
```
#### Helmfile Attributes
- `vars` (optional)
- The `vars` section is a free-form map. Use [component validation](/core-concepts/validate) to enforce policies.
- `vars.namespace` (optional)
-
This is an *optional* [`terraform-null-label`](https://github.com/cloudposse/terraform-null-label) convention.
The namespace of all stacks. Typically, there will be one namespace for the organization.
Example:
```yaml
vars:
namespace: acme
```
- `metadata` (optional)
- The `metadata` section extends functionality of the component.
- `settings`
- The `settings` block is a free-form map used to pass configuration information to [integrations](/integrations).
### Types of Components
In Atmos, each component configuration defines its type through the `metadata.type` parameter. This defines how the component behaves—whether it can be used directly to provision resources or serves as a base configuration for other components.
The type of component is expressed in the `metadata.type` parameter of a given component configuration.
There are two types of components:
- `real`
- Think of a `real` component as one that can be deployed. It’s fully configured and ready to be provisioned, similar to a "concrete" class in programming. Once defined, you can use it to create resources or services directly in your infrastructure.
- `abstract`
- An `abstract` component is more like a blueprint. It can’t be deployed on its own. Instead, it’s a base configuration that needs to be extended or inherited by other components. This is similar to an ["abstract base classes"](https://en.wikipedia.org/wiki/Abstract_type) in programming—it defines reusable configurations, but it’s not complete enough to be deployed directly.
### Disabling Components with `metadata.enabled`
The `metadata.enabled` parameter controls whether a component is included in deployment. By default, components are enabled. Setting `metadata.enabled` to `false` skips the component entirely—no workspace is created, and no Terraform commands are executed. Disabling a component does not cause deletion. It just signals that it's no longer managed by Atmos.
:::info Note
This should not be confused with [Cloud Posse's conventions and best practices](/best-practices/terraform/) of
having modules and components define a Terraform input named `enabled`.
This is a general convention and `vars.enabled` is not a special variable. Atmos does not treat it differently from any other variable.
:::
**Example**:
```yaml
# Disable a component in a specific environment
components:
terraform:
vpc:
metadata:
type: real
enabled: false
vars:
name: primary-vpc
```
Using the `metadata.enabled` flag makes it easy to ensure that only the intended components are active in each environment.
### Locking Components with `metadata.locked`
The `metadata.locked` parameter prevents changes to a component while still allowing read operations. When a component is locked, operations that would modify infrastructure (like `terraform apply`) are blocked, while read-only operations (like `terraform plan`) remain available. By default, components are unlocked. Setting `metadata.locked` to `true` prevents any change operations.
:::info Note
Locking a component does not affect the Terraform state. It's intended as a way to communicate intention and prevent accidental changes to sensitive or critical infrastructure.
:::
**Example**:
```yaml
# Lock a production database component to prevent accidental changes
components:
terraform:
rds:
metadata:
locked: true
vars:
name: production-database
```
Using the `metadata.locked` flag helps protect critical infrastructure from unintended modifications while still allowing teams to inspect and review the configuration.
---
## Configure Dependencies Between Components
import File from '@site/src/components/File'
import Intro from '@site/src/components/Intro'
import Terminal from '@site/src/components/Terminal'
Atmos supports configuring the relationships between components in the same or different stacks. You can define
dependencies between components to ensure that components are deployed in the correct order.
Before deploying components, it's important to consider the dependencies between components.
For example, a database component might depend on a network component.
When this happens, it's important to ensure that the network component is deployed before the database component.
:::important Support for Dependencies
Support for dependencies is reliant on the [integration](/integrations) used and not all integrations support dependencies.
For example, GitHub Actions do not support dependency order applies, while [Spacelift does](https://docs.spacelift.io/concepts/stack/stack-dependencies).
:::
You can define component dependencies by using the `settings.depends_on` section. The section used to define all the Atmos components (in
the same or different stacks) that the current component depends on.
The `settings.depends_on` section is a map of objects. The map keys are just the descriptions of dependencies and can be strings or numbers. Provide meaningful descriptions or numbering so that people can understand what the dependencies are about.
Why is `settings.depends_on` a map instead of a list?
We originally implemented `settings.depends_on` as a list. However, since it’s not clear how lists should be
deep-merged, so we decided to convert it to a map instead. In this map, the keys are lexicographically ordered, and
based on that order, the dependencies are managed.
Each object in the `settings.depends_on` section has the following schema:
- file (optional)
- A file on the local filesystem that the current component depends on
- folder (optional)
- A folder on the local filesystem that the current component depends on
- component (required if `file` or `folder` is not specified)
- an Atmos component that the current component depends on
- stack (optional)
- The Atmos stack where the `component` is provisioned
- namespace (optional)
- The `namespace` where the `component` is provisioned
- tenant (optional)
- The `tenant` where the `component` is provisioned
- environment (optional)
- The `environment` where the `component` is provisioned
- stage (optional)
- The `stage` where the `component` is provisioned
One of `component`, `file` or `folder` is required.
If `component` is specified, you can provide the other context variables to define an Atmos stack other than the current stack.
For example, you can specify:
- `stack` if the `component` is from a different Atmos stack
- `namespace` if the `component` is from a different Organization
- `tenant` if the `component` is from a different Organizational Unit
- `environment` if the `component` is from a different region
- `stage` if the `component` is from a different account
- `tenant`, `environment` and `stage` if the component is from a different Atmos stack (e.g. `tenant1-ue2-dev`)
:::info
If `stack` is specified, it's processed first and the `namespace`, `tenant`, `environment` and `stage` attributes are ignored.
:::
:::tip
You can use [Atmos Stack Manifest Templating](/core-concepts/stacks/templates) in `depends_on`.
Atmos processes the templates first, and then detects all the dependencies, allowing you to provide the parameters to
`depends_on` dynamically.
:::
## Examples
In the following example, we specify that the `component1` component depends on the following:
- The `component2` component in the same Atmos stack as `component1`
- The `component3` component from the `prod` stage
- The `component4` component from the `tenant1` tenant, `ue2` environment and `staging` stage (`tenant1-ue2-staging` Atmos stack)
- The `component5` component from the `tenant1-ue2-prod` Atmos stack
- The `component6` component from the same Atmos stack as `component1`
- The `component7` component from the same tenant and stage as `component1`, but `uw2` environment
```yaml
vars:
tenant: "tenant1"
environment: "ue1"
stage: "dev"
components:
terraform:
component1:
settings:
depends_on:
1:
# If the context (`stack`, `namespace`, `tenant`, `environment`, `stage`) is not
# provided, the `component` is from the same Atmos stack as `component1`
component: "component2"
2:
# `component1` (in any stage) depends on `component3`
# from the `prod` stage (in any `environment` and any `tenant`)
component: "component3"
stage: "prod"
3:
# `component1` depends on `component4`
# from the the `tenant1` tenant, `ue2` environment and `staging` stage
# (`tenant1-ue2-staging` Atmos stack)
component: "component4"
tenant: "tenant1"
environment: "ue2"
stage: "staging"
4:
# `component1` depends on `component5`
# from the `tenant1-ue2-prod` Atmos stack
component: "component5"
stack: "tenant1-ue2-prod"
5:
# `component1` depends on `component6`
# from the same Atmos stack
component: "component6"
stack: "{{ .vars.tenant }}-{{ .vars.environment }}-{{ .vars.stage }}"
6:
# `component1` depends on `component7`
# from the same tenant and stage as `component1`, but `uw2` environment
component: "component7"
stack: "{{ .vars.tenant }}-uw2-{{ .vars.stage }}"
vars:
enabled: true
```
## Specifying `stack`
The `stack` attribute has higher precedence than the other context variables.
If `stack` is specified, the `namespace`, `tenant`, `environment` and `stage` attributes are ignored.
As you can see in the examples above, we can use [Atmos Stack Manifest Templating](/core-concepts/stacks/templates) in the `stack` attribute to dynamically specify the stack.
This is useful when configuring
[`stacks.name_template` in `atmos.yaml`](/core-concepts/projects/configuration/#stack-names-slugs) to define and refer to stacks.
In this case, you can't use the context variables `namespace`, `tenant`, `environment` and `stage` in `depends_on`.
For example, in `atmos.yaml`, we specify `stacks.name_template` to define Atmos stacks, and enable templating:
```yaml
stacks:
base_path: "stacks"
name_template: "{{ .settings.context.tenant }}-{{ .settings.context.environment }}-{{ .settings.context.stage }}"
# `Go` templates in Atmos manifests
templates:
settings:
enabled: true
```
:::note
In this example, stacks are defined by the `settings.context` section, not `vars`.
:::
In the `tenant1-uw2-dev` Atmos stack, we can use the following `depends_on` configuration to define the component dependencies:
```yaml
settings:
context:
tenant: "tenant1"
environment: "uw2"
stage: "dev"
components:
terraform:
vpc:
vars:
enabled: true
tgw/attachment:
settings:
depends_on:
1:
# `tgw/attachment` depends on the `vpc` component
# from the same Atmos stack (same tenant, account and region)
component: vpc
# NOTE: The same stack can be specified by using exactly the same template as in
# `stacks.name_template` in `atmos.yaml`, but it's not required and not recommended.
# If the dependent component is from the same stack, just omit the `stack` attribute completely.
# stack: "{{ .settings.context.tenant }}-{{ .settings.context.environment }}-{{ .settings.context.stage }}"
2:
# `tgw/attachment` depends on the `tgw/hub` components
# from the same tenant and account, but in `us-east-1` region (`ue1` environment)
component: tgw/hub
stack: "{{ .settings.context.tenant }}-ue1-{{ .settings.context.stage }}"
tgw/cross-region-hub-connector:
settings:
depends_on:
1:
# `tgw/cross-region-hub-connector` depends on `tgw/hub` components
# in the same tenant and account, but in `us-east-1` region (`ue1` environment)
component: tgw/hub
stack: "{{ .settings.context.tenant }}-ue1-{{ .settings.context.stage }}"
```
Execute the following Atmos commands to see the component dependencies:
```shell
> atmos describe dependents vpc -s tenant1-uw2-dev --pager off
```
```json
[
{
"component": "tgw/attachment",
"component_type": "terraform",
"stack": "tenant1-uw2-dev",
"stack_slug": "tenant1-uw2-dev-tgw-attachment"
}
]
```
```shell
> atmos describe dependents tgw/hub -s tenant1-ue1-dev --pager off
```
```json
[
{
"component": "tgw/attachment",
"component_type": "terraform",
"stack": "tenant1-uw2-dev",
"stack_slug": "tenant1-uw2-dev-tgw-attachment"
},
{
"component": "tgw/cross-region-hub-connector",
"component_type": "terraform",
"stack": "tenant1-uw2-dev",
"stack_slug": "tenant1-uw2-dev-tgw-cross-region-hub-connector"
}
]
```
:::tip
For more information, refer to [`atmos describe dependents`](/cli/commands/describe/dependents)
and [`atmos describe affected`](/cli/commands/describe/affected) CLI commands.
:::
---
## Manage Lifecycle Events with Hooks
import Terminal from '@site/src/components/Terminal'
import Intro from '@site/src/components/Intro'
import File from '@site/src/components/File'
Atmos supports the ability to take action at various points in the lifecycle of your components. This is done by
configuring the `hooks` section in your stack manifest for the component that you want to take action on.
## Hooks Schema
The `hooks` section schema is as follows:
```yaml
hooks:
store-outputs:
events:
- after-terraform-apply
command: store
name: prod/ssm
outputs:
vpc_id: .id
```
This schema can be specified at the top level of the stack configuration (global), within the `terraform` section,
inside individual components, or in the `overrides` section. Partial config can also be specified at various levels
to help keep the configuration [DRY](https://en.wikipedia.org/wiki/Don%27t_repeat_yourself).
#### An example demonstrating this concept is below:
At the global level, set that the store command will run after terraform apply:
```yaml
# stacks/catalog/vpc/_defaults.yaml (global)
hooks:
store-outputs:
events:
- after-terraform-apply
command: store
```
In the production account, use the `prod/ssm` store (configured in atmos.yaml):
```yaml
# stacks/orgs/acme/plat/prod/_defaults.yaml (terraform)
terraform:
hooks:
store-outputs:
name: prod/ssm
```
At the component level, specify that the `id` output of the component should be stored in the store as the `vpc_id` key:
```yaml
# stacks/orgs/acme/plat/prod/us-east-2.yaml (component)
components:
terraform:
vpc:
hooks:
store-outputs:
outputs:
vpc_id: .id
```
## Supported Lifecycle Events
Atmos supports the following lifecycle events:
- `after-terraform-apply` (this event is triggered after the `atmos terraform apply` or `atmos terraform deploy` command is run)
## Supported Commands
## store
The `store` command is used to write data to a remote store.
- `hooks.[hook_name]`
- This map key is the name you want to give to the hook. This must be unique for each hook in the component.
- `hooks.[hook_name].events`
-
This is a list of [Supported Lifecycle Events](#supported-lifecycle-events) that should trigger running the command.
- `hooks.[hook_name].command`
- Must be set to `store`
- `hooks.[hook_name].name`
- The name of the store to use.
- `hooks.[hook_name].outputs`
-
A map of values that will be written to the store under the key for this component. The key is the name of the key in
the store. The value is the value to write to the store. If the value begins with a dot (`.`), it will be treated as a
[Terraform output](https://developer.hashicorp.com/terraform/language/values/outputs) and the value will be retrieved
from the Terraform state for the current component.
---
## Import Stack Configurations
import File from '@site/src/components/File'
import Intro from '@site/src/components/Intro'
As your stacks grow taller with more and more component configurations, it often makes sense to start splitting them apart into different files. That's why you might want to take advantage of imports. This helps you keep your stack files smaller so they are easier to understand, while reusing their configuration in multiple places.
Each import overlays on top of others, and gets deep merged. Then we support [inheritance](/core-concepts/stacks/inheritance) and overrides to manage configuration variations, all without relying on templating. When none of these other methods work for your use-case, we provide an "Escape Hatch" with [templating](/core-concepts/stacks/templates).
## Use cases
- **DRY Configuration:** Imports are how we reduce duplication of configurations.
- **Configuration Blueprints:** Define reusable baselines or "defaults". Think of them almost as blueprints, that you can reuse anytime you want some particular combination of components in a stack.
- **Service Catalogs:** Provide a "Service Catalog" for your team with reusable configurations that anyone can use to easily compose architectures with golden-path configurations.
:::warning Pitfalls!
Overusing imports can make configurations harder to understand. We recommend limiting import levels to maintain clarity. Review our [best practices](/best-practices/stacks) for practical guidance.
:::
Imports may be used in Stack configurations together with [inheritance](/core-concepts/stacks/inheritance)
and [mixins](/core-concepts/stacks/inheritance/mixins) to produce an exceptionally DRY configuration in a way that is logically organized and easier to maintain by your team.
## Configuration
To import any stack configuration from the `catalog/`, simply define an `import` section at the top of any [Stack](/core-concepts/stacks)
configuration. Technically, it can be placed anywhere in the file, but by convention we recommend putting it at the top.
Here are some simple examples of how to import configurations:
```yaml
import:
- catalog/file1 # First import "file1" from the catalog
- catalog/file2 # Second import "file2" from the catalog, deep merging on top of the first import
- catalog/file3 # Third import "file3" from the catalog, deep merging on top of the preceding imports
```
The base path for imports is specified in the [`atmos.yaml`](/cli/configuration) in the `stacks.base_path` section.
If no file extension is used, a `.yaml` extension is automatically appended.
It's also possible to specify file extensions, although we do not recommend it.
```yaml
import:
- catalog/file1.yml # Explicitly load a file with a .yml extension
- catalog/file2.yaml # Explicitly load a file with a .yaml extension
- catalog/file3.YAML # Explicitly load a file with a .YAML extension
```
### Automatic Template File Detection
When importing files without specifying an extension, Atmos will now automatically search for and use template versions of the files if they exist. The search order is:
1. `.yaml`
2. `.yml`
3. `.yaml.tmpl`
4. `.yml.tmpl`
For example, if you import `catalog/file1`, Atmos will:
1. First look for `catalog/file1.yaml` or `catalog/file1.yml`
2. If found, check if a template version exists (`catalog/file1.yaml.tmpl` or `catalog/file1.yml.tmpl`)
3. Use the template version if it exists, otherwise use the regular YAML file
4. If no files are found, default to using `.yaml` extension
This feature makes it easier to work with templated configurations as you don't need to explicitly specify the template file extension - Atmos will automatically use the template version when available.
:::note Template File Validation
While template files are automatically detected and processed during normal operations (imports, etc.), they are excluded from YAML validation (`atmos validate stacks`) since they may contain template placeholders that are invalid YAML before being rendered.
This means:
- Template files are fully supported for imports and normal operations
- Template files are skipped during `atmos validate stacks` to prevent validation errors from unrendered templates
- You don't need to explicitly specify template extensions - Atmos will find them automatically
:::
## Import Path Resolution
Atmos supports two types of import paths:
### Base-Relative Paths (Default)
Most imports use paths relative to the `stacks.base_path` configured in `atmos.yaml`:
- `catalog/vpc/defaults`
- `mixins/region/us-east-2`
- `orgs/acme/_defaults`
These paths are resolved from the base stacks directory, regardless of where the importing file is located.
### File-Relative Paths
Imports starting with `.` or `..` are relative to the current file's directory:
- `./_defaults` - imports from the same directory as the current file
- `../shared/_defaults` - imports from a sibling `shared` directory
This is useful when you want to import files that are co-located with the current configuration.
## Conventions
We recommend placing all baseline "imports" in the `stacks/catalog` folder, however, they can exist anywhere.
Use [mixins](/core-concepts/stacks/inheritance/mixins) for reusable snippets of configurations that alter the behavior of Stacks in some way.
### The _defaults.yaml Pattern
Many Atmos projects use `_defaults.yaml` as a naming convention for default configurations at each level of the hierarchy. This is purely a convention—Atmos has no special handling for these files. They must be explicitly imported like any other file.
The underscore prefix ensures they:
- Sort to the top of directory listings (lexicographic sorting)
- Are visually distinct from actual stack configurations
- Are excluded from stack discovery (via `excluded_paths` configuration)
:::info
The `_defaults.yaml` pattern is a common convention, not an Atmos feature. These files are only excluded from stack discovery because they match the pattern in `excluded_paths` configuration. They must always be explicitly imported to take effect.
:::
For a complete explanation of this pattern, see the [_defaults.yaml Design Pattern](/design-patterns/defaults-pattern) documentation.
## Imports Schema
The `import` section supports two different formats, depending on whether the imported files use templates or not. One is a list of strings representing paths to the imported files, and the other is a list of objects with several feature flags.
### Imports without Templates
For a list of paths to the imported files, just provide a list of strings like this:
```yaml title="stacks/orgs/cp/tenant1/test1/us-east-2.yaml"
import:
- mixins/region/us-east-2
- orgs/cp/tenant1/test1/_defaults
- catalog/terraform/top-level-component1
- catalog/terraform/test-component
- catalog/terraform/vpc
- catalog/helmfile/echo-server
```
### Imports with Templates
Sometimes you may want to import files that use Go templates. Templates can be used with or without providing a `context` - files with `.yaml.tmpl` or `.yml.tmpl` extensions are always processed as Go templates.
:::important
Files with the `.yaml.tmpl` or `.yml.tmpl` extension are always processed as Go templates, regardless of whether `context` is provided.
This allows you to use template functions that don't require context (like `{{ now }}`, `{{ env "VAR" }}`, `{{ uuidv4 }}`, etc.) even without providing context variables.
If you don't want a file to be processed as a template, use the `.yaml` or `.yml` extension instead.
The `skip_templates_processing` flag can be used to explicitly skip template processing for any imported file.
Templating must be enabled in [`atmos.yaml`](/core-concepts/stacks/templates) for Atmos to process the imported files as Go templates.
:::
For example, here we import a file with a template and provide a `context` to passing two variables.
```yaml
import:
- path: "catalog/something.yaml.tmpl" # Path to the imported file with the required .tmpl extension for Go templates
context:
foo: bar
baz: qux
skip_templates_processing: false
ignore_missing_template_values: false
skip_if_missing: false
- path: "catalog/something.yaml.tmpl"
context: {}
skip_templates_processing: false
ignore_missing_template_values: true
skip_if_missing: true
```
You can also use templates without providing any context variables. This is useful for including dynamic values that don't depend on context:
```yaml
import:
# This template file uses functions that don't require context
- path: "catalog/metadata.yaml.tmpl"
# No context needed - the template can use functions like:
# {{ now | date "2006-01-02" }}
# {{ env "BUILD_NUMBER" }}
# {{ uuidv4 }}
# {{ randAlphaNum 10 }}
```
Example template file (`catalog/metadata.yaml.tmpl`) without context:
```yaml
metadata:
generated_at: {{ now | date "2006-01-02T15:04:05Z07:00" }}
build_number: {{ env "BUILD_NUMBER" | default "local" }}
deployment_id: {{ uuidv4 }}
version: "1.0.0"
```
The `import` section supports the following fields:
- `path` - (string) **required**
- The path to the imported file
- `context` - (map)
- An optional freeform map of context variables that are applied as template variables to the imported file (if the imported file is
a [Go template](https://pkg.go.dev/text/template))
- `skip_templates_processing` - (boolean)
- Skip template processing for the imported file. Can be used if the imported file uses `Go` templates that should not be interpreted by atmos. For example, sometimes configurations for components may pass Go template strings not intended for atmos.
- `ignore_missing_template_values` - (boolean)
- Ignore the missing template values in the imported file. Can be used if the imported file uses `Go` templates to configure external systems, e.g. Datadog. In this case, Atmos will process all template values that are provided in the `context`, and will skip the missing values in the templates for the external systems without throwing an error. The `ignore_missing_template_values` setting is different from `skip_templates_processing` in that `skip_templates_processing` skips the template processing completely in the imported file, while `ignore_missing_template_values` processes the templates using the values provided in the `context` and skips all the missing values
- `skip_if_missing` - (boolean)
- Set it to `true` to ignore the imported manifest if it does not exist, and don't throw an error. This is useful when generating Atmos manifests using other tools, but the imported files are not present yet at the generation time.
A combination of the two formats is also supported:
```yaml
import:
- mixins/region/us-east-2
- orgs/cp/tenant1/test1/_defaults
- path: ""
- path: ""
context: {}
skip_templates_processing: false
ignore_missing_template_values: true
```
## `Go` Templates in Imports
Atmos supports all the functionality of [Go templates](https://pkg.go.dev/text/template) in imported stack configurations, including
[functions](https://pkg.go.dev/text/template#hdr-Functions) and [Sprig functions](http://masterminds.github.io/sprig/).
Stack configurations can be templatized and then reused with different settings provided via the import `context` section.
For example, we can define the following configuration for EKS Atmos components in the `catalog/terraform/eks_cluster.yaml.tmpl` template file:
```yaml title="stacks/catalog/terraform/eks_cluster.yaml.tmpl"
# Imports can also be parameterized using `Go` templates
import: []
components:
terraform:
"eks-{{ .flavor }}/cluster":
metadata:
component: "test/test-component"
vars:
enabled: "{{ .enabled }}"
name: "eks-{{ .flavor }}"
service_1_name: "{{ .service_1_name }}"
service_2_name: "{{ .service_2_name }}"
tags:
flavor: "{{ .flavor }}"
```
:::note
Since `Go` processes files ending in `.yaml.tmpl` text files with templates, we can parameterize the Atmos component name `eks-{{ .flavor }}/cluster` and any values in any sections (`vars`, `settings`, `env`, `backend`, etc.), and even the `import` section in the imported file (if the file imports other configurations).
:::
Then we can import the template into a top-level stack multiple times providing different context variables to each import:
```yaml title="stacks/orgs/cp/tenant1/test1/us-west-2.yaml"
import:
- path: "mixins/region/us-west-2"
- path: "orgs/cp/tenant1/test1/_defaults"
# This import with the provided context will dynamically generate
# a new Atmos component `eks-blue/cluster` in the current stack
- path: "catalog/terraform/eks_cluster.yaml.tmpl"
context:
flavor: "blue"
enabled: true
service_1_name: "blue-service-1"
service_2_name: "blue-service-2"
# This import with the provided context will dynamically generate
# a new Atmos component `eks-green/cluster` in the current stack
- path: "catalog/terraform/eks_cluster.yaml.tmpl"
context:
flavor: "green"
enabled: false
service_1_name: "green-service-1"
service_2_name: "green-service-2"
```
Now we can execute the following Atmos commands to describe and provision the dynamically generated EKS components into the stack:
```shell
atmos describe component eks-blue/cluster -s tenant1-uw2-test-1
atmos describe component eks-green/cluster -s tenant1-uw2-test-1
atmos terraform apply eks-blue/cluster -s tenant1-uw2-test-1
atmos terraform apply eks-green/cluster -s tenant1-uw2-test-1
```
All the parameterized variables get their values from the `context`:
```yaml title="atmos describe component eks-blue/cluster -s tenant1-uw2-test-1"
vars:
enabled: true
environment: uw2
name: eks-blue
namespace: cp
region: us-west-2
service_1_name: blue-service-1
service_2_name: blue-service-2
stage: test-1
tags:
flavor: blue
tenant: tenant1
```
```yaml title="atmos describe component eks-green/cluster -s tenant1-uw2-test-1"
vars:
enabled: true
environment: uw2
name: eks-green
namespace: cp
region: us-west-2
service_1_name: green-service-1
service_2_name: green-service-2
stage: test-1
tags:
flavor: green
tenant: tenant1
```
## Hierarchical Imports with Context
Atmos supports hierarchical imports with context.
This will allow you to parameterize the entire chain of stack configurations and dynamically generate components in stacks.
For example, let's create the configuration `stacks/catalog/terraform/eks_cluster_hierarchical.yaml.tmpl` with the following content:
```yaml title="stacks/catalog/terraform/eks_cluster_hierarchical.yaml.tmpl"
import:
# Use `region.yaml.tmpl` `Go` template and provide `context` for it.
# This can also be done by using `Go` templates in the import path itself.
# - path: "mixins/region/{{ .region }}"
- path: "mixins/region/region.yaml.tmpl"
# `Go` templates in `context`
context:
region: "{{ .region }}"
environment: "{{ .environment }}"
# `Go` templates in the import path
- path: "orgs/cp/{{ .tenant }}/{{ .stage }}/_defaults"
components:
terraform:
# Parameterize Atmos component name
"eks-{{ .flavor }}/cluster":
metadata:
component: "test/test-component"
vars:
# Parameterize variables
enabled: "{{ .enabled }}"
name: "eks-{{ .flavor }}"
service_1_name: "{{ .service_1_name }}"
service_2_name: "{{ .service_2_name }}"
tags:
flavor: "{{ .flavor }}"
```
Then we can import the template into a top-level stack multiple times providing different context variables to each import and to the imports for
the entire inheritance chain (which `catalog/terraform/eks_cluster_hierarchical.yaml.tmpl` imports itself):
```yaml title="stacks/orgs/cp/tenant1/test1/us-west-1.yaml"
import:
# This import with the provided hierarchical context will dynamically generate
# a new Atmos component `eks-blue/cluster` in the `tenant1-uw1-test1` stack
- path: "catalog/terraform/eks_cluster_hierarchical.yaml.tmpl"
context:
# Context variables for the EKS component
flavor: "blue"
enabled: true
service_1_name: "blue-service-1"
service_2_name: "blue-service-2"
# Context variables for the hierarchical imports
# `catalog/terraform/eks_cluster_hierarchical.yaml.tmpl` imports other parameterized configurations
tenant: "tenant1"
region: "us-west-1"
environment: "uw1"
stage: "test1"
# This import with the provided hierarchical context will dynamically generate
# a new Atmos component `eks-green/cluster` in the `tenant1-uw1-test1` stack
- path: "catalog/terraform/eks_cluster_hierarchical.yaml.tmpl"
context:
# Context variables for the EKS component
flavor: "green"
enabled: false
service_1_name: "green-service-1"
service_2_name: "green-service-2"
# Context variables for the hierarchical imports
# `catalog/terraform/eks_cluster_hierarchical.yaml.tmpl` imports other parameterized configurations
tenant: "tenant1"
region: "us-west-1"
environment: "uw1"
stage: "test1"
```
In the case of hierarchical imports, Atmos performs the following steps:
- Processes all the imports in the `import` section in the current configuration in the order they are specified providing the `context` to all
imported files
- For each imported file, Atmos deep-merges the parent `context` with the current context. Note that the current `context` (in the current file) takes
precedence over the parent `context` and will override items with the same keys. Atmos does this hierarchically for all imports in all files,
effectively processing a graph of imports and deep-merging the contexts on all levels
For example, in the `stacks/orgs/cp/tenant1/test1/us-west-1.yaml` configuration above, we first import
the `catalog/terraform/eks_cluster_hierarchical.yaml.tmpl` and provide it with the `context` which includes the context variables for the EKS component
itself, as well as the context variables for all the hierarchical imports. Then, when processing
the `stacks/catalog/terraform/eks_cluster_hierarchical.yaml.tmpl` configuration, Atmos deep-merges the parent `context` (from
`stacks/orgs/cp/tenant1/test1/us-west-1.yaml`) with the current `context` and processes the `Go` templates.
We are now able to dynamically generate the components `eks-blue/cluster` and `eks-green/cluster` in the stack `tenant1-uw1-test1` and can
execute the following Atmos commands to provision the components into the stack:
```shell
atmos terraform apply eks-blue/cluster -s tenant1-uw1-test-1
atmos terraform apply eks-green/cluster -s tenant1-uw1-test-1
```
All the parameterized variables get their values from the hierarchical `context` settings:
```yaml title="atmos describe component eks-blue/cluster -s tenant1-uw1-test-1"
vars:
enabled: true
environment: uw1
name: eks-blue
namespace: cp
region: us-west-1
service_1_name: blue-service-1
service_2_name: blue-service-2
stage: test-1
tags:
flavor: blue
tenant: tenant1
```
:::warning Handle with Care
Leveraging Go templating for Atmos stack generation grants significant power but demands equal responsibility. It can easily defy the principle of creating stack configurations that are straightforward and intuitive to read.
While templating fosters DRYer code, it comes at the expense of searchable components and introduces elements like conditionals, loops, and dynamic variables that impede understandability. It's a tool not for regular use, but for instances where code duplication becomes excessively cumbersome.
Before resorting to advanced Go templates in Atmos, rigorously evaluate the trade-off between the value added and the complexity introduced.
:::
## Advanced Examples of Templates in Atmos Configurations
Atmos supports all the functionality of [Go templates](https://pkg.go.dev/text/template), including [functions](https://pkg.go.dev/text/template#hdr-Functions) and [Sprig functions](http://masterminds.github.io/sprig/).
The Sprig library provides over 70 template functions for `Go's` template language.
The following example shows how to dynamically include a variable in the Atmos component configuration by using the `hasKey` Sprig function.
The hasKey function returns `true` if the given dictionary contains the given key.
```yaml
components:
terraform:
eks/iam-role/{{ .app_name }}/{{ .service_environment }}:
metadata:
component: eks/iam-role
settings:
spacelift:
workspace_enabled: true
vars:
enabled: {{ .enabled }}
tags:
Service: {{ .app_name }}
service_account_name: {{ .app_name }}
service_account_namespace: {{ .service_account_namespace }}
{{ if hasKey . "iam_managed_policy_arns" }}
iam_managed_policy_arns:
{{ range $i, $iam_managed_policy_arn := .iam_managed_policy_arns }}
- '{{ $iam_managed_policy_arn }}'
{{ end }}
{{- end }}
{{ if hasKey . "iam_source_policy_documents" }}
iam_source_policy_documents:
{{ range $i, $iam_source_policy_document := .iam_source_policy_documents }}
- '{{ $iam_source_policy_document }}'
{{ end }}
{{- end }}
```
The `iam_managed_policy_arns` and `iam_source_policy_documents` variables will be included in the component configuration only if the
provided `context` object has the `iam_managed_policy_arns` and `iam_source_policy_documents` fields.
## Summary
Using imports with context (and hierarchical imports with context) with parameterized config files will help you make the configurations
extremely DRY. It's very useful in many cases, for example, when creating stacks and components
for [EKS blue-green deployment](https://aws.amazon.com/blogs/containers/kubernetes-cluster-upgrade-the-blue-green-deployment-strategy/).
## Related
- [Configure CLI](/quick-start/advanced/configure-cli)
- [Create Atmos Stacks](/quick-start/advanced/create-atmos-stacks)
---
## Inherit Configurations in Atmos Stacks
import File from '@site/src/components/File'
import Terminal from '@site/src/components/Terminal'
import PillBox from '@site/src/components/PillBox'
import Intro from '@site/src/components/Intro'
Inheritance provides a template-free way to customize Stack configurations. When combined with [imports](/core-concepts/stacks/imports), it provides the ability to combine multiple configurations through ordered deep-merging of configurations. Inheritance is how you manage configuration variations, without resorting to [templating](/core-concepts/stacks/templates).
Atmos supports the following concepts and principles of **Component-Oriented Programming (COP)**:
- [Single Inheritance](/core-concepts/stacks/inheritance#single-inheritance) - when an Atmos component inherits the configuration properties from
another Atmos component
- [Multiple Inheritance](/core-concepts/stacks/inheritance#multiple-inheritance) - when an Atmos component inherits the configuration from more than one Atmos
component
These concepts and principles are implemented and used in Atmos by combining two features: [`import`](/core-concepts/stacks/imports)
and [`metadata`](/core-concepts/stacks/define-components) component's configuration section.
:::info
The mechanics of mixins and inheritance apply only to the [Stack](/core-concepts/stacks) configurations. Atmos knows nothing about the underlying
components (e.g. terraform), and does not magically implement inheritance for HCL. However, by designing highly reusable components that do one thing
well, we're able to achieve many of the same benefits.
:::
Component Inheritance is implemented and used in Atmos by combining two features: [`import`](/core-concepts/stacks/imports)
and `metadata` component's configuration section.
### Definitions
- Base Component
- is an Atmos component from which other Atmos components inherit all the configuration properties
- Derived Component
- is an Atmos component that derives the configuration properties from other Atmos components
# Understanding Inheritance
The concept of inheritance in Atmos is implemented through deep merging. Deep merging involves taking two maps or objects and combining them in a specific order, where the values in the latter map override those in the former. This approach allows us to achieve a template-free way of defining configurations in a logical, predictable, and consistent manner.
## Single Inheritance
Easy
Single Inheritance is used when an Atmos component inherits from another base Atmos component.
In the diagram below, `ComponentA` is the base component. `ComponentB` and `ComponentC` are derived components, they inherit all the
configurations (`vars`, `settings`, `env` and other sections) from `ComponentA`, and can override the default values from `ComponentA`.
```mermaid
classDiagram
direction TB
ComponentA --> ComponentB
ComponentA --> ComponentC
ComponentA : vars
ComponentA : settings
ComponentA : env
ComponentA : backend
class ComponentB {
vars
settings
env
backend
metadata:
inherits:
- ComponentA
}
class ComponentC {
vars
settings
env
backend
metadata:
inherits:
- ComponentA
}
```
### Single Inheritance Example
Let's say we want to provision two VPCs with different settings into the same AWS account.
In the `stacks/catalog/vpc.yaml` file, add the following config for the VPC component:
```yaml
components:
terraform:
vpc-defaults:
metadata:
# Setting `metadata.type: abstract` makes the component `abstract`,
# explicitly prohibiting the component from being deployed.
# `atmos terraform apply` will fail with an error.
# If `metadata.type` attribute is not specified, it defaults to `real`.
# `real` components can be provisioned by `atmos` and CI/CD like Spacelift and Atlantis.
type: abstract
# Default variables, which will be inherited and can be overridden in the derived components
vars:
public_subnets_enabled: false
nat_gateway_enabled: false
nat_instance_enabled: false
max_subnet_count: 3
vpc_flow_logs_enabled: true
```
In the configuration above, the following **Component-Oriented Programming** concepts are implemented:
- **Abstract Components**: `atmos` component `vpc-defaults` is marked as abstract in `metadata.type`. This makes the component non-deployable, and it
can be used only as a base for other components that inherit from it
- **Dynamic Polymorphism**: All the variables in the `vars` section become the default values for the derived components. This provides the ability to
override and use the base component properties in the derived components to provision the same Terraform configuration many times but with different
settings
Deep Dive
Component Inheritance is one of the principles of [Component-Oriented Programming (COP)](https://en.wikipedia.org/wiki/Component-based_software_engineering)
supported by Atmos.
The concept is borrowed from [Object-Oriented Programming](https://en.wikipedia.org/wiki/Inheritance_(object-oriented_programming))
to logically organize complex configurations in a way that makes conceptual sense. The side effect of this are extremely DRY and reusable
configurations.
[Component-Oriented Configuration](https://en.wikipedia.org/wiki/Component-based_software_engineering) is a reuse-based approach to defining,
implementing and composing loosely-coupled independent components into systems.
- Dynamic Polymorphism
- Ability to use and override base component(s) properties
- Encapsulation
- Enclose a set of related configuration properties into reusable loosely-coupled modules. Encapsulation is implemented by Atmos Components which are opinionated building blocks of Infrastructure-as-Code (IAC) that solve one specific problem or use-case
- Abstraction
-
Principle of Abstraction: In a given stack, "hide" all but the relevant information about a component configuration in order to reduce complexity and increase efficiency
Abstract Components: If a component is marked as
abstract, it can be used only as a base for other components and can't be provisioned using atmos
In the `stacks/ue2-dev.yaml` stack config file, add the following config for the derived VPC components in the `ue2-dev` stack:
```yaml
# Import the base component configuration from the `catalog`.
# `import` supports POSIX-style Globs for file names/paths (double-star `**` is supported).
# File extensions are optional (if not specified, `.yaml` is used by default).
import:
- catalog/vpc
components:
terraform:
vpc/1:
metadata:
component: infra/vpc # Point to the Terraform component in `components/terraform` folder
inherits:
- vpc-defaults # Inherit all settings and variables from the `vpc-defaults` base component
vars:
# Define variables that are specific for this component
# and are not set in the base component
name: vpc-1
# Override the default variables from the base component
public_subnets_enabled: true
nat_gateway_enabled: true
vpc_flow_logs_enabled: false
vpc/2:
metadata:
component: infra/vpc # Point to the same Terraform component in `components/terraform` folder
inherits:
- vpc-defaults # Inherit all settings and variables from the `vpc-defaults` base component
vars:
# Define variables that are specific for this component
# and are not set in the base component
name: vpc-2
# Override the default variables from the base component
max_subnet_count: 2
vpc_flow_logs_enabled: false
```
In the configuration above, the following **Component-Oriented Programming** concepts are implemented:
- **Component Inheritance**: In the `ue2-dev` stack (`stacks/ue2-dev.yaml` stack config file), the Atmos components `vpc/1` and `vpc/2` inherit from
the base component `vpc-defaults`. This makes `vpc/1` and `vpc/2` derived components
- **Principle of Abstraction**: In the `ue2-dev` stack, only the relevant information about the derived components in the stack is shown. All the base
component settings are "hidden" (in the imported `catalog`), which reduces the configuration size and complexity
- **Dynamic Polymorphism**: The derived `vpc/1` and `vpc/2` components override and use the base component properties to be able to provision the same
Terraform configuration many times but with different settings
Having the components in the stack configured as shown above, we can now provision the `vpc/1` and `vpc/2` components into the `ue2-dev` stack by
executing the following `atmos` commands:
```shell
atmos terraform apply vpc/1 -s ue2-dev
atmos terraform apply vpc/2 -s ue2-dev
```
As we can see, using the principles of **Component-Oriented Programming (COP)**, we are able to define two (or more) components with
different settings, and provision them into the same (or different) environment (account/region) using the same Terraform code (which is
environment-agnostic). And the configurations are extremely DRY and reusable.
## Multiple Inheritance
Advanced
Multiple Inheritance is used when an Atmos component inherits from more than one Atmos component.
In the diagram below, `ComponentA` and `ComponentB` are the base components. `ComponentC` is a derived components, it inherits all the
configurations (`vars`, `settings`, `env` and other sections) from `ComponentA` and `ComponentB`, and can override the default values
from `ComponentA` and `ComponentB`.
```mermaid
classDiagram
ComponentA --> ComponentC
ComponentB --> ComponentC
ComponentA : vars
ComponentA : settings
ComponentA : env
ComponentA : backend
class ComponentB {
vars
settings
env
backend
}
class ComponentC {
vars
settings
env
backend
metadata:
inherits:
- ComponentA
- ComponentB
}
```
Multiple Inheritance allows a component to inherit from many base components or mixins, each base component having its own inheritance chain,
effectively making it an inheritance matrix. It uses a method similar to Method Resolution Order (MRO) using
the [C3 linearization](https://en.wikipedia.org/wiki/C3_linearization) algorithm, which is how Python supports multiple inheritance.
:::info
In **Object-Oriented Programming (OOP)**, a mixin is a class that contains methods for use by other classes without having to be the parent class of
those other classes.
In **Component-Oriented Programming (COP)** implemented in Atmos, a [mixin](/core-concepts/stacks/inheritance/mixins) is an abstract base component that is never
meant to be provisioned and does not have any physical implementation - it just contains default settings/variables/properties for use by other Atmos
components.
:::
Multiple Inheritance, similarly to Single Inheritance, is defined by the `metadata.inherits` section in the component
configuration. `metadata.inherits` is a list of component or mixins names from which the current component inherits.
In the case of multiple base components, it is processed in the order by which it was declared.
For example, in the following configuration:
```yaml
metadata:
inherits:
- componentA
- componentB
```
Atmos will recursively deep-merge all the base components of `componentA` (each component overriding its base),
then all the base components of `componentB` (each component overriding its base), then the two results are deep-merged together with `componentB`
inheritance chain overriding the values from `componentA` inheritance chain.
:::caution
All the base components/mixins referenced by `metadata.inherits` must be already defined in the Stack configuration, either by using an `import`
statement or by explicitly defining them in the Stack configuration. The `metadata.inherits` statement does not imply that we are importing anything.
:::
### Multiple Inheritance Example
Here is a concrete example:
```yaml
# Import all the base components and mixins we want to inherit from.
# `import` supports POSIX-style Globs for file names/paths (double-star `**` is supported).
import:
- catalog/terraform/test/test-component-override
- catalog/terraform/test/test-component-override-2
- catalog/terraform/mixins/test-*.*
components:
terraform:
test/test-component-override-3:
vars: {}
metadata:
# `real` is implicit, you don't need to specify it.
# `abstract` makes the component protected from being deployed.
type: real
# Terraform component. Must exist in `components/terraform` folder.
# If not specified, it's assumed that this component `test/test-component-override-3`
# is also a Terraform component in
# `components/terraform/test/test-component-override-3` folder.
component: "test/test-component"
# Multiple inheritance.
# It's a down-top/left-right matrix similar to Method Resolution Order (MRO) in Python.
inherits:
- "test/test-component-override"
- "test/test-component-override-2"
- "mixin/test-1"
- "mixin/test-2"
```
In the configuration above, all the base components and mixins are processed and deep-merged in the order they are specified in the `inherits` list:
- `test/test-component-override-2` overrides `test/test-component-override` and its base components (all the way up its inheritance chain)
- `mixin/test-1` overrides `test/test-component-override-2` and its base components (all the way up its inheritance chain)
- `mixin/test-2` overrides `mixin/test-1` and its base components (all the way up its inheritance chain)
- The current component `test/test-component-override-3` overrides `mixin/test-2` and its base components (all the way up its inheritance chain)
When we run the following command to provision the `test/test-component-override-3` Atmos component into the stack `tenant1-ue2-dev`:
```shell
atmos terraform apply test/test-component-override-3 -s tenant1-ue2-dev
```
Atmos will process all configurations for the current component and all the base components/mixins and will show the following console output:
```text
Command info:
Atmos component: test/test-component-override-3
Terraform component: test/test-component
Terraform command: apply
Stack: tenant1-ue2-dev
Inheritance: test/test-component-override-3 -> mixin/test-2 -> mixin/test-1 ->
test/test-component-override-2 -> test/test-component-override -> test/test-component
```
The `Inheritance` output shows the multiple inheritance steps that Atmos performed and deep-merged into the final configuration, including
the variables which are sent to the Terraform component `test/test-component` that is being provisioned.
### Multilevel Inheritance
Advanced
Multilevel Inheritance is used when an Atmos component inherits from a base Atmos component, which in turn inherits from another base Atmos component.
In the diagram below, `ComponentC` directly inherits from `ComponentB`.
`ComponentB` directly inherits from `ComponentA`.
After this Multilevel Inheritance chain gets processed by Atmos, `ComponentC` will inherit all the configurations (`vars`, `settings`, `env` and other
sections) from both `ComponentB` and `ComponentA`.
Note that `ComponentB` overrides the values from `ComponentA`.
`ComponentC` overrides the values from both `ComponentB` and `ComponentA`.
```mermaid
classDiagram
direction LR
ComponentA --> ComponentB
ComponentB --> ComponentC
ComponentA : vars
ComponentA : settings
ComponentA : env
ComponentA : backend
class ComponentB {
vars
settings
env
backend
metadata:
inherits:
- ComponentA
}
class ComponentC {
vars
settings
env
backend
metadata:
inherits:
- ComponentB
}
```
### Hierarchical Inheritance
Advanced
Hierarchical Inheritance is a combination of Multiple Inheritance and Multilevel Inheritance.
In Hierarchical Inheritance, every component can act as a base component for one or more child (derived) components, and each derived component can
inherit from one of more base components.
```mermaid
classDiagram
ComponentA --> ComponentB
ComponentA --> ComponentC
ComponentB --> ComponentD
ComponentB --> ComponentE
ComponentC --> ComponentF
ComponentC --> ComponentG
ComponentH --> ComponentE
ComponentI --> ComponentG
ComponentA : vars
ComponentA : settings
ComponentA : env
ComponentA : backend
class ComponentB {
vars
settings
env
backend
metadata:
inherits:
- ComponentA
}
class ComponentC {
vars
settings
env
backend
metadata:
inherits:
- ComponentA
}
class ComponentD {
vars
settings
env
backend
metadata:
inherits:
- ComponentB
}
class ComponentE {
vars
settings
env
backend
metadata:
inherits:
- ComponentB
- ComponentH
}
class ComponentF {
vars
settings
env
backend
metadata:
inherits:
- ComponentC
}
class ComponentG {
vars
settings
env
backend
metadata:
inherits:
- ComponentI
- ComponentC
}
class ComponentH {
vars
settings
env
backend
}
class ComponentI {
vars
settings
env
backend
}
```
In the diagram above:
- `ComponentA` is the base component of the whole hierarchy
- `ComponentB` and `ComponentC` inherit from `ComponentA`
- `ComponentD` inherits from `ComponentB` directly, and from `ComponentA` via Multilevel Inheritance
- `ComponentE` is an example of using both Multiple Inheritance and Multilevel Inheritance.
It inherits from `ComponentB` and `ComponentH` directly, and from `ComponentA` via Multilevel Inheritance
For `ComponentE`, the inherited components are processed and deep-merged in the order they are specified in the `inherits` list:
- `ComponentB` overrides the configuration from `ComponentA`
- `ComponentH` overrides the configuration from `ComponentB` and `ComponentA` (since it's defined after `ComponentB` in the `inherits` section)
- And finally, `ComponentE` overrides `ComponentH`, `ComponentB` and `ComponentA`
For `ComponentG`:
- `ComponentI` is processed first (since it's the first item in the `inherits` list)
- Then `ComponentA` is processed (since it's the base component for `ComponentC` which is the second item in the `inherits` list)
- Then `ComponentC` is processed, and it overrides the configuration from `ComponentA` and `ComponentI`
- And finally, `ComponentG` is processed, and it overrides `ComponentC`, `ComponentA` and `ComponentI`
#### Hierarchical Inheritance Example
Let's consider the following configuration for Atmos components `base-component-1`, `base-component-2`, `derived-component-1`
and `derived-component-2`:
```yaml
components:
terraform:
base-component-1:
metadata:
type: abstract
vars:
hierarchical_inheritance_test: "base-component-1"
base-component-2:
metadata:
type: abstract
vars:
hierarchical_inheritance_test: "base-component-2"
derived-component-1:
metadata:
component: "test/test-component"
inherits:
- base-component-1
vars: {}
derived-component-2:
metadata:
component: "test/test-component"
inherits:
- base-component-2
- derived-component-1
vars: {}
```
This configuration can be represented by the following diagram:
```mermaid
classDiagram
`base-component-1` --> `derived-component-1`
`derived-component-1` --> `derived-component-2`
`base-component-2` --> `derived-component-2`
class `base-component-1` {
settings
env
backend
vars:
hierarchical_inheritance_test: base-component-1
}
class `base-component-2` {
settings
env
backend
vars:
hierarchical_inheritance_test: base-component-2
}
class `derived-component-1` {
settings
env
backend
vars
metadata:
inherits:
- base-component-1
}
class `derived-component-2` {
settings
env
backend
vars
metadata:
inherits:
- base-component-2
- derived-component-1
}
```
In the configuration above, `derived-component-1` inherits from `base-component-1`.
`derived-component-2` inherits from `base-component-2` and `derived-component-1` via Multiple Inheritance, and from `base-component-1` via Multilevel
Inheritance.
The `derived-component-2` component is processed in the following order:
- `base-component-2` is processed first (since it's the first item in the `inherits` list)
- Then `base-component-1` is processed (since it's the base component for `derived-component-1` which is the second item in the `inherits` list), and
it overrides the configuration from `base-component-2`
- Then `derived-component-1` is processed, and it overrides the configuration from `base-component-2` and `base-component-1`
- And finally, `derived-component-2` is processed, and it overrides `derived-component-1`, `base-component-1` and `base-component-2`
When we run the following command to provision the `derived-component-2` component, Atmos will show the following console output:
```console
Variables for the component 'derived-component-2' in the stack 'tenant1-ue2-test-1':
environment: ue2
hierarchical_inheritance_test: base-component-1
namespace: cp
region: us-east-2
stage: test-1
tenant: tenant1
Command info:
Terraform binary: terraform
Terraform command: plan
Component: derived-component-2
Terraform component: test/test-component
Inheritance: derived-component-2 -> derived-component-1 -> base-component-1 -> base-component-2
```
Note that the `hierarchical_inheritance_test` variable was inherited from `base-component-1` because it overrode the configuration
from `base-component-2`.
If we change the order of the components in the `inherits` list for `derived-component-2`:
```yaml
components:
terraform:
derived-component-2:
metadata:
component: "test/test-component"
inherits:
- derived-component-1
- base-component-2
vars: {}
```
`base-component-2` will be processed after `base-component-1` and `derived-component-1`, and the `hierarchical_inheritance_test` variable
will be inherited from `base-component-2`:
```console
Variables for the component 'derived-component-2' in the stack 'tenant1-ue2-test-1':
environment: ue2
hierarchical_inheritance_test: base-component-2
namespace: cp
region: us-east-2
stage: test-1
tenant: tenant1
Command info:
Terraform binary: terraform
Terraform command: plan
Component: derived-component-2
Terraform component: test/test-component
Inheritance: derived-component-2 -> base-component-2 -> derived-component-1 -> base-component-1
```
## References
- [Abstract Component Atmos Design Pattern](/design-patterns/abstract-component)
- [Component Inheritance Atmos Design Pattern](/design-patterns/component-inheritance)
---
## Stack Mixins
import File from '@site/src/components/File'
import PillBox from '@site/src/components/PillBox'
import Intro from '@site/src/components/Intro'
import ActionCard from '@site/src/components/ActionCard'
import PrimaryCTA from '@site/src/components/PrimaryCTA'
Advanced
Mixins are reusable snippets of configurations (like regions, tags, etc) included in stack configurations to avoid repetition and enhance modularity. They allow for defining common settings, variables, or configurations once and applying them efficiently across various stacks.
:::important
Mixins are treated the same as all other imports in Atmos, with no special handling or technical distinction.
:::
## Use-cases
Here are some use-cases for when to use mixins.
### Mixins by Region
Mixins organized by region will make it very easy to configure where a stack is deployed by simply changing the imported mixin.
Consider naming them after the canonical region name for the cloud provider you're using.
For example, here's what it would look like for AWS. Let's name this file `mixins/region/us-east-1.yaml`.
Now, anytime we want a Parent Stack deployed in the `us-east-1` region, we just need to specify this import, and we'll automatically inherit all the settings for that region.
For example, let's define a mixin with the defaults for operating in the `us-east-1` region:
```yaml title="mixins/region/us-east-1.yaml"
vars:
region: us-east-1 # the canonical cloud region
availability_zones: # the designated availability zones to use in this region
- us-east-1a
- us-east-1b
```
Then we can use this mixin, anytime we deploy in `us-east-1` to ensure we conform to the organization's standards.
```yaml title="stacks/prod/network.yaml"
imports:
- mixins/region/us-east-1
terraform:
components:
vpc:
# ...
```
### Mixins by Stage
Provide the default settings for operating in a particular stage (e.g. Dev, Staging, Prod) to enforce consistency.
For example, let's define the stage name and required tags for production in the mixin file named `mixins/stage/prod.yaml`
```yaml title="mixins/stage/prod.yaml"
vars:
stage: prod
tags:
CostCenter: 12345
```
Now, anytime we want to provision a parent stack in production, we'll want to add this to the imports:
```yaml title="stacks/prod/backing-services.yaml"
imports:
- mixins/stage/prod
terraform:
components:
rds-cluster:
# ...
```
:::tip Use Mixins for Naming Conventions
This simple example highlights a simple fix for one of the most common issues in enterprise organizations: naming inconsistency.
Using a mixin is a great way for organizations ensure naming conventions are followed consistently.
For example, there are many ways developers will define `production`.
- e.g. `prd`
- e.g. `prod`
- e.g. `production`
- e.g. `Production`
- e.g. `Prod`
- e.g. `PROD`
- etc
:::
To avoid this situation, use the mixin `mixins/stage/prod` and always use the appropriate naming convention.
Mixins are really just a [Design Pattern](/design-patterns/component-catalog-with-mixins) for [`imports`](/core-concepts/stacks/imports) that uses [inheritance](/core-concepts/stacks/inheritance) to alter the Stack configuration in some deliberate way.
Learn Design Pattern
---
## Override Configurations
import Terminal from '@site/src/components/Terminal'
import Intro from '@site/src/components/Intro'
import File from '@site/src/components/File'
Atmos supports the ability to override the behavior of [imports](/core-concepts/stacks/imports) when the order of
deep-merging interferes with what you want to express. Use the `overrides` section in Atmos stack manifests.
You can override the following sections in the component(s) configuration:
- `command`
- `env`
- `hooks`
- `providers`
- `settings`
- `vars`
The `overrides` section can be used in the global scope or in the Terraform and Helmfile scopes.
The [Component Overrides](/design-patterns/component-overrides) Design Pattern goes into further details on how to use this effectively.
## Overrides Schema
The `overrides` section schema at the global scope is as follows:
```yaml
overrides:
# Override the ENV variables for the components in the current stack manifest and all its imports
env: {}
# Override the hooks for the components in the current stack manifest and all its imports
hooks: {}
# Override the settings for the components in the current stack manifest and all its imports
settings: {}
# Override the variables for the components in the current stack manifest and all its imports
vars: {}
# Override the providers configuration section for the Terraform components in the current stack manifest and all its imports
# Note: this applies only to Terraform components in the `terraform.providers` and `component.terraform..providers` sections
providers: {}
# Override the command to execute for the components in the current stack manifest and all its imports
command: ""
```
The `overrides` section schemas at the Terraform and Helmfile levels are as follows:
```yaml
terraform:
overrides:
env: {}
hooks: {}
settings: {}
vars: {}
providers: {}
command: ""
helmfile:
overrides:
env: {}
settings: {}
vars: {}
command: ""
```
You can include the `overrides`, `terraform.overrides` and `helmfile.overrides` sections in any Atmos stack manifest at any level of inheritance.
The scope of the `override` configuration is limited to all the Atmos components defined within the manifest and all its imports up until that point.
In other words, the `overrides` configuration defined within a stack manifest does not affect any other components defined in different stack manifests for the same top-level stack.
:::tip
Refer to [Atmos Component Inheritance](/core-concepts/stacks/inheritance) for more information on all types of component inheritance
supported by Atmos
:::
## Use-cases
### Overrides for Teams
The **overrides** pattern is used to override the components only in a particular Atmos stack manifest and all the imported
manifests. This is different from the other configuration sections (e.g. `vars`, `settings`, `env`). If we define a `vars`, `settings` or `env`
section at the global, Terraform or Helmfile levels, all the components in the top-level stack will get the updated configurations. On
the other hand, if we define an `overrides` section in a stack manifest, only the components directly defined in the manifest and its imports will get
the overridden values, not all the components in the top-level Atmos stack.
This is especially useful when you have Atmos stack manifests split per Teams. Each Team manages a set of components, and you need to define a common
configuration (or override the existing one) for the components that only a particular Team manages.
For example, we have two Teams: `devops` and `testing`.
The `devops` Team manifest is defined in `stacks/teams/devops.yaml`:
```yaml
import:
# The `devops` Team manages all the components defined in the following stack manifests:
- catalog/terraform/top-level-component1
```
The `testing` Team manifest is defined in `stacks/teams/testing.yaml`:
```yaml
import:
# The `testing` Team manages all the components defined in the following stack manifests:
- catalog/terraform/test-component
- catalog/terraform/test-component-override
```
We can import the two manifests into a top-level stack manifest, e.g. `tenant1/dev/us-west-2.yaml`:
```yaml
import:
- mixins/region/us-west-2
- orgs/cp/tenant1/dev/_defaults
# Import all components that the `devops` Team manages
- teams/devops
# Import all components managed by the `testing` Team
- teams/testing
```
Suppose that we want to change some variables in the `vars` and `env` sections and some config in the `settings` section for all the components that the `testing` Team manages, but we don't want to affect any components that the `devops` Team manages.
If we added a global or Terraform level `vars`, `env` or `settings` sections to the top-level manifest `stacks/orgs/cp/tenant1/dev/us-west-2.yaml` or to the Team manifest `stacks/teams/testing.yaml`, then all the components in the `tenant1/dev/us-west-2` top-level stack would be modified, including those managed by the `devops` Team.
To solve this, we could individually modify the `vars`, `env` and `settings` sections in all the components managed by the `testing` Team, but the entire configuration would not be DRY and reusable. That's where the __overrides__ pattern comes into play. To make the configuration DRY and configured only in one place, use the `overrides` section.
For example, we want to override some values in the `env`, `vars` and `settings` sections for all the components managed by the `testing` Team:
```yaml
import:
# The `testing` Team manages all the components defined in the following stack manifests:
- catalog/terraform/test-component
- catalog/terraform/test-component-override
# Global overrides.
# Override the variables, env, command and settings ONLY in the components managed by the `testing` Team.
overrides:
env:
# This ENV variable will be added or overridden in all the components managed by the `testing` Team
TEST_ENV_VAR1: "test-env-var1-overridden"
settings: {}
vars: {}
# Terraform overrides.
# Override the variables, env, command and settings ONLY in the Terraform components managed by the `testing` Team.
# The Terraform `overrides` are deep-merged with the global `overrides`
# and takes higher priority (it will override the same keys from the global `overrides`).
terraform:
overrides:
settings:
spacelift:
# All the components managed by the `testing` Team will have the Spacelift stacks auto-applied
# if the planning phase was successful and there are no plan policy warnings
# https://docs.spacelift.io/concepts/stack/stack-settings#autodeploy
autodeploy: true
vars:
# This variable will be added or overridden in all the Terraform components managed by the `testing` Team
test_1: 1
# The `testing` Team uses `tofu` instead of `terraform`
# https://opentofu.org
# The commands `atmos terraform ...` will execute the `tofu` binary
command: tofu
# Helmfile overrides.
# Override the variables, env, command and settings ONLY in the Helmfile components managed by the `testing` Team.
# The Helmfile `overrides` are deep-merged with the global `overrides`
# and takes higher priority (it will override the same keys from the global `overrides`).
helmfile:
overrides:
env:
# This ENV variable will be added or overridden in all the Helmfile components managed by the `testing` Team
TEST_ENV_VAR2: "test-env-var2-overridden"
```
In the manifest above, we configure the following:
- The global `overrides` section to override the `TEST_ENV_VAR1` ENV variable in the `env` section. All the Terraform and Helmfile components
managed by the `testing` Team will get the ENV vars updated to `test-env-var1-overridden`.
- The Terraform-level `terraform.overrides` section to override some Spacelift configuration in the `settings` section, a variable in the `vars`
section, and the `tofu` command to execute instead of `terraform` in the `command` section. All the Terraform components managed by the `testing`
Team will be affected by the new values (but not the Helmfile components). The Terraform `overrides` are deep-merged with the global `overrides`
and takes higher priority (it will override the same keys from the global `overrides`).
- The Helmfile-level `helmfile.overrides` section to override an ENV variable in the `env` section. All the Helmfile components managed by
the `testing` Team will get the new ENV variable value (but not the Terraform components). The Helmfile `overrides` are deep-merged with the
global `overrides` and takes higher priority (it will override the same keys from the global `overrides`).
To confirm that the components managed by the `testing` Team get the new values from the `overrides` sections, execute the following
commands:
```shell
atmos describe component test/test-component -s tenant1-uw2-dev
atmos describe component test/test-component-override -s tenant1-uw2-dev
```
You should see the following output:
```yaml
# Final deep-merged `overrides` from all the global `overrides` and Terraform `overrides` sections
overrides:
command: tofu
env:
TEST_ENV_VAR1: test-env-var1-overridden
settings:
spacelift:
autodeploy: true
vars:
test_1: 1
# The `command` was overridden with the value from `terraform.overrides.command`
command: tofu
env:
# The `TEST_ENV_VAR1` ENV variable was overridden with the value from `overrides.env.TEST_ENV_VAR1`
TEST_ENV_VAR1: test-env-var1-overridden
TEST_ENV_VAR2: val2
settings:
spacelift:
# The `autodeploy` setting was overridden with the value
# from `terraform.overrides.settings.spacelift.autodeploy`
autodeploy: true
workspace_enabled: true
vars:
environment: uw2
namespace: cp
region: us-west-2
stage: dev
tenant: tenant1
# The `test_1` variable was overridden with the value from `terraform.overrides.vars.test_1`
test_1: 1
```
To confirm that the components managed by the `devops` Team are not affected by the `overrides` for the `testing` Team, execute the following
command:
```yaml
# The `command` is not overridden
command: terraform
# The component does not get the `overrides` section since it's not defined
# for the components managed by the `devops` Team
overrides: {}
vars:
env:
settings:
```
The `top-level-component1` component managed by the `devops` Team does not get affected by the `overrides` sections for the `testing` Team,
and the sections `vars`, `env`, `settings` and `command` are not updated with the values from the `overrides` configuration.
## Importing the Overrides
To make the `overrides` configuration DRY and reusable, you can place the `overrides` sections into a separate stack manifest,
and then import it into other stacks.
For example:
Define the `overrides` sections in a separate manifest `stacks/teams/testing-overrides.yaml`:
```yaml
# Global overrides
# Override the variables, env, command and settings ONLY in the components managed by the `testing` Team.
overrides:
env:
# This ENV variable will be added or overridden in all the components managed by the `testing` Team
TEST_ENV_VAR1: "test-env-var1-overridden"
settings: {}
vars: {}
# Terraform overrides
# Override the variables, env, command and settings ONLY in the Terraform components managed by the `testing` Team.
# The Terraform `overrides` are deep-merged with the global `overrides`
# and takes higher priority (it will override the same keys from the global `overrides`).
terraform:
overrides:
settings:
spacelift:
# All the components managed by the `testing` Team will have the Spacelift stacks auto-applied
# if the planning phase was successful and there are no plan policy warnings
# https://docs.spacelift.io/concepts/stack/stack-settings#autodeploy
autodeploy: true
vars:
# This variable will be added or overridden in all the Terraform components managed by the `testing` Team
test_1: 1
# The `testing` Team uses `tofu` instead of `terraform`
# https://opentofu.org
# The commands `atmos terraform ...` will execute the `tofu` binary
command: tofu
```
Import the `stacks/teams/testing-overrides.yaml` manifest into the stack `stacks/teams/testing.yaml`:
```yaml
import:
# The `testing` Team manages all the components defined in this stack manifest and imported from the catalog
- catalog/terraform/test-component-2
# The `overrides` in `teams/testing-overrides` will affect all the components in this stack manifest
# and all the components that are imported AFTER the `overrides` from `teams/testing-overrides`.
# It will affect the components imported from `catalog/terraform/test-component-2`.
# The `overrides` defined in this manifest will affect all the imported components, including `catalog/terraform/test-component-2`.
- teams/testing-overrides
- catalog/terraform/test-component
- catalog/terraform/test-component-override
# The `overrides` in this stack manifest take precedence over the `overrides` imported from `teams/testing-overrides`
# Global overrides
# Override the variables, env, command and settings ONLY in the components managed by the `testing` Team.
overrides:
env:
# This ENV variable will be added or overridden in all the components managed by the `testing` Team
TEST_ENV_VAR1: "test-env-var1-overridden-2"
settings: {}
vars: {}
# Terraform overrides
# Override the variables, env, command and settings ONLY in the Terraform components managed by the `testing` Team.
# The Terraform `overrides` are deep-merged with the global `overrides`
# and takes higher priority (it will override the same keys from the global `overrides`).
terraform:
overrides:
vars:
# This variable will be added or overridden in all the Terraform components managed by the `testing` Team
test_1: 2
```
:::important
- The order of the imports is important. The `overrides` in `teams/testing-overrides` will affect all the components in
this stack manifest and all the components that are imported __after__ the `overrides` from `teams/testing-overrides`.
In other words, the `overrides` in `teams/testing-overrides` will be applied to the `catalog/terraform/test-component`
and `catalog/terraform/test-component-override` components, but not to `catalog/terraform/test-component-2`
- On the other hand, the `overrides` defined in this stack manifest `stacks/teams/testing.yaml` will be applied to __all__
components defined inline in `stacks/teams/testing.yaml` and all the imported components, including `catalog/terraform/test-component-2`
- The `overrides` defined inline in the stack manifest `stacks/teams/testing.yaml` take precedence over the `overrides`
imported from `teams/testing-overrides` (they will override the same values defined in `teams/testing-overrides`)
:::
:::tip
Refer to [`atmos describe component`](/cli/commands/describe/component) CLI command for more details
:::
---
## Atmos Stacks
import File from '@site/src/components/File'
import Intro from '@site/src/components/Intro'
import ActionCard from '@site/src/components/ActionCard'
When you design cloud architectures with Atmos, you break them apart into pieces called components that you implement with Terraform "root modules". Stacks are how you connect your components with configuration, so that everything comes together.
The power of components comes from their ability to be reused: you can compose stacks with one or more components, even reusing any component multiple times within a stack. But as your stacks grow with more and more components, it often makes sense to start splitting them into different files and that's why you might want to make use of imports. This lets you keep your Stack files easier to scan and reuse their configuration in multiple places.
Stacks define the complete configuration of an environment. Think of Stacks like an architectural "Blueprints" composed of one or more [Components](/core-concepts/components) configurations and defined using a [standardized YAML configuration](#schema).
Then by running the `atmos` command, automate the orchestrate the deployment of loosely coupled [components](/core-concepts/components), such as Terraform "root" modules. By doing this, it enables scalable infrastructure-as-code configurations, allowing environments to inherit from one or more common bases (child stacks) by importing configuration that gets deep-merged, thus minimizing config duplication and manual effort. Each stack uses a simple schema that provides a declarative description of your various environments. This approach empowers you to separate your infrastructure’s environment configuration settings from the code it manages (e.g., [Terraform components](/core-concepts/components/terraform)).
By facilitating the infrastructure configurations this way, developers achieve DRY (Don't Repeat Yourself) architectures with minimal
configuration. Stacks make infrastructure more streamlined and consistent, significantly enhancing productivity. Best of all, Stacks
can deploy vanilla Terraform "root" modules *without* any code generation, custom vendor extensions, or changes to the HCL code.
Atmos utilizes a custom YAML configuration format for stacks. YAML is ideal because it's portable across multiple toolchains and languages; every developer understands it. The Atmos [CLI](/cli), the [terraform-utils-provider](https://github.com/cloudposse/terraform-provider-utils) provider, and Spacelift via the [terraform-spacelift-cloud-infrastructure-automation](https://github.com/cloudposse/terraform-spacelift-cloud-infrastructure-automation) module all support stacks. Utilizing the Terraform provider enables native access to the entire infrastructure configuration directly from Terraform.
Define your first component configuration using stacks.
## Use-cases
- **Rapid Environment Provisioning:** Leverage stacks to swiftly set up and replicate development, testing,
and production environments, ensuring consistency and reducing manual setup errors. This accelerates the development
cycle and enables businesses to respond quickly to market demands or development needs.
- **Multi-Tenant Infrastructure Management:** Utilize stacks to manage and isolate resources for different clients or projects
within a single cloud infrastructure. This approach supports SaaS companies in providing secure, isolated environments for each
tenant, optimizing resource utilization and simplifying the management of complex, multi-tenant architectures.
- **Compliance and Governance:** Implement stacks to enforce compliance and governance policies across all environments systematically.
By defining standard configurations that meet regulatory requirements, businesses can ensure that every deployment is compliant,
reducing the risk of violations and enhancing security posture.
## Conventions
The differentiation between the following two types of stacks is crucial for understanding how to organize stacks and the basis for the
various [design patterns](/design-patterns/).
### Stack Names (aka "slugs")
Every stack is uniquely identified by a name. The name is used to reference the stack in the Atmos CLI, or with stack dependencies.
These are computed from either the `name_pattern` (old way) or the more configurable
`name_template` (new way). These are configured in the `atmos.yaml` configuration file.
For example, using the slug, we can reference a stack like this when applying the `vpc` stack in the `us2-dev` environment:
```bash
atmos terraform apply vpc -s us2-dev
```
### Components vs Component instances
Components are different from Stacks.
When a component is added to a stack, we call that a "Component Instance"
### Parent Stacks vs Child Stacks
- Parent Stacks
- These are the top-level stacks that are responsible for importing Child stacks. Components inside of Parent stacks are deployable, unlike in Child stacks.
- Child Stacks
- These are any stacks whose components cannot be deployed independently without being imported by a Parent Stack. Catalogs are typically where we keep our Child stacks.
### Logical Stacks vs. Physical Stack Manifests
- Logical Stacks
-
Represent the entire environment defined by context variables and global settings in atmos.yaml.
Logical stacks are the in-memory representation of the deep-merged configuration.
- Physical Stacks
- Are the raw YAML files where the specific configurations of components are defined.
Atmos processes each physical stack file, first evaluating any templates and then processing it as YAML. After loading the YAML,
it proceeds to deep-merge the configuration with the current in-memory logical representation of the Stack, then apply any overrides.
This is done iteratively for each physical stack file in the order they are defined in the `import` section of the Stack file.
Note, the logical representation is never influenced by file paths or directories. It's only influenced by the configuration itself.
## Schema
A Stack file contains a manifest defined in YAML that follows a simple, extensible schema. In fact, every Stack file follows exactly the same schema, and every setting in the configuration is optional. Enforcing a consistent schema ensures we can easily [import and deep-merge](/core-concepts/stacks/imports) configurations and use [inheritance](/core-concepts/stacks/inheritance) to achieve DRY configuration.
```yaml
# Configurations that should get deep-merged into this one
import:
# each import is a "Stack" file. The `.yaml` extension is optional, and we do not recommend using it.
- ue2-globals
# Top-level variables that are inherited by every single component.
# Use these wisely. Too many global vars will pollute the variable namespace.
vars:
# Variables can be anything you want. They can be scalars, lists, and maps. Whatever is supported by YAML.
stage: dev
# There can then be global variables for each type of component.
# Here we set global variables for any "terraform" component.
terraform:
vars: {}
# Here we set global variables for any "helmfile" component.
helmfile:
vars: {}
# Components are the building blocks of reusable infrastructure.
# They can be anything. Atmos natively supports "terraform" and "helmfile".
components:
terraform:
vpc:
command: "/usr/bin/terraform-0.15"
backend:
s3:
workspace_key_prefix: "vpc"
vars:
cidr_block: "10.102.0.0/18"
eks:
backend:
s3:
workspace_key_prefix: "eks"
vars: {}
helmfile:
nginx-ingress:
vars:
installed: true
```
### Stack Attributes
- `components`
-
The `components` is the list of all the building blocks.
Example:
```yaml
components:
sometool: # "sometool" can be any tool
somecomponent: # "somecomponent" can be the name of any "sometool" component
vars: # etc...
```
- `components.terraform`
-
So for `terraform`, it might look something like this:
```yaml
components:
terraform:
vpc:
vars: # etc...
```
## Stack Files
Stack files can be very numerous in large cloud environments (think many dozens to hundreds of stack files). To enable the proper organization of stack files, SweetOps has established some conventions that are good to follow. However, these are just conventions, and there are no limits enforced by the tool.
By convention, we recommend storing all Stacks in a `stacks/` folder at the root of your infrastructure repository. This way it's clear where they live and helps keep the configuration separate from your code (e.g. HCL).
The filename of individual environment stacks can follow any convention, and the best one will depend on how you model environments at your organization.
### Basic Layout
A basic form of organization is to follow the naming pattern where each `$environment-$stage.yaml` is a file. This works well until you have so
many environments and stages.
For example, `$environment` might be `ue2` (for `us-east-2`) and `$stage` might be `prod` which would result in `stacks/ue2-prod.yaml`
Some resources, however, are global in scope. For example, Route53 and IAM might not make sense to tie to a region. These are what we call "global
resources". You might want to put these into a file like `stacks/global-region.yaml` to connote that they are not tied to any particular region.
### Hierarchical Layout
We recommend using a hierarchical layout that follows the way AWS thinks about infrastructure. This works very well when you may have dozens or
hundreds of accounts and regions that you operate in. Use [Catalogs](/core-concepts/stacks/catalogs) to organize your Stack configurations.
---
## Template Data Sources
import File from '@site/src/components/File'
import Terminal from '@site/src/components/Terminal'
import PillBox from '@site/src/components/PillBox'
import Intro from '@site/src/components/Intro'
Advanced
Data sources in Atmos refer to external locations from which Atmos can fetch configuration data.
Atmos supports all data sources supported by [Gomplate](https://docs.gomplate.ca/datasources).
For example, you can use data sources to fetch JSON metadata from API endpoints or read from various backends like S3 Buckets, AWS SSM Parameter Store, HashiCorp Vault, and many others.
## Data sources
Currently, Atmos supports all the [Gomplate Datasources](https://docs.gomplate.ca/datasources).
More data sources will be added in the future (and this doc will be updated).
All datasource configurations are defined in the `templates.settings.gomplate.datasources` section in `atmos.yaml` [CLI config file](/cli/configuration)
or in the `settings.templates.settings.gomplate.datasources` section of any [Atmos stack manifests](/core-concepts/stacks).
The `gomplate.datasources` section is a map of [Gomplate Datasource](https://docs.gomplate.ca/datasources) definitions.
The keys of the map are the data source names (aliases) that you will use to refer to them. For example,
if you define a data source called `foobar` which has a property called `tag`, you could refer to it like this in a
stack manifest: `{{ (datasource "foobar").tag }}`.
For example:
```yaml
terraform:
vars:
tags:
provisioned_by_ip: '{{ (datasource "ip").ip }}'
config1_tag: '{{ (datasource "config-1").tag }}'
config2_service_name: '{{ (datasource "config-2").service.name }}'
```
The values in the map are data source definitions following this schema:
- `url`
-
All data sources are defined as a [URL](https://docs.gomplate.ca/datasources/#url-format).
As a refresher, a Gomplate Data Source URL is made up of the following components:
```plaintext
scheme://user@host.com:8080/path?query=string#fragment
```
- `headers`
-
A map of [HTTP request headers](https://developer.mozilla.org/en-US/docs/Web/HTTP/Headers) for
the [`http` data source](https://docs.gomplate.ca/datasources/#sending-http-headers).
The keys of the map are the header names. The values of the map are lists of values for the header.
The following configuration will result in the
[`accept: application/json`](https://developer.mozilla.org/en-US/docs/Web/HTTP/Headers/Accept) HTTP header
being sent with the HTTP request to the data source:
```yaml
headers:
accept:
- "application/json"
```
## Types of Data Sources
The following are the types of data sources are supported by Atmos via [Gomplate](https://docs.gomplate.ca/datasources/#url-format).
- `aws+smp://`
-
AWS Systems Manager Parameter Store is a key/value store that supports encryption and versioning.
- `aws+sm://`
-
AWS Secrets Manager lets you store and retrieve secrets.
- `s3://`
- Amazon S3 provides object storage, which is convenient for stashing shared configurations.
- `consul://`, `consul+http://`, `consul+https://`
- Use HashiCorp Consul provides as a backend key/value store
- `env://`
- Environment variables can be used as data sources, although [template functions](/functions/template) might make more sense.
- `file://`
- Files can be read in any of the supported formats (JSON, YAML). Directories are also supported, just end the URL path with a `/`.
- `git://`, `git+file://`, `git+http://`, `git+https://`, `git+ssh://`
-
Files can be read from a local or remote git repository, at specific branches or tags. Directory semantics are also supported.
- `gs://`
-
Google Cloud Storage is the object storage service that is similar to AWS S3.
- `http://`, `https://`
-
Retrieve data from HTTP/HTTPS endpoints. Custom HTTP headers can also be passed.
- `merge://`
-
Merge two or more data sources together to produce the final value - useful for resolving defaults. Uses coll.Merge for merging.
- `stdin://`
-
Read configuration data from standard input.
- `vault://`, `vault+http://`, `vault+https://`
-
HashiCorp Vault is a popular open-source secret management platform.
## Environment Variables
Some data sources might need environment variables that are different from the environment variables in Stack configuration. Environment variables may be passed to data sources when processing and executing templates by defining `env` map.
It's supported in both the `templates.settings` section in `atmos.yaml` [CLI config file](/cli/configuration) and in the
`settings.templates.settings` section in [Atmos stack manifests](/core-concepts/stacks).
For example:
```yaml
settings:
templates:
settings:
# Environment variables passed to `datasources` when evaluating templates
# https://docs.gomplate.ca/datasources/#using-awssmp-datasources
# https://docs.gomplate.ca/functions/aws/#configuring-aws
# https://docs.aws.amazon.com/sdk-for-go/v1/developer-guide/configuring-sdk.html
env:
AWS_PROFILE: ""
AWS_TIMEOUT: 2000
```
This is useful when executing data sources that need to authenticate to cloud APIs.
For more details, refer to:
- [Configuring AWS](https://docs.gomplate.ca/functions/aws/#configuring-aws)
- [Configuring GCP](https://docs.gomplate.ca/functions/gcp/#configuring-gcp)
## Configuring Data Sources
For example, let's define the following Gomplate `datasources` in the global `settings` section (this will apply to all
components in all stacks in the infrastructure).
First, enable `Go` templates and `gomplate` datasources in the `atmos.yaml` CLI config file:
```yaml
templates:
settings:
# Enable `Go` templates in Atmos stack manifests
enabled: true
gomplate:
# Enable Gomplate functions and data sources in `Go` templates in Atmos stack manifests
enabled: true
```
Then, define the following data sources in the global `settings` section in an Atmos stack manifest:
```yaml
settings:
templates:
settings:
gomplate:
# Timeout in seconds to execute the data sources
timeout: 5
# https://docs.gomplate.ca/datasources
datasources:
# 'http' data source
# https://docs.gomplate.ca/datasources/#using-file-datasources
ip:
url: "https://api.ipify.org?format=json"
# https://docs.gomplate.ca/datasources/#sending-http-headers
# https://docs.gomplate.ca/usage/#--datasource-header-h
headers:
accept:
- "application/json"
# 'file' data sources
# https://docs.gomplate.ca/datasources/#using-file-datasources
config-1:
url: "./config1.json"
config-2:
url: "file:///config2.json"
# `aws+smp` AWS Systems Manager Parameter Store data source
# https://docs.gomplate.ca/datasources/#using-awssmp-datasources
secret-1:
url: "aws+smp:///path/to/secret"
# `aws+sm` AWS Secrets Manager datasource
# https://docs.gomplate.ca/datasources/#using-awssm-data source
secret-2:
url: "aws+sm:///path/to/secret"
# `s3` datasource
# https://docs.gomplate.ca/datasources/#using-s3-data sources
s3-config:
url: "s3://mybucket/config/config.json"
```
After the above data sources are defined, you can use them in Atmos stack manifests like this:
```yaml
terraform:
vars:
tags:
tag1: '{{ (datasource "config-1").tag }}'
service_name2: '{{ (datasource "config-2").service.name }}'
service_name3: '{{ (datasource "s3-config").config.service_name }}'
components:
terraform:
vpc-1:
settings:
provisioned_by_ip: '{{ (datasource "ip").ip }}'
secret-1: '{{ (datasource "secret-1").secret1.value }}'
vars:
enabled: '{{ (datasource "config-2").config.enabled }}'
```
## Using templates in the URLs of `datasources`
Advanced
Let's suppose that your company uses a centralized software catalog to consolidate all tags for tagging all the cloud
resources. The tags can include tags per account, per team, per service, billing tags, etc.
:::note
An example of such a centralized software catalog could be [Backstage](https://backstage.io).
:::
Let's also suppose that you have a service to read the tags from the centralized catalog and write them into an S3
bucket in one of your accounts. The bucket serves as a cache to not hit the external system's API with too many requests
and not to trigger rate limiting.
And finally, let's say that in the bucket, you have folders per account (`dev`, `prod`, `staging`). Each folder has a JSON
file with all the tags defined for all the cloud resources in the accounts.
We can then use the [Gomplate S3 datasource](https://docs.gomplate.ca/datasources/#using-s3-datasources) to read the JSON
file with the tags for each account and assign the tags to all cloud resources.
In `atmos.yaml`, we figure two evaluations steps of template processing:
```yaml
templates:
settings:
enabled: true
# Number of evaluations to process `Go` templates
evaluations: 2
gomplate:
enabled: true
```
In an Atmos stack manifest, we define the environment variables in the `env` section (AWS profile with permissions to
access the S3 bucket), and the `s3-tags` Gomplate datasource.
In the `terraform.vars.tags` section, we define all the tags that are returned from the call to the S3 datasource.
```yaml
import:
# Import the default configuration for all VPCs in the infrastructure
- catalog/vpc/defaults
# Global settings
settings:
templates:
settings:
# Environment variables passed to data sources when evaluating templates
# https://docs.gomplate.ca/functions/aws/#configuring-aws
# https://docs.aws.amazon.com/sdk-for-go/v1/developer-guide/configuring-sdk.html
env:
# AWS profile with permissions to access the S3 bucket
AWS_PROFILE: ""
gomplate:
# Timeout in seconds to execute the data sources
timeout: 5
# https://docs.gomplate.ca/datasources
datasources:
# `s3` datasource
# https://docs.gomplate.ca/datasources/#using-s3-datasources
s3-tags:
# The `url` uses a `Go` template with the delimiters `${ }`,
# which is processed as first step in the template processing pipeline
url: "s3://mybucket/{{ .vars.stage }}/tags.json"
# Global Terraform config
terraform:
# Global variables that are used by all Atmos components
vars:
tags:
atmos_component: "{{ .atmos_component }}"
atmos_stack: "{{ .atmos_stack }}"
terraform_component: "{{ .component }}"
terraform_workspace: "{{ .workspace }}"
devops_team: '{{`{{ (datasource "s3-tags").tags.devops_team }}`}}'
billing_team: '{{`{{ (datasource "s3-tags").tags.billing_team }}`}}'
service: '{{`{{ (datasource "s3-tags").tags.service }}`}}'
# Atmos component configurations
components:
terraform:
vpc/1:
metadata:
component: vpc # Point to the Terraform component in `components/terraform/vpc` folder
inherits:
# Inherit from the `vpc/defaults` base Atmos component, which defines the default
# configuration for all VPCs in the infrastructure.
# The `vpc/defaults` base component is defined in the `catalog/vpc/defaults`
# manifest (which is imported above).
# This inheritance makes the `vpc/1` Atmos component config DRY.
- "vpc/defaults"
vars:
name: "vpc-1"
```
When executing an Atmos command like `atmos terraform apply vpc/1 -s plat-ue2-dev`, the above template will be processed
in two evaluation steps:
- Evaluation 1:
- `datasources.s3-tags.url` is set to `s3://mybucket/dev/tags.json`
- the tags that use the `datasource` templates are set to the following:
```yaml
devops_team: '{{ (datasource "s3-tags").tags.devops_team }}'
billing_team: '{{ (datasource "s3-tags").tags.billing_team }}'
service: '{{ (datasource "s3-tags").tags.service }}'
```
- Evaluation 2:
- all `s3-tags` datasources get executed, the JSON file `s3://mybucket/dev/tags.json` with the tags
for the `dev` account is downloaded from the S3 bucket, and the tags are parsed and assigned in the
`terraform.vars.tags` section
After executing the two evaluation steps, the resulting tags for the Atmos component `vpc/1` in the stack `plat-ue2-dev`
would look like this:
```yaml
atmos_component: vpc/1
atmos_stack: plat-ue2-dev
terraform_component: vpc
terraform_workspace: plat-ue2-dev-vpc-1
devops_team: dev_networking
billing_team: billing_net
service: net
```
The tags will be added to all the AWS resources provisioned by the `vpc` Terraform component in the `plat-ue2-dev` stack.
---
## Stack Manifest Templating
import File from '@site/src/components/File'
import Terminal from '@site/src/components/Terminal'
import PillBox from '@site/src/components/PillBox'
import Intro from '@site/src/components/Intro'
import ActionCard from '@site/src/components/ActionCard'
import PrimaryCTA from '@site/src/components/PrimaryCTA'
import SecondaryCTA from '@site/src/components/SecondaryCTA'
Advanced
Use templates as an _escape hatch_, when standard [inheritance](/core-concepts/stacks/inheritance) or
[Atmos Functions](/functions/yaml) are insufficient.
Atmos supports [Go templates](https://pkg.go.dev/text/template) in stack manifests and functions to customize Stack configurations.
:::note Template File Validation
Template files (`.yaml.tmpl`, `.yml.tmpl`, `.tmpl`) are automatically detected and processed during normal operations (imports, etc.).
However, they are excluded from YAML validation (`atmos validate stacks`) since they may contain template placeholders that are invalid YAML before being rendered.
This ensures that template files can contain valid Go template syntax without causing validation errors.
:::
### Enable Templating
Templating in Atmos stack manifests is configured in the `atmos.yaml` [CLI config file](/cli/configuration) in the
`templates.settings` section.
- `templates.settings`
- In the `templates.settings` section in `atmos.yaml` [CLI config file](/cli/configuration)
- `settings.templates.settings`
-
In the `settings.templates.settings` section in [Atmos stack manifests](/core-concepts/stacks). The `settings.templates.settings` section can be defined globally per organization, tenant, account, or per component. Atmos deep-merges the configurations from all scopes into the final result using [inheritance](/core-concepts/stacks/inheritance).
- `templates.settings.enabled`
- A boolean flag to enable/disable the processing of `Go` templates in Atmos stack manifests. If set to `false`, Atmos will not process `Go` templates in stack manifests.
### Configure Templating
- `templates.settings.env`
- A map of environment variables to use when executing the templates.
- `templates.settings.evaluations`
- Number of evaluations/passes to process `Go` templates. If not defined, `evaluations` is automatically set to `1`. For more details, refer to [Template Evaluations and Template Processing Pipelines](#processing-pipelines).
- `templates.settings.delimiters`
- A list of left and right delimiters to use to process the templates. If not defined, the default `Go` template delimiters `["{{", "}}"]` will be used.
- `templates.settings.sprig.enabled`
- A boolean flag to enable/disable the [Sprig Functions](https://masterminds.github.io/sprig/) in Atmos stack manifests.
- `templates.settings.gomplate.enabled`
- A boolean flag to enable/disable the [Gomplate Functions](https://docs.gomplate.ca/functions/) and [Gomplate Datasources](https://docs.gomplate.ca/datasources) in Atmos stack manifests.
- `templates.settings.gomplate.timeout`
- Timeout in seconds to execute [Gomplate Datasources](https://docs.gomplate.ca/datasources).
:::warning
Some functions are present in both [Sprig](https://masterminds.github.io/sprig/) and [Gomplate](https://docs.gomplate.ca/functions/).
For example, the `env` function has the same name in [Sprig](https://masterminds.github.io/sprig/os.html) and
[Gomplate](https://docs.gomplate.ca/functions/env/), but has different syntax and accept different number of arguments.
If you use the `env` function from one templating engine and enable both [Sprig](https://masterminds.github.io/sprig/)
and [Gomplate](https://docs.gomplate.ca/functions/), it will be invalid in the other templating engine, and an error will be thrown.
To be able to use the `env` function from both templating engines, you can do one of the following:
- Use the `env` function from one templating engine, and disable the other templating engine by using the
`templates.settings.sprig.enabled` and `templates.settings,gomplate.enabled` settings
- Enable both engines and use the Gomplate's `env` function via its
[`getenv`](https://docs.gomplate.ca/functions/env/#examples) alias
:::
#### Example Configuration
```yaml
# https://pkg.go.dev/text/template
templates:
settings:
# Enable `Go` templates in Atmos stack manifests
enabled: true
# Number of evaluations/passes to process `Go` templates
# If not defined, `evaluations` is automatically set to `1`
evaluations: 2
# Optional template delimiters
# The `{{ }}` delimiters are the default, no need to specify/redefine them
delimiters: ["{{", "}}"]
# Environment variables passed to data sources when evaluating templates
# https://docs.gomplate.ca/datasources/#using-awssmp-datasources
# https://docs.gomplate.ca/functions/aws/#configuring-aws
# https://docs.aws.amazon.com/sdk-for-go/v1/developer-guide/configuring-sdk.html
env:
AWS_PROFILE: ""
AWS_TIMEOUT: 2000
# https://masterminds.github.io/sprig
sprig:
# Enable Sprig functions in `Go` templates in Atmos stack manifests
enabled: true
# https://docs.gomplate.ca
# https://docs.gomplate.ca/functions
gomplate:
# Enable Gomplate functions and data sources in `Go` templates in Atmos stack manifests
enabled: true
# Timeout in seconds to execute the data sources
timeout: 5
datasources: {}
```
## Functions and Data Sources
Go templates by themselves are pretty basic, supporting concepts like ranges and variable interpolations. But what really makes templating powerful is the library of functions provided by Atmos to the template engine.
In `Go` templates, you can use the following functions and data sources:
- [Go `text/template` functions](https://pkg.go.dev/text/template#hdr-Functions)
- [Sprig Functions](https://masterminds.github.io/sprig/)
- [Gomplate Functions](https://docs.gomplate.ca/functions/) (note, this is "Gomplate" and not "Go template")
- [Gomplate Datasources](https://docs.gomplate.ca/datasources/)
- [Atmos Template Functions](/functions/template)
Functions are a crucial part of templating in Atmos stack manifests. They allow you to manipulate data and perform operations on the data to customize the stack configurations.
Learn About Functions
### Configuring Templating in Atmos Stack Manifests
Templating in Atmos can also be configured in the `settings.templates.settings` section in stack manifests.
The `settings.templates.settings` section can be defined globally per organization, tenant, account, or per component.
Atmos deep-merges the configurations from all scopes into the final result using [inheritance](/core-concepts/stacks/inheritance).
The schema is the same as `templates.settings` in the `atmos.yaml` [CLI config file](/cli/configuration),
except the following settings are not supported in the `settings.templates.settings` section:
- `settings.templates.settings.enabled`
- `settings.templates.settings.sprig.enabled`
- `settings.templates.settings.gomplate.enabled`
- `settings.templates.settings.evaluations`
- `settings.templates.settings.delimiters`
These settings are not supported for the following reasons:
- You can't disable templating in the stack manifests which are being processed by Atmos as `Go` templates
- If you define the `delimiters` in the `settings.templates.settings` section in stack manifests,
the `Go` templating engine will think that the delimiters specify the beginning and the end of template strings, will
try to evaluate it, which will result in an error
As an example, let's define templating configuration for the entire organization in the `stacks/orgs/acme/_defaults.yaml`
stack manifest:
```yaml
settings:
templates:
settings:
# Environment variables passed to data sources when evaluating templates
# https://docs.gomplate.ca/datasources/#using-awssmp-datasources
# https://docs.gomplate.ca/functions/aws/#configuring-aws
# https://docs.aws.amazon.com/sdk-for-go/v1/developer-guide/configuring-sdk.html
env:
AWS_PROFILE: ""
AWS_TIMEOUT: 2000
gomplate:
# 7 seconds timeout to execute the data sources
timeout: 7
# https://docs.gomplate.ca/datasources
datasources:
# 'file' data sources
# https://docs.gomplate.ca/datasources/#using-file-datasources
config-1:
url: "./my-config1.json"
config-3:
url: "file:///config3.json"
```
Atmos deep-merges the configurations from the `settings.templates.settings` section in [Atmos stack manifests](/core-concepts/stacks)
with the `templates.settings` section in `atmos.yaml` [CLI config file](/cli/configuration) using [inheritance](/core-concepts/stacks/inheritance).
The `settings.templates.settings` section in [Atmos stack manifests](/core-concepts/stacks) takes precedence over
the `templates.settings` section in `atmos.yaml` [CLI config file](/cli/configuration), allowing you to define the global
`datasources` in `atmos.yaml` and then add or override `datasources` in Atmos stack manifests for the entire organization,
tenant, account, or per component.
For example, taking into account the configurations described above in `atmos.yaml` [CLI config file](/cli/configuration)
and in the `stacks/orgs/acme/_defaults.yaml` stack manifest, the final `datasources` map will look like this:
```yaml
gomplate:
timeout: 7
datasources:
ip:
url: "https://api.ipify.org?format=json"
headers:
accept:
- "application/json"
random:
url: "http://www.randomnumberapi.com/api/v1.0/randomstring?min=${ .settings.random.min }&max=${ .settings.random.max }&count=1"
secret-1:
url: "aws+smp:///path/to/secret"
secret-2:
url: "aws+sm:///path/to/secret"
s3-config:
url: "s3://mybucket/config/config.json"
config-1:
url: "./my-config1.json"
config-2:
url: "file:///config2.json"
config-3:
url: "file:///config3.json"
```
Note that the `config-1` datasource from `atmos.yaml` was overridden with the `config-1` datasource from the
`stacks/orgs/acme/_defaults.yaml` stack manifest. The `timeout` attribute was overridden as well.
You can now use the `datasources` in `Go` templates in all Atmos sections that support `Go` templates.
## Atmos sections supporting `Go` templates
You can use `Go` templates in the following Atmos sections to refer to values in the same or other sections:
- `vars`
- `settings`
- `env`
- `providers`
- `overrides`
- `backend`
- `backend_type`
- `metadata`
- `component`
- `command`
:::tip
In the template tokens, you can refer to any value in any section that the Atmos command
[`atmos describe component -s `](/cli/commands/describe/component) generates
:::
For example, let's say we have the following component configuration using `Go` templates:
```yaml
component:
terraform:
vpc:
settings:
setting1: 1
setting2: 2
setting3: "{{ .vars.var3 }}"
setting4: "{{ .settings.setting1 }}"
component: vpc
backend_type: s3
region: "us-east-2"
assume_role: ""
backend_type: "{{ .settings.backend_type }}"
metadata:
component: "{{ .settings.component }}"
providers:
aws:
region: "{{ .settings.region }}"
assume_role: "{{ .settings.assume_role }}"
env:
ENV1: e1
ENV2: "{{ .settings.setting1 }}-{{ .settings.setting2 }}"
vars:
var1: "{{ .settings.setting1 }}"
var2: "{{ .settings.setting2 }}"
var3: 3
# Add the tags to all the resources provisioned by this Atmos component
tags:
atmos_component: "{{ .atmos_component }}"
atmos_stack: "{{ .atmos_stack }}"
atmos_manifest: "{{ .atmos_stack_file }}"
region: "{{ .vars.region }}"
terraform_workspace: "{{ .workspace }}"
assumed_role: "{{ .providers.aws.assume_role }}"
description: "{{ .atmos_component }} component provisioned in {{ .atmos_stack }} stack by assuming IAM role {{ .providers.aws.assume_role }}"
# Examples of using the Sprig and Gomplate functions and datasources
# https://masterminds.github.io/sprig/os.html
provisioned_by_user: '{{ env "USER" }}'
# https://docs.gomplate.ca/functions/strings
atmos_component_description: "{{ strings.Title .atmos_component }} component {{ .vars.name | strings.Quote }} provisioned in the stack {{ .atmos_stack | strings.Quote }}"
# https://docs.gomplate.ca/datasources
provisioned_by_ip: '{{ (datasource "ip").ip }}'
config1_tag: '{{ (datasource "config-1").tag }}'
config2_service_name: '{{ (datasource "config-2").service.name }}'
config3_team_name: '{{ (datasource "config-3").team.name }}'
```
When executing Atmos commands like `atmos describe component` and `atmos terraform plan/apply`, Atmos processes all the template tokens
in the manifest and generates the final configuration for the component in the stack:
```yaml
settings:
setting1: 1
setting2: 2
setting3: 3
setting4: 1
component: vpc
backend_type: s3
region: us-east-2
assume_role:
backend_type: s3
metadata:
component: vpc
providers:
aws:
region: us-east-2
assume_role:
env:
ENV1: e1
ENV2: 1-2
vars:
var1: 1
var2: 2
var3: 3
tags:
assumed_role:
atmos_component: vpc
atmos_component_description: Vpc component "common" provisioned in the stack "plat-ue2-dev"
atmos_manifest: orgs/acme/plat/dev/us-east-2
atmos_stack: plat-ue2-dev
config1_tag: test1
config2_service_name: service1
config3_team_name: my-team
description: vpc component provisioned in plat-ue2-dev stack by assuming IAM role
provisioned_by_user:
provisioned_by_ip: 167.38.132.237
region: us-east-2
terraform_workspace: plat-ue2-dev
```
## Performance Implications
There are some performance implications of using Go Templates with Atmos Stack configurations.
Using Go templates and template functions in Atmos stack configurations is generally safe and provides powerful flexibility. However, caution is required when leveraging functions like `atmos.Component` or others that depend on remote resources or network configurations. These functions can have significant performance implications and potential impacts on availability.
:::warning Why the Caution?
Atmos processes stack configuration files in multiple stages: first as Go templates, and then as YAML. During the Go template stage, every template function must be evaluated and resolved before Atmos can load the file. This introduces a critical dependency: Atmos cannot proceed unless all referenced resources are available and accessible.
:::
1. **Performance**: Functions like [`Atmos.Component`](/functions/template/atmos.Component) may require Atmos to retrieve extensive information about other components or outputs that depend on Terraform remote state. This adds latency, especially if used extensively across your stack configurations. In the case of retrieving Terraform outputs, Atmos must initialize the Terraform component which involves downloading all Terraform providers, which is slow. Commands like [`atmos describe stacks`](/cli/commands/describe/stacks) or [`atmos describe affected`](/cli/commands/describe/affected), which rely on evaluating all templates, can become noticeably slower as the number of remote calls increases.
2. **Availability Risks:** Templated references to remote resources introduce fragility. If a referenced resource becomes unavailable—whether due to downtime, decommissioning, or network issues—Atmos commands that depend on those templates will fail. This can severely impact high availability (HA) scenarios and your ability to reliably deploy or manage infrastructure.
### Template Function Best Practices
Careful management of template dependencies is essential for optimizing the performance of Atmos while ensuring a robust and reliable infrastructure configuration process.
To avoid potential pitfalls and maximize efficiency, follow these best practices:
1. **Minimize Dependency on Remote Sources**: Avoid referencing resources in your templates that are not highly available or are prone to downtime. Where possible, use static or locally resolvable values.
2. **Use `Atmos.Component` Sparingly**: While Atmos.Component is powerful, its overuse can significantly degrade performance. Limit its use to scenarios where it is truly necessary, and consider precomputing or caching values to reduce the frequency of evaluations.
3. **Use Terraform Remote State Directly**: Instead of relying on template functions to retrieve remote state, [use Terraform's native ability to retrieve the remote state](/core-concepts/share-data/#using-terraform-remote-state) of other components.
4. **Test for Resilience**: Simulate scenarios where a remote resource becomes unavailable and observe how Atmos behaves. Design your configurations to handle failures gracefully or provide fallbacks where feasible.
## Template Evaluations
Atmos supports many different ways of configuring and using `Go` templates:
- In [Atmos Custom Commands](/core-concepts/custom-commands)
- In [Atmos Vendoring](/core-concepts/vendor)
- In [Atmos Component Vendoring](/core-concepts/vendor/vendor-manifest)
- In [Imports](/core-concepts/stacks/imports)
- In [Stack Manifests](/core-concepts/stacks)
### Phases of Template Evaluation
These templates are processed in different phases and use different context:
- `Go` templates in [Atmos Custom Commands](/core-concepts/custom-commands) are processed when the custom commands are
executed. The execution context can be specified by using the `component_config` section. If a custom command defines
a `component_config` section with `component` and `stack`, Atmos generates the config for the component in the stack
and makes it available in the `{{ .ComponentConfig.xxx.yyy.zzz }}` template variables,
exposing all the component sections that are returned by the `atmos describe component -s ` CLI
command
- `Go` templates in [Atmos Vendoring](/core-concepts/vendor) and [Atmos Component Vendoring](/core-concepts/vendor/vendor-manifest)
are processed when the CLI command [`atmos vendor pull`](/cli/commands/vendor/pull) is executed. The templates in
the vendoring manifests support the `{{.Version}}` variable, and the execution context is provided in the `version` attribute
- [`Go` Templates in Imports](/core-concepts/stacks/imports#go-templates-in-imports) are used in imported stack
manifests to make them DRY and reusable. The context (variables) for the `Go` templates is provided via the static
`context` section. Atmos processes `Go` templates in imports as the **very first** phase of the stack processing pipeline.
When executing the [CLI commands](/cli/commands), Atmos parses and executes the templates using the provided static
`context`, processes all imports, and finds stacks and components
- `Go` templates in Atmos stack manifests, on the other hand, are processed as the **very last** phase of the stack processing
pipeline (after all imports are processed, all stack configurations are deep-merged, and the component in the stack is found).
For the context (template variables), it uses all the component's attributes returned from the
[`atmos describe component`](/cli/commands/describe/component) CLI command
These mechanisms, although all using `Go` templates, serve different purposes, use different contexts, and are executed
in different phases of the stack processing pipeline.
For more details, refer to:
- [`Go` Templates in Imports](/core-concepts/stacks/imports#go-templates-in-imports)
- [Excluding templates in imports from processing by Atmos](#excluding-templates-in-stack-manifest-from-processing-by-atmos)
### Processing Pipelines
Atmos supports configuring the number of evaluations/passes for template processing in `atmos.yaml` [CLI config file](/cli/configuration).
It effectively allows you to define template processing pipelines.
For example:
```yaml
templates:
settings:
# Enable `Go` templates in Atmos stack manifests
enabled: true
# Number of evaluations/passes to process `Go` templates
# If not defined, `evaluations` is automatically set to `1`
evaluations: 2
```
- `templates.settings.evaluations` - number of evaluations to process `Go` templates. If not defined, `evaluations`
is automatically set to `1`
Template evaluations are useful in the following scenarios:
- Combining templates from different sections in Atmos stack manifests
- Using templates in the URLs of `datasources`
## Use-cases
While `Go` templates in Atmos stack manifests offer great flexibility for various use-cases, one of the obvious use-cases
is to add a standard set of tags to all the resources in the infrastructure.
For example, by adding this configuration to the `stacks/orgs/acme/_defaults.yaml` Org-level stack manifest:
```yaml title="stacks/orgs/acme/_defaults.yaml"
terraform:
vars:
tags:
atmos_component: "{{ .atmos_component }}"
atmos_stack: "{{ .atmos_stack }}"
atmos_manifest: "{{ .atmos_stack_file }}"
terraform_workspace: "{{ .workspace }}"
# Examples of using the Gomplate and Sprig functions
# https://docs.gomplate.ca/functions/strings
atmos_component_description: "{{ strings.Title .atmos_component }} component {{ .vars.name | strings.Quote }} provisioned in the stack {{ .atmos_stack | strings.Quote }}"
# https://masterminds.github.io/sprig/os.html
provisioned_by_user: '{{ env "USER" }}'
```
The tags will be processed and automatically added to all the resources provisioned in the infrastructure.
## Excluding Templates in Stack Manifest from Processing by Atmos
If you need to provide `Go` templates to external systems (e.g. ArgoCD or Datadog) verbatim and prevent Atmos from
processing the templates, use **double curly braces + backtick + double curly braces** instead of just **double curly braces**:
```console
{{`{{ instead of {{
}}`}} instead of }}
```
For example:
```yaml
components:
terraform:
eks/argocd:
metadata:
component: "eks/argocd"
vars:
enabled: true
name: "argocd"
chart_repository: "https://argoproj.github.io/argo-helm"
chart_version: 5.46.0
chart_values:
template-github-commit-status:
message: |
Application {{`{{ .app.metadata.name }}`}} is now running new version.
webhook:
github-commit-status:
method: POST
path: "/repos/{{`{{ call .repo.FullNameByRepoURL .app.metadata.annotations.app_repository }}`}}/statuses/{{`{{ .app.metadata.annotations.app_commit }}`}}"
body: |
{
{{`{{ if eq .app.status.operationState.phase "Running" }}`}} "state": "pending"{{`{{end}}`}}
{{`{{ if eq .app.status.operationState.phase "Succeeded" }}`}} "state": "success"{{`{{end}}`}}
{{`{{ if eq .app.status.operationState.phase "Error" }}`}} "state": "error"{{`{{end}}`}}
{{`{{ if eq .app.status.operationState.phase "Failed" }}`}} "state": "error"{{`{{end}}`}},
"description": "ArgoCD",
"target_url": "{{`{{ .context.argocdUrl }}`}}/applications/{{`{{ .app.metadata.name }}`}}",
"context": "continuous-delivery/{{`{{ .app.metadata.name }}`}}"
}
```
When Atmos processes the templates in the manifest shown above, it renders them as raw strings allowing sending
the templates to the external system for processing:
```yaml
chart_values:
template-github-commit-status:
message: |
Application {{ .app.metadata.name }} is now running new version.
webhook:
github-commit-status:
method: POST
path: "/repos/{{ call .repo.FullNameByRepoURL .app.metadata.annotations.app_repository }}/statuses/{{ .app.metadata.annotations.app_commit }}"
body: |
{
{{ if eq .app.status.operationState.phase "Running" }} "state": "pending"{{end}}
{{ if eq .app.status.operationState.phase "Succeeded" }} "state": "success"{{end}}
{{ if eq .app.status.operationState.phase "Error" }} "state": "error"{{end}}
{{ if eq .app.status.operationState.phase "Failed" }} "state": "error"{{end}},
"description": "ArgoCD",
"target_url": "{{ .context.argocdUrl }}/applications/{{ .app.metadata.name }}",
"context": "continuous-delivery/{{ .app.metadata.name }}"
}
```
The `printf` template function is also supported and can be used instead of **double curly braces + backtick + double curly braces**.
The following examples produce the same result:
```yaml
chart_values:
template-github-commit-status:
message: >-
Application {{`{{ .app.metadata.name }}`}} is now running new version.
```
```yaml
chart_values:
template-github-commit-status:
message: "Application {{`{{ .app.metadata.name }}`}} is now running new version."
```
```yaml
chart_values:
template-github-commit-status:
message: >-
{{ printf "Application {{ .app.metadata.name }} is now running new version." }}
```
```yaml
chart_values:
template-github-commit-status:
message: '{{ printf "Application {{ .app.metadata.name }} is now running new version." }}'
```
## Excluding Templates in Imports
If you are using [`Go` Templates in Imports](/core-concepts/stacks/imports#go-templates-in-imports) and `Go` templates
in stack manifests in the same Atmos manifest, take into account that in this case Atmos will do `Go`
template processing two times (two passes):
- When importing the manifest and processing the template tokens using the variables from the provided `context` object
- After finding the component in the stack as the final step in the processing pipeline
For example, we can define the following configuration in the `stacks/catalog/eks/eks_cluster.tmpl` template file:
```yaml title="stacks/catalog/eks/eks_cluster.tmpl"
components:
terraform:
eks/cluster:
metadata:
component: eks/cluster
vars:
enabled: "{{ .enabled }}"
name: "{{ .name }}"
tags:
atmos_component: "{{ .atmos_component }}"
atmos_stack: "{{ .atmos_stack }}"
terraform_workspace: "{{ .workspace }}"
```
Then we import the template into a top-level stack providing the context variables for the import in the `context` object:
```yaml title="stacks/orgs/acme/plat/prod/us-east-2.yaml"
import:
- path: "catalog/eks/eks_cluster.tmpl"
context:
enabled: true
name: prod-eks
```
Atmos will process the import and replace the template tokens using the variables from the `context`.
Since the `context` does not provide the variables for the template tokens in `tags`, the following manifest will be
generated:
```yaml
components:
terraform:
eks/cluster:
metadata:
component: eks/cluster
vars:
enabled: true
name: prod-eks
tags:
atmos_component:
atmos_stack:
terraform_workspace:
```
The second pass of template processing will not replace the tokens in `tags` because they are already processed in the
first pass (importing) and the values `` are generated.
To deal with this, use **double curly braces + backtick + double curly braces** instead of just **double curly braces**
in `tags` to prevent Atmos from processing the templates in the first pass and instead process them in the second pass:
```yaml title="stacks/catalog/eks/eks_cluster.tmpl"
components:
terraform:
eks/cluster:
metadata:
component: eks/cluster
vars:
enabled: "{{ .enabled }}"
name: "{{ .name }}"
tags:
atmos_component: "{{`{{ .atmos_component }}`}}"
atmos_stack: "{{`{{ .atmos_stack }}`}}"
terraform_workspace: "{{`{{ .workspace }}`}}"
```
Atmos will first process the import and replace the template tokens using the variables from the `context`.
Then in the second pass the tokens in `tags` will be replaced with the correct values.
It will generate the following manifest:
```yaml
components:
terraform:
eks/cluster:
metadata:
component: eks/cluster
vars:
enabled: true
name: prod-eks
tags:
atmos_component: eks/cluster
atmos_stack: plat-ue2-prod
terraform_workspace: plat-ue2-prod
```
## Combining templates from different sections in Atmos stack manifests
You can define more than one step/pass of template processing to use and combine the results from each step.
For example:
```yaml
templates:
settings:
enabled: true
# Number of evaluations to process `Go` templates
evaluations: 3
```
```yaml
settings:
test: "{{ .atmos_component }}"
test2: "{{ .settings.test }}"
components:
terraform:
vpc:
vars:
tags:
tag1: "{{ .settings.test }}-{{ .settings.test2 }}"
tag2: "{{\"{{`{{ .atmos_component }}`}}\"}}"
```
When executing an Atmos command like `atmos terraform plan vpc -s `, the above template will be processed
in three phases:
- Evaluation 1
- `settings.test` is set to `vpc`
- `settings.test2` is set to `{{ .atmos_component }}`
- `vpc.vars.tags.tag1` is set to `{{ .atmos_component }}-{{ .settings.test }}`
- `vpc.vars.tags.tag2` is set to `{{{{ .atmos_component }}}}`
- Evaluation 2
- `settings.test` is `vpc`
- `settings.test2` is set to `vpc`
- `vpc.vars.tags.tag1` is set to `vpc-vpc`
- `vpc.vars.tags.tag2` is set to `{{ .atmos_component }}`
- Evaluation 3
- `settings.test` is `vpc`
- `settings.test2` is `vpc`
- `vpc.vars.tags.tag1` is `vpc-vpc`
- `vpc.vars.tags.tag2` is set to `vpc`
:::warning
The above example shows the supported functionality in Atmos templating.
You can use it for some use-cases, but it does not mean that you **should** use it just for the sake of using, since
it's not easy to read and understand what data we have after each evaluation step.
The [Using Templates in the URLs of Datasources](/core-concepts/stacks/templates/datasources#using-templates-in-the-urls-of-datasources)
document describes a practical approach to using evaluation steps in Atmos templates to work
with data sources.
:::
---
## EditorConfig Validation
import Terminal from '@site/src/components/Terminal'
import File from '@site/src/components/File'
import Intro from '@site/src/components/Intro'
Atmos supports validation of EditorConfigs to check the formatting of your configuration files. By enforcing the canonical rules specified in your `.editorconfig` file, it helps ensure consistent formatting across your project.
## Example
```shell
# Validate all files in the current project using EditorConfig
atmos validate editorconfig
```
### Configuration
To use the `atmos validate editorconfig` command, ensure that your project contains a properly configured `.editorconfig` file at the root level or in relevant directories. This file defines the coding styles for the project, such as indentation, line endings, and character encodings.
```ini
# EditorConfig is awesome: https://editorconfig.org
root = true
[*]
indent_style = space
indent_size = 4
end_of_line = lf
charset = utf-8
trim_trailing_whitespace = true
insert_final_newline = true
[*.md]
trim_trailing_whitespace = false
```
### Output
The `atmos validate editorconfig` command will provide detailed output indicating whether the files comply with the `.editorconfig` rules or if there are any violations. For example:
```console
scenarios/complete/modules/label/context.tf:
267: Wrong amount of left-padding spaces(want multiple of 2)
268: Wrong amount of left-padding spaces(want multiple of 2)
2 errors found
```
### Troubleshooting
If validation fails, review your `.editorconfig` file and ensure the rules align with your project's requirements. You can also run the command with verbose output for more details:
```shell
atmos validate editorconfig --logs-level trace
```
---
## JSON Schema Validation
import Terminal from '@site/src/components/Terminal'
import File from '@site/src/components/File'
import EmbedFile from '@site/src/components/EmbedFile'
import Intro from '@site/src/components/Intro'
Atmos supports [JSON Schema](https://json-schema.org/) validation, which can validate the schema of configurations such as stacks, workflows, and vendoring manifests.
JSON Schema is an industry standard and provides a vocabulary to annotate and validate JSON documents for correctness.
## Example
```shell
# Validate 'vpc' component using JSON Schema in the 'plat-ue2-prod' stack
atmos validate component vpc -s plat-ue2-prod --schema-path vpc/validate-vpc-component.json --schema-type jsonschema
```
### Configure Component Validation
In [`atmos.yaml`](https://github.com/cloudposse/atmos/blob/main/examples/quick-start-advanced/rootfs/usr/local/etc/atmos/atmos.yaml), add the `schemas`
section:
```yaml
# Validation schemas (for validating atmos stacks and components)
schemas:
# https://json-schema.org
jsonschema:
# Can also be set using `ATMOS_SCHEMAS_JSONSCHEMA_BASE_PATH` ENV var, or `--schemas-jsonschema-dir` command-line arguments
# Supports both absolute and relative paths
base_path: "stacks/schemas/jsonschema"
```
In the component [manifest](https://github.com/cloudposse/atmos/blob/main/examples/quick-start-advanced/stacks/catalog/vpc/defaults.yaml), add
the `settings.validation` section:
Add the following JSON Schema in the
file [`stacks/schemas/jsonschema/vpc/validate-vpc-component.json`](https://github.com/cloudposse/atmos/blob/main/examples/quick-start-advanced/stacks/schemas/jsonschema/vpc/validate-vpc-component.json):
---
## Open Policy Agent (OPA) Validation
import Terminal from '@site/src/components/Terminal'
import File from '@site/src/components/File'
import EmbedFile from '@site/src/components/EmbedFile'
import Intro from '@site/src/components/Intro'
The [Open Policy Agent](https://www.openpolicyagent.org/docs/latest/) (OPA) is the open-source industry standard for policy-as-code validation. It provides a general-purpose policy engine to unify policy enforcement across your stacks.
The OPA (pronounced “oh-pa”) language (Rego) is a high-level declarative language for specifying policy as code. Atmos has native support for the OPA decision-making engine to enforce policies across all the components in your stacks (e.g. for microservice configurations).
This is powerful stuff: because you can define many policies, it's possible to apply different policies depending on where a component is defined in the stacks. For example, it could validate differently based on environments or teams.
## Use Cases
Use Open Policy Agent (OPA) policies to validate Atmos stacks and component configurations.
* Validate component config (`vars`, `settings`, `backend`, `env`, `overrides` and other sections) using JSON Schema
* Check if the component config (including relations between different component variables) is correct to allow or deny component provisioning using
OPA/Rego policies
## Usage
Atmos `validate component` command supports `--schema-path`, `--schema-type` and `--module-paths` command line arguments.
If the arguments are not provided, Atmos will try to find and use the `settings.validation` section defined in the component's YAML config.
:::tip
Refer to [atmos validate component](/cli/commands/validate/component) CLI command for more information
:::
```shell
# Validate 'vpc' component using OPA policy in the 'plat-ue2-prod' stack
atmos validate component vpc -s plat-ue2-prod --schema-path vpc/validate-vpc-component.rego --schema-type opa
# Validate 'vpc' component using OPA policy in the 'plat-ue2-dev' stack with additional module paths 'catalog/constants'
atmos validate component vpc -s plat-ue2-dev --schema-path vpc/validate-vpc-component.rego --schema-type opa --module-paths catalog/constants
# Validate 'vpc' component using OPA policy in the 'plat-ue2-dev' stack with additional module paths 'catalog'
atmos validate component vpc -s plat-ue2-dev --schema-path vpc/validate-vpc-component.rego --schema-type opa --module-paths catalog
# Validate 'vpc' component in the 'plat-ue2-prod' stack
atmos validate component vpc -s plat-ue2-prod
# Validate 'vpc' component in the 'plat-ue2-dev' stack
atmos validate component vpc -s plat-ue2-dev
# Validate 'vpc' component in the 'plat-ue2-dev' stack with a timeout of 15 seconds
atmos validate component vpc -s plat-ue2-dev --timeout 15
```
### Configure Component Validation
In [`atmos.yaml`](https://github.com/cloudposse/atmos/blob/main/examples/quick-start-advanced/rootfs/usr/local/etc/atmos/atmos.yaml), add the `schemas`
section:
```yaml
# Validation schemas for OPA for validating atmos stacks and components
schemas:
# https://www.openpolicyagent.org
opa:
# Can also be set using `ATMOS_SCHEMAS_OPA_BASE_PATH` ENV var, or `--schemas-opa-dir` command-line arguments
# Supports both absolute and relative paths
base_path: "stacks/schemas/opa"
```
In the component [manifest](https://github.com/cloudposse/atmos/blob/main/examples/quick-start-advanced/stacks/catalog/vpc/defaults.yaml), add
the `settings.validation` section:
Add the following Rego package in the file [`stacks/schemas/opa/catalog/constants/constants.rego`](https://github.com/cloudposse/atmos/blob/main/examples/quick-start-advanced/stacks/schemas/opa/catalog/constants/constants.rego):
Add the following OPA policy in the file [`stacks/schemas/opa/vpc/validate-vpc-component.rego`](https://github.com/cloudposse/atmos/blob/main/examples/quick-start-advanced/stacks/schemas/opa/vpc/validate-vpc-component.rego):
### Use One Policy File or Many
Atmos supports OPA policies for components validation in a single Rego file and in multiple Rego files.
As shown in the example above, you can define some Rego constants, modules and helper functions in a separate
file `stacks/schemas/opa/catalog/constants/constants.rego`, and then import them into the main policy
file `stacks/schemas/opa/vpc/validate-vpc-component.rego`.
You also need to specify the `module_paths` attribute in the component's `settings.validation` section.
The `module_paths` attribute is an array of filesystem paths (folders or individual files) to the additional modules for schema validation.
Each path can be an absolute path or a path relative to `schemas.opa.base_path` defined in `atmos.yaml`.
If a folder is specified in `module_paths`, Atmos will recursively process the folder and all its sub-folders and load all Rego files into the OPA
engine.
This allows you to separate the common OPA modules, constants and helper functions into a catalog of reusable Rego modules,
and to structure your OPA policies to make them DRY.
## Examples
### Validate VPC Component in Stacks
Run the following commands to validate the component in the stacks:
```console
Mapping public IPs on launch is not allowed in 'prod'. Set 'map_public_ip_on_launch' variable to 'false'
exit status 1
```
```console
In 'dev', only 2 Availability Zones are allowed
VPC name must be a valid string from 2 to 20 alphanumeric chars
exit status 1
```
### Validate Before Provisioning
Try to run the following commands to provision the component in the stacks:
```bash
atmos terraform apply vpc -s plat-ue2-prod
atmos terraform apply vpc -s plat-ue2-dev
```
Since the OPA validation policies don't pass, Atmos does not allow provisioning the component in the stacks:
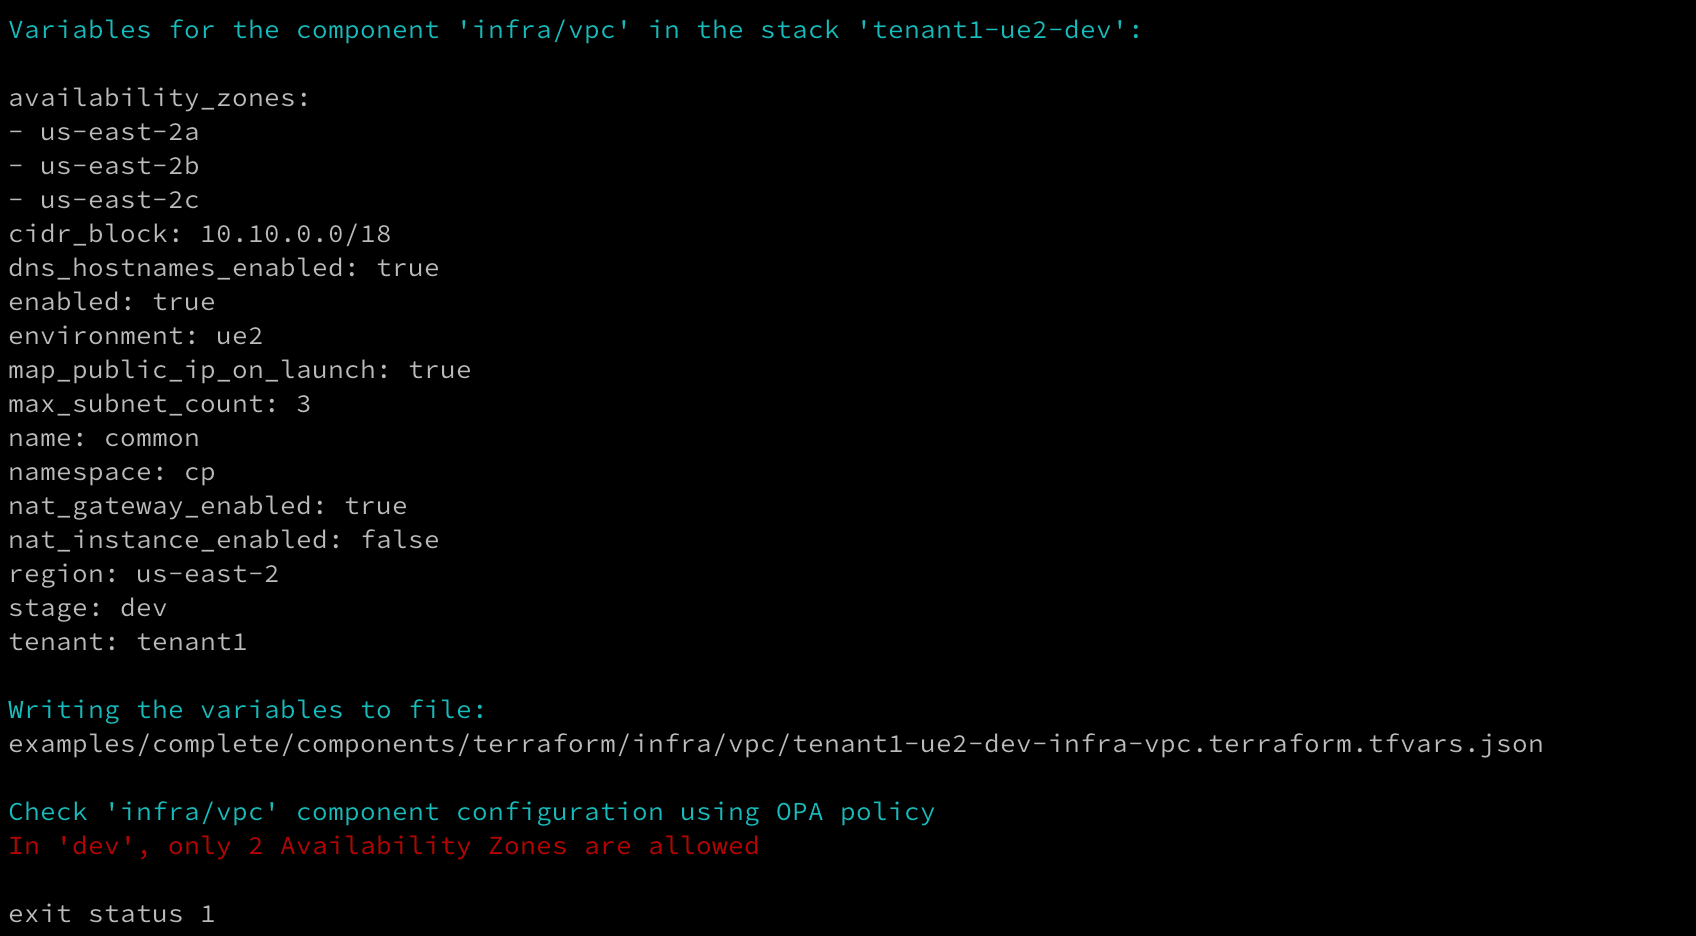

### Advanced Policy Examples
:::note
- If a regex pattern in the 're_match' function contains a backslash to escape special chars (e.g. '\.' or '\-'),
it must be escaped with another backslash when represented as a regular Go string ('\\.', '\\-').
- The reason is that backslash is also used to escape special characters in Go strings like newline (\n).
- If you want to match the backslash character itself, you'll need four slashes.
:::
## Policy Execution Context
Atmos allows enforcing custom governance rules based on metadata about Atmos commands and provides a powerful
policy evaluation mechanism by passing structured metadata to OPA policies at runtime.
This metadata enables fine-grained control over when certain actions (like `terraform apply`) are allowed or denied,
based on the context in which they're executed.
### Policy Metadata
When Atmos runs a command, it supplies an input object to OPA policies that contains detailed contextual information, such as:
- `process_env`: a map of the environment variables in the current process
- `cli_args`: a list of the command line arguments and flags (e.g., executing the `atmos terraform apply` command will generate the `["terraform", "apply"]` list)
- `tf_cli_vars`: a map of variables with proper type conversion from the command-line `-var` arguments
- `env_tf_cli_args`: a list of arguments from the [`TF_CLI_ARGS`](https://developer.hashicorp.com/terraform/cli/config/environment-variables#tf_cli_args-and-tf_cli_args_name) environment variable
- `env_tf_cli_vars`: a map of variables with proper type conversion from the [`TF_CLI_ARGS`](https://developer.hashicorp.com/terraform/cli/config/environment-variables#tf_cli_args-and-tf_cli_args_name) environment variable
- `vars`: a map of variables passed to the command, either via the stack config files or [CLI flags](/core-concepts/validate/terraform-variables)
- other contextual attributes that are returned from the [`atmos describe component`](/cli/commands/describe/component) command for a component in a stack
### Policy Execution Context Example
Below is an OPA policy rule to enforce infrastructure governance during command execution.
Specifically, this rule blocks the execution of `atmos terraform apply` if the variable `foo` is set to the string `"foo"`.
```rego
# 'package atmos' is required in all Atmos OPA policies
package atmos
# Atmos looks for the 'errors' (array of strings) output from all OPA policies
# If the 'errors' output contains one or more error messages, Atmos considers the policy failed
# Don't allow `terraform apply` if the `foo` variable is set to `foo`
# The `input` map contains the `cli_args` attribute (a list of the command line arguments and flags)
errors[message] {
count(input.cli_args) >= 2
input.cli_args[0] == "terraform"
input.cli_args[1] == "apply"
input.vars.foo == "foo"
message = "the component can't be applied if the 'foo' variable is set to 'foo'"
}
```
The rule checks if:
- The `cli_args` list has at least two items
- The command (first item in the `cli_args` list) is `terraform`
- The subcommand (second item in the `cli_args` list) is `apply`
- The variable `foo` is set to `"foo"`
If all conditions are true, the rule generates an error message.
The generated error message is added to the `errors` array.
Atmos interprets the presence of any messages in `errors` as a policy violation and blocks the operation with the
following error:
```console
the component can't be applied if the 'foo' variable is set to 'foo'
exit status 1
```
### Environment and Process Context Examples
The following examples demonstrate how to use the process environment and Terraform CLI context in OPA policies for advanced governance scenarios.
#### Process Environment Variables (`process_env`)
Access environment variables from the current process to enforce security and compliance policies.
```rego
package atmos
# Block operations if running in production without proper approval
errors[message] {
input.process_env.ENVIRONMENT == "production"
not input.process_env.DEPLOYMENT_APPROVED
message = "Production deployments require DEPLOYMENT_APPROVED environment variable"
}
# Ensure required environment variables are set
errors[message] {
required_vars := ["AWS_REGION", "AWS_PROFILE"]
missing_var := required_vars[_]
not input.process_env[missing_var]
message = sprintf("Required environment variable '%s' is not set", [missing_var])
}
# Validate AWS region restrictions
errors[message] {
input.process_env.AWS_REGION
not input.process_env.AWS_REGION in ["us-east-1", "us-west-2", "eu-west-1"]
message = sprintf("AWS region '%s' is not allowed. Use: us-east-1, us-west-2, or eu-west-1", [input.process_env.AWS_REGION])
}
```
#### Terraform CLI Variables (`tf_cli_vars`)
Validate variables passed via command-line `-var` arguments with proper type handling and JSON parsing.
```rego
package atmos
# Validate instance types passed via CLI
errors[message] {
input.tf_cli_vars.instance_type
not input.tf_cli_vars.instance_type in ["t3.micro", "t3.small", "t3.medium"]
message = sprintf("Instance type '%s' not allowed via CLI. Use t3.micro, t3.small, or t3.medium", [input.tf_cli_vars.instance_type])
}
# Validate JSON configuration passed via CLI
errors[message] {
input.tf_cli_vars.config
is_object(input.tf_cli_vars.config)
input.tf_cli_vars.config.encryption_enabled != true
message = "Configuration passed via CLI must have encryption_enabled set to true"
}
# Ensure sensitive variables are not passed via CLI
errors[message] {
sensitive_vars := ["password", "secret", "api_key", "token"]
cli_var := sensitive_vars[_]
input.tf_cli_vars[cli_var]
message = sprintf("Sensitive variable '%s' should not be passed via command line", [cli_var])
}
# Validate numeric ranges for CLI variables
errors[message] {
input.tf_cli_vars.max_instances
is_number(input.tf_cli_vars.max_instances)
input.tf_cli_vars.max_instances > 10
message = sprintf("max_instances cannot exceed 10, got %d", [input.tf_cli_vars.max_instances])
}
```
#### TF_CLI_ARGS Environment (`env_tf_cli_args`)
Parse and validate arguments from the `TF_CLI_ARGS` environment variable.
```rego
package atmos
# Block dangerous flags in TF_CLI_ARGS
errors[message] {
dangerous_flags := ["-auto-approve", "-force", "-lock=false"]
flag := dangerous_flags[_]
flag in input.env_tf_cli_args
input.process_env.ENVIRONMENT == "production"
message = sprintf("Flag '%s' is not allowed in production via TF_CLI_ARGS", [flag])
}
# Require planfile for apply (positional, not a flag)
errors[message] {
some i
input.cli_args[i] == "apply"
# next token exists and is not a flag -> planfile path
i+1 < count(input.cli_args)
not startswith(input.cli_args[i+1], "-")
# Optionally, enforce a prefix/dir policy for plan files
not allowed_planfile(input.cli_args[i+1])
message = "Apply must use an approved plan file generated by 'terraform plan -out=...'"
}
allowed_planfile(p) {
startswith(p, "plans/")
}
# Validate parallelism settings
errors[message] {
some i
# equals form: -parallelism=50
startswith(input.env_tf_cli_args[i], "-parallelism=")
parallelism := to_number(replace(input.env_tf_cli_args[i], "-parallelism=", ""))
parallelism > 20
message = sprintf("Parallelism cannot exceed 20, got %d", [parallelism])
}
errors[message] {
some i
# space form: -parallelism 50
input.env_tf_cli_args[i] == "-parallelism"
i + 1 < count(input.env_tf_cli_args)
parallelism := to_number(input.env_tf_cli_args[i+1])
parallelism > 20
message = sprintf("Parallelism cannot exceed 20, got %d", [parallelism])
}
```
#### TF_CLI_ARGS Variables (`env_tf_cli_vars`)
Access and validate variables extracted from `TF_CLI_ARGS` with JSON type conversion.
```rego
package atmos
# Validate environment-specific constraints
errors[message] {
input.env_tf_cli_vars.environment == "production"
input.env_tf_cli_vars.instance_count
is_number(input.env_tf_cli_vars.instance_count)
input.env_tf_cli_vars.instance_count < 2
message = "Production environment requires at least 2 instances"
}
# Validate complex JSON configurations from TF_CLI_ARGS
errors[message] {
input.env_tf_cli_vars.networking_config
is_object(input.env_tf_cli_vars.networking_config)
not input.env_tf_cli_vars.networking_config.vpc_id
message = "Networking configuration must include vpc_id"
}
# Cross-validate CLI args and environment variables
errors[message] {
input.env_tf_cli_vars.region
input.process_env.AWS_REGION
input.env_tf_cli_vars.region != input.process_env.AWS_REGION
message = sprintf("Region mismatch: TF_CLI_ARGS region '%s' != AWS_REGION '%s'", [
input.env_tf_cli_vars.region,
input.process_env.AWS_REGION
])
}
# Validate resource naming conventions from environment variables
errors[message] {
input.env_tf_cli_vars.resource_name
not regex.match("^[a-z][a-z0-9-]*[a-z0-9]$", input.env_tf_cli_vars.resource_name)
message = sprintf("Resource name '%s' must be lowercase alphanumeric with hyphens", [input.env_tf_cli_vars.resource_name])
}
# Ensure cost controls are in place
errors[message] {
input.env_tf_cli_vars.instance_type
expensive_types := ["m5.large", "m5.xlarge", "c5.large", "c5.xlarge"]
input.env_tf_cli_vars.instance_type in expensive_types
not input.env_tf_cli_vars.cost_center
message = sprintf("Expensive instance type '%s' requires cost_center to be specified", [input.env_tf_cli_vars.instance_type])
}
```
### Combined Context Validation
Leverage multiple context sources for comprehensive governance policies.
```rego
package atmos
# Comprehensive validation combining all context sources
errors[message] {
# Check if this is a production apply operation
"apply" in input.cli_args
(input.process_env.ENVIRONMENT == "production" or
input.vars.environment == "production" or
input.tf_cli_vars.environment == "production" or
input.env_tf_cli_vars.environment == "production")
# Ensure proper approval workflow
not production_approved
message = "Production deployments require proper approval workflow"
}
# Helper rule for production approval
production_approved {
input.process_env.DEPLOYMENT_APPROVED == "true"
input.process_env.APPROVED_BY
input.process_env.APPROVAL_TICKET
}
# Validate consistency across all variable sources
errors[message] {
sources := [
object.get(input.vars, "environment", null),
object.get(input.tf_cli_vars, "environment", null),
object.get(input.env_tf_cli_vars, "environment", null),
object.get(input.process_env, "ATMOS_ENVIRONMENT", null)
]
# Remove null/undefined values
defined_envs := [env | env := sources[_]; env != null; env != ""]
# Check if all defined environments match
count(defined_envs) > 1
not all_equal(defined_envs)
message = sprintf("Environment mismatch across sources: %v", [defined_envs])
}
# Helper function to check if all elements in array are equal
all_equal(arr) {
count(arr) <= 1
}
all_equal(arr) {
count(arr) > 1
first := arr[0]
all_match := [x | x := arr[_]; x == first]
count(all_match) == count(arr)
}
# Validate resource limits based on environment context
errors[message] {
environment := get_environment
environment == "development"
total_instances := get_total_instances
total_instances > 5
message = sprintf("Development environment limited to 5 instances, requested %d", [total_instances])
}
# Helper to get environment from any source
get_environment := env {
env := input.vars.environment
env != null
env != ""
}
get_environment := env {
env := input.tf_cli_vars.environment
env != null
env != ""
}
get_environment := env {
env := input.env_tf_cli_vars.environment
env != null
env != ""
}
get_environment := env {
env := input.process_env.ATMOS_ENVIRONMENT
env != null
env != ""
}
# Helper to calculate total instances from all sources
get_total_instances := total {
instance_counts := [
object.get(input.vars, "instance_count", null),
object.get(input.tf_cli_vars, "instance_count", null),
object.get(input.env_tf_cli_vars, "instance_count", null)
]
valid_counts := [n | n := instance_counts[_]; is_number(n)]
total := sum(valid_counts)
}
```
### Best Practices for Context-Aware Policies
1. **Environment Consistency**: Always validate that environment settings are consistent across all input sources
2. **Security First**: Use `process_env` to enforce security requirements like required credentials and approval workflows
3. **Type Safety**: Leverage Rego's type checking functions (`is_number`, `is_object`, etc.) when working with parsed JSON from CLI variables
4. **Graceful Handling**: Check for null/undefined values before processing to avoid policy evaluation errors
5. **Clear Messages**: Provide specific error messages that indicate which context source triggered the violation
6. **Separation of Concerns**: Create focused policies for different aspects (security, compliance, cost control) rather than monolithic rules
---
## Terraform Input Variables Validation
import Terminal from '@site/src/components/Terminal'
import File from '@site/src/components/File'
import EmbedFile from '@site/src/components/EmbedFile'
import Intro from '@site/src/components/Intro'
Use [Open Policy Agent](https://www.openpolicyagent.org/docs/latest/) (OPA) policies to validate Terraform input variables.
## Introduction
When executing `atmos terraform ` commands, you can provide
[Terraform input variables](https://developer.hashicorp.com/terraform/language/values/variables) on the command line
using the `-var` flag. These variables will override the variables configured in Atmos stack manifests.
For example:
```shell
atmos terraform apply -s -- -var name=api
atmos terraform apply -s -- -var name=api -var 'tags={"Team":"api", "Group":"web"}'
```
:::tip
Use double-dash `--` to signify the end of the options for Atmos and the start
of the additional native arguments and flags for the Terraform commands.
Refer to [Terraform CLI commands usage](/cli/commands/terraform/usage) for more details.
:::
:::info
Terraform processes variables in the following order of precedence (from highest to lowest):
- Explicit `-var` flags: these variables have the highest priority and will override any other variable values, including those specified in `--var-file`.
- Variables in `--var-file`: values in a variable file override default values set in the Terraform configuration.
Atmos generates varfiles from stack configurations and provides it to Terraform using the `--var-file` flag.
- Environment variables: variables set as environment variables using the `TF_VAR_` prefix.
- Default values in the Terraform configuration files: these have the lowest priority.
:::
When log level `Trace` is used, Atmos prints the Terraform variables specified on the command line in the "CLI variables" output.
For example:
```console
ATMOS_LOGS_LEVEL=Trace /
atmos terraform apply my-component -s plat-ue2-dev -- -var name=api -var 'tags={"Team":"api", "Group":"web"}'
Variables for the component 'my-component' in the stack 'plat-ue2-dev':
environment: ue2
namespace: cp
region: us-east-2
stage: dev
tenant: plat
Writing the variables to file:
components/terraform/my-component/plat-ue2-dev-my-component.terraform.tfvars.json
CLI variables (will override the variables defined in the stack manifests):
name: api
tags:
Team: api
Group: web
```
Atmos exposes the Terraform variables passed on the command line in the `tf_cli_vars` section, and also provides access to
the variables from the [`TF_CLI_ARGS`](https://developer.hashicorp.com/terraform/cli/config/environment-variables#tf_cli_args-and-tf_cli_args_name)
environment variable in the `env_tf_cli_vars` section. Both can be used in OPA policies for validation.
## Terraform Variables Validation using OPA Policies
In `atmos.yaml`, configure the `schemas.opa` section:
```yaml
# Validation schemas
schemas:
# https://www.openpolicyagent.org
opa:
# Can also be set using `ATMOS_SCHEMAS_OPA_BASE_PATH` ENV var, or `--schemas-opa-dir` command-line arguments
# Supports both absolute and relative paths
base_path: "stacks/schemas/opa"
```
In the component manifest, add the `settings.validation` section to point to the OPA policy file:
```yaml
components:
terraform:
my-component:
settings:
# All validation steps must succeed to allow the component to be provisioned
validation:
check-template-functions-test-component-with-opa-policy:
schema_type: opa
# 'schema_path' can be an absolute path or a path relative to 'schemas.opa.base_path' defined in `atmos.yaml`
schema_path: "my-component/validate-my-component.rego"
description: Check 'my-component' component using OPA policy
# Validation timeout in seconds
timeout: 5
```
### Require a Terraform variable to be specified on the command line
If you need to enforce that a Terraform variable must be specified on the command line (and not in Atmos stack manifests),
add the following OPA policy in the file `stacks/schemas/opa/my-component/validate-my-component.rego`
```rego
# 'package atmos' is required in all `atmos` OPA policies
package atmos
# Atmos looks for the 'errors' (array of strings) output from all OPA policies.
# If the 'errors' output contains one or more error messages, Atmos considers the policy failed.
errors["for the 'my-component' component, the variable 'name' must be provided on the command line using the '-var' flag"] {
not input.tf_cli_vars.name
}
```
When executing the following command (and not passing the `name` variable on the command line), Atmos will validate
the component using the OPA policy, which will fail and prevent the component from being provisioned:
```console
atmos terraform apply my-component -s plat-ue2-dev
Validating the component 'my-component' using OPA file 'my-component/validate-my-component.rego'
for the 'my-component' component, the variable 'name' must be provided on the command line using the '-var' flag
```
On the other hand, when passing the `name` variable on the command line using the `-var name=api` flag, the command will succeed:
```shell
atmos terraform apply my-component -s plat-ue2-dev -- -var name=api
```
### Restrict a Terraform variable from being provided on the command line
If you need to prevent a Terraform variable from being passed (and overridden) on the command line,
add the following OPA policy in the file `stacks/schemas/opa/my-component/validate-my-component.rego`
```rego
package atmos
errors["for the 'my-component' component, the variable 'name' cannot be overridden on the command line using the '-var' flag"] {
input.tf_cli_vars.name
}
```
When executing the following command, Atmos will validate the component using the OPA policy, which will fail and prevent
the component from being provisioned:
```console
atmos terraform apply my-component -s plat-ue2-dev -- -var name=api
Validating the component 'my-component' using OPA file 'my-component/validate-my-component.rego'
for the 'my-component' component, the variable 'name' cannot be overridden on the command line using the '-var' flag
```
This command will pass the validation and succeed:
```shell
atmos terraform apply my-component -s plat-ue2-dev
```
## Environment Variables Validation using OPA Policies
In addition to `tf_cli_vars` (which contains variables passed via `-var` flags on the command line),
Atmos also provides access to the variables through the `env_tf_cli_vars` section passed via the `TF_CLI_ARGS` environment variable.
### Require a variable to be set via the `TF_CLI_ARGS` environment variable
If you need to enforce that a specific Terraform variable must be set, add the following OPA policy:
```rego
package atmos
errors["for the 'my-component' component, 'environment' must be set in the 'TF_CLI_ARGS' environment variable"] {
not input.env_tf_cli_vars.environment
}
```
This policy will fail if the `'environment'` variable is not set in the 'TF_CLI_ARGS' environment variable.
```console
# This will fail validation
atmos terraform apply my-component -s plat-ue2-dev
# This will pass validation
TF_CLI_ARGS="-var environment=production" atmos terraform apply my-component -s plat-ue2-dev
```
### Validate environment variable values
You can also validate the actual values of variables passed via `TF_CLI_ARGS`. For example, to ensure that the `environment` variable is set to one of the allowed values:
```rego
package atmos
# Define allowed environment values
allowed_environments := ["development", "staging", "production"]
errors["for the 'my-component' component, 'environment' variable in TF_CLI_ARGS must be one of: development, staging, production"] {
input.env_tf_cli_vars.environment
not input.env_tf_cli_vars.environment in allowed_environments
}
```
### Combine command-line and environment variable validation
You can create policies that validate both command-line variables (`tf_cli_vars`) and environment variables (`env_tf_cli_vars`) together:
```rego
package atmos
# Ensure that if a variable is set via TF_CLI_ARGS, it cannot be overridden via command line
errors["for the 'my-component' component, when 'environment' is set in TF_CLI_ARGS, it cannot be overridden with -var"] {
input.env_tf_cli_vars.environment
input.tf_cli_vars.environment
}
# Require either TF_CLI_ARGS variable OR command-line variable, but not both
errors["for the 'my-component' component, 'environment' must be specified either via TF_CLI_ARGS or -var, but not both"] {
input.env_tf_cli_vars.environment
input.tf_cli_vars.environment
}
# Require at least one method of setting the environment
errors["for the 'my-component' component, 'environment' must be specified via either TF_CLI_ARGS or -var flag"] {
not input.env_tf_cli_vars.environment
not input.tf_cli_vars.environment
}
```
### Complex validation with type checking
Variables passed via `TF_CLI_ARGS` are automatically parsed and converted to their appropriate types when possible, so you can validate their format and values:
```rego
package atmos
import rego.v1
# Validate that instance_count is a valid number
errors["for the 'my-component' component, 'instance_count' in TF_CLI_ARGS must be a valid positive integer"] {
input.env_tf_cli_vars.instance_count
input.env_tf_cli_vars.instance_count <= 0
}
# Validate that tags is a valid object
errors["for the 'my-component' component, 'tags' in TF_CLI_ARGS must be a valid object"] {
input.env_tf_cli_vars.tags
not is_object(input.env_tf_cli_vars.tags)
}
# Validate specific object structure
errors["for the 'my-component' component, 'tags' in TF_CLI_ARGS must contain 'Environment' key"] {
input.env_tf_cli_vars.tags
is_object(input.env_tf_cli_vars.tags)
not input.env_tf_cli_vars.tags.Environment
}
errors["for the 'my-component' component, 'tags' in TF_CLI_ARGS must contain 'Team' key"] {
input.env_tf_cli_vars.tags
is_object(input.env_tf_cli_vars.tags)
not input.env_tf_cli_vars.tags.Team
}
```
:::tip
Variables in `env_tf_cli_vars` are automatically parsed and converted to their appropriate types when possible. For example:
- `TF_CLI_ARGS="-var count=5"` becomes `input.env_tf_cli_vars.count` with integer value `5`
- `TF_CLI_ARGS="-var enabled=true"` becomes `input.env_tf_cli_vars.enabled` with boolean value `true`
- `TF_CLI_ARGS='-var tags={"env":"prod"}'` becomes `input.env_tf_cli_vars.tags` with object value `{"env":"prod"}`
This makes it easier to write OPA policies that work with the actual data types rather than just strings.
:::
:::info
The `env_tf_cli_vars` section provides a way to validate and control variables passed via the `TF_CLI_ARGS` environment variable, complementing the `tf_cli_vars` section which handles command-line variables.
Together, they give you complete control over how variables are passed to Terraform.
:::
---
## Validating Stack Configurations
import Terminal from '@site/src/components/Terminal'
import File from '@site/src/components/File'
import Intro from '@site/src/components/Intro'
Validation is essential for ensuring clean and correct configurations, especially in environments where multiple teams contribute
to the development and deployment processes.
Atmos enhances this validation process in three significant ways with [JSON Schema](https://json-schema.org/), [OPA](https://www.openpolicyagent.org/) policies, and the [EditorConfig Checker](https://github.com/editorconfig-checker/editorconfig-checker).
## Types of Validation
Atmos supports three types of native validation.
### JSON Schema
Atmos supports [JSON Schema](https://json-schema.org/) validation, which can validate the schema of configurations such as stacks, workflows, and vendoring manifests.
JSON Schema is an industry standard and provides a vocabulary to annotate and validate JSON documents for correctness.
### Open Policy Agent (OPA)
The [Open Policy Agent](https://www.openpolicyagent.org/docs/latest/) (OPA, pronounced “oh-pa”) is another open-source industry standard that provides
a general-purpose policy engine to unify policy enforcement across your stacks.
The OPA language (Rego) is a high-level declarative language for specifying policy as code.
Atmos has native support for the OPA decision-making engine to enforce policies across all the components in your stacks (e.g., for microservice configurations).
This is powerful stuff: because you can define many policies, it's possible to validate components differently for different environments or teams.
### EditorConfig Checker
The [EditorConfig Checker](https://github.com/editorconfig-checker/editorconfig-checker) is a tool that ensures adherence to the rules defined in your `.editorconfig` file. This ensures consistency in coding styles across teams, which is particularly important in collaborative environments. Atmos supports running the EditorConfig Checker to validate the configurations in your project.
## Validate Your Configurations
### Validate Components
To validate an Atmos component in a stack, execute the `validate component` command:
```shell
atmos validate component --stack
```
:::tip
Refer to [atmos validate component](/cli/commands/validate/component) CLI command for more information on how to validate Atmos components
:::
### Check Your Stacks
To validate all Stack configurations and YAML syntax, execute the `validate stacks` command:
```shell
atmos validate stacks
```
The command checks and validates the following:
- All YAML manifest files for YAML errors and inconsistencies
- All imports: if they are configured correctly, have valid data types, and point to existing manifest files
- Schema: if all sections in all YAML manifest files are correctly configured and have valid data types
- Misconfiguration and duplication of components in stacks. If the same Atmos component in the same Atmos stack is
defined in more than one stack manifest file, and the component configurations are different, an error message will
be displayed similar to the following:
```console
The Atmos component 'vpc' in the stack 'plat-ue2-dev' is defined in more than one
top-level stack manifest file: orgs/acme/plat/dev/us-east-2-extras, orgs/acme/plat/dev/us-east-2.
The component configurations in the stack manifest are different.
To check and compare the component configurations in the stack manifests, run the following commands:
- atmos describe component vpc -s orgs/acme/plat/dev/us-east-2-extras
- atmos describe component vpc -s orgs/acme/plat/dev/us-east-2
You can use the '--file' flag to write the results of the above commands to files
(refer to https://atmos.tools/cli/commands/describe/component).
You can then use the Linux 'diff' command to compare the files line by line and show the differences
(refer to https://man7.org/linux/man-pages/man1/diff.1.html)
When searching for the component 'vpc' in the stack 'plat-ue2-dev', Atmos can't decide which
stack manifest file to use to get the configuration for the component. This is a stack misconfiguration.
Consider the following solutions to fix the issue:
- Ensure that the same instance of the Atmos 'vpc' component in the stack 'plat-ue2-dev'
is only defined once (in one YAML stack manifest file)
- When defining multiple instances of the same component in the stack,
ensure each has a unique name
- Use multiple-inheritance to combine multiple configurations together
(refer to https://atmos.tools/core-concepts/stacks/inheritance)
```
## Validate Atmos Manifests using JSON Schema
Atmos uses the [Atmos Manifest JSON Schema](pathname:///schemas/atmos/atmos-manifest/1.0/atmos-manifest.json) to validate Atmos manifests, and has a default (embedded) JSON Schema.
If you don't configure the path to a JSON Schema in `atmos.yaml` and don't provide it on the command line using the `--schemas-atmos-manifest` flag,
the default (embedded) JSON Schema will be used when executing the command `atmos validate stacks`.
To override the default behavior, configure JSON Schema in `atmos.yaml`:
- Add the [Atmos Manifest JSON Schema](pathname:///schemas/atmos/atmos-manifest/1.0/atmos-manifest.json) to your repository, for example
in [`stacks/schemas/atmos/atmos-manifest/1.0/atmos-manifest.json`](https://github.com/cloudposse/atmos/blob/main/examples/quick-start-advanced/stacks/schemas/atmos/atmos-manifest/1.0/atmos-manifest.json)
- Configure the following section in the `atmos.yaml` [CLI config file](/cli/configuration)
```yaml title="atmos.yaml"
# Validation schemas (for validating atmos stacks and components)
schemas:
# JSON Schema to validate Atmos manifests
atmos:
# Can also be set using 'ATMOS_SCHEMAS_ATMOS_MANIFEST' ENV var, or '--schemas-atmos-manifest' command-line arguments
# Supports both absolute and relative paths (relative to the `base_path` setting in `atmos.yaml`)
manifest: "stacks/schemas/atmos/atmos-manifest/1.0/atmos-manifest.json"
# Also supports URLs
# manifest: "https://atmos.tools/schemas/atmos/atmos-manifest/1.0/atmos-manifest.json"
```
- Instead of configuring the `schemas.atmos.manifest` section in `atmos.yaml`, you can provide the path to
the [Atmos Manifest JSON Schema](pathname:///schemas/atmos/atmos-manifest/1.0/atmos-manifest.json) file by using the ENV variable `ATMOS_SCHEMAS_ATMOS_MANIFEST`
or the `--schemas-atmos-manifest` command line flag:
```shell
ATMOS_SCHEMAS_ATMOS_MANIFEST=stacks/schemas/atmos/atmos-manifest/1.0/atmos-manifest.json atmos validate stacks
atmos validate stacks --schemas-atmos-manifest stacks/schemas/atmos/atmos-manifest/1.0/atmos-manifest.json
atmos validate stacks --schemas-atmos-manifest https://atmos.tools/schemas/atmos/atmos-manifest/1.0/atmos-manifest.json
```
:::tip
For more details, refer to [`atmos validate stacks`](/cli/commands/validate/stacks) CLI command
:::
---
## Component Manifest
import File from '@site/src/components/File'
import Terminal from '@site/src/components/Terminal'
import Intro from '@site/src/components/Intro'
Atmos natively supports the concept of "vendoring" individual components by defining a `component.yaml` inside of the component directory, which is making a copy of 3rd-party components or other dependencies in your own repo.
## Examples
### Vendoring using `component.yaml` manifest
After defining the `component.yaml` vendoring manifest, the remote component can be downloaded by running the following command:
```shell
atmos vendor pull -c components/terraform/vpc
```
:::tip
Refer to [`atmos vendor pull`](/cli/commands/vendor/pull) CLI command for more details
:::
### Vendoring Components from a Monorepo
To vendor a component, create a `component.yaml` file stored inside the `components/_type_/_name_/` folder (e.g. `components/terraform/vpc/`).
The schema of a `component.yaml` file is as follows:
```yaml
apiVersion: atmos/v1
kind: ComponentVendorConfig
metadata:
name: vpc-flow-logs-bucket-vendor-config
description: Source and mixins config for vendoring of 'vpc-flow-logs-bucket' component
spec:
source:
# Source 'uri' supports the following protocols: OCI (https://opencontainers.org), Git, Mercurial, HTTP, HTTPS, Amazon S3, Google GCP,
# and all URL and archive formats as described in https://github.com/hashicorp/go-getter
# See https://atmos.tools/core-concepts/vendor/url-syntax for complete URL syntax documentation
# In 'uri', Golang templates are supported https://pkg.go.dev/text/template
# If 'version' is provided, '{{.Version}}' will be replaced with the 'version' value before pulling the files from 'uri'
# To vendor a module from a Git repo, use the following format: 'github.com/cloudposse/terraform-aws-ec2-instance.git//modules/name?ref={{.Version}}
uri: github.com/cloudposse/terraform-aws-components.git//modules/vpc-flow-logs-bucket?ref={{.Version}}
version: 1.398.0
# Only include the files that match the 'included_paths' patterns
# If 'included_paths' is not specified, all files will be matched except those that match the patterns from 'excluded_paths'
# 'included_paths' support POSIX-style Globs for file names/paths (double-star/globstar `**` is supported)
# https://en.wikipedia.org/wiki/Glob_(programming)
# https://github.com/bmatcuk/doublestar#patterns
included_paths:
- "**/*.tf"
- "**/*.tfvars"
- "**/*.md"
# Exclude the files that match any of the 'excluded_paths' patterns
# Note that we are excluding 'context.tf' since a newer version of it will be downloaded using 'mixins'
# 'excluded_paths' support POSIX-style Globs for file names/paths (double-star/globstar `**` is supported)
excluded_paths:
- "**/context.tf"
# Mixins override files from 'source' with the same 'filename' (e.g. 'context.tf' will override 'context.tf' from the 'source')
# All mixins are processed in the order they are declared in the list.
mixins:
# https://github.com/hashicorp/go-getter/issues/98
- uri: https://raw.githubusercontent.com/cloudposse/terraform-null-label/0.25.0/exports/context.tf
filename: context.tf
- uri: https://raw.githubusercontent.com/cloudposse/terraform-aws-components/{{.Version}}/modules/datadog-agent/introspection.mixin.tf
version: 1.398.0
filename: introspection.mixin.tf
```
:::warning
The `glob` library that Atmos uses to download remote artifacts does not treat the double-star `**` as including sub-folders.
If the component's folder has sub-folders, and you need to vendor them, they have to be explicitly defined as in the following example.
:::
```yaml title="component.yaml"
spec:
source:
uri: github.com/cloudposse/terraform-aws-components.git//modules/vpc-flow-logs-bucket?ref={{.Version}}
version: 1.398.0
included_paths:
- "**/**"
# If the component's folder has the `modules` sub-folder, it needs to be explicitly defined
- "**/modules/**"
```
### Vendoring Modules as Components
Any terraform module can also be used as a component, provided that Atmos backend
generation ([`auto_generate_backend_file` is `true`](/cli/configuration/components)) is enabled. Use this strategy when you want to use the module
directly, without needing to wrap it in a component to add additional functionality. This is essentially treating a terraform child module as a root
module.
To vendor a module as a component, simply create a `component.yaml` file stored inside the `components/_type_/_name_/` folder
(e.g. `components/terraform/ec2-instance/component.yaml`).
The schema of a `component.yaml` file for a module is as follows.
Note the usage of the `///` in the `uri`, which is to vendor from the root of the remote repository.
```yaml
apiVersion: atmos/v1
kind: ComponentVendorConfig
metadata:
name: ec2-instance
description: Source for vendoring of 'ec2-instance' module as a component
spec:
source:
# To vendor a module from a Git repo, use the following format: 'github.com/cloudposse/terraform-aws-ec2-instance.git///?ref={{.Version}}
uri: github.com/cloudposse/terraform-aws-ec2-instance.git///?ref={{.Version}}
version: 0.47.1
# Only include the files that match the 'included_paths' patterns
# 'included_paths' support POSIX-style Globs for file names/paths (double-star/globstar `**` is supported)
included_paths:
- "**/*.tf"
- "**/*.tfvars"
- "**/*.md"
```
### Vendoring Components from OCI Registries
Atmos supports vendoring components from [OCI registries](https://opencontainers.org).
To specify a repository in an OCI registry, use the `oci:///:tag` scheme in the `sources` and `mixins`.
Components from OCI repositories are downloaded as Docker image tarballs, then all the layers are processed, un-tarred and un-compressed,
and the component's source files are written into the component's directory.
For example, to vendor the `vpc` component from the `public.ecr.aws/cloudposse/components/terraform/stable/aws/vpc`
[AWS public ECR registry](https://docs.aws.amazon.com/AmazonECR/latest/public/public-registries.html), use the following `uri`:
```yaml
uri: "oci://public.ecr.aws/cloudposse/components/terraform/stable/aws/vpc:latest"
```
The schema of a `component.yaml` file is as follows:
```yaml
# This is an example of how to download a Terraform component from an OCI registry (https://opencontainers.org), e.g. AWS Public ECR
# 'component.yaml' in the component folder is processed by the 'atmos' commands:
# 'atmos vendor pull -c infra/vpc' or 'atmos vendor pull --component infra/vpc'
apiVersion: atmos/v1
kind: ComponentVendorConfig
metadata:
name: stable/aws/vpc
description: Config for vendoring of the 'stable/aws/vpc' component
spec:
source:
# Source 'uri' supports the following protocols: OCI (https://opencontainers.org), Git, Mercurial, HTTP, HTTPS, Amazon S3, Google GCP,
# and all URL and archive formats as described in https://github.com/hashicorp/go-getter
# In 'uri', Golang templates are supported https://pkg.go.dev/text/template
# If 'version' is provided, '{{.Version}}' will be replaced with the 'version' value before pulling the files from 'uri'
# Download the component from the AWS public ECR registry (https://docs.aws.amazon.com/AmazonECR/latest/public/public-registries.html)
uri: "oci://public.ecr.aws/cloudposse/components/terraform/stable/aws/vpc:{{.Version}}"
version: "latest"
# Only include the files that match the 'included_paths' patterns
# If 'included_paths' is not specified, all files will be matched except those that match the patterns from 'excluded_paths'
# 'included_paths' support POSIX-style Globs for file names/paths (double-star `**` is supported)
# https://en.wikipedia.org/wiki/Glob_(programming)
# https://github.com/bmatcuk/doublestar#patterns
included_paths:
- "**/*.*"
```
---
## Vendor URL Syntax
import File from '@site/src/components/File'
import Terminal from '@site/src/components/Terminal'
import Intro from '@site/src/components/Intro'
import Tabs from '@theme/Tabs'
import TabItem from '@theme/TabItem'
Atmos vendor sources support a wide variety of URL schemes and path formats for pulling external components, stacks, and configurations. Understanding the URL syntax helps you effectively vendor dependencies from any source.
## URL Schemes
Atmos vendoring is built on [HashiCorp's go-getter library](https://github.com/hashicorp/go-getter), with additional support for OCI registries and smart defaults for Git hosting platforms.
### Supported Schemes
| Scheme | Description | Example |
|--------|-------------|---------|
| ` `(no scheme) | Implicit HTTPS for Git hosts | `github.com/owner/repo.git?ref=v1.0` |
| `https://` | HTTPS protocol | `https://github.com/owner/repo.git//path?ref=v1.0` |
| `git::` | Explicit Git protocol | `git::https://github.com/owner/repo.git?ref=v1.0` |
| `oci://` | OCI registries (Atmos extension) | `oci://ghcr.io/owner/image:tag` |
| `file://` | Local filesystem | `file:///absolute/path/to/components` |
| `ssh://` | SSH protocol | `ssh://git@github.com/owner/repo.git` |
| SCP-style | SSH shorthand | `git@github.com:owner/repo.git` |
:::tip
Most of the time, you can use the **simplest form** without an explicit scheme. Atmos will automatically detect the right protocol.
:::
## Subdirectory Syntax
One of the most powerful features is the **subdirectory delimiter** that lets you vendor only a specific directory from a repository.
### The Double-Slash Delimiter
The double-slash (`//`) is a special delimiter (not a path separator) that separates:
1. **Left side**: The source to download (repository URL, archive, etc.)
2. **Right side**: The subdirectory within that source to extract
```yaml
source: "github.com/cloudposse-terraform-components/aws-vpc.git//modules/public-subnets?ref=1.398.0"
```
**Result:** Clones the repository and extracts only the `modules/public-subnets` subdirectory.
```yaml
source: "github.com/cloudposse-terraform-components/aws-s3-bucket.git//.?ref=v5.7.0"
```
**Result:** Clones the repository and uses the root directory (`.` means current directory).
```yaml
source: "github.com/cloudposse-terraform-components/aws-vpc.git?ref=v1.0"
```
**Result:** For Git URLs without a subdirectory, Atmos automatically adds `//.` for you (root of repository).
### Common Patterns
| Pattern | What It Means | When To Use |
|---------|---------------|-------------|
| `repo.git//path/to/dir` | Extract `path/to/dir` subdirectory | When you only need a specific directory |
| `repo.git//.` | Extract root directory | When you need the entire repository |
| `repo.git` | No subdirectory specified | Atmos adds `//.` automatically for Git URLs |
:::caution Deprecated: Triple-Slash Pattern
The triple-slash pattern (`///`) was used in older Atmos versions to indicate the root directory:
```yaml
# Old syntax (still works but deprecated)
source: "github.com/owner/repo.git///?ref=v1.0"
# New syntax (explicit and clear)
source: "github.com/owner/repo.git//.?ref=v1.0"
```
Atmos automatically normalizes the triple-slash pattern for backward compatibility, but we recommend using `//.` for clarity.
:::
## Query Parameters
Query parameters are appended to the URL and control how the source is downloaded.
### Common Parameters
| Parameter | Description | Example |
|-----------|-------------|---------|
| `ref=` | Git reference (branch, tag, commit) | `?ref=main` or `?ref=v1.0.0` |
| `depth=` | Git clone depth (shallow clone) | `?depth=1` |
| `sshkey=` | Path to SSH private key | `?sshkey=~/.ssh/id_rsa` |
:::tip Automatic Shallow Clones
Atmos automatically adds `depth=1` to Git clones for faster downloads. You can override this by explicitly setting `depth`.
:::
### Examples
```yaml
source: "github.com/cloudposse-terraform-components/aws-vpc.git?ref=v1.398.0"
```
```yaml
source: "github.com/cloudposse/atmos.git//examples?ref=main"
```
```yaml
source: "github.com/cloudposse-terraform-components/aws-vpc.git?ref=a1b2c3d4"
```
```yaml
source: "github.com/cloudposse-terraform-components/aws-vpc.git?ref=main&depth=10"
```
## URL Patterns by Platform
### Implicit HTTPS (recommended)
```yaml
# Simple - implicit HTTPS, root directory
source: "github.com/cloudposse-terraform-components/aws-vpc.git?ref=v1.398.0"
```
### With Subdirectory
```yaml
# Clone and extract specific subdirectory
source: "github.com/cloudposse-terraform-components/aws-vpc.git//modules/public-subnets?ref=v1.398.0"
```
### Explicit git:: Protocol
```yaml
# Explicit git protocol
source: "git::https://github.com/cloudposse/atmos.git//examples?ref=main"
```
### SSH Authentication
```yaml
# SSH protocol (requires SSH key setup)
source: "git::ssh://git@github.com/cloudposse-terraform-components/aws-vpc.git?ref=v1.0.0"
# Or SCP-style shorthand
source: "git@github.com:cloudposse-terraform-components/aws-vpc.git?ref=v1.0.0"
```
### With Credentials (Not Recommended)
```yaml
# HTTPS with embedded credentials (not recommended, use tokens)
source: "https://user:password@github.com/owner/repo.git?ref=v1.0"
```
:::tip Token Authentication
Atmos automatically injects GitHub tokens from `ATMOS_GITHUB_TOKEN` or `GITHUB_TOKEN` environment variables. No need to embed credentials in URLs!
:::
### Implicit HTTPS
```yaml
# Simple - implicit HTTPS
source: "gitlab.com/group/project.git?ref=v1.0.0"
```
### With Subdirectory
```yaml
# Extract specific directory
source: "gitlab.com/group/project.git//terraform/modules?ref=main"
```
:::tip GitLab Token Authentication
Set `ATMOS_GITLAB_TOKEN` or `GITLAB_TOKEN` for automatic authentication.
:::
### Implicit HTTPS
```yaml
# Simple - implicit HTTPS
source: "bitbucket.org/owner/repo.git?ref=main"
```
### With Subdirectory
```yaml
# Extract specific directory
source: "bitbucket.org/owner/repo.git//infrastructure?ref=main"
```
:::tip Bitbucket Token Authentication
Set `ATMOS_BITBUCKET_TOKEN` or `BITBUCKET_TOKEN` for automatic authentication.
:::
### Azure DevOps Repositories
```yaml
# Azure DevOps Git repositories
source: "dev.azure.com/organization/project/_git/repository//path?ref=main"
```
### Self-Hosted Git Servers
```yaml
# Any self-hosted Git server
source: "git.company.com/team/repository.git//modules?ref=v1.0.0"
# With explicit HTTPS
source: "https://git.company.com/team/repository.git?ref=v1.0.0"
```
Atmos supports pulling artifacts from OCI-compatible registries like GitHub Container Registry (ghcr.io), AWS ECR, Google Artifact Registry, and more.
### OCI Syntax
```yaml
source: "oci:////:"
```
### GitHub Container Registry
```yaml
source: "oci://ghcr.io/cloudposse/components/vpc:v1.0.0"
```
### AWS ECR Public
```yaml
source: "oci://public.ecr.aws/cloudposse/components/terraform/stable/aws/vpc:latest"
```
### Docker Hub
```yaml
source: "oci://docker.io/library/nginx:alpine"
```
:::info OCI Authentication
OCI registries use standard container registry authentication. Ensure you're logged in with `docker login` or equivalent.
:::
## Local Paths
### Relative Paths
```yaml
# Relative to vendor.yaml location
source: "../../../components/terraform/mixins"
```
### Absolute Paths
```yaml
# Absolute filesystem path
source: "/absolute/path/to/components"
```
### file:// URI
```yaml
# file:// URI (gets converted to absolute path)
source: "file:///path/to/local/components"
```
:::caution Path Traversal Security
Atmos validates local paths to prevent directory traversal attacks. Paths with `..` are carefully validated.
:::
## HTTP/HTTPS Downloads
### Archive Files
```yaml
# Download and extract archives
source: "https://example.com/components.tar.gz"
source: "https://example.com/components.zip"
```
### Single Files
```yaml
# Download a single file
source: "https://raw.githubusercontent.com/cloudposse/terraform-null-label/0.25.0/exports/context.tf"
```
## Template Variables
Atmos supports Go templates in vendor URLs for dynamic configuration.
### Available Variables
| Variable | Description | Example |
|----------|-------------|---------|
| `{{.Component}}` | Component name | Replaced with the value of `component:` field |
| `{{.Version}}` | Component version | Replaced with the value of `version:` field |
### Example
```yaml
sources:
- component: "vpc"
source: "github.com/cloudposse-terraform-components/aws-{{.Component}}.git?ref={{.Version}}"
version: "1.398.0"
targets:
- "components/terraform/{{.Component}}"
```
**Result:** Downloads from `aws-vpc` repository at version `1.398.0` to `components/terraform/vpc`.
## Authentication
### Token Injection
Atmos automatically injects tokens for supported platforms:
| Platform | Environment Variables | Username |
|----------|----------------------|----------|
| GitHub | `ATMOS_GITHUB_TOKEN` or `GITHUB_TOKEN` | `x-access-token` |
| GitLab | `ATMOS_GITLAB_TOKEN` or `GITLAB_TOKEN` | `oauth2` |
| Bitbucket | `ATMOS_BITBUCKET_TOKEN` or `BITBUCKET_TOKEN` | `x-token-auth` |
### SSH Keys
For SSH-based Git access:
```yaml
# SSH with default key (~/.ssh/id_rsa)
source: "git@github.com:owner/private-repo.git?ref=main"
# SSH with custom key
source: "git@github.com:owner/private-repo.git?ref=main&sshkey=~/.ssh/custom_key"
```
### Embedded Credentials
```yaml
# Not recommended: credentials in URL
source: "https://username:password@github.com/owner/repo.git?ref=v1.0"
```
:::danger Security Warning
Embedding credentials in URLs is **not recommended**. Use environment variables for tokens or SSH keys instead.
:::
## Best Practices
### 1. Use Explicit Versions
```yaml
# Pin to specific version
source: "github.com/cloudposse-terraform-components/aws-vpc.git?ref=v1.398.0"
```
```yaml
# Unpinned version (follows branch HEAD)
source: "github.com/cloudposse-terraform-components/aws-vpc.git?ref=main"
```
### 2. Use Subdirectories When Needed
```yaml
# ✅ Extract specific subdirectory from a repository
source: "github.com/cloudposse-terraform-components/aws-vpc.git//modules/public-subnets?ref=v1.398.0"
# ✅ Use root directory (no subdirectory needed)
source: "github.com/cloudposse-terraform-components/aws-vpc.git?ref=v1.398.0"
```
### 3. Use Token Authentication
```bash
# Set GitHub token
export ATMOS_GITHUB_TOKEN=ghp_xxxxxxxxxxxxxxxxxxxxxxxxxxxxxxxxxxxx
# Or use standard GitHub token
export GITHUB_TOKEN=ghp_xxxxxxxxxxxxxxxxxxxxxxxxxxxxxxxxxxxx
```
### 4. Prefer OCI for Binary Artifacts
```yaml
# ✅ OCI for container images and binary artifacts
source: "oci://ghcr.io/cloudposse/components/terraform/stable/aws/vpc:v1.0.0"
# ✅ Git for source code
source: "github.com/cloudposse-terraform-components/aws-vpc.git?ref=v1.398.0"
```
## Troubleshooting
### Empty Directories After Vendor Pull
**Symptom:** `atmos vendor pull` creates directories but no files are pulled.
**Causes:**
1. Using triple-slash (`///`) instead of double-slash-dot (`//.`) for root directory
2. Incorrect subdirectory path
3. Files excluded by `excluded_paths` or `included_paths` glob patterns
**Solution:**
```yaml
# ✅ Correct: Use //. for root
source: "github.com/owner/repo.git//.?ref=v1.0"
# ❌ Avoid: Triple-slash (deprecated)
source: "github.com/owner/repo.git///?ref=v1.0"
```
### Authentication Failures
**Symptom:** `fatal: Authentication failed` or `permission denied`
**Solution:**
1. Verify token is set: `echo $ATMOS_GITHUB_TOKEN`
2. Check token has correct permissions (repo access)
3. For SSH: Verify SSH keys are set up (`ssh -T git@github.com`)
### Rate Limits
**Symptom:** `API rate limit exceeded`
**Solution:** Set authentication tokens to increase rate limits:
- GitHub: 60 req/hr (unauthenticated) → 5,000 req/hr (authenticated)
- GitLab: Similar improvements with tokens
- Bitbucket: Token required for most operations
## Related Documentation
- [Vendor Manifest](/core-concepts/vendor/vendor-manifest) - Complete vendor.yaml reference
- [Vendor Pull Command](/cli/commands/vendor/pull) - CLI command documentation
- [go-getter Documentation](https://github.com/hashicorp/go-getter) - Underlying library reference
- [OCI Distribution Spec](https://github.com/opencontainers/distribution-spec) - OCI registry specification
---
## Vendor Manifest
import File from '@site/src/components/File'
import Terminal from '@site/src/components/Terminal'
import Intro from '@site/src/components/Intro'
import CollapsibleText from '@site/src/components/CollapsibleText'
The vendoring configuration is defined in the `vendor.yaml` manifest (vendor config file). The vendoring manifest is used to make copies of 3rd-party components, stacks, and other artifacts in your own repository.
It functions a little bit like the `packages.json` file in Node.js or the `go.mod` file in Go, but for infrastructure code.
## How it works
Atmos searches for the vendoring manifest in the following locations and uses the first one found:
- In the directory from which the [`atmos vendor pull`](/cli/commands/vendor/pull) command is executed, usually in the root of the infrastructure repo
- In the directory pointed to by the [`base_path`](/cli/configuration/#base-path) setting in the [`atmos.yaml`](/cli/configuration) CLI config file
After defining the `vendor.yaml` manifest, all the remote artifacts can be downloaded by running the following command:
```shell
atmos vendor pull
```
To vendor a particular component or other artifact, execute the following command:
```shell
atmos vendor pull -c
```
To vendor components and artifacts tagged with specific tags, execute the following command:
```shell
atmos vendor pull --tags ,
```
:::tip
Refer to [`atmos vendor pull`](/cli/commands/vendor/pull) CLI command for more details
:::
## Vendoring Manifest
To vendor remote artifacts, create a `vendor.yaml` file similar to the example below:
```yaml
apiVersion: atmos/v1
kind: AtmosVendorConfig
metadata:
name: example-vendor-config
description: Atmos vendoring manifest
spec:
# `imports` or `sources` (or both) must be defined in a vendoring manifest
imports:
- "vendor/vendor2"
- "vendor/vendor3.yaml"
sources:
# `source` supports the following protocols: local paths (absolute and relative), OCI (https://opencontainers.org),
# Git, Mercurial, HTTP, HTTPS, Amazon S3, Google GCP,
# and all URL and archive formats as described in https://github.com/hashicorp/go-getter.
# See https://atmos.tools/core-concepts/vendor/url-syntax for complete URL syntax documentation.
# In 'source' and 'targets', Golang templates are supported https://pkg.go.dev/text/template.
# Currently the fields '{{.Component}}' and '{{.Version}}' are supported.
# Download the component from the AWS public ECR registry (https://docs.aws.amazon.com/AmazonECR/latest/public/public-registries.html).
- component: "vpc"
source: "oci://public.ecr.aws/cloudposse/components/terraform/stable/aws/vpc:{{.Version}}"
version: "latest"
targets:
- "components/terraform/infra/vpc3"
# Only include the files that match the 'included_paths' patterns.
# If 'included_paths' is not specified, all files will be matched except those that match the patterns from 'excluded_paths'.
# 'included_paths' support POSIX-style Globs for file names/paths (double-star `**` is supported).
# https://en.wikipedia.org/wiki/Glob_(programming)
# https://github.com/bmatcuk/doublestar#patterns
included_paths:
- "**/*.tf"
- "**/*.tfvars"
- "**/*.md"
# Tags can be used to vendor component that have the specific tags
# `atmos vendor pull --tags test`
# Refer to https://atmos.tools/cli/commands/vendor/pull
tags:
- test
- networking
- component: "vpc-flow-logs-bucket"
source: "github.com/cloudposse-terraform-components/aws-vpc-flow-logs-bucket.git?ref={{.Version}}"
version: "1.323.0"
targets:
- "components/terraform/infra/{{.Component}}/{{.Version}}"
excluded_paths:
- "**/*.yaml"
- "**/*.yml"
# Tags can be used to vendor component that have the specific tags
# `atmos vendor pull --tags networking,storage`
# Refer to https://atmos.tools/cli/commands/vendor/pull
tags:
- test
- storage
- component: "vpc-mixin-1"
source: "https://raw.githubusercontent.com/cloudposse/terraform-null-label/0.25.0/exports/context.tf"
targets:
- "components/terraform/infra/vpc3"
# Tags can be used to vendor component that have the specific tags
# `atmos vendor pull --tags test`
# Refer to https://atmos.tools/cli/commands/vendor/pull
tags:
- test
- component: "vpc-mixin-2"
# Copy a local file into a local folder (keeping the same file name)
# This `source` is relative to the current folder
source: "components/terraform/mixins/context.tf"
targets:
- "components/terraform/infra/vpc3"
# Tags can be used to vendor component that have the specific tags
# `atmos vendor pull --tags test`
# Refer to https://atmos.tools/cli/commands/vendor/pull
tags:
- test
- component: "vpc-mixin-3"
# Copy a local folder into a local folder
# This `source` is relative to the current folder
source: "components/terraform/mixins"
targets:
- "components/terraform/infra/vpc3"
# Tags can be used to vendor component that have the specific tags
# `atmos vendor pull --tags test`
# Refer to https://atmos.tools/cli/commands/vendor/pull
tags:
- test
- component: "vpc-mixin-4"
# Copy a local file into a local file with a different file name
# This `source` is relative to the current folder
source: "components/terraform/mixins/context.tf"
targets:
- "components/terraform/infra/vpc3/context-copy.tf"
# Tags can be used to vendor component that have the specific tags
# `atmos vendor pull --tags test`
# Refer to https://atmos.tools/cli/commands/vendor/pull
tags:
- test
```
With this configuration, it would be possible to run the following commands:
```shell
# atmos vendor pull
# atmos vendor pull --everything
# atmos vendor pull --component vpc-mixin-1
# atmos vendor pull -c vpc-mixin-2
# atmos vendor pull -c vpc-mixin-3
# atmos vendor pull -c vpc-mixin-4
# atmos vendor pull --tags test
# atmos vendor pull --tags networking,storage
```
## Vendoring Manifest Schema
The `vendor.yaml` vendoring manifest supports Kubernetes-style YAML config to describe vendoring configuration for components, stacks,
and other artifacts. The file is placed into the directory from which the `atmos vendor pull` command is executed (usually the root of the repo).
- `version`
-
The `version` attribute is used to specify the version of the artifact to download. The `version` attribute is used in the `source` and `targets` attributes as a template parameter using `{{ .Version }}`.
- `source`
-
The `source` attribute supports all protocols (local files, Git, Mercurial, HTTP, HTTPS, Amazon S3, Google GCP), and all the URL and archive formats as described in [go-getter](https://github.com/hashicorp/go-getter), and also the `oci://` scheme to download artifacts from [OCI registries](https://opencontainers.org).
See [Vendor URL Syntax](/core-concepts/vendor/url-syntax) for complete documentation on supported URL formats, authentication, and subdirectory syntax.
**IMPORTANT:** Include the `{{ .Version }}` parameter in your `source` URI to ensure the correct version of the artifact is downloaded.
For example, for `http` and `https` sources, use the following format:
```yaml
source: "github.com/cloudposse-terraform-components/aws-vpc-flow-logs-bucket.git?ref={{.Version}}"
```
For private Git repositories, prepend the URI with `git::` and use the following format to pass a environment variable with the GitHub token:
```yaml
source: "git::https://{{env "GITHUB_TOKEN"}}@github.com/some-org/some-private-repo/terraform/vpc.git?ref={{.Version}}"
```
Note, that `GITHUB_TOKEN` provided by GitHub Actions are only valid for the current repository, or repositories marked as `internal` within GitHub Enterprise organizations. For cross-repository access, make sure you provision a [fine grained token](https://docs.github.com/en/rest/authentication/permissions-required-for-fine-grained-personal-access-tokens?apiVersion=2022-11-28) with the necessary permissions.
- `ref`
-
Pass the `ref` as a query string with either the tag, branch, or commit hash to download the correct version of the artifact. e.g. `?ref={{.Version}}` will pass the `version` attribute to the `ref` query string.
- `depth`
-
Pass the `depth` as a query string to download only the specified number of commits from the repository. e.g. `?depth=1` will download only the latest commit.
- `targets`
-
The `targets` in each source supports absolute paths and relative paths (relative to the `vendor.yaml` file). Note: if the `targets` paths
are set as relative, and if the `vendor.yaml` file is detected by Atmos using the `base_path` setting in `atmos.yaml`, the `targets` paths
will be considered relative to the `base_path`. Multiple targets can be specified.
- `included_paths` and `excluded_paths`
-
`included_paths` and `excluded_paths` support [POSIX-style greedy Globs](https://en.wikipedia.org/wiki/Glob_(programming)) for filenames/paths (double-star/globstar `**` is supported as well). For more details, see [Vendoring with Globs](#vendoring-with-globs).
- `component`
-
The `component` attribute in each source is optional. It's used in the `atmos vendor pull -- component ` command if the component is passed in. In this case, Atmos will vendor only the specified component instead of vendoring all the artifacts configured in the `vendor.yaml` manifest.
- `source` and `targets` templates
-
The `source` and `targets` attributes support [Go templates](https://pkg.go.dev/text/template) and [Sprig Functions](http://masterminds.github.io/sprig/). This can be used to templatise the `source` and `targets` paths with the component name specified in the `component` attribute and artifact versions specified in the `version` attribute.
Here's an advanced example showcasing how templates and Sprig functions can be used together with `targets`:
```yaml
targets:
# Vendor a component into a major-minor versioned folder like 1.2
- "components/terraform/infra/vpc-flow-logs-bucket/{{ (first 2 (splitList \".\" .Version)) | join \".\" }}"
```
- `tags`
-
The `tags` in each source specifies a list of tags to apply to the component. This allows you to only vendor the components that have the specified tags by executing a command `atmos vendor pull --tags ,`
- `imports`
-
The `imports` section defines the additional vendoring manifests that are merged into the main manifest. Hierarchical imports are supported at many levels (one vendoring manifest can import another, which in turn can import other manifests, etc.). Atmos processes all imports and all sources in the imported manifests in the order they are defined.
:::note
The imported file extensions are optional. Imports that do not include file extensions will default to the `.yaml` extension.
:::
```yaml title="vendor.yaml"
spec:
sources:
- component: "vpc-flow-logs-bucket"
source: "github.com/cloudposse-terraform-components/aws-vpc-flow-logs-bucket.git?ref={{.Version}}"
version: "1.323.0"
targets:
- "components/terraform/vpc-flow-logs-bucket"
included_paths:
- "**/**"
# If the component's folder has the `modules` sub-folder, it needs to be explicitly defined
- "**/modules/**"
```
:::warning
The `glob` library that Atmos uses to download remote artifacts does not treat the double-star `**` as including sub-folders.
If the component's folder has sub-folders, and you need to vendor them, they have to be explicitly defined as in the following example.
:::
## Template Parameters
The vendor manifest supports basic template parameters, which is useful for versioning and other dynamic values. The following template parameters are supported:
- `{{ .Component }}`
-
Refers to the `component` attribute in the current section. The `component` attribute is used to specify the component name. This is useful to vendor components into folders by the same name.
```yaml
targets:
- "components/terraform/{{ .Component }}"
```
- `{{ .Version }}`
-
Refers to the `version` attribute the current section. The `version` attribute is used to specify the version of the artifact to download. This is useful to version components into different folders.
```yaml
targets:
- "components/terraform/{{ .Component }}/{{ .Version }}"
```
When stacks need to pin to different versions of the same component, the `{{ .Version }}` template parameter can be used to ensure the components are vendored into different folders.
You can also use any of the [hundreds of go-template functions](/functions/template). For example, to extract the major and minor version from the `{{ .Version }}` attribute, use the following template:
```yaml
targets:
- "components/terraform/{{ .Component }}/{{ (first 2 (splitList \".\" .Version)) | join \".\" }}"
```
Or to access an environment variable in the `source` attribute, use the following template:
```yaml
source: "git::https://{{env "GITHUB_TOKEN"}}@github.com/some-org/some-private-repo/terraform/{{ .Component }}/{{ .Version }}.git?ref={{.Version}}"
```
This will enable vendoring to download the component into a versioned folder from a private repository, by reading the GitHub token from the `GITHUB_TOKEN` environment variable.
## Hierarchical Imports in Vendoring Manifests
Use `imports` to split the main `vendor.yaml` manifest into smaller files for maintainability, or by their roles in the infrastructure.
For example, import separate manifests for networking, security, data management, CI/CD, and other layers:
```yaml
imports:
- "layers/networking"
- "layers/security"
- "layers/data"
- "layers/analytics"
- "layers/firewalls"
- "layers/cicd"
```
Hierarchical imports are supported at many levels. For example, consider the following vendoring configurations:
```yaml
apiVersion: atmos/v1
kind: AtmosVendorConfig
metadata:
name: example-vendor-config
description: Atmos vendoring manifest
spec:
imports:
- "vendor/vendor2"
- "vendor/vendor3"
sources:
- component: "vpc"
source: "oci://public.ecr.aws/cloudposse/components/terraform/stable/aws/vpc:{{.Version}}"
version: "latest"
targets:
- "components/terraform/infra/vpc3"
- component: "vpc-flow-logs-bucket"
source: "github.com/cloudposse-terraform-components/aws-vpc-flow-logs-bucket.git?ref={{.Version}}"
version: "1.323.0"
targets:
- "components/terraform/infra/vpc-flow-logs-bucket/{{.Version}}"
```
```yaml
apiVersion: atmos/v1
kind: AtmosVendorConfig
metadata:
name: example-vendor-config-2
description: Atmos vendoring manifest
spec:
imports:
- "vendor/vendor4"
sources:
- component: "my-vpc1"
source: "oci://public.ecr.aws/cloudposse/components/terraform/stable/aws/vpc:{{.Version}}"
version: "1.0.2"
targets:
- "components/terraform/infra/my-vpc1"
```
```yaml
apiVersion: atmos/v1
kind: AtmosVendorConfig
metadata:
name: example-vendor-config-4
description: Atmos vendoring manifest
spec:
imports:
- "vendor/vendor5"
sources:
- component: "my-vpc4"
source: "github.com/cloudposse-terraform-components/aws-vpc.git?ref={{.Version}}"
version: "1.319.0"
targets:
- "components/terraform/infra/my-vpc4"
```
When you execute the `atmos vendor pull` command, Atmos processes the import chain and the sources in the imported manifests in the order they
are defined:
- First, the main `vendor.yaml` file is read based on search paths
- The `vendor/vendor2` and `vendor/vendor3` manifests (defined in the main `vendor.yaml` file) are imported
- The `vendor/vendor2` file is processed, and the `vendor/vendor4` manifest is imported
- The `vendor/vendor4` file is processed, and the `vendor/vendor5` manifest is imported
- Etc.
- Then all the sources from all the imported manifests are processed and the artifacts are downloaded into the paths defined by the `targets`
```shell
> atmos vendor pull
Processing vendor config file 'vendor.yaml'
Pulling sources for the component 'my-vpc6' from 'github.com/cloudposse-terraform-components/aws-vpc.git?ref=1.315.0' into 'components/terraform/infra/my-vpc6'
Pulling sources for the component 'my-vpc5' from 'github.com/cloudposse-terraform-components/aws-vpc.git?ref=1.317.0' into 'components/terraform/infra/my-vpc5'
Pulling sources for the component 'my-vpc4' from 'github.com/cloudposse-terraform-components/aws-vpc.git?ref=1.319.0' into 'components/terraform/infra/my-vpc4'
Pulling sources for the component 'my-vpc1' from 'public.ecr.aws/cloudposse/components/terraform/stable/aws/vpc:1.0.2' into 'components/terraform/infra/my-vpc1'
Pulling sources for the component 'my-vpc2' from 'github.com/cloudposse-terraform-components/aws-vpc.git?ref=1.320.0' into 'components/terraform/infra/my-vpc2'
Pulling sources for the component 'vpc' from 'public.ecr.aws/cloudposse/components/terraform/stable/aws/vpc:latest' into 'components/terraform/infra/vpc3'
Pulling sources for the component 'vpc-flow-logs-bucket' from 'github.com/cloudposse-terraform-components/aws-vpc-flow-logs-bucket.git?ref=1.323.0' into 'components/terraform/infra/vpc-flow-logs-bucket/1.323.0'
```
## Vendoring Multiple Versions of Components
Atmos supports vendoring multiple versions of the same component. This is useful when you need to pin stacks to different versions of the same component.
When vendoring multiple versions of the same component, use the `{{ .Version }}` template parameter in the `targets` attribute to ensure the components are vendored into different folders. Then update the stack configuration to point to the correct version of the component, and ensure the `backend.s3.workspace_key_prefix` is defined _without the version_ to ensure you can seamlessly upgrade between versions of a component without losing the state. By default the `workspace_key_prefix` incorporates the `component` relative path, which will include the version if it's included in the path.
```
components:
terraform:
# `vpc` is the Atmos component name
vpc:
# Backend configuration for the component
backend:
s3:
# Ensure the path in the bucket is stable across versions
# IMPORTANT: If not explicitly set, the `workspace_key_prefix` will include the version
# This will cause the state to be lost when upgrading between versions.
workspace_key_prefix: vpc
metadata:
# Point to the Terraform component on the filesystem
component: vpc/1.2.3
```
:::important
If not using the S3 backend, use the appropriate parameter for your backend to ensure the workspace is stable across versions of the component deployed.
:::
## Vendoring from OCI Registries
Atmos supports vendoring from [OCI registries](https://opencontainers.org).
To specify a repository in an OCI registry, use the `oci:///:tag` scheme.
Artifacts from OCI repositories are downloaded as Docker image tarballs, then all the layers are processed, un-tarred and un-compressed,
and the files are written into the directories specified by the `targets` attribute of each `source`.
For example, to vendor the `vpc` component from the `public.ecr.aws/cloudposse/components/terraform/stable/aws/vpc`
[AWS public ECR registry](https://docs.aws.amazon.com/AmazonECR/latest/public/public-registries.html), use the following `source`:
```yaml
# This is an example of how to download a Terraform component from an OCI registry (https://opencontainers.org), e.g. AWS Public ECR
apiVersion: atmos/v1
kind: AtmosVendorConfig
metadata:
name: example-vendor-config
description: Atmos vendoring manifest
spec:
sources:
- component: "vpc"
source: "oci://public.ecr.aws/cloudposse/components/terraform/stable/aws/{{ .Component }}:{{ .Version }}"
version: "latest"
targets:
- "components/terraform/{{ .Component }}"
included_paths:
- "**/*.tf"
- "**/*.tfvars"
- "**/*.md"
excluded_paths: []
```
To vendor the `vpc` component, execute the following command:
```bash
atmos vendor pull -c vpc
```
## Vendoring with Globs
In Atmos, **glob patterns** define which files and directories are included or excluded during vendoring. These patterns go beyond simple wildcard characters like `*`—they follow specific rules that dictate how paths are matched. Understanding the difference between **greedy** (`**`) and **non-greedy** (`*`) patterns, along with other advanced glob syntax, ensures precise control over vendoring behavior.
### Understanding Wildcards, Ranges, and Recursion
Glob patterns in Atmos provide flexible and powerful matching, that's simpler to understand than regular expressions:
- `*` (single asterisk)
- Matches any sequence of characters within a single path segment.
- Example: `vendor/*.yaml` matches `vendor/config.yaml` but not `vendor/subdir/config.yaml`.
- `**` (double asterisk, also known as a "greedy glob")
- Matches across multiple path segments recursively.
- Example: `vendor/**/*.yaml` matches `vendor/config.yaml`, `vendor/subdir/config.yaml`, and `vendor/deep/nested/config.yaml`.
- `?` (question mark)
- Matches exactly one character in a path segment.
- Example: `file?.txt` matches `file1.txt` and `fileA.txt` but not `file10.txt`.
- `[abc]` (character class)
- Matches any single character inside the brackets.
- Example: `file[123].txt` matches `file1.txt`, `file2.txt`, and `file3.txt`, but not `file4.txt` or `file12.txt`.
- `[a-z]` (character range)
- Matches any single character within the specified range.
- Example: `file[a-c].txt` matches `filea.txt`, `fileb.txt`, and `filec.txt`.
- `{a,b,c}` (brace expansion)
- Matches any of the comma-separated patterns.
- Example: `*.{jpg,png,gif}` matches `image.jpg`, `image.png`, and `image.gif`.
This distinction is important when excluding specific directories or files while vendoring.
#### Example: Excluding a Subdirectory
Consider the following configuration:
```yaml
included_paths:
- "**/demo-library/**"
excluded_paths:
- "**/demo-library/**/stargazers/**"
```
How it works:
- The `included_paths` rule `**/demo-library/**` ensures all files inside `demo-library` (at any depth) are vendored.
- The `excluded_paths` rule `**/demo-library/**/stargazers/**` prevents any files inside `stargazers` subdirectories from being vendored.
This means:
- All files within `demo-library` except those inside any `stargazers` subdirectory are vendored.
- Any other files outside `stargazers` are unaffected by this exclusion.
#### Example: A Non-Recursive Pattern That Doesn't Work
```yaml
included_paths:
- "**/demo-library/*"
excluded_paths:
- "**/demo-library/**/stargazers/**"
```
In this case:
- `**/demo-library/*` only matches immediate children of `demo-library`, not nested files or subdirectories.
- This means `stargazers/` itself could be matched, but its contents might not be explicitly excluded.
- To correctly capture all subdirectories and files while still excluding stargazers, use `**/demo-library/**/*`.
Using `{...}` for Multiple Extensions or Patterns
Curly braces `{...}` allow for expanding multiple patterns into separate glob matches. This is useful when selecting multiple file types or directories within a single glob pattern.
#### Example: Matching Multiple File Extensions
```yaml
included_paths:
- "**/demo-library/**/*.{tf,md}"
```
This is equivalent to writing:
```yaml
included_paths:
- "**/demo-library/**/*.tf"
- "**/demo-library/**/*.md"
```
The `{tf,md}` part expands to both `*.tf` and `*.md`, making the rule more concise.
#### Example: Excluding Multiple Directories
```yaml
excluded_paths:
- "**/demo-library/**/{stargazers,archive}/**"
```
This excludes both:
- `**/demo-library/**/stargazers/**`
- `**/demo-library/**/archive/**`
Using `{...}` here prevents the need to write two separate exclusion rules.
## Key Takeaways
1. Use `**/` for recursive matching to include everything inside a directory.
2. Use `*` for single-segment matches, which won't include deeper subdirectories.
3. Use `{...}` to match multiple extensions or directories within a single pattern.
4. Exclusion rules must match nested paths explicitly when trying to exclude deep directories.
By carefully combining `included_paths`, `excluded_paths`, and `{...}` expansion, you can precisely control which files are vendored while ensuring unwanted directories are omitted.
---
## Vendoring
import File from '@site/src/components/File'
import Terminal from '@site/src/components/Terminal'
import Intro from '@site/src/components/Intro'
Atmos natively supports "vendoring," a practice that involves replicating 3rd-party components, stacks, and artifacts within your own repository. This feature is particularly beneficial for managing dependencies in software like Terraform, which do not support pulling root modules remotely by configuration.
Vendoring standardizes dependency management, encourages enterprise component reuse, and ensures compliance standards adherence. Furthermore, it allows teams to customize and independently manage their vendored components according to their specific requirements.
## Use-cases
Atmos vendoring streamlines component sharing and version control across an enterprise, enhancing efficiency and collaboration while offering the flexibility to customize and manage multiple versions of dependencies, ensuring best practices in DevOps environments.
- **Sharing Components Across an Enterprise**: Utilize Atmos vendoring to access a centralized component library, promoting code reuse and
efficiency across teams (or business units) while enabling customization and independent version control post-vendoring. This approach enhances collaboration without sacrificing the flexibility for teams to tailor components to their specific needs or update them at their preferred pace.
- **Managing Multiple Versions of Dependencies:** Use Atmos vendoring to manage multiple versions of remote dependencies,
effectively implementing version pinning through locally controlled artifacts. By configuring a stacks component directory (e.g., `vpc/v1` or `vpc/v2`), vendoring provides maximum flexibility while still aligning with best practices in DevOps environments.
- **Reinforce Immutable Infrastructure**: Employ Atmos vendoring to store immutable infrastructure artifacts, guaranteeing that once a committed,
it remains unaltered throughout its lifecycle, ensuring stability and reliability in deployments.
## Types of Vendoring
Atmos supports two different ways of vendoring components:
- [**Vendor Manifest**](/core-concepts/vendor/vendor-manifest) Using `vendor.yaml` vendoring manifest file containing a list of all dependencies.
- [**Component Manifest**](/core-concepts/vendor/vendor-manifest) Using `component.yaml` manifest file inside of a component directory. See below.
The `vendor.yaml` vendoring manifest describes the vendoring config for all components, stacks and other artifacts for the entire infrastructure.
The file is placed into the directory from which the `atmos vendor pull` command is executed. It's the recommended way to describe vendoring
configurations.
:::tip
Refer to [`Atmos Vendoring`](/core-concepts/vendor) for more details
:::
The `component.yaml` vendoring manifest is used to vendor components from remote repositories.
A `component.yaml` file placed into a component's directory is used to describe the vendoring config for one component only.
:::tip Pro Tip! Use GitOps
Vendoring plays nicely with GitOps practices, especially when leveraging [GitHub Actions](/integrations/github-actions/).
Use a workflow that automatically updates the vendor manifest and opens a pull request (PR) with all the changes.
This allows you to inspect and precisely assess the impact of any upgrades before merging by reviewing the job summary of the PR.
:::
## Features
With Atmos vendoring, you can copy components and other artifacts from the following sources:
- Copy all files from an [OCI Registry](https://opencontainers.org) into a local folder
- Copy all files from Git, Mercurial, Amazon S3, Google GCP into a local folder
- Copy all files from an HTTP/HTTPS endpoint into a local folder
- Copy a single file from an HTTP/HTTPS endpoint to a local file
- Copy a local file into a local folder (keeping the same file name)
- Copy a local file to a local file with a different file name
- Copy a local folder (all files) into a local folder
Our implementation is primarily inspired by the excellent tool by VMware Tanzu, called [`vendir`](https://github.com/vmware-tanzu/carvel-vendir).
While Atmos does not call `vendir`, it functions and supports a subset of the configuration that is very similar.
---
## Workflows
import File from '@site/src/components/File'
import Terminal from '@site/src/components/Terminal'
import Intro from '@site/src/components/Intro'
Workflows are a way of combining multiple commands into one executable unit of work.
You can use [Atmos Custom Commands](/core-concepts/custom-commands) in Atmos Workflows, and Atmos Workflows in [Atmos Custom Commands](/core-concepts/custom-commands)
## Simple Example
Here's an example workflow called `eks-up` which runs a few commands that will bring up the EKS cluster:
```yaml title=stacks/workflows/workflow1.yaml
workflows:
eks-up:
description: |
Bring up the EKS cluster.
steps:
- command: terraform apply vpc -auto-approve
- command: terraform apply eks/cluster -auto-approve
- command: terraform apply eks/alb-controller -auto-approve
```
## Retry Configuration
The `command` section of the workflow schema has been updated to allow for retrying of failed commands. The `retry` section
accepts the following parameters:
* `max_attempts`: The maximum number of times the command will be retried. The default is `1`.
* `delay`: The amount of time to delay between retries. The default is `5s`.
* `backoff_strategy`: The backoff strategy to use. The default is `constant`. The other options are `exponential` and `linear`.
* `initial_delay`: The initial delay to use when retrying. The default is `5s`.
* `random_jitter`: the random jitter number to the delay between retries. The default is `0.0`.
* `multiplier`: The multiplier to use when retrying. The default is `2`.
* `max_elapsed_time`: The maximum time allocated to the command before the retry fails. The default is 30 minutes.
Here is an example of a workflow with retry configuration:
```
workflows:
eks-up:
description: Bring up the eks cluster
steps:
- command: terraform apply vpc -auto-approve
retry:
max_attempts: 3
backoff_strategy: exponential # could be exponential, constant and linear
initial_delay: 3s # the time used by the backoff_strategy
random_jitter: 0.0 # the random jitter to be added while retrying.
multiplier: 2 # used during exponential strategy as multiplier that would be raised by configuration
max_elapsed_time: 4m # Default (30 min for all commands). This sets the total duration alloated to the command before the retry fails.
- command: terraform apply eks/cluster -auto-approve
- command: terraform apply eks/alb-controller -auto-approve
```
:::note
The workflow name can be anything you want, and the workflow can also accept command-line parameters (e.g. stack name)
:::
If you define this workflow in the file `workflow1.yaml`, it can we executed like this to provision
the `vpc`, `eks/cluster` and `eks/alb-controller` [Atmos Components](/core-concepts/components) into
the `tenant1-ue2-dev` [Atmos Stack](/core-concepts/stacks):
```shell
atmos workflow eks-up -f workflow1 --stack tenant1-ue2-dev
```
:::tip
Refer to [`atmos workflow`](/cli/commands/workflow) for the complete description of the CLI command
:::
## Configuration
To configure and execute Atmos workflows, follow these steps:
- Configure workflows in [`atmos.yaml` CLI config file](/cli/configuration)
- Create workflow files and define workflows using the workflow schema
### Configure Workflows in `atmos.yaml`
In `atmos.yaml` CLI config file, add the following sections related to Atmos workflows:
```yaml
# Base path for components, stacks and workflows configurations.
# Can also be set using 'ATMOS_BASE_PATH' ENV var, or '--base-path' command-line argument.
# Supports both absolute and relative paths.
# If not provided or is an empty string, 'components.terraform.base_path', 'components.helmfile.base_path', 'stacks.base_path'
# and 'workflows.base_path' are independent settings (supporting both absolute and relative paths).
# If 'base_path' is provided, 'components.terraform.base_path', 'components.helmfile.base_path', 'stacks.base_path'
# and 'workflows.base_path' are considered paths relative to 'base_path'.
base_path: ""
workflows:
# Can also be set using 'ATMOS_WORKFLOWS_BASE_PATH' ENV var, or '--workflows-dir' command-line arguments
# Supports both absolute and relative paths
base_path: "stacks/workflows"
```
where:
- `base_path`
- The base path for components, stacks and workflows configurations
- `workflows.base_path`
- The base path to Atmos workflow files
### Create Workflow Files
In `atmos.yaml`, we set `workflows.base_path` to `stacks/workflows`. The folder is relative to the root of the repository.
Refer to [networking.yaml](https://github.com/cloudposse/atmos/tree/main/examples/quick-start-advanced/stacks/workflows/networking.yaml) for an example.
We put the workflow files into the folder. The workflow file names can be anything you want, but we recommend naming them according to the functions
they perform, e.g. create separate workflow files per environment, account, team, or service.
For example, you can have a workflow file `stacks/workflows/workflows-eks.yaml` to define all EKS-related workflows.
Or, you can have a workflow file `stacks/workflows/workflows-dev.yaml` to define all workflows to provision resources into the `dev` account.
Similarly, you can create a workflow file `stacks/workflows/workflows-prod.yaml` to define all workflows to provision resources into the `prod`
account.
You can segregate the workflow files even further, e.g. per account and service. For example, in the workflow
file `stacks/workflows/workflows-dev-eks.yaml` you can define all EKS-related workflows for the `dev` account.
### Use Workflow Schema
Workflow files must confirm to the following schema:
```yaml
workflows:
workflow-1:
description: "Description of Workflow #1"
steps: []
workflow-2:
description: "Description of Workflow #2"
steps: []
```
Each workflow file must have the `workflows:` top-level section with a map of workflow definitions.
Each workflow definition must confirm to the following schema:
```yaml
workflow-1:
description: "Description of Workflow #1"
stack: # optional
steps:
- command:
name: > # optional
type: atmos # optional
stack: # optional
- command:
name: > # optional
stack: